UAZ brakes Help! | Topic author: Vikki
Tell me, who knows? ! It started like this, I stopped after driving through a puddle, and steam started pouring out of the right front wheel.
Artyom (Aatmadeva) try to bleed the front completely, maybe a piece of hose or cuff is floating in the tubes. And more precisely, let the eccentrics down. Or maybe the drums are simply worn beyond the limit.
Yulia (Gedi) Thanks, I’ll try it. Are there any other options?
Gennady (Leopold) Yulia They gave the right advice. But before this procedure, it’s better to do this - Unscrew all the tubes from the front end and blow it out - ONCE. From the main thing too - clean it - TWO. Remove the working cylinders and also wash them (required) - THREE. The thing is that a piece of hose may be floating in the system. Oh, what a phantom it is. It happened to me. Until I washed everything I couldn’t find it.
Yulia (Gedi) Thanks everyone! That's what happened, the front left tube (which was replaced) was rolled inward (either from the factory, or we twisted it that way.) What a mess due to inattention! )))))
Artyom (Aatmadeva) It's a matter of boundless muscles. All threaded connections must be pulled with force, but it turns out with a pipe.
Adriano (Takiyah) UAZ and brakes are incompatible things. )))))))) eternal struggle..))
Sergey (Brigette) Guys, I really need advice too. It was like this: everything worked like clockwork. I sat in a swamp (not serious), but I couldn’t get out myself. While he was looking for assistants, he stayed with me there for two days. Pulled it out, no brakes. I thought hoses - tubes - no, everything is intact, the liquid has not escaped. After a few swings, it started to grab near the floor, but the brakes sucked. Then I took a break for a month - I practically didn’t drive it (very rarely), it seemed to be slowing down (also not very good), I thought I’d pump it up and adjust it by the fall. I looked at the pads at the beginning of summer - less than half of the output. Then I went on an urgent matter - the left front wheel jammed (the pedal was stuck, the linings were burned, the anthers too, the liquid was already boiling - it was splashing through the lid of the glass). The pads on the eccentrics were jammed, plus the pistons in the working cylinders were soured (apparently because the brakes were bad). Replaced the pads, washed the pistons, replaced the cuffs. I set everything up, set it up according to the book. I can't pump it. I do it according to the book, from the rear right wheel. There is no pressure regulator. The tubes, hoses and connections seem to be intact, otherwise there would be a leak. They pumped and pumped - to no avail, the liquid seems to be leaving the fitting and the reservoir, but slowly, the pedal to the floor remains unchanged. The vacuum seems to be working, although it hisses when you press the pedal (air comes out - is that how it should be?). The pedal is easy to press. What to do? I really don’t want to remove all the tubes and wash them. But if you wash it, then with what? I think I need to replace the fluid, apparently no one has done this before me, and flush the GTZ (the question is how?). Please advise what is best. And yet, maybe it also matters. On my 469 (1991 onwards) the brake activation sensor is hydraulic - at the beginning of summer it got stuck (the feet were constantly on fire), I turned it off and connected the wires to a regular frog under the pedal. I did not remove the sensor itself so as not to depressurize the system. Maybe he clogged something, an infection? Local men say it sucked in a lot of air, plus the liquid was boiling. So as not to worry, unscrew the fittings on the rear wheels, they say, the liquid will leak out on its own (the main thing is that not all of it), or fill it in under slight pressure, like with an aerator on a Zhiguli).
Andrey (Sioned) Go through the main brake, replace the cuffs, then pump the pipes with new brake fluid and wash them. It doesn’t matter to start pumping from the back or front. Bleed this way, open the fitting, press the pedal, the fluid comes out, squeeze the bleed tube with your hands, release the pedal, and so on until the fluid comes out it will come out clean and free of bubbles.
Andrey (Sioned) and be sure to bring the pads with eccentrics to the drum, otherwise you will never pump them up to working condition
Mikhail (Kaiea) Disc brakes solve all these problems.
Diagnostics and repair
From the signs listed above, it is easy to understand that in most cases there is only one source of problems - rubber products that have become unusable. The cuffs crack and swell, as a result they leak liquid and close the discharge holes. Hence the recommendation: all “rubber bands” of the brake system should be changed at intervals of approximately 100 thousand km, without waiting for critical wear.
Reference. Many auto mechanics express the opinion that after replacing the cuffs, the main hydraulic cylinder will not last long. The statement is true if the car owner purchased cheap, low-quality spare parts or installed new o-rings in the cylinder, where internal wear has formed in the walls.
Before checking the GTZ for operability, make sure there are no other faults:
- Inspect the wheel assemblies from the inside for leakage of brake fluid from the working cylinders.
- Check the integrity of the expansion tank and the fluid level in it.
- Start the engine and at idle speed, press the vacuum take-off pipe to the amplifier. If the engine speed has increased noticeably, the master cylinder is most likely working.
A clear symptom indicating a breakdown of the main hydraulic cylinder is drops of brake fluid on the body
. If you discover a leak, feel free to dismantle the unit and disassemble it to look for the cause. Another common problem - fluid flowing through the seals - is diagnosed as follows:
- Open the cover of the expansion tank and place an assistant in the driver's seat.
- Listening to sounds in the tank, give the command to an assistant to press the pedal.
- If the pedal moves easily and gurgling is heard in the reservoir, liquid is entering there. The reason is that worn cuffs are unable to create pressure in the circuits; liquid seeps through the leaks and enters the container.
Also, problems with the GTZ are indicated by jamming or too little pedal travel. Sit behind the wheel, press it several times, and start the engine while holding the pedal with your foot. If it sinks to the floor or does not budge, disassemble the hydraulic cylinder.
To replace or repair the master brake cylinder, you need to remove the unit from the vehicle. Work is carried out in the following order:
- Suck out the liquid from the tank with a syringe. If the cuffs are leaking, press the pedal several times and suck out the excess fluid.
- Remove the expansion tank.
- It is not necessary to drain all brake circuits. Substituting a small container, unscrew the nut of the first tube and carefully move it to the side, plugging it with a wooden stick.
- Repeat the operation with the second tube, unscrew the fastening of the GTZ flange and remove the unit.
Further actions depend on the design of the master cylinder. If the element is completely disassembled, change the rubber seals. Otherwise, you will have to replace the pistons assemblies. Pre-wash the body and all openings with alcohol; do not use gasoline. After assembly, add fluid and bleed the brake system to remove air.
The main factor in the malfunction of the vacuum brake booster is considered to be its complete or partial inability to create a vacuum in the working chamber. A potential source of the problem is a break or depressurization of the hose connecting the engine intake manifold and the amplifier.
Interference in the operation of the unit is also caused by defects located inside the amplifier - due to a violation of the integrity of the working surface of the diaphragm or loss of elasticity of the valve. In order to detect malfunctions of the vacuum brake booster, certain tests are carried out.
"UAZ BUKHANKA" | Topic author: Maxim
guys, help, UAZ loaf 2022, you constantly have to pump the clutch, the fluid doesn’t go away, the pedal goes to the very bottom, you don’t have time to remove your foot, the car is already moving, pumping helps a little (but not for long), air is observed in the fluid,
Roma (Jager) Look in the thread somewhere there is air
Maxim (Kristie) where exactly in the thread?
Roma (Jager) Look from the main thing to the worker, I had nothing on the brake system, nothing was leaking anywhere, but air was flowing. Well, purely by chance I found a threaded connection that was sucking air into the system
Kostya (Well) maybe it’s the cuff of the master cylinder.
Maxim (Kristie) thanks, I’ll check it
Nikolay (Aksita) Unscrew the tube from the main one and bleed it, press it with your finger so that air does not get sucked in
Andrey (Philana) The master cylinder needs to be changed. If you buy a new one, then only with a return guarantee, I have 4 pieces. I was only able to pump one normally! I fucked for two days, the batch was probably defective.
Nikolay (Aksita) It’s just that these GCs need to be pumped before installation on the car.
Ivan (Boutros) look at the clutch tabs, they unscrew themselves
Maxim (Kristie) what does the air in the system have to do with it?
Ivan (Boutros) maxim you are wrong
Maxim (Kristie) I don’t understand you
Ivan (Boutros) I didn’t write about air
Vyacheslav (Yuna). Replacing the clutch master cylinder will help very quickly.
Vyacheslav (Yuna) and all this is pumped together with the working cylinder. This is not a shock absorber that needs to be pumped before installing it on a car. something like this.
Tolik (Peder) and listen, dear friend, the fork accidentally didn’t bend on the release lever, and such crap happened, but everyone sinned on the main one.
Maxim (Kristie) Well, then air pumping also helps
Tolik (Peder) try the Hz change if it helps until you try everything you won’t understand, at one time there was a hemorrhage with the front sports brakes, they kept it just done, went through everything and listened to advice, but the reason was petty, the spring from the pedal fell off, so all the brakes were held at half strength, warm up the discs
Tolik (Peder) search and you will find
Nikolay (Aksita) First check for worn out lugs on the levers and wear of the pin on the master cylinder and then get into the weeds.
Quick brake bleeding after replacing the turbocharger? — uazbuka.ru
Tell me, is it possible to do without completely bleeding the system in . me from Lada, suitable for the main brake cylinder of Lada, . I can't bleed the brakes on a loaf.
How to bleed the master brake cylinder:: how to bleed.
Those car owners who have changed the master brake cylinder in their car at least once in their life know how difficult it is.
The UAZ Bukhanka brake system includes a working system and a parking system. In turn, the service brake system includes drum-type brake mechanisms on each wheel, as well as a hydraulic drive. The parking brake system on the UAZ Bukhanka works on the transmission and is equipped with a mechanical drive.
UAZ brake system: device features
Replacing some parts can be delayed, but repairs to the brake system cannot be delayed. The life of passengers, drivers, pedestrians and the safety of other vehicles depend on the condition of the brakes.
The UAZ “loaf” brake system consists of:
- hydraulic drive;
- service brake;
- hand brake.
The service brake consists of two pads of the same size. Each block ends in contact with the cylinder pistons, and itself rests on a support pin. The wheel cylinders have two holes. One is for venting air while bleeding the brakes. For tightness, a valve is installed in it. The second hole is designed to drain brake fluid from the drives. Pipes connect the cylinders to the entire master cylinder system and the brake pedal.
If the front brake circuit of the UAZ “loaf” is compared with the rear brake circuit, then it is easy to understand that they are the same, with one exception. The rear brake pads operate from one cylinder, while the front brake pads operate from two. This is because the front axle requires a more efficient braking system due to the greater load during braking.
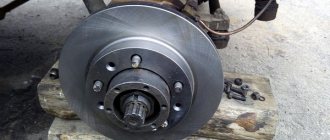
"Loaf" drum brake mechanism
The brake system of the UAZ 469, like that of the UAZ 452, is drum. The drums consist of a stamped steel disc, a cast iron rim and a reinforcement welded to the disc. On the UAZ “bukhanka” the drums are installed so that they are quite easy to reach and, if necessary, remove to install new ones. To do this, you do not have to remove the hubs, therefore, the operation of the wheel bearings will not be affected.
The drums are attached to the hubs with three screws. The location of these screws makes it possible to install new drums in their original position.
Return to contents
UAZ “loaf” caliper
The brake caliper may also need repair. All components of the device are constantly exposed to the negative effects of water, brake fluid and salt. In order for the caliper to last longer and wear less, it must be regularly lubricated with special products. Nigrol or lithol cannot be used for these purposes. The lubricant must be heat-resistant. The operating parameter of the substance must be at least 180°C. The lubricant must not dissolve in water or brake fluid. Its main property is compatibility with plastic parts.
Lubricants can be divided into three types.
- Oxol consists of anti-seize high-temperature paste. It is used to lubricate brackets, metal surfaces of plates and pads to eliminate squeaks.
- A lubricant made from materials that work well with bolts, pins, and pistons.
- A universally used substance for lubricating all moving parts, both plastic and elastic.
Silicone high temperature caliper grease
Silicone high-temperature lubricants are the most popular. A car owner who is poorly versed in the assortment usually buys substances from the third group. The first thing to do before starting lubricant treatment is to check the dust cap and, if it is faulty, replace it with a new one. When processing, do not allow the paste to get on the anti-dust cuffs, otherwise they may swell. The lubricant is applied to the parts in a thin and even layer.
Bleeding brakes UAZ 469
The purpose of carrying out pumping manipulations is to remove the air contained in the internal parts of the braking mechanism. Periodically, once a week, inspect the machine for damage and leaks, paying attention to:
- Presence of mechanical damage to pipes;
- Violation of seals in joints;
- Compliance of the amount of working fluid with the required standard;
- Operation of the foot brake lever.
Braking mechanism UAZ (469, 452):
A sign that it is time to perform pumping manipulations is an increased working stroke of the foot brake lever, as well as detection of dips when pressing the foot brake. In addition, the lubricant is changed after repairs or replacement of components or parts of mechanisms. Regardless of the circumstances, you need to refill DOT-4 brake concentrate and bleed the brakes on UAZ 469 and 452 once every two years.
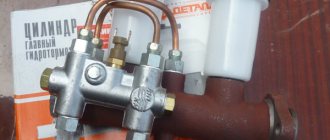
Dismantling and repair of GTZ
After dismantling the GTZ, it is necessary to carefully inspect it for fluid leaks. If the rear oil seal is damp or damp, most likely some of the brake fluid has entered the VUT and is corroding its membranes. It is necessary to pump out the liquid from the VUT using a syringe and a thin tube.
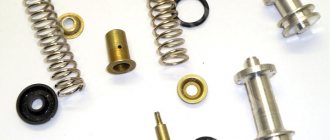
To disassemble the GTZ, drain the liquid from it, then carefully clamp it in a vice so that the holes for installing the tank are at the bottom. Remove the locking screws that prevent the pistons from returning too far. Remove the GTZ from the vice and use a puller to remove the retaining ring from the VUT side. Pull out the first piston and spring. Often the second piston comes out with difficulty, so you have to either knock the gas turbine engine on a wooden block, or plug one of the holes in the far cylinder using a suitable bolt and connect a compressor with a pressure of at least 6 atmospheres to the second hole. When removing the pistons, be sure to remember how the rubber seals are installed and how the pistons are located, this will greatly help during assembly.
Carefully inspect the inner surface of the GTZ. Any scratches lead to a decrease in braking efficiency and are therefore unacceptable. If scratches are found on the inner surface, the body or the entire GTZ must be replaced. After making sure that the internal surface of the GTZ is not damaged, buy the appropriate repair kit. When choosing a repair kit, give preference to products that are manufactured by partner enterprises of major automakers. Often original repair kits from one brand or model fit another.
Remove all old rubber seals from the pistons. Wash the pistons with water and dry with compressed air. Install new seals from the repair kit. Before installing, be sure to lubricate them with brake fluid, this will make them easier to fit into place and prevent damage. Do not confuse the direction of installation of the cuffs. Before assembling the GTZ, wash its body with water and detergents, dry it with compressed air and lubricate it generously with brake fluid. Do not use gasoline or other petroleum products for flushing; if you do not wash them off properly, they will corrode the rubber seals. Reinstall the pistons, tighten the retaining bolts, and insert the rear oil seal and retaining ring.
Parking brake system of UAZ vehicles
Parking mechanism diagram
Rice. 2 Parking brake system: a – view with brake drum; b – view without brake drum; 1 – adjustment fork; 2 – lock nut; 3 – drive rod; 4 – expansion cracker; 5 – plug; 6 – drive lever; 7 – adjustment screw; 8 – block support; 9 – pusher of the expansion unit; 10 – ball body; 11 – housing of the expansion unit; 12 – brake drum; 13 – first block; 14 – tension spring of pads; 15 – cap; 16 – expansion unit ball; 17 – bolt; 18 – second block; 19 – brake shield; 20 – housing of the adjustment mechanism; 21 – rod; 22 – spring; 23 – spring cup.
Operating principle of the parking mechanism
The brake mechanism of the parking system is equipped on the transfer case and brakes the rear propeller shaft of the Bukhanka. Its design includes a support disk with two pads installed on it, connected by springs. The pads act on the brake drum, which is fixed on the centering belt of the propeller shaft flange. Attached to the top of the support disk is the housing of the expansion unit with pushers, which are attached to the top of the pads. Inside, the pushers are equipped with recesses filled with balls that are located in the rod. The housing of the adjusting element is installed at the bottom of the support disk. The recesses of the housing contain pad supports that can move due to the work of the block and the adjusting screw.
The brake mechanism drive includes a lever mounted on the support disk and an expansion element supporting the rod of the balls. The free end of the lever is attached to the fork, which in turn is attached to the rod using a lock nut. The drive rod is attached to the parking brake lever, which is installed in the driver’s cab.
In addition, on the UAZ Bukhanka, the parking brake system drive is supplemented with an extension located between the parking brake lever and the brake mechanism. This extension cord is a steel cable with elements for its fastening.
Read also:
— Tuning UAZ Bukhanka — making an exclusive out of a simple bus — Tuning UAZ Hunter — a whim or necessary modifications? — How to lift a UAZ “Loaf” — A trunk on a Niva with your own hands — A trailer on a UAZ with your own hands — Are tracks effective for a Niva?
comments powered by HyperComments
Site about SUVs UAZ, GAZ, SUV, CUV, crossovers, all-terrain vehicles
Utility vehicles UAZ-3741, UAZ-3962, UAZ-3909, UAZ-2206, UAZ-3303 are equipped with working, parking and spare brake systems. A service brake system with drum brake mechanisms on the front and rear wheels, with two separate hydraulic drive circuits to them from a two-chamber master cylinder: one to the brake mechanisms of the front wheels, the other to the brake mechanisms of the rear wheels.
The parking brake system with a drum brake mechanism located behind the transfer case and acting on the rear driveshaft has a manual mechanical drive. The spare brake system consists of each of the hydraulic drive circuits.
Installation of the service brake system of UAZ-3741, UAZ-3962, UAZ-3909, UAZ-2206, UAZ-3303, installation of front and rear brakes.
The front service brakes have two wheel cylinders, each of which acts separately on the pad. Cylinder diameter 32 mm. The rear brakes have one wheel cylinder acting on both pads. Cylinder diameter 25 mm.
Front wheel braking system.
Two wheel cylinders are secured to the brake shield using support pins and nuts. The support pins have eccentrics on which brass pad support bushings are installed. By turning the support pins with eccentrics, you can move the support ends of the pads relative to the brake shield. They adjust the brakes using support pins when assembling them at the factory or when repairing brakes with replacing pads or linings.
When correctly installing the pads with unworn linings and the brake drum, the “a” marks on the support pins (cores on the outer ends) should be located as shown in the figure above, or with deviations from this position in one direction or another up to 50 degrees. The friction linings of the pads are attached to the rim with aluminum rivets recessed into the body of the lining.
The moving ends of the brake pads fit into the grooves of the piston tips of the wheel cylinders. The pads, with the inner surface of their rims, rest on adjusting eccentrics, movably mounted on the brake shield. The eccentrics are kept from arbitrary rotation by strong springs. The pads are pressed against the eccentrics by tension springs.
The hexagonal heads of the adjusting eccentric axes are located on the outside of the brake shield. Using eccentrics, the required gap is established between the pads and the drum. The pads are kept from lateral displacement by the ends of the axes of the adjusting eccentrics and by springs installed in the middle part of the pads.
Inside each wheel cylinder there is a piston with two rubber O-rings and a spring that presses the wheel cylinder piston against the thrust end of the pad rib. The wheel cylinder has two holes. One hole is used to supply brake fluid from the hydraulic drive system, and the other is to release air from the system during bleeding.
It is closed by a bypass valve, which in the closed position ensures a tight seal. To prevent clogging, the valve opening is closed with a protective cap. The internal cavities of the wheel cylinders are protected from moisture, dust and dirt by rubber caps.
Rear wheel braking system.
In the lower part of the brake shield there are support pins, which are fitted with brass bushings similar to those of the front brakes, against which the pads swing. When correctly installing the pads with new linings and drums, the “a” marks on the supporting pins (cores on the outer ends) should be located as shown in the figure below, or with deviations from this position in one direction or another up to 50 degrees.
The rear brake pad lining is shorter than the front brake pad lining. This is designed to ensure that the wear on the rear and front pads is equal. Brake drums are the same on all wheels of the car. The drums are attached to the hub with three screws, which are unevenly spaced around the circumference.
This ensures that the drum is installed on the hub in one specific position, in which the drum assembly with the hub is processed. It is not recommended to move brake drums from one hub to another, as this will lead to increased runout of the working surfaces of the brake drum.
Hydraulic drive of the service brake system of UAZ-3741, UAZ-3962, UAZ-3909, UAZ-2206, UAZ-3303, device.
Consists of a suspended pedal, a vacuum booster, a two-chamber master cylinder, pipelines with connecting fittings and wheel working cylinders. The hydraulic drive pedal to the wheel brake mechanisms, as well as the clutch release pedal, swings on an axle on a plastic bushing, requiring no lubrication during operation.
The axis is fixedly fixed in the bracket. The return spring constantly holds the pedal in its original position by pressing it against the brake light switch cap mounted on the pedal bracket. The brake pedal is connected through a system of shafts and rods to the pusher of the vacuum booster.
Vacuum booster of the service brake system.
Serves to increase the efficiency of hydraulic brakes when the engine is running. If the amplifier fails, only the force from the driver's foot is transmitted to the pistons of the master cylinder through the brake pedal, pushrod, control valve, buffer and rod. The vacuum booster does not require adjustments.
Maintenance consists of checking the reliability of fastening, washing or replacing the amplifier air filter during seasonal maintenance before the winter operating season.
Service brake system pressure regulator.
Automatically adjusts the brake fluid pressure in the rear wheel brake circuit depending on the load on the vehicle, preventing the vehicle from skidding due to the rear wheels locking during heavy braking. It may not be installed on some modifications of UAZ-3741, UAZ-3962, UAZ-3909, UAZ-2206, UAZ-3303 vehicles.
Bleeding the brakes, sequence
Before pumping the brakes on your UAZ, look for a dry, flat surface. In addition, you will need an assistant, since it is difficult to perform the operation alone, but in case of urgent need it is possible.
The sequence of the process is as follows:
- We remove valve plaque;
- We check whether there are any smudges or leaks in connections and pipes;
- We control the amount of working fluid in the container for compliance with the standard. If necessary, add “MAX” to the desired mark. We carry out manipulations, constantly check and bring the liquid to the required level; it is impossible for the mixture to drop to the “MIN” mark.
- We pump the foot brake lever without starting the power plant;
- We remove the safety cap from the cylinder bypass valve located at the rear (right) and install a light-transmitting tube, product size 400mm. We wet the unoccupied edge of the tube in a container containing half a liter of working suspension and leave the tube there;
- Press the foot lever until it stops 4-5 times;
- Holding the lever with your foot, unscrew (key 11) the bleeding valve, make ½, ¾ turns;
- We control the movement of air masses in the form of bubbles from the cavity of the tube lowered into the suspension;
- When the stop lever goes all the way down, close the bleeder valve and press out the mechanism;
- We carry out the actions in the required order as long as necessary to completely remove the bubbles;
- We remove the tube and install the safety cap;
- Using the same method, we bleed the stop cylinder located at the rear (left);
- Afterwards, we perform similar actions on the pressure regulator.
The cylinders on the front wheels are pumped in the same way, the sequence of manipulations is: bottom right, top right, bottom left, top left. It is necessary to observe the pumping order. Otherwise, a situation is possible when the brakes on the UAZ loaf are not pumped. If technically there is no wear and tear, then the problem lies in a violation of the procedure.
When the actions taken do not produce results and air is also present in the mechanism, then when force is applied, the stop lever will be elastic to the touch. In this situation, the process is repeated again until a feeling of hard leverage appears.
Air control in brakes:
When the process is completed and the liquid continues to bubble, check the seals of the joints, pipes, and cylinders (main and working). Check threaded connections, change seals, gaskets, rings, and cylinder cuffs. As for replacing working cylinders, the replacement process occurs as a complex.
At the end of the steps, fill the brake fluid to about 0, fix the cap of the container with a meter that monitors the decrease in level. The liquid is changed until the new, light consistency replaces the old, dark matter.
Replacing brake fluid
Not all car owners know that brake fluid needs to be replaced every two years when the car is used in moderate conditions. The main mistake is often that many people simply add lubricant to the required level, rather than change it completely.
UAZ loaf How to bleed the brakes alone
How to bleed your brakes alone
Before this, you need to unscrew the cylinder or caliper fitting a little so that the liquid flows out a little by gravity...
Every 60 thousand kilometers, the brake fluid needs to be replaced. Car brake fluid can withstand very serious loads. During intensive driving and sudden stops, the temperature range can vary from 170 to 2000°C. It needs to be completely changed because as it moves, water gets into the liquid and dilutes it. A lower concentration negatively affects the quality of the substance. If the liquid is too diluted and boils, it can block the brakes with steam and subsequently lead to an emergency.
Nowadays, car companies have developed a special device that determines the boiling point of brake fluid. The device diagnoses the substance and displays appropriate recommendations. It can show the condition of the fluid at the moment and how necessary it is to replace it as soon as possible. The entire procedure takes no more than a minute, but this frees car owners from unnecessary hassle.
Working brake system of UAZ Bukhanka
Service brake system diagram
The diagram allows you to study how the brake system of the UAZ Bukhanka works more clearly.
Fig. 1 Diagram of the working brake system of the UAZ Bukhanka: 1 – brake disc; 2 – front wheel brake bracket; 3 – outline of the front part; 4 – main brake cylinder; 5 – reservoir equipped with a brake fluid movement sensor to the emergency level; 6 – amplifier with vacuum; 7 – pusher; 8 – brake pedal; 9 – light switch when braking; 10 – rear wheel brake pads; 11 – rear wheel braking cylinder; 12 – outline of the rear part; 13 – casing of the axle axle at the rear; 14 – load spring; 15 – pressure regulator; 16 – rear cables; 17 – equalizer; 18 – central cable; 19 – parking brake lever; 20 – indicator of brake fluid movement to the emergency level; 21 – parking brake warning switch; 22 – front wheel brake pads.
Hydraulic drive of the service brake system
Since 1985, the hydraulic drive of the UAZ service brake system began to be produced with two separate branches, one of which extends to the brake mechanisms of the front wheels, and the second extends to the brake mechanisms of the rear wheels. The drive design includes:
- master brake cylinder;
- a brake pedal, which is connected to the cylinder through its piston;
- wheel cylinders of wheel brake mechanisms, both in the front and rear of the car;
- pipelines and hoses that connect all cylinders;
- control pedal and drive force amplifiers.
The lines, the inside of the master cylinder, and all wheel cylinders contain brake fluid.
When installing a brake force regulator and an anti-lock braking system modulator on a UAZ, they are also placed in the hydraulic drive structure.
The principle of operation of the UAZ brake system
When you press the pedal, the brake system operates in the following sequence:
- The master cylinder piston moves fluid into the lines and wheel cylinders;
- in the wheel cylinders, the brake fluid causes all the pistons to move, as a result of which the brake pads move closer to the drums;
- when there is no distance left between the pads and the drums, the release of fluid from the main brake cylinder will stop;
- When you press the pedal harder, the fluid pressure in the drive rises and braking of all wheels starts at the same time.
Greater force applied to the pedal results in greater pressure exerted by the master cylinder piston on the fluid, as well as greater force exerted by all the wheel cylinder pistons on the brake shoe.
This suggests that the simultaneous operation of all brakes and the regular relationship between the force on the brake pedal and the driving forces of the brakes are created thanks to the hydraulic drive system.
When the brake pedal is released, it returns to its original position due to the functioning of the return spring. In addition, due to the spring, the piston of the main brake cylinder also moves to its original position. And the tension springs of the mechanisms, in turn, move the pads away from the drums. Brake fluid from the wheel cylinders is pushed through pipelines into the master cylinder.
Advantages and disadvantages of hydraulic drive
Advantages of hydraulic drive:
- quick response provided by the impressive rigidity of the pipelines;
- high efficiency, since energy is wasted as a result of pouring low-viscosity liquid from one device to another;
- not a complex design;
- low weight and dimensions as a result of high driving pressure;
- comfortable layout of drive devices and pipelines;
- a chance to achieve the required distribution of braking forces among the vehicle axles, obtained due to the difference between the diameters of the pistons of the wheel cylinders.
Among the disadvantages of the hydraulic drive are:
- requires special brake fluid with a high boiling point and low thickening point;
- the threat of malfunctions due to depressurization as a result of liquid leakage when damaged, or malfunctions when filling the drive with air;
- a strong decrease in efficiency at low temperatures, usually below minus 30 °C.
Brake fluid
Special brake fluids are sold for use in hydraulic drives. They are produced on alcohol, glycol or oil bases. It is prohibited to mix them with each other; this can lead to a deterioration in their quality and the appearance of flakes. Brake fluids made from petroleum products may only be used in hydraulic drives whose seals and hoses are made of oil-resistant rubber. This is done in order to prevent the destruction of rubber parts.
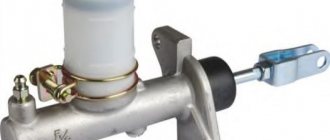
How does the GTZ function?
The unit consists of the following parts:
- metal housing with holes for supplying brake fluid, pedal rod and connecting the expansion tank;
- 2 pistons with rubber seals;
- 2 return springs;
- guide bushings;
- end plug with gasket.
An expansion tank is attached to the top of the main distributor body, where excess fluid goes through compensation holes. Inside, the element is divided into 2 cylinders with separate pistons standing on the same axis.
The blind end of the housing is closed with a threaded plug; on the other side there is a flange for attaching to the vacuum booster. The brake pedal rod is attached to the first piston. The brake circuit pipes are connected to the lower holes - separately for the front and rear wheels.
The operating principle of the master brake cylinder looks like this:
- When you press the pedal, both pistons simultaneously move forward and push fluid into the circuit tubes. Under its pressure, the wheel cylinders are activated, compressing the pads on the discs.
- Part of the liquid that does not have time to pass into the tubes flows into the expansion tank through special bypass holes.
- When the driver releases the pedal, the springs push the pistons back, returning them to their original position. Liquid from the tubes and reservoir refills the cylinders.
- To compensate for the expansion of the liquid (for example, from heating), another pair of holes is provided leading to the expansion tank.
Note. The GTZ acts in conjunction with a vacuum booster (not shown in the diagram), which helps put pressure on the pistons. This allows the system to respond faster and make the driver's actions easier.
Sequence of actions when bleeding the brakes of the UAZ “Loaf”
- The brake fluid identical to that previously filled should be filled into the corresponding reservoir to the required level.
- Cleaning valves that remove air. Removing the protective caps and connecting the hose, the free end of which should be lowered into a container filled with brake fluid.
- Next, you need to sharply press the brake pedal 4-5 times with an interval of 10 seconds , and after each press the pedal should be released smoothly (for these manipulations you will need an assistant). When the pedal is depressed, the bypass valve is turned half a turn with a wrench and the liquid with bubbles begins to fall into the container. After the air plugs come out, the valve screws back. A similar procedure is repeated until the release of bubbles stops and “elasticity” appears in the pedal.
- After all of the above, the bypass valve is closed, the rubber hose is removed, and the cap is attached back to its place.
When bleeding the UAZ brake system, fresh brake fluid should be added to the reservoir, if necessary. The liquid flowing from the hose is not suitable in this form for subsequent use, since it is initially subject to filtration and settling.
It is better to start pumping from the rear right wheel, then move to the rear left, then the front right and, finally, the front left. For cars with split drive, each part will need to be bled separately.
If the bubbles do not disappear after a long pumping, you should recheck the tightness of the entire system, especially the cylinders. Replace or repair if necessary.
Did you like the article? add it to your bookmarks so as not to lose it - PRESS “Ctrl + D”
Symptoms of problems
The fluid brake system consists of many parts that can become unusable: pipes, wheel cylinders, calipers, drums and pads. Typical signs of a faulty master cylinder:
- After pressing the pedal, the car stops slowly. The reason is that the cuffs of one or two pistons have lost their tightness - they have cracked or “floated”.
- To slow down, you need to press the brake pedal hard. The phenomenon occurs due to swelling of the rubber of the piston seals.
- The brake pedal travel is too short. The fluid inside the cylinder has nowhere to go because the compensation hole is clogged. Another option is that the passage is blocked by a swollen rubber seal.
- A common symptom is pedal failure, the brakes coming on at the end of the stroke. This indicates complete wear of the cuffs; as a result, liquid penetrates behind the piston and rushes into the expansion tank - the cylinder “bypasses.”
- The pads do not release the brake discs and drums and get very hot when driving. Options: one of the pistons is jammed or the bypass hole is clogged.
The listed symptoms of a GTZ malfunction are similar to malfunctions of other elements. Pedal failure also occurs when a large amount of air enters the tubes or loss of fluid in one of the working cylinders. Sluggish deceleration and increased force on the pedal are often caused by a breakdown of the vacuum booster - a cracked membrane or a lack of tightness at the joints of the hose that takes off engine vacuum.
There are signs that clearly indicate the performance of the main hydraulic cylinder and the malfunction of other elements:
- during braking, the car pulls to the side - the problem lies in a certain circuit or wheel;
- jamming of the brake mechanisms of one wheel;
- creaking and squeaking when braking;
- heating the discs and pads on one wheel.
If you eliminate these symptoms, it will become easier to check the brake master cylinder in a garage. This also includes obvious brake fluid leaks and the knocking sound of worn calipers.