In general, the stove had been asking for a long time, howling on the waves, squealing on the bumps, and then one day it started howling all the time... it was decided to change it myself (the toad would strangle 7 thousand to give for a replacement) plus make a noise on the engine shield... I decided to try to film the whole thing, climbing a bunch of videos and I couldn't find any data on the forums. The biggest problem was that it was very difficult to find a garage for such a crocodile, so having stocked up on a 220V heater, I went to open it with spare parts to replace the stove motor... I also purchased: 4 sheets of STP AERO PREMIUM (2.5 was enough) 2 sheets of BIPLAST A 15 (1 was enough ,5)
Below are pictures of the bolt positions! Attention, you will need to remove: - Brand from the battery - side pillars - plastic sheets with places for standard speakers - side panel covers - dashboard - middle part (xs as the name) between 4.5 and 6.7 - lower glove compartment - right cup holder - pry off a plastic screwdriver under the windshield (what’s the name)…
If everything worked out, move on, open the hood and look
Unscrew it, go to the salon, the panel should be loose. You need to unscrew the heater radiator pipes in the salon.
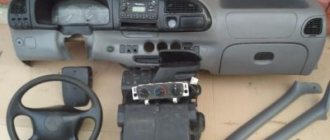
Removing the instrument panel is necessary to remove and repair the interior heater, as well as for other repair work.
The work of removing and installing an old-style instrument panel (before 2003) is shown.
The new panel is removed and installed in almost the same way, the difference lies in the location and number of wires and air ducts of the heating and ventilation system.
The panel must be removed with an assistant, since the instrument panel is quite heavy.
1. Using a Phillips screwdriver, unscrew the three self-tapping screws securing the upholstery
2. Remove the windshield pillar trim.
3. Remove the steering column.
5. Disconnect the connectors from the switch for the cabin lights and the rear fog lamp.
6. Disconnect the plug block from the headlight electric corrector.
7. Using keys “7” and “8”, unscrew the bolt securing the air damper control cable.
8. Using a screwdriver, unscrew the screw securing the cable sheath and disconnect the cable from the carburetor.
9. Disconnect the hazard warning switch connector.
Panel purpose
The main purpose of the instrument panel is to inform the driver about the current state of the car. On the Gazelle, all instruments and indicators are located on a small area of the torpedo. Drivers get used to this arrangement of instruments.
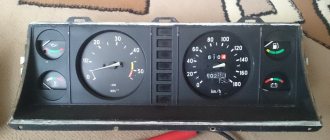
The old-style instrument panel on the Gazelle contains from 3 to 5 round dials, which are surrounded by different indicators. The largest dials are the tachometer and speedometer. The main instrument is the speedometer, so it is always located in the center.
The third largest device is the coolant temperature gauge. In addition, the dashboard contains dials for charging the battery and the amount of gasoline. Less commonly, an oil dial is present.
Read:
Old style tidy
How to Remove a Torpedo on an Old Model Gazelle
Content
Install a new toolbar on Gazelle or not. here's the question
Many drivers, paying tribute to fashion, want to replace the old instrument panel on the Gazelle with a new one. The article is devoted to the “accuracy of the Gazelle”: destination, possible malfunctions. Instructions for removing and installing the torpedo are provided.
Panel purpose
The main purpose is the dashboard . inform the driver about the current condition of the car. On the Gazelle, all instruments and indicators are located on a small area of the torpedo. Drivers get used to this arrangement of devices.
The old-style Gazelle instrument panel contains 3 to 5 round dials, which are surrounded by various indicators. The biggest ones. tachometer and speedometer. The main instrument is the speedometer, so it is always in the center.
The third largest device. This is the coolant temperature sensor. Also, carefully place the dials to charge the battery, the amount of gasoline. The oil dial is less common.
Neat Old Style
Updated look
Drivers are turning old trim into a business dashboard because of its attractive appearance. The second reason for the replacement is that the Gazelle dashboard has expanded functionality and more options for providing information about the operation of the car.
The Euro panel is equipped with two large dials for the speedometer and tachometer and two small dials for indicating the amount of gasoline and coolant temperature. Other indicators are in the center.
READ Kia Sportage 3 Battery Replacement
The simplicity of the Euro panel makes it easier for the driver to perceive information. The disadvantage of the new panel is the complexity of installation. However, the confession is contained in the instructions. If a car enthusiast has experience in such work, then installing a new device will not be easy.
Gazelle tool combination cut
functional
When installed correctly, the new instrument cluster operates correctly. The only drawback is the low backlight, which is almost invisible at night. It is recommended to install LED lighting for the instruments along the perimeter of the panel (author of the Chelyabinsk video).
The Gazelle has 20 indicators that indicate that one of the vehicle’s components or sensors is not working.
If the Stop light is one of the icons, it is recommended that you correct the problem before moving.
We remove the panel from the 2005 gazelle. Installing and removing the Gazelle panel. We fire a torpedo at the gazelle.
Subscribe to the channel. Gazelle repair
.
as a take-off
panel on
a gazelle
.
Replacing furnace engines with an old gazelle.
We change the heater motor without removing steam.
Information about the status of the vehicle's major components and components is displayed on the dashboard using indicators. A detailed description of the purpose of each can be found in the installation and operating instructions.
Typical disadvantages
The following errors are possible after changing a spell:
- Neither part of the device nor the entire panel works;
- the arrows on the devices stop;
- Incorrect sensor readings.
You can resolve the issue by following these steps:
- First you need to check the power: the integrity of the wires, the quality of the contacts.
- If the wiring is OK, the controller may be faulty. It is better to replace the entire panel than to repair the controller.
- Sensors may not work if the connection is poor or the fuse is blown.
- You can try restoring the sensors by pressing the Mode button.
READ How to Remove the Dashboard on a Renault Logan
When replacing the tool combination , the electronics were not damaged and this is where the failures occur. Problem solved by replacing fuses and updating wiring.
Installing and removing the torpedo
The dashboard is included in the Euro Gazelle kit. In the latest versions it is installed at the factory. Older drivers also want to upgrade their dashboards. Replacing a neat one is not difficult: the design of the fasteners has remained virtually unchanged, and the panel seats have the same dimensions.
Replacing a torpedo entails significant changes, since it differs in both shape and mounting design. What changes need to be made, you need to think about the owner of the car. Sometimes to repair a furnace it is necessary to completely dismantle the torpedo. You need to know how to remove and reinstall the dash. A set of keys and screwdrivers must be prepared for this procedure. You may need an assistant.
Dismantling a Gazelle torpedo
The removal procedure consists of the following steps:
- Before operating, turn off the vehicle for safety reasons. To do this, remove the negative terminal from the battery.
- First of all, all the lining is removed. Use a Phillips screwdriver to remove the screws that secure the trim.
- Then, unscrew the two screws and remove the housing from the steering column.
- Then remove the overlay from the dashboard , we remove it by pulling the steering wheel all the way.
- Unscrew the device keyboard mounts and remove the gadget, disconnecting all wires.
- Then remove the steering column with all connections.
- In the next step, turn off the lights: rear fog lights, interior lights. You should also turn off headlight leveling.
- Then unscrew the bolt securing the air damper.
- We disconnect the cable from the carburetor by unscrewing the screw that secures the cable sheath.
- Then turn off the lighter and anxiety.
- Use a screwdriver to remove the two screws that control the cooker.
- Remove the 10 panel mounting bolts by carefully lifting them out of their mounting location.
- Now disconnect the air ducts from the partitions.
- Remove the carburetor damper.
- Remove the panel by disconnecting the air duct hoses.
- You can now shoot the torpedo. It is better to do this with an assistant, as it is very difficult.
- Installation of the torpedo is carried out in the reverse order.
READ How to Adjust the Ignition on a Single Cylinder Diesel Engine
After installing a new torpedo, some indicators may not work due to incompatibility between the system and the new torpedo.
Conclusion
Installing a European panel is recommended for owners of new Gazelle models, as it will require minimal improvements. For older models, you should consider replacing the panel as the electronics often do not work due to incompatibility after replacement. You can replace the dashboard if it fits this car model.
Video “Removing the Gazelle dashboard”
This video demonstrates how to fly up the instrument panel on a gazelle car (video of the car by Evgeny Logachev).
Updated look
Drivers are replacing their old dashboard with a business panel because of its attractive appearance. The second reason for the replacement is that the dashboard has expanded functionality and more options for providing information about the operation of the car.
The Euro panel is equipped with two large dials for the speedometer and tachometer and two small ones, informing about the amount of gasoline and coolant temperature. The remaining indicators are located in the center.
Removing the instrument cluster for cars produced before 2003
1. Disconnect the battery.
The instrument panel is equipped with a combination of instruments, which combines in one housing:
— speedometer (with total and daily mileage counters);
— indicators for coolant temperature, fuel level (with fuel reserve indicator), oil pressure (with emergency pressure indicator);
— a block of indicators for battery charge, high beam headlights, direction indicators, side lights, emergency drop in the level of brake fluid and parking brake, overheating of the coolant, activation of the center differential lock of the transfer case (for the 4x4 modification).
Using a short Phillips screwdriver, unscrew the two screws for the upper fastening of the instrument cluster trim
Using a screwdriver, unscrew the two screws of the lower fastening of the instrument cluster trim
Using pliers, unscrew the nut securing the trip odometer reset handle.
Recess the handle into the control panel
Using a long slotted screwdriver, unscrew the two screws from the ends of the instrument cluster
Having removed the instrument cluster from the panel, unscrew the nut securing the speedometer drive cable.
Disconnect the three connectors from the terminals of the instrument cluster.
The pads vary in color and number of connectors, so there is no need to mark them.
To replace the instrument lighting bulbs, turn the socket counterclockwise and remove it from the instrument cluster
We replace the faulty lamp.
To replace the warning lamp, turn the socket counterclockwise and remove it from the instrument cluster
We replace the faulty lamp together with the socket
We assemble and install the instrument cluster in the reverse order.
Functional
If the installation is done correctly, the new instrument cluster works properly. The only drawback is the weak backlight, which is almost invisible at night. It is recommended to install LED instrument lighting along the entire perimeter of the panel (video author: Vodila Chelyabinsk).
The Gazelle is equipped with 20 indicators that indicate that one of the vehicle’s components or sensors is not working.
If the “Stop” light comes on along with one of the icons, it is advisable to eliminate the problem before starting to drive.
We remove the panel from the 2005 gazelle. Installation and removal of the Gazelle Panel. We remove the torpedo on the gazelle.
Subscribe to the channel. Gazelle repair
.
How to remove
a panel on
a gazelle
.
Replacing the GAZelle stove motor
GAZTEC.ru - Repair, painting, LPG, spare parts for GAZ, UAZ. Website: https://gaztec.ru/ Our VK group: https://vk.com/gaztec_ru.
Using indicators, the dashboard displays information about the status of the main components and assemblies of the vehicle. A detailed description of the purpose of each of them can be found in the installation and operating instructions.
Installing and removing the torpedo
The dashboard is included in the Euro kit for Gazelle. On the latest versions it is installed at the factory. Drivers of older models also want to upgrade their dashboard. Replacing the device is not difficult: the design of the fasteners is almost identical, and the panel seat is the same in size.
Replacing a torpedo entails significant alterations, since it differs in both the shape and design of the fastenings. The car owner has to think about what changes to make himself. Sometimes, to repair the stove, you have to completely dismantle the torpedo. To do this, you need to know how to remove and install the torpedo back. For this procedure you need to prepare a set of keys and screwdrivers. An assistant may be needed.
Removing a torpedo on a Gazelle
The removal procedure consists of the following steps:
- Before starting work, for safety reasons, the vehicle should be de-energized. To do this, you need to remove the negative terminal from the battery.
- First of all, all the pads are removed. Use a Phillips screwdriver to unscrew the screws securing the upholstery.
- Then, by unscrewing two screws, remove the casing from the steering column.
- Next, remove the trim from the instrument panel, remove it by pulling the steering wheel towards you until it stops.
- We unscrew the fastenings of the instrument cluster and dismantle the tidy, disconnecting all the wires.
- Next, remove the steering column along with all connections.
- At the next stage, turn off the power supply to the lighting: rear fog lights, interior lighting. You also need to turn off the electric headlight leveler.
- Then unscrew the air damper bolt.
- Disconnect the cable from the carburetor by unscrewing the screw securing the cable sheath.
- Next, turn off the cigarette lighter and hazard warning lights.
- Using a screwdriver, unscrew the two bolts near the stove control.
- After unscrewing the 10 bolts securing the panel, carefully remove it from its mounting location.
- Now we disconnect the air ducts from the deflectors.
- Remove the carburetor damper.
- We dismantle the panel by disconnecting the hoses of the heater air ducts.
- Now you can remove the torpedo. It is better to do this with an assistant, as it is very heavy.
- Installation of the torpedo is carried out in the reverse order.
After installing a new torpedo, some indicators may not work due to incompatibility between the system and the new torpedo.
Typical faults
After replacing the device, the following malfunctions are possible:
- either part of the instruments or the entire panel does not work;
- the arrows on the instruments stop;
- incorrect sensor readings.
Read:
You can solve the problem by doing the following:
- First you need to check the power: the integrity of the wires, the quality of the contacts.
- If everything is fine with the wiring, it is possible that the controller is broken. It is better to replace the entire panel than to repair the controller.
- The sensors may not work if the connection is poor or the fuse is blown.
- You can try to restore the operation of the sensors by pressing the “Mode” button.
When replacing the instrument cluster, the electronics are not affected, but problems occur with them. The problem is solved by replacing the fuses and updating the wiring.
Detailed description of icons
Details about instrument combinations, decoding of symbols and pictograms are described in the GAZelle operating instructions.
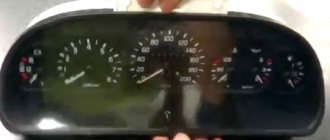
The panel is a combination of instruments with sound and signal indication. The main meters that the driver focuses on are the speedometer and tachometer, located on either side of the signal sensors. The speedometer indicates the speed of the vehicle. Its scale ranges from 0 to 200 km/h. The tachometer shows the crankshaft rotation speed of the power unit per minute with a scale of 0-6.
On the left side of the speedometer there is a device that determines the amount of fuel in the fuel tank. Nearby is the “Reset” button, when clicked, the daily mileage readings are reset to zero. Mileage parameters can be read on the digital odometer, with the upper numbers indicating the total value, the lower ones indicating the daily value.
To the right of the tachometer is the coolant temperature indicator. The arrow moving into the red sector means the engine is overheating. The motor runs until the alarm high temperature signal is triggered.
In the lower right corner there is a “Mode” button that turns on the ignition. Signal sensors are installed in the center of the panel.
- STOP indicator, when activated, further movement is prohibited until the problems in the car are resolved;
- indicator of lack of battery charging, which operates when the ignition is turned on until the engine starts;
- indicator of low oil pressure in the engine;
- minimum fluid level sensor in the brake system hydraulic drive reservoir;
- engaging the parking brake.
- left and right direction indicators;
- side light switch;
- Low beam headlight switch indicator.
Sensors flashing orange are responsible for turning on the rear fog lights, as well as for malfunctions of the anti-lock braking system and engine control mechanism. The high beam switch is blue.
In addition to the color display, an audible warning in the form of a characteristic signal has been developed on the instrument panel. It occurs in the following cases:
- when the fuel level drops to a minimum;
- when the engine temperature rises to 105° or more;
- when the handbrake is released and the car is moving at a speed of 2 km/h.
The disadvantage of the new panel is that it is difficult to install. The problem is solved this way: the pinout diagram is included in the package, you just need to add a few terminals, change the contacts so that all systems and components work correctly, connect LED lighting inside the devices and around the perimeter of the panel for better visualization.
Possible problems
Even if you change the panel to a Gazelle, you won’t be able to get rid of all the problems. Quite often problems occur after replacement. Here are the most common ones:
- individual sensors or the entire panel stops working;
- instrument readings “freeze”;
- The sensors lie, the indicators are incorrect.
Most drivers panic and then take the panel apart, which only makes things worse. Here are some solutions for most panels:
- The first thing you should always do if such devices malfunction is to check the wire contacts. A break or breakdown can cause a malfunction. You should also inspect the food.
Pinout and instrument cluster on the Gazelle panel
Since the electronic system is not improved by replacing the panel, and the devices are more demanding, problems occur with the electronics. Replacing the wiring and fuses most often solves the problem. Generally, reviews about the operation of the instrument panel are favorable, but on some older car models there are a number of problems that can only be solved by installing original instruments.