It is difficult to dispute the fact that a chainsaw is a universal tool. In addition to the traditional tasks for which it was originally created - logging, sawing wood and other building materials, this gasoline tool is increasingly becoming the basis for numerous homemade products that craftsmen adapt to their needs. In addition to the sawmill or winch, homemade boat motors made from chainsaws have become extremely popular among the masses. Productive and reliable, they cope with their task no worse than their factory counterparts, and are several times cheaper. After all, everyone who has ever been interested in buying a motor for a boat knows that this pleasure hits hard on your pocket.
The rest of the article will be devoted to how to make a boat motor from a chainsaw with your own hands.
The principle of assembling a boat motor from a chainsaw
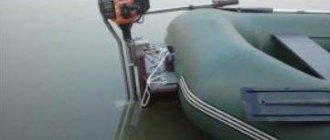
In order for the chainsaw to turn into a boat motor, you need to attach a special attachment. Thanks to a device with a three-blade propeller and a gearbox with a gear ratio of 2:1, you can reach speeds on the boat of up to 20 km/h, while fuel consumption will be minimal and amount to only 1 liter per hour.
Boat motor made from a chainsaw
The very principle of creating a homemade chainsaw is to use sawing equipment as a kind of drive. With the right device and the availability of circuits, you can make many devices on a chainsaw engine. You will make a boat motor using a special attachment with blades.
The fact that chainsaws are distinguished by high engine power, small size and weight allows the power unit to be used in many areas of activity and under any environmental conditions. The boat motor, which is assembled on the basis of a chainsaw, has a special tightness, which allows the user to use it in any position.
Choosing a saw for remodeling
When choosing a chainsaw that will become a “donor” for a new device, you should be guided by the following basic parameters:
The device of the Ural chainsaw.
- Power. The best option is a motor in the range of 2-3 kW. This power will be sufficient for most devices.
- Price. Despite confidence in success, the engine may not withstand a load for which the tool is not designed, so experimenting with expensive models is not recommended. It is best to use old models: they are highly reliable, and if they break down, you will not regret the money spent.
- Simplicity of design. The saw should be chosen so that it is easy not only to disassemble it, but also to find inexpensive spare parts for it.
It has been experimentally determined that the optimal saws for reworking are tools of the Druzhba, Ural, and Shtil brands.
Necessary parts for assembling a motor for a boat with your own hands
Below we list the main components and parts that, with the right approach and quick work, will make a homemade motor for a boat from a chainsaw. Of course, the main part is the chainsaw. Next you will need a gearbox from an angle grinder (you can also take an old, unnecessary model) and transmission oil. We will use a clamp for fastening. And the second important part is the chainsaw attachment in the form of a screw. You can use either the previous screw from an old engine or assemble it yourself. How to do this is shown in the following videos:
How to create a lawn mower using improvised materials
To quickly deal with tall grass or tidy up the lawn, a lawn mower must be among the owner’s tools. You can purchase an ordinary factory version of the equipment, which is convenient to use, but you should keep in mind that the price of the lawn mower will be significant. A homemade “Friendship” chainsaw made by yourself will cost one and a half times less than a factory device, and the power is quite enough for standard household use.
Regardless of the type of design chosen, the trimmer will consist of a drive, frame, control system and knives. For ease of operation, the device is additionally equipped with wheels, legs, handles and a protective casing in which the mowed grass is collected. The process of making a lawn mower begins with creating a frame of a convenient size, most often made of metal corners. The optimal size is 25x25 cm. In general, the progress of work on the manufacture of equipment looks like this:
- Using bolts, iron handles are attached to the finished frame, and wheels are mounted on the side parts.
- Having previously studied the characteristics of the Ural chainsaw or any other model, remove the handle and tire from the device.
- Using studs and nuts, the remaining part of the equipment is attached to the base. This must be done so that the gearbox shaft, rotated 90˚, looks down.
- At the next stage, you will need to lengthen the gas cable, and use two tubes to make a sliding shaft connected to the gearbox.
A lawn mower made from a chainsaw will cost much less than a store-bought one.
Elements from old baby strollers or wheelbarrows are used as wheels. If you use several pipes of different diameters for manufacturing, you will be able to make a device with a telescopic operating system that can change the length.
This is especially important if the device is often used by people of different sizes. Also, creating a telescopic shaft will help regulate the height of the grass after the lawn mower passes. To ensure that the device lasts longer, does not fail after encountering hard stones, and effectively fights small bushes, it should be equipped with high-quality steel knives
For convenient use, it is recommended to additionally equip the mower with a grass catcher so that you do not have to collect the remains of the mown grass.
To ensure that the device lasts longer, does not fail after encountering hard stones, and effectively fights small bushes, it should be equipped with high-quality steel knives. For convenient use, it is recommended to additionally equip the mower with a grass catcher so that you do not have to collect the remains of the mown grass.
Important Technical characteristics of Hyundai County middle class buses
Assembly diagram, drawings and instructions
In principle, the whole job consists of replacing the chain element of the chainsaw with an attachment with a screw. We remind you that this procedure is not forever and in the future, if necessary, you will have the opportunity to change the design of the chainsaw to the original one and continue cutting with it. The procedure itself is very quick and consists of the following steps:
First, you need to remake the coupling. To do this you need to machine a smaller bowl and change the spring. These actions will lead to the fact that the starting torque will decrease, and the dimensions and mass will be more balanced. Secondly, the bowl and coupling cover must be connected with brackets, which are then secured with a screw and washer.
The screw and the bar will close the pin connecting the bowl and the shaft.
Only after completing the steps described above can you fill in the transmission oil. Next, you secure the lid with sealant. Some owners recommend creating a gas handle for your convenience in controlling a chainsaw-based motor.
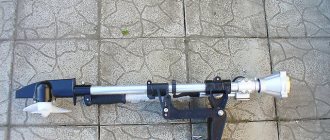
Installation of the unit structure
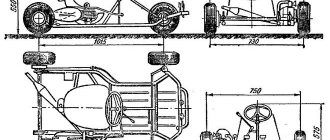
Once assembled, the height of the structure will be barely 10 cm (including the body, protective screen, including the distance to the support plate). The distance between the axes of the studs in this case will be 32 millimeters with a height of 24.5, the center-to-center distance from the shaft to the first stud will be 54 millimeters. Considering that the weight of the entire structure (albeit without taking into account the tire) is quite suitable, a little more than 4.5 kg, for fastening you can choose a stud with a metric thread with a diameter of 8 mm and a thread pitch of 1 mm.
To secure the motor and shaft, you will need a channel. Armed with a grinder, a mount of the desired configuration is cut out of the workpiece, and then holes are drilled for the fasteners connecting this structure and the chainsaw itself.
When assembling, it is necessary to take into account sufficient distance between the front coupling bowl and the support frame. A gearbox borrowed from an angle grinder will be attached to the second side of the shaft.
The next stage of work will be the construction of the rotary unit. To do this, you will need a piece of tube with a diameter slightly larger than the shaft with a welded corner for fastening the guide, a hollow hexagonal guide, a metal rod of suitable diameter and a rectangular metal blank with holes in the ends for securing the rod, as well as a slot in the upper part for ease of work.
The edges of the cut “handle” in the workpiece must be thoroughly cleaned. A guide is attached to the corner by welding, and then using a rod the resulting structure is connected to a rectangular “handle”. The ends of the rod can be threaded for secure fastening; you can simply install them with a slight interference fit. Then the entire assembly is placed on the shaft and secured in a place convenient for control.
At the next step, you will have to adapt the gearbox shaft for the existing propeller. It is advisable, of course, to use this important part ready-made; it can be removed from the old motor. For those who are not looking for easy ways, the option of making a homemade product is possible. In the image and likeness of a factory-made screw, a mold is made into which the future screw is poured using epoxy glue and fiberglass. After some simple manipulations (grinding, painting), the screw is ready
However, it must be taken into account that the propeller will take on a significant load, and during manufacturing it is very important to correctly maintain all dimensions. Therefore, it is better to use a ready-made part.
After connecting the screw and the gearbox shaft using a pin, the final stage begins. Transmission oil is poured into the gearbox, the cover together with the installed shaft is secured using sealant. And then comes the final assembly of the entire structure. For ease of use, you can additionally mount the throttle handle.
Boat owners often use motors to make their boat as fast and maneuverable as possible. The cost of factory units is not affordable for everyone, so most users prefer to create a motor from a chainsaw for a boat on their own. It is worth noting that the upcoming intervention in the basic design is minimal, so the equipment will remain suitable for further use for its intended purpose.
What do you need for work?
In order for the old Ural chainsaw to be reborn, in addition to a perfectly working head and straight arms, you will need a certain tool. Which one depends on the final product and the degree of the author’s ideas, however, for the most part, it is:
- screwdriver with different bits or flat and Phillips screwdrivers;
- a set of keys;
- drill;
- Bulgarian;
- metal scissors;
- welding machine;
- various processing machines;
- various measuring instruments, for example, tape measure and calipers;
- a hammer or even a sledgehammer for rough work, etc.
ATTENTION. Update your browser! Our site does not work correctly with IE 8 and older versions.
The diameter of the screw is 60 cm, fits into the interior of any car, without gearbox, without starter, weight 9.5 kg.
The thrust is 10 kg, a 1.25 liter bottle is enough for 20 minutes of flight. Clings to a standard suspension. An excellent assistant for learning thermal flights. Allows you to support your carcass on the slope and wait for the thermal in case of dead or unstable wind. Price 12 thousand rubles. 8-905-313-9-131 Everything is correct, just remove the spaces between tags
So, what is next?
— Since we’re not into parabusiness, let’s discuss the new product? Comments.
PS: Do you know the dealer?
I just suddenly imagined how my wife, clumsily, offers my paraglider on the Internet, and everyone praises her so much and helps her.