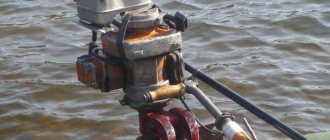
Boat motor from a gasoline trimmer
Almost every fisherman has a rubber inflatable boat at home. And naturally, everyone would like this type of transport to be as fast, convenient and comfortable as possible. If, in addition to an inflatable boat, you have a lawn mower on your farm, then you can design a homemade boat motor based on a trimmer. Such a device is quite easy and quick to make, and its performance and reliability will be sufficient to move the boat over long distances. We will tell you step by step about constructing a boat motor from a brush cutter below.
Benefits of converting a trimmer into a boat motor
Using a trimmer as a boat motor has a number of significant advantages and disadvantages.
The benefits of such a technical solution:
- low cost: a trimmer is much cheaper than a professional boat motor;
- low fuel consumption with sufficient performance;
- reliability and tightness of the structure, taking into account individual nuances of use;
- small dimensions and weight of the tool, which is also very practical and convenient for use on light boats;
- fuel control thanks to the transparent walls of the tank;
- rigid shaft inside the rod.
The engine power must be at least 0.7 kW. Ready-made attachments for conversion (an attachment for attaching to the engine, a special adjustable handle with a muffler button, fasteners) can be purchased. After installing them on the trimmer, all that remains is to connect the throttle cable to the engine and connect the wires to the muffler.
How to make a boat motor with your own hands from a trimmer?
To create a boat motor from a lawn mower, a tool with a straight rod is suitable. If the trimmer rod is curved, you will have to work on improving it.
The alteration occurs according to the following algorithm:
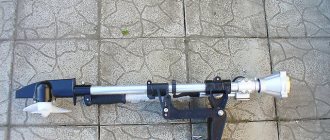
- First, remove the standard nut (indicated by number 2 in the drawing below). Do not throw it away or lose it, as it is not possible to replace the factory parts with regular nuts.
- Unscrew the remaining fasteners, remove the stern tube and flexible shaft from the rod (numbers 8 and 9 in the drawing).
- Select a new duralumin rod with a slightly smaller internal diameter. Carefully place the bronze bushing into it (in drawing No. 6).
- Cut the protector (item #10) to the required size and insert it into the rod.
- If the outer diameter of the rod is too large for the motor hole, grind it.
- Using a standard nut, secure the screw.
- The shaft is attached to the motor using adapters. There are no universal drawings for this part, since different trimmer models have their own design features. You can order this part from a turning workshop or make it yourself from plywood. The structure will be secured with 4 screws.
If it is not possible to purchase a ready-made conversion kit, which was mentioned earlier, you can take the adjustment knob from a sports bike.
You can also make a screw yourself from a piece of duralumin using the drawing below:
Pitch is the distance from the blade to the horizontal surface. The angle of inclination is adjusted using pliers. To do this, the workpiece is preheated.
To refuel the engine from the trimmer to the boat, use only high-quality fuels and lubricants. Dilute gasoline and oil in appropriate proportions. For the first 10 kilometers, do not subject the engine to high loads - this will be a break-in period. Depending on the engine power, a boat with such a motor can reach speeds from 5 to 8 km/h.
Below is a video demonstrating the operation of such a unit:
Modifying the trimmer using a ready-made set of attachments
The choice of a gasoline trimmer as a fundamental device for an outboard motor, which is not inferior in its technical characteristics to mass-produced models such as the Centaur ML-5241RD and others, is due to the presence of a number of components that do not need modification. Among them:
- economical internal combustion engine;
- a rod equipped with a rigid shaft;
- engine starting mechanism (starter);
- unpainted fuel tank to allow visual control of the amount of combustible mixture.
When choosing a trimmer to turn it into a boat engine, you should decide on its power. For example, for a small rubber watercraft "Ufimka-22" a trimmer with a power of 0.7-1.0 kW is suitable. A watercraft equipped with such a unit will be able to reach a speed of about 5-8 km/h. If you need to propel a heavier boat, you will need a more powerful trimmer.
On a note! When choosing the power of a brush cutter based on the weight and dimensions of the existing boat, it is necessary to take into account the weight of the attached engine itself.
There are various ways to turn a trimmer into a boat motor. For example, you can buy a set of ready-made parts needed for modification and use the manual that comes with it. With its help, within a short time (no more than 1 hour) you can turn a lawn mower into a boat engine.
The kit for converting the trimmer into a boat motor includes the following parts:
- propeller screw;
- a special drive-attachment, which is made of stainless steel;
- a set of adapters and attachments for different types of trimmers (universal);
- control handle (tiller), equipped with a muffler button and a gas adjustment knob;
- clamp for attaching the trimmer to the transom of the boat, etc.
The price of such a kit, as a rule, does not exceed 5,000 rubles, but the engine itself is not included.
Important! When mounting the kit components on the trimmer, the owner will need to attach the throttle control cable to the motor, and then secure the muffler cable, turning it towards the propeller.
Methods for making your own boat engine from a brush cutter
The easiest way to make a motor for a watercraft is to use a lawn mower with a straight leg (bar) and, accordingly, a rigid shaft. In this case, all modification comes down to the production of a propeller, which can be cut from a strip of stainless steel or duralumin. The size of the workpiece is 100x30x2 mm. The blades should be given a curved shape, for which they need to be bent by about 10 mm. The edges of the screw need to be sharpened. An example of constructing a simplified drawing of a propeller is shown in the figure below.
The manufactured propeller is installed in place of the trimmer head. In this case, it would be advisable to use a ring attachment, which will prevent the propeller from damaging the boat. The process of modifying the trimmer with your own hands is shown in more detail in the video:
Modification of the grinder gearbox
To achieve the maximum number of engine revolutions, you can equip the trimmer with an angular gearbox from an angle grinder, which must first be modified. This may require seals and bearings. The process of modifying the gearbox itself consists of replacing the standard short shaft with a longer one, corresponding in size to the trimmer rod. However, to do this you will have to disassemble the gearbox.
Having made a new shaft, the gearbox is assembled, having previously protected the bearing with a seal that prevents water from penetrating into it. In addition, it is recommended to apply thick lubricant to the existing gears or fill the internal cavity of the housing with it. To seal the housing, use a rubber seal and/or sealant.
Modification of a trimmer with a curved rod
If the boat owner has a brushcutter with a bent shaft, the latter must be dismantled and replaced with a straight pipe of the appropriate diameter made of duralumin. If the diameter of the new tube is larger than the size of the hole in the engine block, then the seat will need to be machined to the required size. Refinement is carried out in the following order (see drawing).
First, unscrew the standard nut 2, which is located in the spool with the cord. At the same time, it is strictly not recommended to throw away the fasteners removed from the rod, since manufacturers of brush cutters often use their own types of threaded connections that do not correspond to the standard ones. Then unscrew the standard nut 4 and remove the stern tube (item and flexible (item 9) shafts. Then cut out position 6 - the plain bearing (looks like a bronze bushing at the end of the shaft). Next, knock out the plastic protector 10 from the rod. Into a straight pipe selected in advance 7 press in the previously removed sliding bearing 6. It may be necessary to bore the pipe for this. Then the sliding bearing 6 is carefully pressed with a hammer along the groove 5
Important The best Bosch electric trimmers: technical specifications, owner reviews, prices
It is important here not to damage the pressed bronze bushing. Then the plastic protector 10 is cut in place and tightly inserted into the pipe 7. Next, the stern shaft is connected to a steel rod, which will replace the flexible shaft 9. It is possible that the help of a turner will be needed for this. The final step is that propeller 3 is attached to the stern shaft 8 with nut 2.
The assembled rod is connected to the motor using specially made adapters, the shape and dimensions of which depend on the design features of the particular trimmer model.
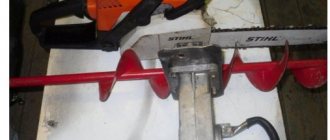
How to make a boat motor from a chainsaw?
In order to avoid typical mistakes when assembling a motor from a used chainsaw, it is important to adhere to the diagram and follow the correct procedure. The assembly steps are as follows:
The assembly steps are as follows:
The first step is for the manufacturer to redesign the coupling. To do this, you first need to machine a cup of suitable size and replace the spring used. In this way, the manufacturer will be able to reduce the initial moment of the standard clutch and adjust the mass dimensions to the required dimensions. The finished cup must be secured to the bracket using a washer and screws. The pin securing the cup and shaft together will need to be covered with a bar and a screw; Next you need to connect the shaft and the motor from the chainsaw. A pre-painted channel is best for this.
In this case, you need to pay attention to the distance between the front cup of the assembled coupling and the built-in support frame. The distance must be such that during operation the rotating parts do not interfere or come into contact with each other; Then you need to install a gearbox on the second side of the shaft; After this, the outboard motor from the chainsaw will need to be equipped with a turning mechanism
It will allow you to change direction while the boat is moving through the water. To make the unit you need a piece of pipe. Its thickness should be slightly larger than the diameter of the shaft with a pre-welded corner, which is used to attach the standard guide. In this case, the steel rod must match the dimensions of the hexagon used.
After assembling a homemade outboard motor from a chainsaw, it will need to be filled with fresh fuel mixture and transmission oil. Then the fuel tank cap will need to be screwed on and secured with sealant. When testing the motor, you do not need to load it immediately. For the first 30 minutes, you need to subject the internal combustion engine to low loads. After the first fuel tank is completely used up, you can move on to more intensive engine operation.
Advantages and features of converting a trimmer into a boat motor
Using the lawn mower available on the farm has a number of advantages. Firstly, the boat owner will not overpay for an expensive motor purchased in a store. Secondly, a motor for a boat made from a brush cutter consumes much less fuel than specialized boat engines. Thirdly, the engine from a lawn mower is an order of magnitude smaller in size than a store-bought outboard motor. There are a number of other factors that force fishermen to use a trimmer instead of a boat motor.
These include:
- high reliability of engines of modern trimmers;
- complete sealing inside the housing;
- the presence of all the elements necessary to control a homemade engine;
- presence of a built-in tank.
Thanks to all these factors, the outboard motor made from brush cutters is the most popular among enthusiasts.
In the process of converting an engine from a lawn mower into a boat motor, it is extremely important to take into account that this power unit was produced for other purposes. Engines on trimmers operate at low torques, but at fairly high speeds. In the case of a specialized boat engine, the opposite happens. In this regard, to remake the motor from the trimmer, you will need to prepare drawings, equipment and follow a certain procedure.
Despite some difficulties during the conversion, the trimmer contains all the parts necessary for the manufacture of a boat motor - a built-in starter and throttle lever, a rod with a rigid shaft and a translucent fuel tank.
Motorized scooter made from a lawn mower
If you like to make something in the garage, or make a unique type of transport, this instruction is just for you. Here you will learn how you can equip your scooter with a gasoline engine. The author decided to use an unnecessary motor from a trimmer as a power unit. Similarly, you can install an engine from a chainsaw, lawn mower, and so on.
Materials and tools for homemade work: - an old scooter (can be made from scratch); - an engine from a lawn mower; - bicycle wheels (will be used for spare parts); - a bicycle chain; - metal pipes (found in an unnecessary chair); - a cable for controlling the throttle ;— welding;— grinder;— paint— wrenches, screwdrivers and more.
The process of making a gas scooter:
Step one. Freewheel device
A special feature of this homemade product is that the rear wheel is connected to the engine through a bicycle hub. This means that having gained a certain speed and releasing the gas, you can roll by inertia. But this is very convenient, because it allows you to significantly save fuel and also prevent engine overheating.
In other similar options, the torque is transmitted directly to the tire, which is not very professional.
As for installing the carriage, you will have to tinker. You may need to make some spacers, bushings, etc. to connect everything together.
Step two. Installing the sprocket on the engine
Petrol mowers come in different varieties; the author needed one that was equipped with a centrifugal clutch. Otherwise, if it is not there, it will be very difficult to use the scooter, because when you start the engine it will immediately drive away. And so the engine will idle without problems, and will only begin to move when the crankshaft speed increases.
From the scythe engine you need to cut off a piece of the shaft that goes to the knife, that is, the area behind the clutch. As a result, a shaft will remain, to which the sprocket is welded. The star needs to be well centered. Most likely, you will have to select or make a bushing.
Step three. Frame diagram
The author first made the frame wooden in order to decide on the creation of a metal one. The problem was that the new rear wheel mounts did not fit the old frame.
As a result, it was necessary to make a different rear fork. It must hold not only the wheel, but also the engine. A chair came to the rescue as materials, in other words, steel pipes are needed. Well, then the pipes are cut exactly according to the diagram and welded thoroughly. It is necessary to make a mount under the engine; for such purposes you will need a piece of strong steel plate. You need to cut a hole in the center for the clutch, and also drill four mounting holes for mounting the motor. Well, this sheet is welded to the rear fork.
Important Characteristics and reviews of owners of German-Chinese chainsaws of the Gardenlux brand (Gardenlux)
Step four. Assembly
Now everything can be put together.
Step five. Painting
At this stage, the author paints the frame. If the original board has become bad or is not there at all, then it can be made from a sheet of plywood and then painted. The size is selected depending on your needs.
Step six. Connecting the engine After painting, the engine is installed in place and everything is finally assembled
It is important to tighten the chain, otherwise it will fly off. Before driving, you need to spin the rear wheel and make sure that all the sprockets are centered and clearly opposite each other.
To control the engine, you will need to connect the ignition button, as well as the throttle control cable. However, the button may not be located on the steering wheel, but the throttle handle will definitely be needed. You can use a cable from a bicycle brake or from a gear shift as a cable. As for the handle, the throttle handle can be made from the gear shift handle, throwing out unnecessary parts from it, as a result the handle will rotate freely. Well, or, as a last resort, you can control the throttle using the bicycle brake handle, but this is not very convenient, since you can get everything mixed up when riding.
To further strengthen the clutch axis, a steel axle and bearing were found, and an additional bracket was welded to the frame. Now the axle already has two supports, which has significantly reduced the load on the clutch. The axle is connected using a nut, since the engine axle has a thread.
Receive a selection of new homemade products by email. No spam, only useful ideas!
*By filling out the form you agree to the processing of personal data
Features of making a jet motor for a boat with your own hands
If you want to make a high-quality water jet engine, then the Veterok brand motor may be the best base motor. There is nothing special about this, since this particular motor is equipped with all the necessary spare elements that may be needed during the engine manufacturing process. You can purchase it in almost every fishing store or on the Internet.
After the purchased base motor is upgraded, the weight of the jet engine will be increased by literally 1 kg, which is not significant for boats of any type. If the motor is manufactured correctly, it will subsequently be able to accelerate the boat to 25-30 km/h with a boat load capacity of 450 kg. In order to create a jet engine from a base motor, you need to purchase the following additional elements:
- motor of a special type Veterok, which is equipped with a flange;
- water collector and its development;
- rectifier gearbox;
- welding machine;
- hub;
- waterproof glue;
- fittings;
- engine drawings and diagrams.
An important nuance before making a homemade motor is that you need to approach the preparation process as responsibly as possible. With an irresponsible approach, the motor can fail very quickly.
When choosing all the components, it is important to choose only reliable ones so that the motor works properly.
To ensure maneuverability on the surface of the water and the so-called maneuverability of the boat in the future, a special recess must be made in the water collector. It also allows you to reduce hydrodynamic resistance. This can only be done due to the fact that the leading edge, located in the upper part, is located 35 mm higher than the level of the boat bottom.
To assemble the motor yourself, you need to have a very ordinary gearbox. It must be secured to the engine using a flange. After this action, you should take a metal blank in your hands, on which you need to draw a scan of the water collector, the so-called shell and blades in the amount of 6 pieces.
Using hybrid rollers and a file, it is necessary to produce workpieces that will have the most correct shape. To do this, you can use a mandrel or do this process manually. In order to connect the transverse and longitudinal seams of the water jet chamber and drainage system, welding work begins. Do not forget that the design of the water cannon must also have a hub located on the very boss of the finished product.
Once the water cannon is completely ready, its weight should be about 20 kg. Drawings of water cannons of this type are very rare on sale. Therefore, you should create it yourself or find it on the Internet.
Reviews
Sergey Petrovich, 58 years old, fisherman, Saratov.
I made a motor for a boat from a mower. The noise is not very loud, the muffler removes the high frequencies. I've been fishing on this boat for 2 years now. The motor works reliably, without interference. I've never done a renovation before. I'm happy with the homemade product.
Mikhail, 40 years old, engineer, Tyumen.
Made a boat motor from a lawn mower. The structure was made exactly according to the drawings. I installed a new speed switch, made a stainless steel drive, and used plain bearings. The device turned out to be quite durable. Installed on a rubber boat. Works great. It is not difficult to make such a design yourself. And this gives big savings, since the factory motor is expensive.
Valentin, 43 years old, fisherman, Engels.
I have long been planning to make a motor boat from my simple one. On the advice of friends, I purchased a special set of attachments from the store to convert my old mower into a boat engine. I figured out the design easily, did everything according to the instructions with my own hands. Now I use a motor boat for fishing. The only drawback is that the motor is very noisy, but if you use it at low speeds, it is much quieter.
Grigory Ivanovich, 49 years old, carpenter, Petrozavodsk.
In the summer we always relax at the dacha and fish in the river nearby. Last year I installed a motor from a lawn mower on the boat. I had to tinker when I dismantled and rebuilt the structure. But everything turned out great. The motor works well and is no worse than an expensive off-the-shelf engine. True, there is excess noise, but we have already become accustomed to it.
Almost every fisherman has a rubber inflatable boat at home. And naturally, everyone would like this type of transport to be as fast, convenient and comfortable as possible. If, in addition to an inflatable boat, you have a lawn mower on your farm, then you can design a homemade boat motor based on a trimmer. Such a device is quite easy and quick to make, and its performance and reliability will be sufficient to move the boat over long distances. We will tell you step by step about constructing a boat motor from a brush cutter below.
Characteristics of outboard motors
First of all, you should pay attention to the size and power of the engine. To prevent the stern of the boat from sinking under the water, do not use too heavy devices
Two-stroke models are easy to maintain and lightweight. Four-stroke options are installed on large boats.
Power
A high power engine can capsize the boat during launch. To prevent this from happening, you need to know how much power the device should have. An 8-9 liter motor is installed on a boat up to 7 m in size. With. For a small boat 5 m long, an engine of up to 5 hp will be sufficient.
Operating voltage
The motor has a flywheel with magnets. The flywheel consists of an ignition coil and a core with a wire. The ignition coil is powered by an electric current that is generated inside the core wire. From the coil, current flows to the spark plugs. The generator coil installed under the flywheel produces a voltage of 6-40 V, and the operating voltage of the engine should be 12 V. An installed regulator helps correct the situation. As engine speed increases, the resulting voltage surges are absorbed by the battery.
Important TOP 4 Sungarden cultivators for cultivating small areas of land
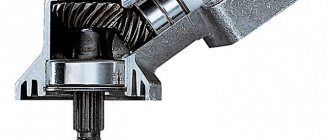
Gearbox and its influence on operation
An angular gearbox for a boat motor is a separate unit that works in conjunction with an electric motor. The unit is lightweight and compact in size. But, despite these data, it has great efficiency and is capable of doing a lot of work. Mounting the gearbox will help reduce the rotation speed, as it converts the available energy into mechanical energy and transfers it to the output shaft. At the same time, torque transmission will remain high.
Principle of operation
The motor for a boat from a trimmer has a higher speed of rotation of the blades, which allows you to move faster along the river. When a gas mower operates when mowing lawns, its blades are turned in the opposite direction. When making a boat motor, the engine blades are turned over. Then the engine will work to push the boat. The higher the blades are located to the surface of the water, the faster the speed of revolutions and the higher the speed of the boat.
Tuning of external parts of the Urals
Here the direction of tuning depends on the style in which you want to make the motorcycle. Typically, owners choose classic custom options.
Most often, the appearance of the Urals undergoes the following changes:
- replacement of fenders, handles, mirrors, fairings, seats, footrests;
- chrome plating of parts for more shine;
- changing the shape of the fuel tank and steering wheel;
- making a new muffler.
Ural - cafe racer
One of the simplest and most popular custom styles. During the remodeling process, unnecessary parts are removed from the Urals, and old heavy ones are replaced with lightweight and stylish ones.
The tail of the motorcycle is digested to create an aerodynamic hump, and a new seat is installed. The wheels are also being updated: they should be spoked, with light rims and road tires.
Read more about how to make Cafe Racer here:
no images were found
Ural - bobber
Also quite a popular area of customization among the owners of the Urals. In this case, the rear part of the frame is modified and the rear shock absorbers are removed. The tank is replaced with a smaller version of it, and a small single seat is also made.
In principle, it’s also nothing particularly complicated, the only thing is that you’ll have to tinker with altering the motorcycle frame. And it is made of durable low-carbon steel and therefore is quite difficult to overcook.
Read more about building a Bobber with your own hands here:
no images were found
Ural - chopper
This is the most complex and expensive type of tuning of the Urals with your own hands. First, you will have to make a completely new frame. Most often, ordinary water pipes with thick walls are used for this.
You will have to tinker with finding and installing a wide rear wheel, at least 150 mm. The exhaust pipe will also need to be redesigned to make it look stylish.
The chopper driver must sit imposingly, so the footpegs will need to be moved forward, and the location of the motorcycle controls will need to be changed. And of course, make a large and wide steering wheel.
The last step will be to ensure that all parts of the motorcycle are covered with chrome and shine dazzlingly.
For an example of drawings for converting a chopper, see here:
no images were found
Models with two-stroke engines
You can make a boat motor with a two-stroke engine with your own hands only if you use a crankshaft with a diameter of at least 60 mm. Otherwise, it will not withstand the load. In this case, you can select a regular flywheel. In this case, the fuel pump must withstand a maximum pressure of at least 3 bar. Experts advise installing rocker arms only on three valves. The thermostat can be mounted on boat motors (homemade) if desired.
Exhaust valves in the system are most often installed in aluminum. There are a variety of cooling devices available today. The simplest option is considered to be a water modification. To do this, intakes should be provided in advance in the pallet. The pushrods above the engine should be installed last. The deadwood for the two-stroke modification is suitable with a 120 mm rod.
Other devices used to create a boat engine
In fact, there are quite a lot of ways to create a motor; the main thing is to correctly approach the process of selecting related parts and the most suitable base. In addition to a screwdriver, you can use a walk-behind tractor or a trimmer. But the best technical characteristics will have a boat motor made from a chainsaw with your own hands.
Due to the fact that fuel consumption in this type of engine is minimal, it is often made from this very device. In this case, the tank will have a transparent appearance. A homemade propeller that acts as a propeller is often made of duralumin. The edges must be carefully sharpened, and the propeller blades must have a 10mm bend. The ring attachment, which is necessarily used to make such a motor, is designed to protect the boat from damage during operation.
Using adapters, you need to connect the propeller and the motor shaft. You need to remove the starter from the lawn mower. Using a previously prepared drawing, you can begin to create a motor from an element such as a trimmer.
The motor can also be built from a starter taken from a device such as a walk-behind tractor. To assemble a four-stroke model, use a conventional type of fuel system, but make sure that the pump designed for pumping water has excellent quality indicators. If you have any old engine, then you can remove the so-called deadwood from it.
Above an element such as a carburetor, it is necessary to install the fuel pump in such a way that there is not the slightest contact with the rocker arm. You can use clamps to secure them. The crankshaft should be secured directly above the gear at the top. The water pump should be installed under the deadwood. For free operation of the lower rod, you can use springs.
Possibility of using the trimmer as a boat engine
To be fair, it should be noted that domestic craftsmen have learned to use internal combustion engines from lawn mowers and chainsaws as outboard motors. However, many people see the simplest option when making a homemade engine for a motorboat using a gasoline trimmer, which, in addition to its low cost:
- has a set of all elements and mechanisms necessary for control;
- has a built-in fuel tank;
- characterized by minimal fuel consumption and high operational reliability;
- It is lightweight, which allows it to be used on rubber or plastic boats;
- ensures the tightness of the structure, etc.
However, in order to use a brush cutter as the basis of a boat motor, it will need to be modified. This is due to the fact that initially the trimmer engine must operate at maximum speed with low torque, and the motor for the watercraft requires a different operating mode . However, remaking the trimmer will require the owner to have certain skills in performing plumbing and installation work. In addition, he will need to develop drawings of some parts and have the necessary set of tools on hand.