Blade for mini tractor
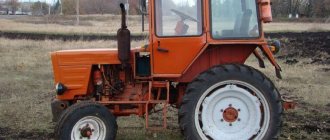
A mini tractor is one of the most necessary devices that is used on farms and in rural areas. The tractor copes with a variety of tasks: working in the garden or in the field, harvesting crops, transporting goods. But if you also equip it with attachments, the functionality of the mini tractor increases several times.
A snow blade for a mini tractor is a necessary piece of equipment that allows you to clear an area of snow debris. By attaching it to the device, you can do all the work in a few minutes that previously took many hours and effort.
Today, a shovel for a minitractor is produced by many companies, but craftsmen suggest making it yourself. This will save money and get the most convenient and high-quality equipment.
Purpose of the tractor blade
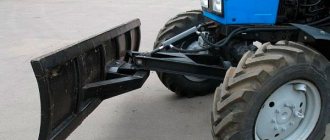
The structure, made of steel sheet with additional reinforcements, is intended for cleaning the road surface or for collecting soil (for example, during excavation work). A cutting element made of special steel is installed along the lower edge of the bulldozer element; on units for public works, a rubber lining is used to protect the road surface from damage (for example, when removing ice or snow). On MTZ wheeled tractors, the blade is mounted at the front; road machines are equipped with an additional scraper.
Types of dumps and design features
These devices are used for clearing snow in both small and large areas. They resemble a small shovel that scoops up snow and throws it to the side.
There are two types of dumps, which differ in the method of attachment.
- Front blade - it contains a hydraulic cylinder, with the help of which the equipment is started.
- Rear-mounted blade - it works using the hitch of a mini tractor.
All dumps have the following characteristics:
- weight is 65-105 kg;
- the width of the shovel can be from 120 to 200 cm;
- can be installed on mini tractors with a power of 16 hp or more. With.
The front linkage allows the tractor to be used as a bulldozer, thereby significantly expanding its functionality. It makes the model heavier, but the quality of cleaning will be much higher.
Self-production
to find ready-made drawings and descriptions for making one or another home-made mounted snow blower for a specific machine. After all, the unit is installed in some special way for each type of vehicle.
The mounting methods and location also differ .
Therefore, in most cases you have to:
- take drawings and methods for manufacturing a device for one machine and adapt it to another;
- draw up a drawing yourself, using a unit installed on another car as a sample.
In addition, the parts for which the drawing is drawn up are not always available.
Therefore you have to:
- draw up a new drawing;
- do it the old way, making changes as you go.
You should know the three main conditions for making good mounted snow removal devices yourself: these are:
- availability of skilled and experienced craftsmen ;
- access to the necessary equipment ;
- good lawyers who can obtain the necessary documents and legalize the units.
If you decide to make some kind of snow removal equipment yourself, then make sure that all three conditions are met.
You can make the necessary equipment:
- from a not very suitable drawing;
- no drawing at all;
- looking at the finished unit.
But only such specialists as:
- welders;
- turners;
- locksmiths;
- hydraulics.
Also make sure they have all the necessary equipment .
Then talk to:
- traffic police officers;
- lawyers or companies involved in automotive technical expertise and legalization of various changes made to the design of the vehicle.
Perhaps, after calculating all the costs, including payments to these companies or lawyers, you will decide that you will purchase a ready-made unit with all the permits:
- easier;
- cheaper.
Nobody clears the streets of snow? Find out who is responsible for snow removal and who to complain to. Do you want to buy a snow blower, but don’t understand anything about it? Read all the necessary information here. Should I repair the snow blower myself or take it to a workshop? Find the answer to this question here:
How to make a blade for a mini tractor with your own hands?
If a person has the desire and time, he can easily design a homemade blade for a mini tractor, just as he can make a clutch for a mini tractor with his own hands. First, he needs to think about the type of future shovel, draw a diagram or use existing drawings.
It is necessary to prepare the following list of equipment:
- drill, grinder, pliers;
- a 200 liter steel barrel or other equipment that will act as a shovel;
- welding;
- steel and rubber strips;
- screwdrivers, keys, fasteners.
Features of creating a shovel for snow removal
- The dimensions of the future blade are selected, which depend on the type of mini tractor.
- The barrel is cut into three even parts, which will become segments of the future blade.
- The two parts are welded along the contour, resulting in a brush 3 mm thick.
- A knife is constructed using a 5 mm thick steel strip.
- The lower part of the device is reinforced with a knife, for which holes with a diameter of 5-6 mm and a pitch of 10-12 cm are drilled into it.
- A safety rubber strip is attached to the knife.
- The attachment of the blade shovel is reinforced with the help of square steel pipes with a cross-section of 40x40; the pipes are welded below the middle of the shovel.
- The lower part of the blade is covered with a rubber casing, which will prevent the equipment from coming into contact with the asphalt.
The blade can be installed with a lifting mechanism that will raise the equipment to the desired height. For these purposes, it is necessary to weld an A-frame and attach a hydraulic cylinder to it.
To assemble the entire structure together and work fully with a brush, you need to:
- attach the blade at the bottom using two through bushings;
- connect the equipment at the top through the hydraulic center;
- bring the control into the cabin and fix it with a lever or remote control.
You can watch a video on how to assemble the blade.
A homemade blade is a great opportunity to save money and create an effective assistant for working in snowy areas.
Blade classification
This simple mounted implement has the following classification:
- According to execution form:
- shovel blade (straight rotating, straight non-rotating);
- bucket (hemispherical, spherical, spherical for bulk materials).
- According to the method of attachment to the walk-behind tractor:
- standard bracket;
- using lugs and locks.
- According to the location of the working body relative to the walk-behind tractor
- front;
- rear (if the steering column can be rotated 180 degrees).
- By hitch type:
- adjustable:
- unregulated.
- By type of lifting mechanism:
- manual or mechanical;
- hydraulic.
Types of dumps for mini tractors
This attachment is used for cleaning snow and ice in the household. Mini tractors with a shovel are actively used in the public utilities and construction industries. In the latter case, they are used to evenly distribute crushed stone or sand.
There are two main types of this equipment:
- Rear blade for a mini tractor. In this case, the equipment is rear-mounted. Starting is carried out by attaching the unit;
- Front blade. The design includes a hydraulic cylinder that launches the device. The mini tractor acts as a bulldozer with a front linkage. The weight of the machine increases significantly, so slight difficulties arise when lifting the shovel during transportation.
Dumps differ from each other in the following qualities:
- Weight ranges from 65 to 105 kilograms;
- Width from 120 to 200 centimeters;
- Tractor power with a shovel from 16 liters. With.
After installing the blade on the mini tractor, you need to select the angle at which the work will be performed. An acute angle is suitable for cleaning roads; a right angle is more suitable for working in large areas.
If you have the necessary tools and materials, you can make a snow blade for a mini tractor with your own hands.
Features and techniques for making a blade
There is no point in indicating specific dimensions or technological solutions in this article, since when making a blade on their own, everyone will be guided by their own capabilities in the material, the technical base in tools and equipment, the design features of the steering mechanism and the drive of the front axle of the tractor. To simplify do-it-yourself manufacturing, we will indicate a number of technological and design points that need to be taken into account in the process.
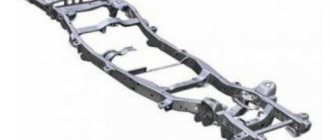
An example of the design of the frame and attachment of the blade to the hitch with a change in the angle of attack
- When welding a blade blade consisting of several parts, it is recommended to take into account that the loads acting on the fracture of a fragile weld will destroy the structure. Therefore, such seams need to be reinforced with welded overlays. If you have a flat sheet of the required size, the bending of the profile can be facilitated by cutting half the body of the sheet with a grinder cutting disc along the bend line. After forming the desired profile using an impact tool (hammer), the cut must be welded and reinforced with overlays to achieve rigidity and strength.
- It is advisable to make mounting mounting holes in the area of the working blade and blade blade under countersunk bolt heads, ensuring a smooth working surface and durability of the connection.
- For a rigid connection of the blade with the attachment, the hinges must have a minimum gap in the connections of the fingers with the earrings.
- Changing the working angle of attack of the blade, without including sophisticated rotary mechanisms in the design, can be done simply by including a hinged insert in one of the lower horizontal bars of the hitch, ensuring an increase in its length. By compensating for the changed length of one hitch bar, one attachment point on the blade should also be able to change its position along the blade of the blade.
- In the absence of a standard front linkage, a rigid frame is made from two beams welded in parallel with jumpers, whose inner ends are attached to the middle part of the tractor half-frame through vertical overhead extensions, and the outer ends act as longitudinal bars of the linkage. To connect to the blade, the ends are equipped with holes with welded bushings or earrings. The vertical size of the fastening pads and their lower hinge points of connection with the lifting hinged frame must ensure lifting of the attached equipment without obstructing the robotic drive of the front axle and the hydraulic cylinder for turning the front wheels of the tractor. The linings are made from flat metal blanks with a thickness of at least 8 mm.
- When organizing hydraulic lifting of equipment, use any hydraulic cylinder with a working stroke of at least 250 mm. To install it at the front of the tractor, a bracket of any suitable shape and design with a hydraulic cylinder, the rod of which is pivotally connected to the lifting frame, is attached to the front part of the semi-frame. To ensure the operation of the cylinder, the terminals of the assembly are connected to two free terminals of one section of the distributor of the tractor hydraulic linkage system.
- Installation of all fasteners to the tractor half-frame does not require drilling additional holes, where the standard holes in the part are sufficient for installation.
How to make a blade for a mini tractor with your own hands?
Before you start making a blade, you need to acquire the following tools:
- Pliers;
- Drill and grinder;
- Welding;
- Keys and screwdrivers;
- Fastening elements: nuts, bolts, screws and rivets.
You will also need a 200 liter steel barrel and strips of steel and rubber.
A shovel for a mini tractor is made according to the following scheme:
- The barrel is cut into three parts to obtain parts for the shovel;
- The two parts are welded along the contour. The result is a product with a thickness of three millimeters;
- The lower part of the blade is reinforced with a knife;
- The knife is made from a steel strip five millimeters thick, length in accordance with the grip of the blade;
- Holes with a diameter of 5-6 millimeters and at a distance of 10-12 centimeters are drilled in the knife. A safety rubber strip will be attached to them;
- The width of the shovel directly depends on the power and size of the mini tractor. The finished dump should not extend beyond the boundaries of the unit by more than 40 centimeters on each side;
- Special longitudinal stops are used to strengthen the device. You need square steel pipes with a cross section of 40*40. The pipes are welded below the middle of the dump;
- A rubber casing is attached to the bottom of the blade to prevent friction of the device with the surface.
Drawings with the indicated dimensions will allow you to make a homemade blade for a mini tractor correctly and quickly.
Homemade equipment of any type must be mounted as securely as possible. Using a special mechanism, the canopy is raised to the required height.
Blade blade attachment design:
- The longitudinal elements are welded into an A-shaped structure;
- A bracket is fixed near the middle jumper;
- The most suitable hydraulic cylinder is the 2PTS-4 tractor trailed one.
Putting the whole structure together:
- The blade is attached at the bottom through a front bearing connection in two through bushings;
- The blade at the top is connected through a hydraulic unit;
- The control is brought into the cabin and fixed by a remote control or lever.
If you follow simple manufacturing schemes, a homemade blade will be almost identical in parameters and quality to its factory-made counterparts.
How does a blade work?
The blade is mounted on a subframe made of a steel profile, fixedly attached to the tractor frame.
To change the position of the structure and press the working edge to the ground, a 2-way hydraulic cylinder, controlled by a spool valve, is used.
Oil is supplied under pressure by a gear pump driven by an engine.
The tool has a rotating unit that allows you to place the knife at an angle to the longitudinal axis of symmetry of the machine (the position is changed manually or with a separate cylinder).
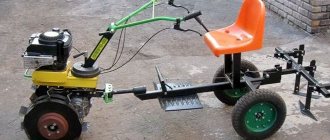
Making a shovel without a lifting mechanism
The design of attachments will be much simpler if the blade frame is fixed in one position, but the mini tractor blade can rotate left and right.
Fixing the hitch is done as follows:
- An iron disk with a diameter of 15 centimeters is welded to the shovel;
- Several holes are drilled on the disk for convenient use. Optimally - three holes;
- To fix the shovel, an L-shaped pin is inserted into the holes to hold the entire structure;
- An extended handle is attached to the bucket;
- The bolts on the structure are tightened and fixed;
- The finished structure is painted.
A ready-made homemade canopy can not only remove snow. In summer, a mini tractor with a blade can be used as a bulldozer to level the soil. The shovel can be replaced with a brush for cleaning the area. The operating principle of factory shovel blades is the same, but their design is not reinforced, and therefore cannot boast of reliability and durability.
The design of such a mounted device is easy to assemble and use. You can also make a clutch for a mini tractor with your own hands and other components if you have the necessary materials and study the drawings and video instructions in detail.
How to make a shovel without a lifting mechanism
But if you don’t want to waste your time and energy, you can do it much simpler. You can make a snow shovel for a homemade rotary snow blower without a lifting mechanism, that is, the blade frame will be fixed in one position, but the blade for a tractor can be rotated to the right or left.
For greater convenience, it is necessary to fix the bucket on the frame.
To do this, we make a fairly simple and convenient blocking in place. We weld half of an iron disk with a diameter of 15 cm to the blade blade and drill as many holes in it as necessary for ease of use. Standard - 3 holes. In order to fix the shovel in one, more convenient position, you will need to insert an L-shaped pin into the previously drilled holes, which will hold the entire structure.
You will also need to attach an extended handle to the bucket for easier movement from side to side. All that remains is to tighten all the bolts, sand and paint the surface. Some time after the paint layer has dried, you can try out the rotary snow blower in action. It can cope with its work not only in winter, removing snow from the territory, but also in summer, for example, as a bulldozer that levels the soil. You just need to attach the hitch to the back of the tractor so that the wheels don’t leave a mark.
Factory dump blades are made according to the same principle. There is only one significant drawback: their design is not reinforced in any way, it will not last very long, since it is unreliable and fragile.
Why buy dumps in stores and spend quite a lot of money on them if you can make a screw rotor with your own hands? The design of such attachments is very simple both in assembly and in use. It is best to first draw detailed diagrams and drawings of this machine and then start manufacturing.
Features and purpose
A blade for a mini-tractor is a necessary piece of equipment, the use of which is aimed at removing snow and cleaning the area during the cold season. And also with the help of a blade you can transport bulk materials without much effort. By connecting this equipment to the unit, the work can be completed within a few minutes. Procedures without dumps take several hours. A shovel for a mini-tractor can not only be purchased, but also made with your own hands, which helps save money, as well as convenient and comfortable work. You simply cannot do without a blade in the winter season, when it is impossible to leave the yard due to snow cover. In order not to waste time manually cleaning the road, you can use this attachment for the unit.
Attachment setup
Installing and adjusting the blade on a mini-tractor
Before use, the blade must be turned left or right at an angle of up to 30˚. Setting up the device ends with fixing it in the required position using cotter pins.
As a rule, the working width of the device is 1 meter and the thickness of the metal from which the grader is made is 2-3 mm. Factory dumps are made from durable high quality steel.
Advantages and disadvantages
A mini-tractor blade is a type of equipment that is characterized by the following advantages:
- high-quality manufacturing material, which contributes to a long period of operation;
- speed and ease of operation;
- ease of use;
- no need for your own efforts during the process.
The attachment has practically no disadvantages, except that it is expensive, but this disadvantage quickly pays for itself.
Pros and cons of using homemade mounted snow removal devices
Using homemade mounted snow removal equipment has not only numerous advantages , but also extremely serious disadvantages .
The main advantage of such snow blowers is a significant reduction in costs associated with:
- purchase;
- transportation.
After all, most of the details can be:
- remove from decommissioned equipment;
- Buy for pennies at a collection point for ferrous and non-ferrous scrap metal.
Another plus is that you can make non-standard equipment that is ideal for some specific tasks.
The main disadvantage of making attachments yourself is the problems with the insurance company and the traffic police that arise after driving on public roads.
Indeed, in most cases, employees of these structures perceive the installation of any attachments as making changes to the design of the car.
Therefore, after installing the unit, the machine must undergo technical inspection , during which the following will be carefully checked:
- compliance of new equipment design ;
- the condition the car itself .
Often the decisive factor that leads to a ban on the operation of a municipal vehicle with homemade attachments is the lack of various documents and certificates for the equipment.
Therefore, before installing homemade attachments, it is necessary to probe the soil at the traffic police department .
After all, the inspector can not only prohibit, but also suggest the right organization where all the documents will be drawn up correctly.
Types and their design features
A blade for a mini-tractor is a type of additional attachment that looks like a bucket. Despite the same purpose - to remove snow cover, the shovel comes in several varieties.
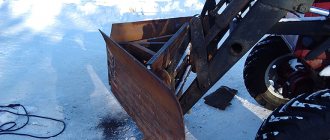
Front
This version of the hitch has a hydraulic cylinder in its design, thanks to which the unit is started. Such equipment fulfills the purpose of a bulldozer, as it has a front linkage. The mini-tractor is heavy, so when starting the shovel, some difficulties may arise during transportation. A mini-tractor with a front-type blade is characterized by maneuverability and high-quality hydraulics. Using this unit, you can clear snow, level paths, and level areas. The front blade is mounted in a special place provided by the design of the tractor.
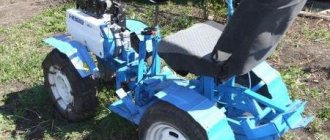
Rear-mounted
The grader type of equipment is defined as rear-mounted. The starting process takes place using the rear linkage. The unit is characterized by the presence of a rotating mechanism and hubs. Rear-mounted equipment can be connected to any brand of mini tractors. Fastening occurs thanks to a three-point fastening system.
Unlike the previous option, this type of hitch does not have a hydraulic cylinder. Snow areas are cleared by reversing the machine. The equipment is made from high-quality materials, so it can perform the most complex tasks. The rear-mounted blade for a mini-tractor is used in agriculture and utilities. With the help of such equipment you can take care of parking areas, areas near schools and others.
The main characteristics of dumps for mini-tractors of various models are as follows:
- weight, which ranges from 65 to 105 kg;
- width – from 1, 2 to 2 meters;
- power unit, which can be no less than 16 horsepower.
How to use?
People who have become owners of a mini-tractor and a blade should know how to use it correctly. The front and rear type blades are characterized by certain features, as well as operational features. After purchasing a blade, it should be installed on the machine, using specially designed fasteners. After this, it is necessary to set the angle of work. If you need to clean roads, it is worth installing an acute angle. When removing snow cover over a large area, it is necessary to establish a right angle. After all the above activities, you can start removing snow.
Important! A purchased blade, just like a homemade one, requires some knowledge and skills when using it. For the attachment to function properly, it is necessary to use it responsibly, otherwise user injury or damage to the device may occur.
It is worth paying attention to the following safety rules when using a mini-tractor with a blade:
- the use of attachments must be carried out in accordance with its intended purpose;
- During operation, it is necessary to monitor the functioning of the blade;
- If the blade is filled with snow while driving, it must be kept lowered.
How to do it yourself?
To make your own blade shovel, the first thing you need to do is prepare the following set of tools:
- pliers;
- drill, grinder;
- welding machine;
- keys, screwdrivers;
- fasteners in the form of nuts, bolts, screws, rivets.
Among other things, it is worth preparing a steel barrel, which has a volume of 200 liters, as well as strips made of rubber and steel. The manufacturing scheme for a shovel for the unit is as follows:
- the barrel must be cut into three parts - these will be the parts for future equipment;
- two parts must be welded in accordance with the contour, as a result the master will be able to obtain a product that has a thickness of 3 mm;
- to strengthen the lower part of the oval it is worth installing a knife;
- the knife is made thanks to a strip of steel, which has a thickness of 5 mm, the length should be equal to the grip of the blade;
- It is worth drilling holes in the knife that will have a diameter of 5 millimeters, while the distance between the holes should be 10 cm; their main purpose is to place a rubber strip with a safety function;
- the width of the structure is affected by the power, as well as the size of the mini-tractor; the assembled dump should not be more than 0.4 meters on each side;
- to strengthen the structure, it is necessary to use specially designed longitudinal stops; the ideal option would be steel tubes, which are characterized by a cross-section of 40 by 40; these elements must be welded below the border on which the dump is located;
- the rubber casing must be secured to the bottom of the blade, preventing friction between the device and the surface.
Blade for a mini tractor: do it yourself
In rural areas, the presence of a mini tractor will not surprise anyone.
Such necessary equipment allows you to cope with a number of tasks on the site, and together with attachments, its functionality increases significantly. If a cultivator on a mini tractor is a very popular canopy, then the blade is less popular. But it still remains a very popular equipment. A blade for a mini tractor becomes necessary when in winter it is impossible to leave the yard due to a pile of snow. In this case, connect the shaft to the mini tractor and in 5 minutes you will have a yard and road well cleared of snow. Doing such work manually with a shovel is much more difficult, so owners of mini tractors either buy a blade or make it themselves. And now we’ll tell you how to do it.
What types of dumps are there?
A blade is an additional attachment to a mini tractor in the form of a bucket, designed for cleaning the yard, roadway, sidewalks from snow and ice. A mini tractor with a shovel is often used by public utilities and in construction, in the latter for the purpose of uniform distribution of crushed stone or sand.
There are 2 types of such equipment:
- rear blade (started into operation using the unit's hitch);
- front blade (equipped with a hydraulic cylinder, which directly starts the equipment).
Dumps differ from each other in the following qualities:
- all dumps weigh from 65 to 105 kg;
- the width can be in the range of 120 – 200 cm;
- the tractor must have a minimum power of 16 hp.
A special feature of the front shaft is that the front canopy makes it possible to use the mini tractor as a bulldozer. Thus, they can easily throw snow from the yard or level paths on the site. It is worth noting that a minitractor with a front blade increases its weight significantly, which creates difficulties when lifting the shovel into the transport position.
Features of working with this canopy:
- We install the blade on the mini tractor.
- We choose the angle at which the work will be done (this will determine where the snow will move).
- If you intend to clear the road, then choose an acute angle. If you are going to work on large areas, then use a right angle.
Description of the blade for the walk-behind tractor
A blade (blade blade, shovel attachment) is a mounted tool in the form of a shovel or bucket, which is mounted on a walk-behind tractor for the purpose of removing snow and debris from a flat surface, and can also be used to level land for planting vegetables or a lawn.
It is a universal equipment, it can be used with any model of walk-behind tractor, without being tied to the power characteristics of the engine. The factory-made blade attachment has the following dimensions: width – 100 cm, height – 40 cm, however, for handicraft production, any dimensions can be selected.
When manufacturing a blade, you need to select such dimensions so that the load on it corresponds to the power of the walk-behind tractor. The use of a tool whose design is designed with too much performance can lead to overload of the unit and its failure.
How to make a shovel with your own hands?
For those who know how to handle tools and understand drawings, it will not be a problem to create a shovel for a mini tractor yourself. And we will tell you how to do this now.
Tools required for work:
- pliers;
- drill and grinder;
- old steel barrel 200 l;
- welding machine;
- keys and screwdrivers;
- strips of steel and rubber;
- fasteners (nuts, bolts, screws and rivets).
Making a shovel:
- Cut the barrel into 3 parts so that you have 3 curved segments for the shovel.
- We weld 2 of them along the contour and as a result you get a product 3 mm thick.
- We reinforce the lower part of the blade with a knife.
- For a knife, take a steel strip 5 mm thick. The length must match the blade grip.
- We drill holes in the knife (diameter: 5 - 6 mm) in increments of 10 - 12 cm. This is necessary for attaching the safety rubber strip.
- The width of the shovel must correspond to the power and dimensions of the mini tractor. But it is important that the blade does not extend beyond it by more than 40 cm on each side.
- It is for the reason stated in paragraph 6 that we strengthen the device with additional longitudinal supports, namely square steel pipes with a cross-section of 40x40. We weld the pipes below the middle of the dump.
- We attach a rubber casing along the entire longitudinal lower part of the blade to prevent the equipment from coming into contact with the asphalt.
Design features of the fastening and lifting mechanism
One of the successful components of such homemade equipment is a good and strong connection. It is with its help that the blade rises to the desired height. To create such a device, you need to weld an A-shaped structure from the longitudinal elements. And in the area of the middle jumper you will need to attach a bracket. As for hydraulics, it is best to purchase a hydraulic cylinder from a 2PTS-4 tractor trailer.
Putting the whole structure together:
- We attach the blade at the bottom through a bearing connection in 2 through bushings.
- We connect the blade at the top through the hydraulic center.
- We bring the device control into the driver’s cabin and fix it in the form of a remote control or lever.
That's basically all you need to know about making a shovel for a mini tractor. If time and materials allow, then take into account the drawings and get to work. Believe me, such a homemade blade will not be inferior to the factory version either in quality or in convenience.
Summing up
To manufacture a blade for a tractor, welding and metal-cutting equipment is required; the tractor owner must have the skills of a designer and welder. A homemade design expands the capabilities of the equipment, but if there are errors in the calculations, the blade can damage the machine. It should be taken into account that when assembling scrapers of complex geometric configuration, the costs of materials and components increase. How can you save additional money and what designs of homemade dumps are used by owners for cleaning or clearing the territory?