The idea of a very light outboard motor for small boats, including the simplest rubber ones, is of interest to many hunters and fishermen today. It is important to note that the cost of such a motor is quite high and maintenance, as well as parts. In this case, many people very often began to use motor trimmers, which are now very popular and widespread.
Required materials and tools
To convert a trimmer into a boat motor, you need to prepare the following materials:
- a lawn mower with a power of at least 2.2 kW (3 hp);
- a sheet of stainless steel or duralumin with a thickness of 2 mm and dimensions of at least 10x3 cm;
- a steel rod with a length equal to the length of the straight part of the trimmer rod;
- tap for thread cutting. The diameter must correspond to the diameter of the metal rod;
- bicycle hand brake handle
- a clamp for fixing the trimmer on the stern of the boat.
It is convenient to use the bodies of old manual meat grinders as fasteners. After sawing off the top of the meat grinder, a reliable clamp remains, to which you can easily weld or secure the engine with screw connections.
The tools you will need are:
Hacksaw for metal
Drill/driver
Set of wrenches
Tap for cutting threads on steel rod
A welding machine will also come in handy. Most connections of metal assemblies do not involve further disassembly, so it is faster and more reliable to secure the metal by welding than to drill and adjust holes for screw connections.
Principle of operation
The trimmer has a higher rotation speed of the blades, which makes it possible to move through the water at a higher speed, which will allow you to start fishing faster than with a motor. Everyone has seen how a trimmer works - how it cuts a lawn and ordinary grass, but here, its blades are turned in the other direction and at the same time, it performs the function of the most economical motor.
And the most important thing is that absolutely everyone can control it - the most important thing is to understand that the higher the blades themselves are to the surface of the water, the faster the rotation speed and thus the higher the speed.
But if the trimmer is lower, the speed will be lower. But the main disadvantage of trimmers compared to ordinary boat motors is that they are very loud and should not be used fully if you do not want to scare away the fish.
Step-by-step instruction
All work is divided into several stages:
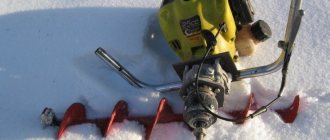
- Preparing the propeller shaft.
To do this, the rod is disconnected from the trimmer body, the bushings that play the role of sliding bearings are unscrewed from it, and the flexible shaft is removed. Then the curved lower part is cut off from the rod. This method will no longer allow you to return the gas trimmer to its original state. Therefore, if you plan to use the trimmer for its intended purpose in the future, then you should not cut the rod. It can be replaced with a piece of stainless steel pipe of suitable length. It is desirable that its diameter matches the diameter of the rod. This will allow you to use complete bushings and attach the shaft to the engine housing. - A steel rod is inserted into the rod, and bushings are installed at its ends.
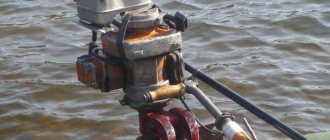
- The resulting structure is attached to the motor shaft. The most reliable connection is welding. If it is necessary to maintain the ability to disassemble this unit, threaded couplings and adapters are used.
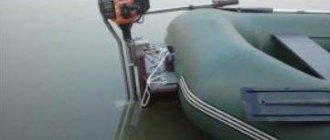
- Using clamps, the engine is mounted on the transom of the boat. Alternatively, you can use durable steel clamps attached to the boat's stiffening elements with self-tapping screws.
Expert opinionTorsunov Pavel Maksimovich
When fixing the engine, it is advisable to use gaskets from an old tire between it and the fastening elements. This will reduce noise and dampen some vibrations.
- Using a standard mount or adapters, the rod is connected to the engine.
- A screw is being made.
To do this, the contour of the propeller is cut out of a sheet of metal, and the resulting blades are bent as necessary. A hole is drilled in the center of the screw for a steel rod. Then the propeller is fixed to the propeller shaft with nuts or welding. It is difficult to determine the optimal shape of a propeller by eye. It is better to download one of the options you like from the network in advance and bend the blades according to its requirements. Two-blade propellers are easier to manufacture and center than three-blade propellers. Therefore, for the first experiments, it is wiser to focus on the option with two blades. With a propeller diameter of about 100 mm and an engine power of 3 hp. such a design can propel a boat with a total mass of 120-150 kg. - A bicycle brake handle is screwed close to the engine. It will act as the engine throttle handle.
- The throttle cable is connected to the bicycle brake handle.
The final stage is to check the performance of the resulting boat propulsion system.
How should an outboard motor be mounted?
When installing the engine on a boat, consider how it should be positioned:
- The anti-cavitation plate should be placed 0-5 cm below the boat bottom.
- The level of installation of the engine depends on the purpose of the boat and its hull, so strictly follow the recommendations given by boat manufacturers; for this, read the technical documentation.
- The depth of the anti-cavitation part is from 10 cm in relation to the water surface. Otherwise, there will be little water that flows through the pump into the cooling system, which leads to overheating of the PLM.
- If the boat is under maximum load, lower the engine completely and stop running. When finished, find out where the idle air outlet is located. An acceptable value is from 15 cm relative to the water level.
If the engine is secured correctly, the bow of the boat will not rise up or sink deeply.
Consequences of improper fastening
Thanks to the correct installation of the PLM, your vessel will show what it is capable of, and the motor itself will work well for a long time. If you treat the process of fastening and adjusting the engine irresponsibly, you will have to face the following consequences:
- It will be difficult (and sometimes even impossible) to control the boat.
- The ship will begin to throw in different directions during turns, acceleration, etc.
- The boat may capsize and assume a keel-up position.
- Water will be scooped up, which may lead to flooding.
- An incorrectly installed motor may catch fire.
No one wants to face even one of these problems, so PLM fasteners must be taken seriously.
Questions and answers
Why can't you keep the standard flexible shaft in the rod?
It is necessary to replace the flexible shaft with a steel pin due to the high load on such a torque transmission system. Under load, the flexible shaft will not be able to rotate evenly due to twisting, and the boat will move jerkily. In addition, in this mode, the standard trimmer shaft will not work for very long.
Why is a factory screw from a store better than a homemade one?
The purchased screw has a precise shape, allowing for maximum efficiency of the entire structure. In addition, boat propellers are often sold complete with the necessary fasteners (bushings). This simplifies the conversion of the trimmer into a boat engine, but requires certain financial investments.
Is it possible to use a screw larger than 100 mm in diameter?
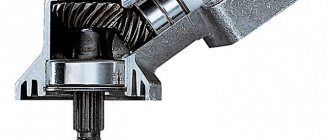
Yes, this is possible, and it will even be possible to achieve greater speed. However, in this case, the design will have to be retrofitted with a gearbox, since the power of the trimmer engine is not enough to rotate a large propeller. You can use a gearbox from a trimmer head. To secure it you will need a couple more clamps. To extend the life of the gearbox, it is necessary to ensure the constant presence of lubricant in its housing.
Steplton › Blog › Outboard motor from a lawn mower, does it make sense?
A couple of years ago, I wanted to get a boat with a motor, for fishing, and for a ride.
The choice fell on a light boat of 2.7 meters with a high-pressure bottom and a Chinese Troll with 2.5 horses. Considering the weight of the boat is 16 kg and the motor is -11, the kit turned out to be super, and it takes up little space in the car and there is no need to strain yourself when carrying this stuff to the water. But looking at the boats flying past, I wanted to increase the speed of the craft. The obvious solution is a more powerful engine. Considering that the boat is designed for a maximum of 4 forces, then an engine is also needed for this power, well, a couple of forces more will also pull normally. The prices for boat motors are disappointing, from 30 tr for a Chinese one, or from 50 for a Japanese one, with a weight of 20 kg or more, two-stroke engines. It’s scary to buy a used motor, who the hell knows how they tormented it, and the prices for them are almost the same as for new ones. The weight is quite acceptable, but the price is not. I came across a homemade forum and the desire to build a motor hit my head. I bought a 6-horsepower, 4-stroke engine from a lawn mower for 7 tr and a killed, 5-horsepower Strela engine for 1 tr. Having removed the leg with the gearbox from the engine, I was unpleasantly surprised by its weight. I'll have to do the leg myself and away I go. The end of autumn and winter passed in leisurely labor, and by the beginning of spring the hybrid lawn mower with a boom was hanging on the stand. The leg was made from scrap materials that were found in bulk near my garage. But I had to spend money on a turner to fold the homemade leg and sharpen a couple of special nuts, and buy a throttle control cable from a jig. A propeller from Veterok was purchased and sharpened, since people on the forums highly praised them for hybrids. The total costs increased to 10tr. The output was a 4-stroke outboard motor, with a propeller power of about 5 hp and a weight of about 18 kg. The first tests on the water caused delight; in one go the boat easily reached planing mode, the speed being about 27 km/h and 17 km/h with propellers from Veterok and Strela according to GPS, respectively. To complete the tests and catch bugs, I took the engine with me on a week-long trip to Karelia. I didn’t regret it, although a couple of problems arose. I made too weak clamps for attaching the engine to the transom of the boat and the cable from the jig could not stand it and fell apart. Well, there is something to do in your spare time. What I liked about the homemade engine. - final price of the product - starts, as a rule, from the first pull - weight - no need to mix oil with gasoline, drained from a common canister and off you go - efficiency - maintainability of the engine itself and the cost of replacing it, if anything. What I didn't like. - catchy and unaesthetic - transportation in a certain position. — it’s not very convenient to carry it to the boat, I’ll have to think about it. — danger of overheating at maximum load. — a little noisy — doesn’t lift a boat with two riders onto the glider, just a little bit missing. literally a foal. — shortage of gearbox parts, because Strela has not been produced for 40 years. The engine fully met my expectations, but the boat is too small for two.
Is it worth buying an attachment to convert a trimmer into a boat motor?
It is impossible to give a definite answer to this question, since some are very accustomed to boat motors, while others have never used them. At the same time, if you want a really powerful boat, then naturally the most profitable and effective solution would be to install a standard trimmer. But it is worth considering that this option is universal. As mentioned above, the most important thing is to combine them correctly.
Many experts recommend blades similar to the blades on your old motor. It is very important that it must be installed in strict accordance with the instructions.
In addition, you should pay attention to the fact that you definitely need to take extra fuel with you, and like a regular lawn mower you should be given the opportunity to “rest” because due to very long use, the trimmer motor may simply fail outright on the water.
The larger the blades, the more effective the trimmer itself will be.
The modification of a brush cutter is as follows:
Initially, the main bent shaft is being reworked: first, a standard nut is removed from a reel with a special fishing line. It is a small tube, 20 mm long.
At the same time, the nut must be preserved, since the threads on brush cutters are unusual and it is almost impossible to find the same one.
Then the plastic cover with the keys is removed. After this, at the very end of the bent pipe itself there is a standard bronze bushing (often called a sleeve bearing) - it must be carefully cut out, after which you need to remove the stern tube, unscrew the nut and the metal shaft.
The most important thing is to choose the right blades. Here everything directly depends on the dimensions of your boat.
Here it is very important to pay attention to the fact that the best solution would be to enter “motors for a boat” in the search and on the first site you come across, go to the site where motors are sold and to a consultant who will offer you his help - you tell the dimensions of your own car, and then, when you receive a suitable motor, you need to look at the technical specifications and find out the dimensions of the blades.
What is an attachment for converting a trimmer into a boat motor?
The idea of a very light outboard motor for small boats, including the simplest rubber ones, is of interest to many hunters and fishermen today. It is important to note that the cost of such a motor is quite high and maintenance, as well as parts. In this case, many people very often began to use motor trimmers, which are now very popular and widespread.