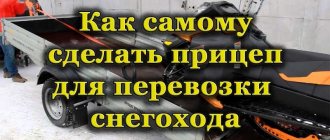
A DIY caterpillar can be made by any craftsman. If you have been thinking about how to make a caterpillar for a long time, then you should read the recommendations presented. To carry out the work, you can use a variety of tools and materials. It is, of course, permissible, if necessary, to use a caterpillar that was produced in a factory. But it will cost much more than if you do the manufacturing yourself. The article will present several options for making tracks, one of which you can choose for yourself.
A simple option for making a caterpillar
A do-it-yourself caterpillar can be made using the simplest technology. This will take you a minimum amount of time. The caterpillar mover can be made on the basis of a bushing-roller chain, as well as a conveyor belt. To carry out the work you need to prepare a certain set of special tools or equipment. In order to extend the life of the tape, it is recommended to sew its edges with a fishing line, strengthening it at a distance of 1 cm. It is necessary to use the principle that seamstresses use to overcast the edges of fabric, which will protect the tape from damage.
Design Features
A modern tracked module for a car is a simple design that is installed instead of wheels. There is nothing fundamentally new in this design - in fact, it is an improved and lightweight Kegress propulsion unit. Typically the module is triangular in shape and consists of a frame, rollers, a drive sprocket and a track similar to a snowmobile.
Tracked module
Thanks to its triangular shape, the device fits easily into the wheel arch, eliminating the need for any modifications to the car. To prevent the module from turning due to excess torque, it is often secured using cables or chains.
The device can have a different shape, and is also designed in such a way that there is no need to even remove the wheels. The car simply drives onto the modules, they are attached and you are good to go. Of course, such tracks on car wheels are not a cheap pleasure. The kit will cost no less than 150-200 thousand rubles. The price of devices from foreign manufacturers can reach up to 700-800 thousand rubles per set, which is higher than the cost of a new UAZ. Of course, many people try to make a tracked module with their own hands, and often they even succeed.
Recommendations for carrying out work
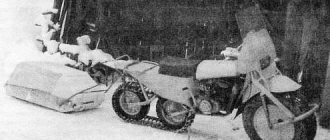
A caterpillar can be made with your own hands by connecting elements into a single ring; this can be done in several ways. So, it is permissible to use a hinge like a piano hinge; you can also use a less reliable method, which involves sewing on the ends of the tape. It is important to note that the thickness of the tape must be selected, which corresponds to the power of the motor. If you intend to use an engine from a domestically produced motorcycle, then you can use a tape whose thickness is 10 mm, similar to that used on agricultural conveyors.
If you make your own caterpillar using this technology, you won’t have to spend a lot of effort. Despite the fact that this model of caterpillar is quite simple to make, it has a long service life and a long service life.
What is the Metelitsa platform?
This invention can be called a tank without a turret, in the place of which a vehicle is installed. This is a type of autonomous module, thanks to which any passenger car can be turned into a powerful all-terrain SUV. Thanks to the comfortable steering on the platform, you can transport passengers, the level of convenience is the same as in a car on original wheels. It is easy to transport - it can be transported to the place of operation on a regular trailer, since its weight and dimensions allow this.
It is worth mentioning another important point - the platform does not harm the environment. It does not damage the vegetation cover of the soil, which is why it does not put much pressure on the soil surface (0.08 kg/cm3). Therefore it is often used:
- for hunting or fishing trips to difficult places;
- in geological and archaeological expeditions;
- for monitoring and repair of power lines and oil and gas pipelines.
The platform allows you to install various equipment on it
Making caterpillars from car tires
You can make your own caterpillar using car tires. To carry out the work, you need to select tires borrowed from trucks; it is recommended to use a suitable tread pattern, and you will spend less effort when working with the tire. The manufacture of such a caterpillar must be done by cutting out the sides from the tire, while leaving space for a treadmill. It is worth considering that this work is quite labor-intensive and requires the application of a lot of patience and effort; you must use only a well-sharpened shoe knife.
In order to spend less effort when making a caterpillar for a car with your own hands, you can wet the blade from time to time using a soap solution. As an alternative solution, you can use a device designed for cutting; it is also possible to use an electric jigsaw. On the latter you first need to attach a file with small teeth, the file must also be pre-moistened with water, during the work such manipulations must be done periodically.
Conclusion
Tracks instead of wheels are perfect for moving through deep snow and in severe off-road conditions. Ultra-low pressure tires can cope with the same task, but their installation will require major changes to the vehicle design. The tracked module can be installed in less than half an hour on any production vehicle, by the way, not necessarily all-wheel drive, and after overcoming a difficult section, switch back to wheels. This is its main advantage compared to ultra-low pressure tires.
Caterpillar on a car
Dear visitors to the “ Samadekin Friend ” website, today we will figure out how to make tracks for a tracked all-terrain vehicle yourself and what is needed for this? Let's go... The tracked all-terrain vehicle is the most passable among its fellows, and all because the specific pressure on the ground is evenly distributed over the entire lower plane of the caterpillar, that is, it is a uniform support point. But on wheeled all-terrain vehicles, the pressure is distributed over 4 points, so they often get stuck and slip. A simple example for you, why are tracked tanks? Yes, all for the same reason, to evenly distribute the huge weight of the machine onto the plane of the caterpillar in contact with the ground, otherwise they will simply get stuck in the ground and not budge.
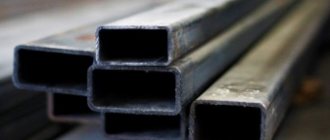
Tracks for homemade all-terrain vehicles are made mainly from conveyor belts and corrugated pipes of rectangular cross-section, and the tracks are pre-pressed on a homemade machine where they are given the required shape. The tracks are attached to the tape with bolts and nuts. And so, let's take a closer look at the process of creating an all-terrain vehicle track.
Materials
- conveyer belt
- rectangular corrugated pipe
- bolts, nuts, washers, screws
- fittings
Tools
- welding machine
- Bulgarian
- drill
- homemade hole punch
- set of wrenches
- hammer
- track crimping machine
Step-by-step process for creating an all-terrain vehicle track with your own hands.
The first step is to get a conveyor belt, it looks like this.
You will also need a corrugated pipe of rectangular cross-section.
And of course fasteners in the form of: bolts, nuts, washers, engravers.
First, we make blanks for the tracks according to the width of the track being made, cut them with a grinder and put them in a pile)
After that, these blanks need to be given the desired shape and pressed on a special homemade machine. For clarity, let's see how a professional does it; 40 seconds to crimp one track is no joke guys)
Work technology
Do-it-yourself tracks for a car must be made using a technology that involves the initial removal of the tire beads, then, if necessary, you need to remove the excess layers that are located on the wrong side of the formed ring; this is necessary if the track has increased hardness. If the tread pattern is not suitable, then you need to cut a new structure, which will be necessary so that the structure can cling to the soil.
A snowmobile track made with your own hands according to the scheme described above will have many advantages, even if compared with the option described above. This is due to the fact that it has a closed loop, which indicates reliability. But there are also disadvantages, one of which is expressed in the limited width of the track, but if there is a need, then a double width can be used.
Main manufacturers and prices
The first tracked mechanisms were developed in the USA, after which they were distributed throughout the world. Now several dozen manufacturers, including domestic ones, are engaged in the production of such structures. Of the imported brands, Mattracks is considered one of the most popular. Their prices correspond to the big name - one set corresponds to the cost of a Russian car.
Several companies are now engaged in the production of tracks for passenger cars, but such a purchase, again, will not be cheap. Pricing depends on the following factors:
- diameter of bearings and axles;
- metal thickness and quality;
- design features.
When choosing imported tracked mechanisms, focus on a price of 230 - 700 thousand rubles. By deciding to buy tracks for the Niva from a domestic manufacturer, you can cut costs in half.
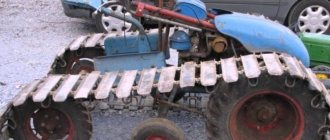
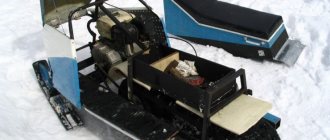
Making a caterpillar from belts
The next version of the caterpillar is especially attractive because you don’t have to waste extra effort during the work. Before you begin, you need to prepare belts that have a wedge-shaped profile. They have to be connected into one whole using soil hooks that are fixed with screws; rivets can be used as an alternative solution. The result is a snowmobile track, created with your own hands, which has holes intended for the drive sprocket. In order to create the holes, you will need to leave some space between the straps.
Build process
The order is something like this:
- Assembling the frame, attaching road wheels and drive wheels to it;
- Installation of the power unit, gearbox;
- Installation of onboard brakes and differential, connection of components to the gearbox;
- Assembling controls, arranging the driver's seat;
- Installation of tracks, additional parts;
- Checking the performance of the mini tractor and modifying individual components (if necessary).
Principle of operation
Homemade mini tractors with caterpillar tracks are not much different from their large-sized counterparts. All key operating moments are organized in the same way as in a conventional tractor. The only difference is that the minitractor has a simplified turning system:
- The engine sends torque to the gearbox, where it is adjusted;
- Next, the rotation is directed to the differential, where the torque is distributed among the axle shafts;
- The wheels begin to move, followed by the tracks, and the entire minitractor begins to move;
- During a turn, one of the axle shafts is braked, and torque is sent to the second. The second caterpillar moves around the stopped first one - this is how the turn is performed.
In other words, the tracks do not have a single drive, and they cannot turn in the same direction at the same time.
IFA car: general information, characteristics, prices, reviews.
Technical characteristics of the KamAZ 43114 truck.
Assembly Tips
- Having decided to make a mini tracked tractor with your own hands, make all the calculations on paper and create a detailed drawing. Without accurate technical data, it is impossible to create a working machine.
- Before starting work, you should check the availability of such necessary devices as a welding machine, drill and grinder. They may be needed at any stage of the assembly. You should also not forget about protective equipment.
- Despite its visual massiveness and angularity, the mini tractor requires a careful approach. Hammer and chisel is not that story. Therefore, be patient, often carefully tightening a bolt with a wrench is much more effective than tightening it “with meat”.
A homemade mini tractor is an effective solution for any agricultural work. And here's an example:
Another option for making a caterpillar
Before you make a caterpillar with your own hands, you need to choose a technology for carrying out the work. It is also possible to use the method presented below. The propulsion frame can be welded using pipes that have a rectangular cross-section. It is recommended to connect them using a frame, this will make the structure collapsible. The splined part can be borrowed from the Buran, this will make it possible to make drive shafts; the splined part of the shafts, which are borrowed from the Oka, must be welded to them. It will also be necessary to use brake discs. When working on the front shafts, you need to install brake mechanisms on them. Some part of the gearbox housing needs to be cut off. Making a caterpillar with your own hands will allow you not only to save money, but also to move through snowy areas without any problems. This design can be used for a long time without the need for repairs.
Which is better - a wheeled or tracked all-terrain vehicle?
How to make a snorkel for the field with your own hands
Domestic companies offer several types of snow and swamp-going vehicles. Some samples are equipped with wheels, others with tracks. Sometimes there are also combined models of wheeled-tracked all-terrain vehicles, but most often they are assembled to order. To determine which vehicle is most effective in off-road conditions, you need to become familiar with the strengths and weaknesses of each vehicle.
The advantages of wheeled vehicles include the following:
- the ability to move on dirt or asphalt surfaces;
- the weight of the vehicle on wheels is less than on tracks;
- consume less fuel;
- the chassis of such machines is lighter than that of similar tracked models, so they are easier to repair and maintain, especially in field conditions;
- despite the no less weight of the device, the all-terrain vehicle can carry the same number of passengers and cargo as its opponent;
- wheels do not cause much harm to vegetation;
- move easily through water.
The strengths of a tracked all-terrain vehicle are the following:
- maximum cross-country ability - it will go where no other vehicle can cope (virgin lands, swampy areas, melted loose snow, etc.);
- the chain links fold in two planes, which ensures smooth movement; the all-terrain vehicle crawls along the surface like a snake;
- the vehicle is capable of overcoming heights that are equivalent to the dimensions of the equipment itself;
- a number of vehicles are equipped with tracks that do not harm the asphalt surface and do not require additional permission to travel on the highway;
- other models are equipped with special rubber “shoes” that allow you to move on well-maintained roads.
It is quite difficult to say unequivocally what is better - tracks or wheels. The choice depends on the operating conditions.
If we are talking about simple dirt roads in the countryside, then wheeled vehicles will be more than enough.
Device Features
The main task of swamp vehicles on tracks is to move through impassable terrain, where no other vehicle can pass. They are able to overcome high obstacles with a slope of 30°, snow drifts, permafrost, rough tundra terrain, swamps and drive along the bottom of reservoirs. The transport has a special design that makes it powerful, reliable, safe, easy to operate and quite maneuverable.
Most models have a completely sealed body, which allows the vehicle to be used in the most adverse conditions. Manufacturers can also equip the equipment with additional equipment, which will turn the truck into a special-purpose mechanism - a fire or rescue vehicle, a drilling rig, etc. The tracks provide precise and strong traction with the ground surface, allowing the all-terrain vehicle to go where any wheeled vehicle would get stuck.
Development of Chelyabinsk engineers
Engineers from Chelyabinsk offer an alternative design, thanks to which the vehicle will be able to conquer not only off-road conditions, but also water. Movement on water is ensured by quick-detachable pontoons fixed to the chassis.
When not needed, they can be stored on a wheeled ski trailer or trunk. Installation of tracks in this case is somewhat more labor-intensive when compared with classic track mechanisms, the installation of which does not take more than an hour. You will have to follow the step-by-step instructions:
- At the first stage, the car should be placed on the tracked module, get rid of the wheels and lower the suspension onto the catchers.
- Next, the car is attached to the frame, and the module bridge is connected to the cardan.
- At the final stage, the control unit is installed and the hydraulic system is pumped.
It takes at least 2 hours for such an all-terrain mechanism to be installed, after which control is available via the steering wheel. After the next off-road raid, the car is put back on the platform, and the tracked modules replace the usual wheels. The asking price is 100 thousand rubles. and higher.