How to pump up PGU Ural 4320
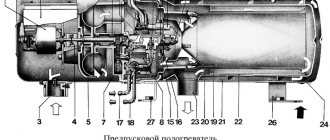
The pneumohydraulic booster of the Ural-4320 car is an integral part of the clutch system of this car, reducing the force applied to the pedal. The CCGT consists of three units:
- pneumatic cylinder;
- tracking system;
- indicator of lining wear on the driven disk.
During operation, the pressure of the liquid that is inside the main cylinder is transferred to the CCGT. As a result, the amplifier pistons and tracking devices are activated. At the moment of release, the pressure on the tracking system piston decreases, as a result of which this mechanism, together with the PSU piston, returns to the initial position.
Possible malfunctions of CCGT units and methods for eliminating them
The pneumohydraulic booster (PGU) is an integral element of the clutch assembly. It reduces pedal effort. Modern pneumohydraulic amplifiers have three components:
- executive pneumatic cylinder;
- tracking system;
- indicator of wear level of driven disc linings.
When activated, the pressure of the liquid located in the main cylinder is transmitted to the CCGT. It forces the hydraulic pistons of the PSU and the tracking device to operate. When released, the pressure on the hydraulic piston of the servo system drops, which moves the specified mechanism and the PSU piston to the initial position.
Signs of improper operation of the components of the pneumatic-hydraulic booster are the characteristics of the clutch, which can:
- "to lead";
- "wedge";
- trigger late when starting to move or when changing gear;
- squeeze with excessive force.
Based on the indicated symptoms of clutch behavior, troubleshooting of the CCGT unit is carried out.
If the clutch "leads", then the problem lies in its drive. Most often, there is no travel of the release fork shaft lever. To solve the problem, you should check the presence of working fluid and make sure that there is no air in the hydraulic system. After this, you need to adjust the free play of the lever. Another reason could be warping of the driven disks. Such discs must be replaced, but you can try to straighten them.
Jamming of the drive is a consequence of swelling of the sealing cuffs of the hydraulic system. The problem can be eliminated by completely flushing the hydraulic system and then replacing the fluid.
Clutch lag may be due to high viscosity of the working fluid or jamming of the piston of the PSU servo system. In the first case, the liquid is changed to a high-quality one. In the second, the piston cuff is changed.
If it is very difficult to depress the clutch and there is no gain at all, then the reason clearly lies in the pneumatic hydraulic booster. A possible malfunction is the cessation of the supply of compressed air due to swelling of the inlet valve of the CCGT unit. The follower system piston may also jam due to swelling of the sealing collar or rubber ring. The third reason is severe wear of the PSU piston cuff. The solution to the problems is to check the condition and replace the intake valve, the sealing collar or ring of the follower piston, the PSU piston collar, respectively.
Read also: KamAZ CCGT structure: principle of operation and repair
www.bigsto.ru
How to pump up a PGU in the Urals-4320
When the brake fluid is replaced or the hydraulic part of the drive is repaired, the system is pumped in the following sequence:
- brake fluid is poured into the compensation tank;
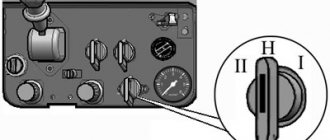
- the cap protecting the valve is removed, a bleeding hose is put on this valve, then the valve is turned back 50-75% of a turn, and the hose on one side is immersed in a transparent container that already contains brake fluid;
- the nut is loosened, at the moment the first drops of brake fluid appear, it is tightened;
- the clutch is depressed, the valve should be open, then the pedal is gradually released after the valve closes until air bubbles stop coming out of the hose. When air bubbles with liquid stop coming out, the bleeder valve tightens.
To avoid air being sucked into the main cylinder during pumping, it is necessary to ensure that the liquid content inside the compensation tank is more than 50% of the volume of this tank; the tip of the hose must be in the liquid at all times.
A sign that the PSU is fully pumped is a sudden increase in the force applied to the pedal while moving it by 3.5-4 cm from the moment the free wheel is selected.
device, how to bleed the clutch, principle of operation, adjustment, bleeding
The PGU unit on the MAZ is designed to reduce the force required to disengage the clutch. The machines contain units of our own design, as well as imported Wabco products. The operating principle of the devices is the same.
Design and principle of operation
Pneumohydraulic amplifiers (PGU) are produced in several modifications, differing in the location of the lines and the design of the working rod and protective cover.
The CCGT device includes the following parts:
- a hydraulic cylinder installed under the clutch pedal, together with a piston and a return spring;
- the pneumatic part, which includes a piston common to pneumatics and hydraulics, a rod and a return spring;
- a control mechanism equipped with a diaphragm with a release valve and a return spring;
- valve mechanism (for intake and exhaust) with a common rod and an elastic element to return the parts to the neutral position;
- lining wear indicator rod.
To eliminate gaps, the design has preload springs. There is no play in the connections to the clutch control fork, which allows you to monitor the degree of wear of the friction linings. As the thickness of the material decreases, the piston is recessed into the depth of the amplifier body. The piston acts on a special indicator that informs the driver about the remaining clutch life. Replacement of the driven disk or linings is required when the indicator rod reaches a length of 23 mm.
The clutch booster is equipped with a fitting for connection to the standard pneumatic system of the truck. Normal operation of the unit is possible at a pressure in the air lines of at least 8 kgf/cm². To attach the PGU to the truck frame, there are 4 holes for M8 studs.
Operating principle of the device:
- When you press the clutch pedal, force is transferred to the piston of the hydraulic cylinder. At the same time, a load is applied to the piston group of the follower rod.
- The follower automatically begins to change the position of the piston in the pneumatic power section. The piston acts on the control valve of the follower device, opening the air supply into the cavity of the pneumatic cylinder.
- Gas pressure provides force on the clutch control fork through a separate rod. The tracking circuit automatically adjusts the pressure depending on the force of pressing the clutch pedal with your foot.
- After releasing the pedal, the fluid pressure is released, and then the air supply valve closes. The piston of the pneumatic section returns to its original position.
Malfunctions
Malfunctions of CCGT units on MAZ trucks include the following:
- Drive jamming due to swelling of sealing collars.
- Late response of the actuator due to thick fluid or sticking of the actuator follower piston.
- Increased pedal effort. The cause of the malfunction may be a failure of the compressed air inlet valve. If the sealing elements swell greatly, the follower mechanism jams, which causes a decrease in the efficiency of the device.
- The clutch does not disengage completely. The defect occurs due to incorrect adjustment of the free play.
- A drop in the liquid level in the tank due to cracks or hardening of the sealing lip.
How to replace
Replacing a MAZ PSU involves installing new hoses and lines. All units must have an internal diameter of at least 8 mm.
The replacement procedure consists of the following steps:
- Disconnect the lines from the old assembly and unscrew the mounting points.
- Remove the unit from the vehicle.
- Install a new unit in its original place and replace damaged lines.
- Tighten the mounting points to the required torque. It is recommended to replace worn or rusty hardware products with new ones.
- After installing the CCGT unit, it is necessary to check the misalignment of the working rods, which should not exceed 3 mm.
How to adjust
By adjustment we mean changing the free play of the clutch release clutch. The clearance is checked by moving the fork lever away from the spherical surface of the booster pusher nut. The operation is carried out manually; to reduce the force, it is necessary to remove the lever spring. A stroke of 5-6 mm (measured at a radius of 90 mm) is normal. If the measured value is within 3 mm, then it should be brought to normal by rotating the spherical nut.
After adjustment, you need to check the full stroke of the pusher, which should be at least 25 mm. The test is performed by fully pressing the clutch pedal.
At lower values, the amplifier does not ensure full disengagement of the clutch discs.
Additionally, the free play of the pedal is adjusted, corresponding to the start of operation of the master cylinder. The value depends on the gap between the piston and the pusher. A normal travel range is 6-12mm, measured across the middle of the pedal. The gap between the piston and the pusher is adjusted by turning the eccentric pin. The adjustment is performed with the clutch pedal fully released (until it contacts the rubber stop). The finger rotates until the required free play is obtained. Then the nut on the regulator is tightened and the safety pin is installed.
How to upgrade
Pumping of the CCGT unit at MAZ is carried out as follows:
- Make a homemade pressure device from a plastic bottle with a capacity of 0.5-1.0 liters. Holes are drilled in the lid and bottom, into which nipples from tubeless tires are then installed.
- It is necessary to remove the spool valve from the part mounted in the bottom of the container.
- Fill the bottle 60-70% with fresh brake fluid. When filling, close the hole in the valve.
- Connect the container with a hose to the fitting installed on the amplifier. A valve without a spool is used for connection. Before installing the line, you need to remove the protective element and loosen the fitting by turning 1-2 turns.
- Apply compressed air to the bottle through the valve installed in the cap. The gas source can be a compressor with a tire inflation gun. The pressure gauge installed on the unit allows you to control the pressure in the container, which should be within 3-4 kgf/cm².
- Under the influence of air pressure, liquid enters the cavities of the amplifier and displaces the air present inside.
- The procedure continues until the air bubbles in the expansion tank disappear.
- After filling the lines, it is necessary to tighten the fitting and bring the liquid level in the tank to the required value. A level located 10-15 mm below the edge of the filler neck is considered normal.
The reverse pumping method is allowed, when the liquid is supplied under pressure into the tank. Filling continues until gas bubbles stop coming out of the fitting (previously unscrewed by 1-2 turns). After filling, the valve is tightened and closed on top with a protective rubber element.
After bleeding the PSU clutch, it is recommended to check the condition of the rods, which should not be deformed. Additionally, the position of the brake lining wear sensor is checked, the rod of which should not protrude beyond the pneumatic cylinder body by more than 23 mm.
After this, you need to check the operation of the amplifier on a truck with the engine running. If there is pressure in the car's pneumatic system, it is necessary to press the pedal all the way down and check the ease of gear shifting. Gears should shift easily and without extraneous noise. When installing a box with a divider, you need to check the operation of the unit drive. In case of incorrect operation, the position of the control bracket must be adjusted.
specmahina.ru
Pumping of CCGT unit in Ural-4320 at an accelerated pace
You can quickly bleed the hydraulic clutch drive using an external source of compressed air flow. This implies the following procedure:
- pouring brake fluid into the compensation tank;
- removing the valve protective cap, putting the bleeding hose on the valve, unscrewing the valve 50-75% of a turn, immersing the end of the hose in a transparent and clean container containing the brake fluid;
- attaching a hose from an external source of compressed air masses to the lid of the compensation tank;
- When supplying air whose pressure does not exceed 250 kPa, it is necessary to ensure that no air bubbles escape from the tube.
Source
Construction and maintenance of a clutch pg on a Ural 4320 car.
The pneumohydraulic booster of the Ural-4320 car is an integral part of the clutch system of this car, reducing the force applied to the pedal. The CCGT consists of three units:
During operation, the pressure of the liquid that is inside the main cylinder is transferred to the CCGT. As a result, the amplifier pistons and tracking devices are activated. At the moment of release, the pressure on the tracking system piston decreases, as a result of which this mechanism, together with the PSU piston, returns to the initial position.
How to properly bleed a car's clutch
The question of how to bleed the clutch rarely arises among motorists. However, it is necessary to know the algorithm for performing this activity in order to be fully prepared in case of an emergency. It is greatly facilitated by the fact that its principle is largely similar to the procedure for bleeding the brake system.
The content of the article
The principle of operation of the system and possible causes of malfunction
Usually the clutch drive on a car is hydraulic. Therefore, a special fluid is used as the drive component. This is justified, because the liquid does not have the characteristic property of air to compress, which guarantees the transfer of all the force from the pedal directly to the cylinders (worker and main). However, even a small volume of air leaking into the system leads to incorrect operation of the hydraulic drive.
After all, the air can be compressed, which leads to the loss of some of the effort. Consequently, the transmission may not turn on correctly or not turn off at all.
The main cause of failure is air getting into the hydraulic clutch system. Typically, this problem occurs when connections (threaded type) are not tightened sufficiently, as well as when there are defects in the pipeline (hoses and pipes).
How to bleed the clutch - preparation for work
First you need to stock up on the necessary tools and materials:
For pumping, an assistant is needed, and he does not need to delve into the intricacies of the process. However, in emergency cases, you can do everything yourself, for which you will need to first prepare a special stop (gas type or other) with which you can fix the clutch pedal during operation. However, for this you can use any branch, rod, lath, or even a piece of brick. Naturally, in this case, the procedure will take much longer, since you will have to constantly get in and out of the car in order to pump the clutch pedal.
In addition, it will be necessary to adjust the clutch in advance, because if the piston pusher does not have a free stroke, bleeding will not be possible.
Procedure for bleeding the clutch
After carrying out the preparatory plan, you can proceed directly to the pumping procedure.
- Before bleeding the clutch, fluid is added to the expansion tank almost to its upper edge (15-20 mm below it). At the same time, it is extremely important to maintain cleanliness so that there is no dust or debris in the system.
- One of the partners must be inside the car and first press the pedal 3 times. This must be done as quickly as possible, making sure that the pedal goes all the way down. After pressing the pedal, you need to release it and wait for it to return to its original position. A nuance - do not exceed the time interval between clicks (no more than 2 seconds)
- After the third press, the pedal must not be released, but locked in a pressed position. At this time, the partner must secure the prepared hose to the fitting, and then, using a special or simple spanner, release the valve designed to release excess air. When unscrewing, you need to constantly monitor the second end of the hose. It needs to be immersed in a prepared container, into which brake fluid (about 200 ml) is poured in advance. It is unacceptable to pull the end of the hose out from there.
- The fitting unscrews approximately half a turn (maximum ¾). After unscrewing the fitting, liquid will begin to flow out of the cylinder. There will also be air bubbles in it. As the fluid flows out and air is removed from the system, the pedal, pressed by the partner’s foot under the applied force, will begin to lower. The person inside the car must wait until the pedal is pressed all the way, and then, without removing his foot from the pedal, inform his partner about this. Having received a signal from the second worker, he screws the valve back on.
How to pump up a PGU in the Urals-4320
When the brake fluid is replaced or the hydraulic part of the drive is repaired, the system is pumped in the following sequence:
- brake fluid is poured into the compensation tank;
- the cap protecting the valve is removed, a bleeding hose is put on this valve, then the valve is turned back 50-75% of a turn, and the hose on one side is immersed in a transparent container that already contains brake fluid;
- the nut is loosened, at the moment the first drops of brake fluid appear, it is tightened;
- the clutch is depressed, the valve should be open, then the pedal is gradually released after the valve closes until air bubbles stop coming out of the hose. When air bubbles with liquid stop coming out, the bleeder valve tightens.
To avoid air being sucked into the main cylinder during pumping, it is necessary to ensure that the liquid content inside the compensation tank is more than 50% of the volume of this tank; the tip of the hose must be in the liquid at all times.
A sign that the PSU is fully pumped is a sudden increase in the force applied to the pedal while moving it by 3.5-4 cm from the moment the free wheel is selected.
How to properly bleed the clutch without resorting to the help of a car repair shop
Good day, dear motorists! The technological operation of bleeding the clutch is a relatively rare thing. Actually, like bleeding the brake system. And according to the algorithm for bleeding the clutch, it is not much different from bleeding the brakes yourself.
Yes, do it yourself, since bleeding the clutch will not take much of your time and will not require highly qualified mechanics. Therefore, without delaying it, let’s learn the theory of how to bleed the clutch of your car.
Do-it-yourself clutch bleeding: features
Bleeding the Hyundai Solaris Clutch
Firstly, when is it necessary to bleed the clutch? To be precise, the operation is called: removing air from the hydraulic system of the car’s clutch control mechanism. This is according to science.
Those. It is clear that you will need to bleed the clutch if air gets into the hydraulic system. As a rule, this occurs due to a malfunction of the pipelines or due to loose tightening of the threaded connections of the clutch system.
What is needed to bleed the clutch:
- standard set of tools;
- brake fluid;
- empty container for draining brake fluid;
- a hose suitable in size for the drain fitting;
- a “gas” stop or something that you can use to fix the clutch pedal (provided that you are bleeding the clutch alone).
Before bleeding the clutch, it is necessary to adjust the clutch. The fact is that bleeding the clutch will not be possible if there is no free play of the master cylinder piston pusher. Essentially, the piston and pusher are a shut-off valve, and if there is no free play, it will be closed.
A similar situation occurs when the tension spring malfunctions and, accordingly, the pedal gets stuck when moving to the uppermost position.
How to bleed a clutch: technology
The clutch can be bled both with and without compressed air in the system. So let's get started.
- Add working fluid to the master cylinder reservoir at a level no lower than 1.5-2 cm from the top edge of the reservoir. The tank is filled through a mesh filter to prevent foreign impurities from entering the system.
- In the upper part of the CCGT housing, you need to remove the rubber cap from the bypass valve and put a hose on it. Place the other end of the hose into a prepared 0.5 liter container. filled 1/3 with brake fluid.
- Before pressing the clutch pedal, unscrew the bypass valve one turn. An assistant presses the clutch pedal all the way until the flow of air bubbles from the hose into the container stops.
- you need to ensure that the liquid level in the tank does not fall below 3.5 cm from the edge. If necessary, add fluid to the reservoir.
- So, the clutch pedal remains pressed all the way, the release of air bubbles has stopped, it is necessary to tighten the bypass valve tightly.
- Popular experience suggests that clutch bleeding is accelerated if the bypass valve is closed every time after pressing the pedal. Then release the pedal and repeat the operation. As a rule, three pedal presses are enough to remove the air from the system.
- remove the hose from the fitting, put on the safety cap and add liquid to the tank: 1.5 - 2 cm from the edge.
After bleeding the clutch, we check the quality of work. To do this, depress the clutch pedal all the way and check the stroke of the piston pusher. Its stroke should be 27-28 mm. If this parameter does not correspond, then we adjust the clutch.
Important! The clutch is pumped only with the working fluid recommended by the manufacturer. Otherwise, swelling of the clutch rubber products may occur, with all the ensuing consequences of clutch failure following the fluid.
Good luck with bleeding your clutch yourself.
cartore.ru
Hydropneumatic clutch drive
Clutch and brake control drive
1. Compensation tank. 2. Tank cover. 3. Bolt. 4. Nut. 5,14,23. Bracket. 6. Cylinder stop. 7. Main cylinder. 8. Pedal mechanism. 9,32,37,51,54,59. Springs. 10. Brake pedal. 11. Clutch pedal stop. 12.15. Brake pedal rods. 13. Brake valve control lever. 16,24,33. Hoses. 17,19,22,31. Clutch drive pipes. 18. Triple protective valve. 20. Air cylinder. 21. Check valve. 25. Clutch fork shaft lever. 26. Rod. 27. Pneumohydraulic booster (PTU). 28. Bleeding valve. 29. Bracket thrust bolt. 30. Clutch pedal. 34,53,64. Cases. 35. Cap. 36. Control valve.
Bleeding the clutch yourself
Technologically, such a phenomenon as bleeding the clutch is a rather rare process. This can also be attributed to bleeding the brake system. And in terms of its execution algorithm, bleeding the clutch is not very different from a similar procedure for brakes, performed independently. Yes, exactly on your own, because bleeding the clutch will not take much of your time and, moreover, will not require high auto mechanic skills. Therefore, you shouldn’t put everything off and it’s time to quickly learn how to pump the clutch of your “four-wheeled horse.” More on this later in our article.
When is clutch bleeding required?
In correct scientific terminology, clutch bleeding is the procedure for removing air from the hydraulic system of the mechanism that controls the automobile clutch system. Air can enter the system due to faulty pipelines or loose threaded connections. With the entry of air, various types of malfunctions often appear, which leads to improper operation of the entire hydraulic clutch system.
The steps for bleeding the clutch must be performed sequentially and as follows:
— preparing the clutch system for operation;
— connecting the rubber hose to the fitting;
— depress the pedal and then drain the liquid until the air is completely removed.
When independently replacing the hydraulic filler of the clutch system, the following rules must be observed:
— the liquid should not get on the skin;
— new fluid must not be contaminated;
— if you add fluid, then only of the same composition, otherwise it should be replaced completely;
— It is better not to use waste liquid.
The procedure for bleeding the clutch is quite simple. Next, we will talk about what tools are needed to carry out this procedure and how to properly bleed the clutch.
What is needed to bleed the clutch?
As with any other procedure, before starting work, you must prepare the necessary materials and tools in advance. Before bleeding the clutch system, you need to prepare the following:
- a standard set of tools that are often used when carrying out repair work: pliers, a set of wrenches, screwdrivers, and so on;
— a container for draining liquid from the system;
— new hydraulic fluid;
— a rubber hose of the appropriate diameter for connection to the fitting. It is desirable that the hose be transparent, which helps to better control the release of air from the clutch system;
— a convenient device for fixing the pedal in case of carrying out the procedure independently, if you do not have an assistant nearby.
But in order for all the work to be carried out efficiently, it is better to get an assistant, preferably knowledgeable in carrying out the clutch bleeding procedure.
Preparing to bleed the clutch
To bleed the hydraulic clutch drive, preliminary preparatory procedures are required. Initially, you should make sure that the fluid level in the expansion tank is within normal limits. If necessary, add fluid to the optimal value. After this, clean the protective valve cap of the cylinder from dust and dirt deposits.
Bleeding the clutch yourself
To begin with, let’s give a precise definition of the concept of “bleeding the clutch.”
Bleeding the clutch is the procedure for removing air from the hydraulic system of your vehicle's clutch control mechanism. This procedure is necessary if air has entered the vehicle's hydraulic system.
Air in the hydraulics can occur for two reasons: either you have a broken (faulty) pipeline, or the threads in the clutch system connection are loose.
How does the clutch bleeding process work? Here is an algorithm that will give you a more or less clear idea of this process.
The master cylinder has a reservoir that contains fluid. Open the cap and add enough liquid to the tank so that no more than 2 centimeters remain to the top edge of the tank level. Important: when you add liquid, be sure to use a mesh filter! This is necessary to prevent dirt from getting into the tank.
In the upper part of the PGU (PGU - pneumatic-hydraulic booster) there is a bypass valve with a rubber cap. Take a piece of hose. Place one side of this hose onto the fitting (which was exposed after removing the cap), and lower the other end of the hose into a container with a volume of 0.5 liters. Important: the container must be filled 1/3 with brake fluid.
Next, slightly unscrew (one turn) the bypass valve and only then press the clutch pedal. Press the pedal smoothly, all the way, and look carefully at the bottle of brake fluid.
The clutch must be pumped until no more air bubbles are released into the fluid bottle! It is also recommended to look into the reservoir after pressing the clutch pedal several times: the fluid level in the reservoir should not be lower than 3-3.5 cm from the top edge. Therefore, if the level in the tank has dropped, simply add the required amount of liquid.
As soon as the bubbles have stopped coming out, get out of the car and close the bypass valve. (When performing this procedure, it is recommended to have an assistant, since the clutch pedal must be recessed when screwing in the bypass valve. But you can do without a partner: just support the pedal with some lever while you screw in the valve).
Now remove the hose from the fitting and plug it - the fitting - with a rubber cap. We look into the reservoir and check the fluid level. If necessary, add.
All that remains is to check how well the pumping procedure was carried out. Press the clutch pedal to the floor and pay attention to the stroke of the piston pusher: it should be 28 mm. If something happens, the clutch needs to be adjusted. We hope that bleeding the clutch is no longer a problem for you.
Kolodiychuk Andrey, especially for ByCars.ru
bycars.ru