Design and principle of operation
The main components of a homemade feed cutter are:
- Receiving tray, or hopper , is a structural element located above the working chamber (to the side of it) and used for storing crushed feed raw materials (grass, vegetables, fruits, grain).
- A working chamber with a knife rotating inside it - in this part of the feed cutter, raw materials are crushed with the sharp edges of moving knives.
- The power unit (motor) is designed to give the chopper knife a high rotation speed. It most often uses an electric motor from an electrical appliance (washing machine, juicer).
- The outlet pipe, or tray for crushed feed, is located, as a rule, in the lower part of the working chamber and serves to divert the result of the feed chopper into a container placed under it.
However, in some cases, due to the lack of materials and the need for quick manufacturing, this design is simplified, as a result of which the raw materials are placed directly into the working chamber and the crushed feed is subsequently poured out of it.
Optimal selection rules
Every farm owner counts on high-quality and long-term service of new equipment.
However, the wrong choice of equipment for grinding feed can quickly become unusable if the capabilities and requirements for the equipment are not optimally correlated.
There are certain criteria that you should pay attention to when choosing a design:
- The very first and most important parameter is the purpose of the device. If your personal farm has a large selection of poultry, cattle, and other types of animals, you should choose a universal model. For a small backyard, a manual unit or a compact unit that sits on a table in a barn or poultry yard is perfect.
- You should pay attention to the power of the device. The greater the power ratings of the design, the greater the performance.
- The noise level emitted by the operating device is of no small importance.
- The material of manufacture is also important, since it is the base that determines the service life of the product.
- If you wish, you can first read reviews about the manufacturing company and study the ratings of manufacturers. Owners of large farms are better off giving preference to proven companies specializing in the development of professional agricultural and agricultural equipment.
- You should definitely evaluate the possibility of repair and replacement of parts, for example, in the event of a device malfunction.
In the store, you need to pay attention to the integrity of the power cord, the absence of defects and malfunctions in the operation of the structure. For compact models, they look at the reliability of the fasteners that fix the installation in a given position.
Drill grass cutter
Grass cutter from a drill
A simple, but quite productive homemade grass cutter can be made from an electric tool such as a drill as follows:
- A hole with a diameter of 12 mm is made in the middle of the seat of a simple wooden stool.
- A UPC 201 bearing assembly is attached to the narrow wooden end of a 20x40 mm wooden block.
- The block, together with the bearing assembly, is attached to the back of the stool seat. In this case, the inner hole of the bearing and the similar one drilled in the seat of the stool must completely coincide (be coaxial).
- A galvanized 12-liter bucket with a 12 mm hole drilled in the center of its bottom is secured to the stool using short self-tapping screws.
- The shaft for the grass cutter knife is made from a durable rod with a diameter of 12 mm. To do this, an M12 thread is cut at one end of it, after which. By pushing it with the other end through the holes in the bottom of the bucket and the seat of the stool, it is pressed into the bearing. In this case, the length of the threaded rod protruding inside the bucket should be no more than 10-15 mm. The length of the lower end is selected taking into account the size of the drill used: it should be such that when the shaft is clamped in the chuck of a vertically installed tool, it rests on the floor and is stable.
- A diamond-shaped knife 10-180 mm long and 35-40 mm wide is cut from durable tool steel.
- The narrow ends and ends of the knife are sharpened on one side.
- The knife is installed on the working shaft and secured with a nut.
Be sure to read:
How to assemble a grain crusher from an angle grinder, a washing machine, myth or reality
A simple drill with a power of 850-1000 W is used as a drive for such a grass cutter. The chopped grass is loaded in small portions when the drive is turned on, and the container must be closed with a lid.
After the working chamber of the grass cutter is filled with chopped food, tilt the stool with the bucket and pour it into a larger container.
Important! If there is no metal bucket available, under no circumstances should it be replaced with a plastic one - such a seemingly profitable and simple way out of the current situation can lead to disastrous consequences in the future. The fact is that if the knife is destroyed, this material will not be able to protect a person nearby from metal fragments flying at high speed.
Main types of feed choppers
Depending on the design and functional features, the following types and sizes of feed choppers are distinguished:
- According to the principle of operation, all models are divided into automatic and mechanical designs. For a small personal farm, a manual machine capable of processing various types of feed, except grain crops, is suitable. If the farm has cattle or a large number of poultry, it is better to stock up on an electric model, which is universal in practical use. Such an installation is capable of processing both grain crops and various root crops, hay, and straw.
- Depending on the type of raw material being processed, there are devices designed for grinding fresh or dried grass, grain and cereal crops, root crops, and threshing machines for shelling corn cobs. Universal designs are especially popular among farmers. Such installations, as a rule, are equipped with a powerful engine, bulky dimensions, and a convenient receiver for a wide variety of feeds.
- Depending on the area of application, household and professional designs are distinguished. The second option is designed for long-term uninterrupted operation, has large dimensions and significant weight, and can process a sufficient amount of feed in a short period of time.
There is one more criterion by which feed grinding devices differ.
When choosing a device for a large farm, it is better to give preference to a manufacturer that specializes in producing professional equipment for farms.
Such companies, as a rule, strictly comply with technical conditions and regulations to produce the highest quality equipment.
Homemade apple, potato, tomato crusher
Homemade crusher
The technology for assembling a homemade crusher for vegetables and fruits used as food consists of the following steps:
- Making a working chamber - any old boiler will do for this. A hole is made in the center of its bottom, and a rectangular window is cut on the side, to which a small box is welded.
- A disk with a diameter 15-20 mm smaller than that of the bottom of the working chamber is cut out of metal 3 mm thick.
- A hole is made in the center of the cut out disk.
- Stepping back 20-30 mm from the central hole and the edges of the disk, 4 oval-shaped slits are made on the disk for knives. The angle between two adjacent slots should be 900.
- According to the size of the slots, 4 blanks are made from a 30x30 mm corner. In the outer plane of one of the corner shelves, 2 oblong adjustment holes are drilled. The distance between them is measured and recorded.
- Blanks from the corners with the ends of the shelves are welded to the side of the oblong slots. In this case, the adjustment holes should be located on the outer plane of the shelf that faces directly to the slot.
- To drain the crushed feed from the tank into the receiving tray, two rubber elastic strips are also attached to the lower surface of the disk.
- 4 knives with one-sided sharpening are made from rapid cloth. After releasing them on the fire, 2 holes are drilled into them. In this case, the distance between them is equal to the same value between the adjustment holes on the corners.
- A frame with legs is welded from the corner.
- The tank is welded to the frame.
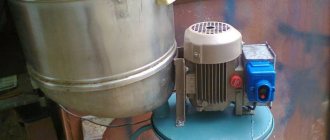
- Next to the tank, an engine with a power of 500-700 W is attached to the frame using 2-3 bolts. Before installing it on the frame, a seam (driven) is attached to the motor shaft.
- A shaft for a disk with knives is made from a strong rod. A thread is cut at one end, and a groove for a keyed joint is cut at the other.
- The disk with knives is installed on the shaft.
- The shaft is inserted into a hole in the bottom of the tank.
- A second pulley (drive) is attached to the end of the shaft.
- The pulleys are connected by a belt.
- A button to turn the engine on/off is mounted at the end of the stand.
- The motor is connected to the button and to the electrical network.
- To eliminate the need for human participation in the process of grinding raw materials placed in the device, a special stop-bar is attached to the inner wall of its tank, resting against which, the raw materials will be crushed faster by the disc knives.
- To prevent electric shock, the frame of the feed cutter is grounded.
Be sure to read:
How to make a cone for slaughtering poultry with your own hands, how much does such equipment cost?
Using such a device, you can chop not only tomatoes, but even harder and denser apples and watermelons.
Grinder feed cutter
Feed cutter from an angle grinder
You can make a simple, but at the same time very productive and convenient feed cutter from an angle grinder (grinder) using the following technology:
- The frame of an old 40-50 liter aquarium is thoroughly cleaned of rust and welded if necessary.
- A pyramidal receptacle for crushed feed with a hole in the lower part (has a truncated top) is welded into one of the ends of the frame.
- A plate is cut out of thick metal according to the dimensions of the end part, and a hole is made in the center of it for the grinder gear shaft. Also, to load raw materials, a window is made in the plate, to which a funnel-shaped hopper or large diameter pipe (80-100 mm) is welded.
- A trapezoidal knife is made from tool steel.
- The grinder shaft is inserted into the hole in the plate, and the knife is secured to it using the lower support washer and a locking nut.
- The platinum is fixed at the end of the frame with 4-6 bolts.
- The body of the angle grinder is attached to the plate using a bracket.
When working on such a feed cutter, raw materials - various vegetables, fruits, grains - are placed in a funnel-shaped hopper and, under the influence of gravity, gradually fall onto a knife rotating at high speed, which chops them.
The finished feed enters the pyramidal receptacle and is poured through its truncated top into a container placed under the feed chopper.
Important! The finer and better the food is crushed, the better it will be eaten by a domestic animal (cow, pigs, rabbits) or poultry (chickens, ducks).
Feed cutter from a gas cylinder
Feed cutter from a gas cylinder
Making a powerful and compact feed cutter from an old gas cylinder is done as follows:
- All the gas is drained from the old cylinder.
- Using a hacksaw for metal, cut off the top of the cylinder.
- From a thick-walled pipe with a diameter of 50-60 cm, reinforcement number 12 (diameter 12 mm) and corners, a frame with 3 legs and 6 reinforcements connecting the frame in the upper and lower parts is welded.
- A 3-phase motor with a power of 2-2.5 kW is placed on the frame so that its shaft faces upward.
- A hole is drilled in the center of the bottom of the container, a window and a tray on the side for ready-made crushed food.
- In a similar way, as in the case of a vegetable crusher, a disk with 2 knives is made.
- The disk is connected to the motor shaft using a rod of the required length.
- The motor is connected to the network via a starter.
- A bolt is welded to one of the lower frame reinforcements to connect the unit to the ground loop.
Be sure to read:
How to make a feather removal machine with your own hands: an economical option from a washing machine
This feed chopper, unlike those described above, has a very high engine power, which directly affects how much electricity it will consume. However, since its operating time, even when the tank is fully loaded, does not exceed 5-7 minutes, the electricity consumption will not be too large.
How to make an electric feed vegetable cutter with your own hands
A do-it-yourself grain crusher, feed cutter and grass cutter can be practically in no way inferior to ready-made store-bought options. The main condition for self-assembly is the presence of a fairly powerful engine with which the device would function.
It is not surprising that craftsmen have learned to adapt grinders and washing machines for grinding various raw materials, through minor alterations in the design. Let's look at both methods in more detail.
Making from a grinder
The grinder is an integral part of any household, especially in rural areas. If there is more than one such tool, then one of them can be adapted for a feed chopper.
From the Bulgarian
The algorithm of actions will be as follows:
- First we need a sheet of fairly durable plywood. This material will act as the base of the unit on which other working units will be installed.
- In our plywood we need to make two through holes, fix the grinder in one of them, and in the second - a reservoir for raw materials.
- The grinder is attached to the plywood using bolts and metal brackets. Next, you need to make a knife that will stand in place of the grinder disk. This knife must be double-edged.
- You need to attach some kind of mesh to the bottom of the plywood to sift through the recycled material. For this purpose, a colander or an old saucepan is suitable, in the bottom of which you need to drill many holes.
- A 5-liter plastic bottle can be used as a reservoir for raw materials.
In principle, this is all work on the manufacture of a homemade device. As we can see, manufacturing costs are minimal.
Making from a washing machine
The design of the washing machine is very suitable for turning it into a feed chopper, combining the functions of a grass cutter and a grain crusher. This applies to older models of top-loading washing machines.
The work process will be as follows:
- The design of the washing machine must be equipped with an additional motor, which must be attached at the top, under the lid itself. It is installed on metal corners using bolts.
- We make a double-edged knife of such a size that its edges do not touch the walls of the washing machine.
- The second such knife must be installed below, where the factory motor of the washing machine is located. At the same time, both knives should rotate in different directions so that the grinding quality is better.
- It is necessary to make a hole in the top cover of the washing machine through which you can pour material for recycling. You also need to provide some kind of funnel so that grain and other raw materials do not spill.
- You also need to cut a hole at the bottom of the washing machine so that the recycled material can spill out.
From the washing machine
This unit from a washing machine will work on the principle of a coffee grinder. We do not publish specific drawings, because there are quite a lot of washing machines, each with its own specific design, etc.
Here it is important to understand the very principle of operation of such a device, after which it can be very easily put into practice.
Washing machine feed chopper
Feed chopper from a washing machine
The design of such a homemade device consists of:
- Tank from an activator-type washing machine (with vertical loading, without a rotating drum).
- A two-blade sharp chopper knife mounted on the activator shaft instead of a disk for mixing water.
- A tray for crushed feed, which is a continuation of the extended drain hole of the tank, with a pipe with a diameter of 50-60 mm inserted into it.
- Square frame on 4 legs.
- A motor connected to the chopper shaft using a V-belt drive (two pulleys and a belt).
- Engine start buttons.
- Cable for connecting the feed chopper to the network.
To ensure that the raw materials crushed in such a feed cutter do not fly out of the tank during operation of the unit, it is covered with a lid.
Mechanical feed chopper device
In addition to the well-known feed cutters powered by an electrical network, you can purchase a mechanical installation.
The design and operating principle of a household feed chopper is quite simple:
- This design has support posts that firmly fix the device on a flat surface.
- At the top of the support legs, holding axles are welded onto which the bucket or drum is attached.
- The entire surface of the drum is covered with sharp cutting rivets.
- This design also has a handle located at a sufficient distance from the rotating bucket.
To start the device, you need to rotate the handle. At the same time, the drum or bucket also comes into action, chopping food, root crops, and corn cobs. There is no container for collecting the finished product, so you should take care of this detail in advance.
Advantages of DIY feed choppers
The main advantages of homemade feed choppers are:
- Cheap and relatively easy to manufacture. A do-it-yourself feed chopper will cost 3-5 times less than its factory counterpart, allowing you to save from 4,000 to 7,000 rubles.
- High performance. Such units can grind up to 100-150 kg of raw materials per hour.
- Ease of repair and improvement. A homemade feed chopper can be very easily improved.
- High-quality grinding of the supplied feed . The high rotation speed of sharp knives allows the units to sufficiently and uniformly grind all the raw materials placed in them.
The main disadvantage of such units is their noise - the knives rotating at a speed of at least a thousand revolutions per minute, chopping the food, make a very loud noise.
Manual feed chopper
Manual disk feed cutter is usually used on farms with small numbers of cattle and poultry. It copes well with root vegetables such as potatoes and beets, and grinds fruits and vegetables well. In an hour, it can be used to process up to 160 kg of feed raw materials, and the thickness of the resulting pieces is no more than 5 mm.
The device is made of stainless steel, which increases reliability and service life. The weight of the machine is only 10 kg.