So what did the author need to assemble the all-terrain vehicle?
Tools
: welding machine, drill, grinder, set of keys, hammer, screwdriver, wire cutters.
Materials
: walk-behind tractor, square and round pipes, angles, bolts, screws, GAZ 53 inner tubes, Lada wheels, steering column, hubs, rods, fittings, steel wire.
So what guided our author in the development of this unit - these are, of course, drawings and sketches
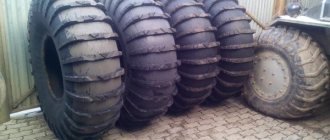
Interestingly, until the eighties, the walk-behind tractor was called a pedestrian or small-sized tractor. It is an indispensable universal tool that makes the work of a gardener and gardener easier. So universal that craftsmen have come up with many ways to use the “iron horse”, in addition to cultivating the land. For example, as a snowmobile in winter. It is quite possible to make such a snowmobile based on a walk-behind tractor yourself in a few days in a garage or at the dacha. The technical capabilities of a homemade snowmobile are not inferior to analogues purchased in stores. The financial savings are obvious.
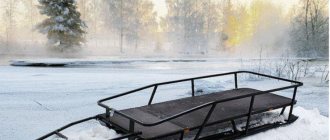
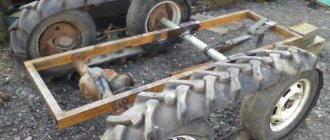
Snowmobile with a walk-behind tractor engine and inner tubes
The walk-behind tractor practically does not have to be redone if you upgrade the original wheels.
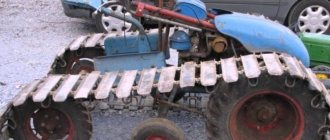
You will need lowered tubes from the truck. Five of them are pulled onto each wheel and secured with chains. The cameras are pumping. Due to the fixation with chains, their shape becomes like a daisy with segments in the form of an ellipse. The new wheels will handle deep snow well. Another wheeled snowmobile can be built from a walk-behind tractor by putting steel hoops on the inner tubes instead of chains. They are equipped with tracks on the outside. The jumpers are welded from metal plates. The height of the track is about 2-3 cm. After inflating the chambers, the metal hoops will be securely fixed to the wheels.
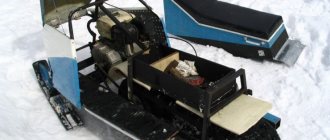
IN SUMMER – MOTORCYCLE, IN WINTER – SNOWMOBILE
The shafts of the front and rear support drums of the caterpillar are machined from steel bar d 25 mm. At the ends of each, journals are machined for bearing No. 204, and in the middle part sprockets (Z = 17) of the chain drive and flanges of the support drums are welded. Since only the front shaft is driving, the rear sprocket is not used, but the shafts are completely interchangeable, which can be useful if the sprocket fails.
The bearing housings of these shafts are machined from steel blanks. In addition to the bearing housing, they have axial holes for fastening to the frame plates and a radial hole (in place) for a long pin used as a caterpillar tensioning rod.
Rice. 3. Caterpillar propulsion device:
1 - attachment point for the propulsion unit to the motorcycle, 2 - drive sprocket (Z=42) with hub, 3 - frame, 4 - caterpillar, 5 - driven shaft disk, 6 - support roller, 7 - drive shaft sprocket, 8 - balancer, 9 — tensioner rod, 10 — tensioner stop, 11 — shaft, 12 — drive sprocket (Z=17), 13 — support drum, 14 — bearing cover, 15 — bearing No. 204, 16 — bearing housing.
The housing covers have a groove for installing a sealing collar and are attached to the housing with M5 bolts.
The caterpillar support drums are machined from duralumin blanks and assembled from two halves with six MB bolts. During assembly, drive sprockets cut from a thick rubber sheet are clamped between them - on the front shaft and cylindrical rollers - on the rear. The teeth of the drive sprockets transmit force to the track by engaging the lugs through the gap between the track strips. And the drums themselves roll along the inside of the track. Semicircular grooves on their outer surface are made so that the heads of the screws that attach the lugs to the tape do not interfere with operation.
The caterpillar consists of four strips 56 mm wide, cut from a conveyor belt and connected together by common lugs - steel U-shaped profiles bent from strips 2 mm thick.
The front track shaft is driven by a chain drive from the drive sprocket (Z = 42), installed in place of the wheel. The sprocket itself is borrowed from the IZH-10 motorcycle. It is attached with six M6 bolts to the wheel hub, which is finished as shown in the drawing. This part is mounted on the rear fork in the same way as the rear wheel with the addition of a simple spacer.
The intermediate supports of the caterpillar propulsion system are balancers - four double-armed levers mounted on a common axis with roller axles fixed at the ends.
Not finding wheels suitable in size and strength for the balancer, I made them myself. Using a simple stamp, I squeezed out halves of wheel disks from round steel plates, and turned out bronze hubs - plain bearings and a mold for roller tires. By connecting the half-discs with six bolts, I got a durable wheel that can be easily repaired in case of wear.
We recommend reading
- LIGHTING EFFECTS! ANYONE! Most automatic lighting effects (ASE), including homemade designs for decorating discos, New Year’s and other holidays (see “Model Designer” No. 4 and 5 for 1995), ...
- AIRBRUSH FROM A BOTTLE It’s a shame when the labor-intensive work of making a model or sample of furniture is ruined due to poor-quality painting. If you look at such a product - it looks unattractive, there are brush marks,...
Here you can evaluate the author's work:
Recommendations from professionals
It must be remembered that a homemade snowmobile is a vehicle. Experts recommend not to forget about this. Even if you have many years of experience in driving a walk-behind tractor, after the modification you need to get used to the new machine. You cannot immediately master snowdrifts and unknown terrain at high speed. The maneuverability of the snowmobile due to the rigid coupling with the sled is reduced. The risk of overturning on difficult roads increases.
Children are driven at low speed on level ground
Children will definitely want to ride in the sleigh. You cannot deprive yourself of such pleasure, but again you need to remember about safety precautions. They choose a flat road and drive at low speed. You can make a train from several drags.
In the video, a homemade snowmobile made from a walk-behind tractor:
Snowmobile assembly instructions
To create a quality pneumatic snowmobile, you first need to think about a forced air cooling system. To create it, you just need to put a special extension with a pulley in two streams on the knee shaft. From this device you need to run belts to the generator and two fan impellers to ensure rotation.
You can quickly carry out these simple operations with your own hands. Next, you can proceed to creating a fuel pump device; it is better to place it on top of the oil pump cover drive; the fuel pump must be connected to the shaft of the oil structure. It is best to use a fuel container with a volume of 30 liters; it must be hung under the frame from the body, near the rear of the axle. An excellent option for a fuel pump would be the device from the ZAZ-965A.
Next you need to install the filter and carburetor. The air filter can also be borrowed from the ZAZ-965A, and the K-127 is suitable as a carburetor. The final stage of the design will be the installation of the ring gear; it must be mounted on the flywheel using an adapter. Don't forget to cover your homemade snowmobile with a hood; a galvanized steel sheet is perfect for this. You can create other elements for pneumatics with your own hands; wheels for it can also be homemade. Let us remind you that for this you will need:
- chambers with low internal pressure (wheels from a tractor trolley can be used);
- frame disks (sizes must be selected individually);
- bandages from transport belts.
Knowing the entire sequence of actions and instructions for constructing a snowmobile, you can quickly and easily make a budget vehicle for snowy roads!
Snowmobiles from a walk-behind tractor on wheels
Let's look at how snowmobiles are made from a walk-behind tractor on wheels. The wheels for a homemade snowmobile should be chosen to be powerful, as this ensures its own safety and easy control. Cameras from the Urals or KamAZ can be used.
There are several ways to create wheels yourself, which involve a metal base with a camera built inside. The main condition when creating an all-terrain vehicle on wheels is to be equipped with 3 or 4 wheels.
When installing wheels for this snowmobile, low-pressure tires or tubes from large cars are selected. They are put on standard discs and secured with chains. The walk-behind tractor engine consumes little fuel, so the high autonomy of a self-produced snowmobile will allow you to travel long distances.
The advantage of a tracked snowmobile. In winter, crawler-mounted walk-behind tractors are much preferable. A large coverage area contributes to proper load distribution and pressure on the ground. The track attachment will never get stuck in snow or other unstable surfaces, which cannot be said about the wheels.
Let's find out how much homemade snowmobiles made from a walk-behind tractor cost. If you compare a finished snowmobile with a homemade one, the price difference will be significant. A homemade one will cost 5 times less. And if you have some parts in stock, then even less. As for the reliability of the machine, when making it yourself, the master approaches the selection of parts thoroughly, selecting the most reliable parts. The result is a powerful, go-anywhere design.
Let's consider the reviews of farmers and gardeners. People believe that it is advisable to create a snowmobile from a walk-behind tractor on their own, if only because the most primitive ready-made machine costs between 3.5 and 5 thousand dollars. The price of the best models starts from 10 thousand dollars. Even when purchasing new parts to assemble a snowmobile, the machine costs several times less. On the forums you can find many positive reviews from people talking about their unforgettable experiences of riding snowmobiles assembled with their own hands. They are happy to share their experience and knowledge with beginners who want to design a similar machine.
A snowmobile with a walk-behind tractor engine: another option
A reliable and fairly powerful snowmobile can be obtained with a monoblock engine. The Neva walk-behind tractor with a Japanese engine is perfect for assembling the structure.
In most cases, walk-behind tractors consist of 4-stroke single-cylinder air-cooled gasoline engines, but 2-stroke engines are also in demand because they have a low weight, simple design, high maintainability, manual start, etc.
Interesting! Homemade grass and twig shredder from a washing machine, here!
70 kilometers per hour - this speed can be “squeezed” out of a regular walk-behind tractor, however, only if its assembly is approached professionally.
You can make a snowmobile out of a walk-behind tractor, like a racing car overcoming snow jams.
With such a unit you can not only plow the land, but also go to the forest for firewood, hunt, fish, or just ride with the breeze. For residents of long winters, a snowmobile will be an indispensable vehicle.
Not much fuel is consumed, about 2 liters per hour.
In most cases, snowmobiles are made according to the “2 skis in front and 1 track in the back” scheme.
This design is optimally stable.
The uniqueness of the snowmobile lies in its ability to travel in places where ordinary cars only dream of doing so.
How to make: instructions
First, the frame is welded. Obviously, the larger the frame, the heavier the device will be and the slower it will move. The optimal frame length is 2 m plus/minus.
The following are sequentially fixed on the frame:
- drive shaft with receiving star;
- power plant with a transmission star and gas tank;
- front wheel axle (fixed fastening to the frame by welding or bolts);
- rear wheel axle (fixed with a movable guide element);
- front suspension with steering structure and guide ski(s);
- seat(s) and body.
Caterpillars are made of drive V-belts or conveyor belts. The optimal track width is from 40 to 50 cm. With a smaller width (40), the snowmobile will be more maneuverable and better controllable. With a higher value (50+), the patency of the device improves.
The function of lugs is performed by PVC pipes of the diameter indicated above, sawn in half lengthwise. They are attached to the rubber base using bolts and nuts. V-belts of insufficient width can be fastened to each other with metal grousers.
In order to be able to adjust the tension of the track, the rear wheel axle is attached using a movable guide element, which allows you to fix the position of the axle in a certain position.
Additional notes:
- The center of gravity should be approximately the center of the structure. Since the power plant is mounted at the front, the driver's seat should be centered over the front axle or slightly offset to the rear.
- The distance between the drive shaft and the power unit should be minimal to minimize losses of energy transmitted to the shaft.
- If you install a shock absorber under the seat, then the front seat support is rigidly mounted on a profile arch, and the rear seat rests on the shock absorber.
- If you are making a snowmobile with a heavy load in mind, then to remove some of the weight from the tracks, it is advisable to install an additional ski in the middle of the base (between two tracks). This ski, 50-70 cm long, is attached directly to the frame. However, this design requires a more accurate preliminary calculation with subsequent leveling of the height of the “leg”, which complicates the manufacture of the snowmobile.
- It is advisable to maintain low pressure in snowmobile tires to avoid rapid wear of parts and high fuel consumption.
The considered version of the snowmobile is the simplest in design. If you have the tools and a welding machine, it can be assembled in the garage without any problems.
A crawler snowmobile made from a walk-behind tractor is perfect for moving through snow-covered forests, overgrown hummocks, and frozen swamps. The machine is manufactured over the summer, using simple tools: metal jigsaw, electric drill, chisel and hammer, welding, etc. You will also need electric welding. Bearings can be purchased at an auto store, and shaft ends can be ordered at a workshop.
DIY low pressure tires
Tires of this type visually resemble huge pillows that support the entire structure. The degree of grip in such wheels allows the vehicle to be passable on any off-road terrain. Depending on the design features, such tires are divided into the following types:
- Arched. They are 5 times larger in size compared to a standard wheel, and have a thickness of up to 700 mm. The pressure in them is like in a regular ball - 0.05 MPa. Installed exclusively on the drive drive.
- Wide-profile. They are distinguished by an oval design and pressure up to 2 times lower than standard. Most often used in lifting vehicles.
- Toroidal. They are manufactured in tube and tubeless versions and are highly popular among car enthusiasts.
- Pneumatic rollers, having lugs to improve cross-country ability, and stiffening ribs, giving the entire structure stability and strength.
The cost of factory-made low-pressure tires may be unaffordable for many car enthusiasts. But for your own all-terrain vehicle, it is quite possible to make such a wheel yourself. The work is performed in the following order:
1. Selection of source material, for example, agricultural or aircraft tires, as well as other types of industrial transport.
2. The tread is cleaned, washed and dried, after which the desired patterns are drawn to create your own design, as well as to remove excess wire and rubber.
3. To remove excess wire, the inner part of the wheel is trimmed and the cord is removed using a winch.
4. Excess rubber is also removed with a winch, making cuts around the circumference, and securing them to the cable with pliers, carefully pulling them and cutting them with a knife.
5. After removing the tread layer, the surface is cleaned with sandpaper.
6. Disk assembly. To do this, use a standard disk cut in half, or welded from plates and pipes, and then carefully polished to prevent damage to the camera.
7. The tire is pulled onto the rim and secured with belts or a fire hose, and then inflated. The wheel is ready.
What type of tread should I choose for an all-terrain vehicle?
To select the right type of tread for an all-terrain vehicle with low-pressure tires, you need to consider the following factors:
- The protector must have the ability to self-clean. This property is especially important for using an all-terrain vehicle in harsh and wetlands.
- When using an all-terrain vehicle on peat bogs, choose tires with low and shallow terrain, otherwise if their top layer breaks, the grip will be insufficient for full movement.
- When used in snowy areas and on sandstones, tires with a rare pattern are chosen.
Advantages of a homemade snowmobile from a walk-behind tractor
Externally, a homemade car is less attractive compared to a factory-made analogue. However, there are many positive aspects to be found. One of the advantages is the fact that the snowmobile is customized. That is, the owner clearly knows what he wants: to transport cargo, go fishing, to the forest, and do other things.
Other advantages include the following:
- Buying a walk-behind tractor and a snowmobile for your farm is expensive. You will need space to store two cars, and each of them will be idle during the off-season. It’s cheaper to get one walk-behind tractor. Use it in winter instead of a snowmobile, and in summer for its intended purpose.
- A homemade design will not require large expenses. Many spare parts are suitable for used cars. At scrap metal you can cheaply buy scraps of pipes, channels and other metal.
- The snowmobile can be used even in summer. The tracked vehicle has good cross-country ability in mud.
Homemade products are a big plus for craftsmen who are accustomed to doing everything with their own hands. A person who shows interest in technology constantly improves it and comes up with new devices.
Materials for production:
- Children's snow scooter.
- Trimmer (the author used Parther t281).
- Ripper attachment with gearbox.
- Garden wheelbarrow wheels - 2 pcs.
- Chain.
- Office chair leg.
- The handle from the bicycle handlebar to the brakes.
The entire manufacturing process is shown in the photo.
First of all, we disassemble the ripper attachment.
The lug mount must be secured to the wheel rims.
The result was a gearbox with a pair of wheels.
To prevent the wheels from slipping in the snow, we put on chains.
We shorten the trimmer rod and drive cable.
We make the mount for the gearbox from a chair leg. We attach it to the frame using this fastening.
Skis can be reinforced with an aluminum angle.
The gas handle is made from a bicycle brake handle.
This is how a snow scooter with a trimmer motor turned out, great fun for children.
The design is collapsible and easily fits into the trunk of a car.
A video of the author of the homemade product testing a homemade snow scooter is attached.
In winter, movement becomes difficult, so you need a universal vehicle for driving through snowdrifts. Using available tools, you can begin constructing a snowmobile. With the right approach, a homemade snow scooter will become an indispensable assistant in winter.
You can begin assembling the structure after developing the drawings. The reliability of the future vehicle depends on their accuracy.
You can make a snowmobile using one of the chainsaws as a basis:
- Friendship. Acts as a power plant. The result is a simple device without unnecessary parts. Such a vehicle will have a fairly large mass with little power, and there will be no safety covers. The saw engine has a power of 1 kW and runs on gasoline. Tool weight 12 kilograms;
- Ural. A more reliable option with more power and less weight. The tool is environmentally friendly and works even at sub-zero temperatures. Two-stroke saw engine with a power of 3.6 kW. Tool weight 11.7 kilograms;
- Calm. The advantage of this saw is its environmental friendliness and low noise level.
Having decided on a chainsaw, you can start designing a snowmobile.
The design consists of the following parts:
- Steering wheel;
- Fuel tank;
- Power plant of petrol tools;
- Steering ski stand bushings (two pipes with a diameter of 30 cm);
- Control ski;
- Crawler gear;
- Track bed;
- Support base;
- Track roller;
- Back brace-limiter;
- Track tensioner;
- Track tension gear;
- Bearing;
- trunk;
- Driver's seat;
- 1st part of chain drive;
- 2nd part of chain drive;
- Driver's seat backrest holder;
- 1st gear driven sprocket;
- 2nd gear drive sprocket;
- Sprockets for the 2nd stage of chain transmission;
- Sprockets for the 1st stage of chain transmission;
- Steering knuckle lever;
- Traction steering rack;
- Bipod with steering shaft;
- Front axle beams;
- Track mounting shaft;
- Track tension axles.
Simple children's snowmobiles
The easiest way to make a support is to install wide skis under the frame. The option of creating a motor sleigh is especially attractive because it uses a children's snow scooter and a tool with a low-power motor - for example, a screwdriver, a hand-held lawn mower-trimmer or a 2-horsepower chainsaw.
A children's snowmobile is assembled from a chainsaw without strengthening its frame, but to transport adults in winter clothes, it is worth adding strength to the structure.
Algorithm for completing parts
There are several proven ways to make a caterpillar with your own hands. They have proven themselves to be the most reliable.
Application of conveyor belt
It is considered one of the simplest methods. In addition to the transport belt, you will need a bushing roller chain. The simplicity in this case lies in the fact that manufacturing does not require a large number of auxiliary materials and tools. To extend the life of the transport belt in the device, you need to circle its edges with fishing line
It is important to ensure a step of 10 mm. To connect the tapes, in this case you need a ring, you need to stitch it along the ends or use hinges
Particular attention is paid to the thickness of the transport tape. The level of load on the unit directly depends on this
The optimal choice would be to select a tape with a thickness of at least 7 mm
Among other things, you will have to take care of an additional wheel on each side
The optimal choice would be to select a tape with a minimum thickness of 7 mm. Among other things, you will have to take care of an additional wheel on each side
You can remove it from an old car, but it is important that its diameter matches the same parameter as the wheel on the walk-behind tractor
Using a tire
For walk-behind tractors, tracks are often taken from tires. Craftsmen claim that the design is highly reliable when the specified element is included in it. In order for the resulting walk-behind tractor to be practical, you must take care of the quality of the car tires. They must have the correct tread pattern. In this regard, tires from large cars and tractors are preferable. The tread pattern is of key importance, as it acts as a lug.
The manufacturing process can be divided into several stages. Here they are:
- After finding suitable tires, a track for the tracks is cut out of them. This is labor-intensive work that will take a lot of time.
- Use a well-sharpened knife for cutting. It's better to take the one that shoemakers use. From time to time it must be moistened in a soap solution. This will make the rubber easier to cut.
- Both sidewalls are cut off the tires. To make the process easier, you can use a fine-tooth jigsaw for this. Remove excess fragments inside the tire if necessary. If the track turns out to be too hard inside, this manipulation can be repeated.
Thanks to this, it is possible to improve the reliability of the tracks, which is especially important under heavy load conditions. And yet such caterpillars are of rather limited length.
It corresponds to a similar parameter for a car tire
It corresponds to a similar parameter for a car tire.
From chains and belts
All-terrain vehicles with tracks are often manufactured using conventional V-belts. They are connected to each other by means of lugs. The straps are attached with screws or rivets.
An additional method is to use chains of the same size. This material is often found in large quantities in gardeners' garages. The manufacturing process boils down to the following points:
- Take 2 chains of the same size. The last links are broken, after which they are combined into a closed ring. The links are clamped and welded.
- The lugs connect the chains to each other and provide reliable fastening. These devices can be made from simple steel plates of suitable thickness. They are connected using bolts.
If you don’t want to make tracks yourself, you can take such products from old equipment. For example, a walk-behind tractor on Buran tracks demonstrates good efficiency. It makes sense to use old parts, since new Buranovsky tracks are quite expensive.
https://youtube.com/watch?v=TRCcf646ahQ
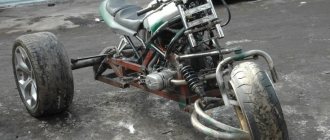
ATV from a walk-behind tractor: conversion in 4 steps
An ATV is a vehicle on four wheels, characterized by good maneuverability, maneuverability and increased safety.
Designers often compare it to a 4-wheeled motorcycle. Homemade ATVs are most often recreated on the basis of powerful Neva-type units. The process looks like this step by step:
- modification of the wheel part. Due to the fact that the walk-behind movers are structurally located under the body, in an ATV they need to be spaced at an equal distance from the body. To do this, it is best to use factory adapters;
- alteration of the frame - it should be strengthened. If possible, take a ready-made one from an old motorcycle. It will be stronger than a homemade one and will not create problems for the quad in the future;
- installation of rims – low-profile rims are suitable for an ATV. To smooth out friction between the rubber and the rim, fabric pads are installed;
- installation of tires on an ATV - traditionally using inner tubes from trucks. You can also use low-pressure wheels, the advantages of which will be discussed further. An undoubted bonus for the ATV will be that it will not need shock absorbers.
After some simple manipulations, the ATV can be tested on a country road.
Related Posts
Today on the Internet you can find many instructions and drawings on how to make a pneumatic snowmobile with your own hands. Before moving on to developing circuits, it is necessary to find out what is special about pneumatics. The homemade device consists of a control support ski and a leading support pneumatic.
The rear axle of such devices has a rather primitive structure; it is usually made independently. The shaft is presented as a single piece, unlike the shaft in conventional snowmobiles. Both wheels are driven, there is no differentiation at all. The differential structure in this case is compensated by the stable design of the hull, resulting in an increase in the overall maneuverability of the vehicle. A significant disadvantage is low maneuverability, although this disadvantage can be smoothed out with special technical features.
The leading ski has two side cuts, which greatly improves traction on snow or ice. Is duralumin used as a material for making corners? This metal, like nothing else, increases ride quality in snowy areas.
The shaft moves due to the tension of the chain, the housing is fixed in the required position. Low-pressure pneumatic tires do an excellent job of shock-absorbing snowmobiles, and special cut tubes are often used as a supplement. Typically, pneumatics for traveling on snow are created from the following parts:
- chambers from tractor wheels (with low internal pressure);
- frame disks of the required size;
- transport belts (only bandages are used).
Together, these elements provide excellent control and uninterrupted shock absorption for the machine. Shaft sprockets must always meet the following parameters:
- front? 8 incisors;
- back? 28 incisors.
Thanks to this resonance, the speed of the machine increases and the shock absorption improves. The above parameters are optimal for snowmobiles.
It is worth paying attention to the fact that the main characteristic of any snowmobile is traction; the quality of movement and safety will depend on this parameter. Typically, snow machines do not accelerate more than 50 km/h? Perhaps everyone will agree that this is the optimal speed for a good device. A car on pneumatic wheels does not weigh much, but its engine power is quite high. With these characteristics, the device can cope with steep slopes and difficulties on snowy roads. Proper structure and high-quality construction can ensure the transportation of cargo or passengers whose total weight does not exceed 100 kilograms.
Calculation and assembly of caterpillars
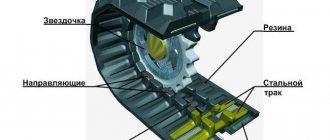
The caterpillar is a tape, on the outer surface of which tracks are attached. Tracks are rigid lugs installed along the entire length of the tracks. Track options:
- Made from 3mm thick transport tape.
- From a car tire.
- From V-belts.
- Ready-made factory-made tracks.
The conveyor belt must be looped. Its strength is only sufficient for light snowmobiles with engines no more powerful than 10 liters. With. Car tires are stronger than tape and are suitable for powerful engines. Solid tires do not need to be looped, so the likelihood of a rupture is minimal. It is more difficult to choose a tire of the required length than a tape.
Finished tracks are removed from other similar equipment (snowmobiles “Buran”, “Sherkhan”). They are equipped with lugs from the factory. The products are not suitable for use with low-power motors from walk-behind tractors. Homemade snowmobiles made from Buranovsky tracks must have gears from the same “donor”.
The size of the caterpillar is selected according to the required driving characteristics: the larger the width, the lower the handling, but the higher the maneuverability. The minimum area of the contact patch from the snowmobile (skis and tracks) must be such that the pressure from the equipped vehicle does not exceed 0.4 kg/cm2 of surface. Light snowmobiles use a 300 mm wide conveyor belt, cut lengthwise into 2 strips of 150 mm each.
Preparing the Tape
The tracks are attached to homemade tracks with M6 bolts with a wide head. The bolts are fixed with a nut, a washer and a groover are used. Before fastening, leading holes with a diameter of 6 mm are drilled in the tape and tracks. When drilling, use a jig and wood drills with special sharpening.
The conveyor belt is also looped with M6 bolts. To do this, the edges of the tapes are overlapped with an overlap of 3-5 cm, the connection contains 1-2 rows of bolts. For a 150 mm wide track, the following distances are maintained:
- From the edge of the tape 15-20 mm.
- Between bolts on tracks 100-120 mm.
- Between the bolts when banding 25-30 mm.
Homemade lugs
The tracks are made of polyethylene pipe with a diameter of 40 mm with a wall thickness of 5 mm, sawn in half in the longitudinal direction. The entire section of the lug is adjacent to the tape. In light snowmobiles, one track connects the tracked pair. With a track width of 150 mm, the track length is 450-500 mm.
The lugs are cut using a wood circular saw. They use a special machine with two guides (metal and wood), rigidly fixed on a fixed tabletop. The walls of the pipes are sawed one by one.
The distance between the tracks depends on the parameters of the gears on the drive shaft. Typically 5−7 cm. The specified distance is maintained with an error of no more than 3 mm. Otherwise, the operation of the drive is disrupted: the lugs “run” onto the teeth of the drive wheels, the caterpillar begins to slip and fly off the rollers.
General rules of constructions
Homemade products for driving on snow are varied in appearance, size, layout, power, and even the principle of movement. But in each variety there are components that provide the properties necessary for snowmobiles, namely:
- Don't fall into the snow.
- Move along the surface with minimal friction and in the desired direction.
Obviously, the probability of sinking into the snow and the friction force depend on the weight of the unit, the contact area, and the shape of the surface of contact with the snow. Of course, the condition of the snow has its influence, but this must be taken into account.
To fulfill its main purpose, the following components are always present in the design of a snowmobile:
- supports in the form of runners, wheels or tracks to support the weight of the structure with passengers on the snow surface;
- engine with gearbox, transmission device and fuel tank;
- movers pushing the structure along the snow surface;
- steering device that changes the vector of interaction with snow for turning;
- frame on which all components are mounted.
Making homemade products is simplified by the availability of parts from specialized equipment. Often spare parts are taken from Buran snowmobiles or any tools and vehicles with a motor - scooters, motorcycles, walk-behind tractors. The scope for creativity when creating each node is huge. There are many varied and proven solutions for every detail.