Making pneumatic tracks with your own hands on low-pressure tires is quite possible. These machines are popular due to their durability and versatility. This technique performed well in the summer heat and on snowy roads. You can use a walk-behind tractor as the basis for a homemade all-terrain vehicle. The unit is a power unit with a rotating element designed for aggregation with various attachments. Such a device is able to transport cargo on a small trailer.
Engine
The power indicator on a homemade unit determines the performance of the selected walk-behind tractor. The higher this parameter, the more efficiently the equipment will function. On the other hand, high power causes increased fuel consumption. If the owner lives in the outback, far from a gas station, this aspect will play a significant role.
Those users who plan to use the equipment only in the warm season are advised to opt for a budget modification with a two-stroke engine. It is simpler and launches quickly. For fishing and hunting in winter, the best option would be a four-stroke power unit. Such variations warm up more slowly, providing longer engine life.
Tools
To make pneumatic ducts with your own hands, you will need a set of certain tools and devices. This list includes the following items:
- Welding machine.
- Hammer, set of screwdrivers.
- Metal cutters.
- Drill and grinder with attachments for metal processing.
- Set of car keys.
The following materials will be needed:
- Motor from a walk-behind tractor or similar agricultural equipment.
- Iron motorcycle or car rims that should be treated with an anti-corrosion coating.
- Cameras from aviation or agricultural equipment.
- Pipe cuttings.
- Steering column. It is advisable to purchase this part in a new form, since it will be responsible for the quality of control of the machine.
- Suspension elements (car hubs can be used).
- Metal corners and fastening fittings.
- Wire and fittings.
Distinctive features of low pressure wheels
Why did designers like this type of tire so much? The pneumatic has low weight, very high elasticity and pressure on the ground within small limits. All these characteristics, coupled with a large rolling radius, give the all-terrain vehicle amazing maneuverability along with efficiency.
Factory LP wheels
A decent volume of chambers gives the design with such a propulsion sufficient buoyancy. This can be called an additional bonus to the vehicle's cross-country ability. In addition, by filling the inner space of the disk with foam, you can give the all-terrain vehicle additional stability on the water and at the same time reduce the sticking of snow or dirt on the inner surfaces of the wheel.
The simple design of these chassis elements and the absence of problems with finding materials for their manufacture allows you to make a pneumatic passage with your own hands without any special material and labor costs. This made machines built according to this principle very popular among home-made people.
Of course, such designs also have their drawbacks, in particular the short service life of the cameras, but they are overcome by introducing additional elements into the design.
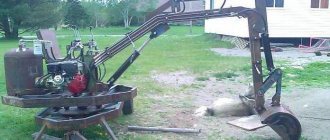
Do-it-yourself pneumatic walk-behind tractor: assembly
Before assembling the unit in question, you must make sure that all electrical connectors and contacts fit together. It is necessary to draw up a schematic plan or drawing of the proposed apparatus. It is also necessary to develop work stages and observe safety precautions.
The installation procedure is divided into the following stages:
- Preparing and cleaning the workplace.
- Determining the dimensions of the base frame and cutting pieces of pipes to the required length and then connecting them by welding.
- Installing prepared cameras on disks and checking them for tightness of connections.
- Steering assembly installation. Particular attention should be paid to the quality of the column, its absence of damage and correct fixation using a suitable galvanized steel bolt.
- Connecting the drive by installing wheels and brake pads on a metal axle.
- Installation of electrical circuits.
After performing these manipulations, you can begin installing the walk-behind tractor with your own hands on the pneumatic ducts. The base must be securely secured with bolts. To make the machine look attractive and have a longer service life, it is advisable to paint the body and open parts with protective materials.
Wheels
When manufacturing the equipment in question, it is better to use parts from a truck or tractor with wide treads as wheels. Such modifications are distinguished by a deep pattern, which ensures high cross-country ability. Alternatively, you can lighten the tires by eliminating excess rubber on the outside. Such “homemade products” are called stripping.
A self-made pneumatic duct from a walk-behind tractor can be reinforced with low-pressure tires. They will provide traction on surfaces covered with ice or snow. To do this, you will need to adapt metal rings or chains, which will create additional rigidity when moving and improve the maneuverability of the equipment.
Until we started designing
Before making a homemade all-terrain vehicle from a walk-behind tractor, from an old vehicle, the details are clarified. You can make an all-terrain vehicle based on a walk-behind tractor with caterpillar tracks or pneumatic wheels.
The tracked unit is not difficult to operate - this is important to take into account. You need to understand where and under what conditions you will use the device, as well as how many people and what weight the vehicle can carry without damage. Next you can develop:
Important: Should you buy a Forza 105 walk-behind tractor: review, technical specifications, equipment
Next you can develop:
- sketch;
- blueprints.
However, it is prohibited to take any car engine. The engine must have forced cooling. It is necessary to buy devices with air and water cooling.
Note! The engine in such a vehicle must be 100% high power so that you can easily move through any territory.
When using a homemade all-terrain vehicle walk-behind tractor in winter, it is better to use a 4-stroke engine. It is the one that works excellently at low temperatures, it is mobile, and easy to operate. A small 4x4 all-terrain vehicle with a walk-behind tractor engine, made independently, will become a true pride for any craftsman. The units can be purchased at a low cost, so it is easier and more economical to assemble them yourself.
Peculiarities
Sometimes combined tires are used, aggregated with low-pressure analogues. Galvanized cast metal wheels are also suitable for wheels. Thanks to their corrosion protection, they will last much longer than conventional metal options. The four-range gearbox from the VAZ car will allow you to distribute and adjust the resulting load. This will also allow you to adjust the speed and optimize fuel consumption.
Design and properties
The air pressure in such tires is often no more than 1 atmosphere. By increasing the width of contact with the road, the load is evenly distributed between all wheels, and the machine freely overcomes soft snow, clay and sand.
The basic principle of their design is based on increasing volume and decreasing pressure. As a result, the buoyancy and shock-absorbing properties of rubber improve, and it becomes possible to easily pass snow and muddy soils. The tread of such a tire has only two patterns: sports “checkered” and mud “herringbone”.
All-terrain vehicles based on the Ural
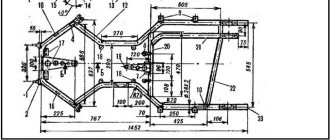
It is possible to make homemade pneumatic propellers with your own hands from a Ural motorcycle. The main load-bearing part is the frame arc, consisting of pipe elements with a diameter of at least 4.2 mm. The rigidity of the structure is also ensured by pipes that form a reinforced triangle, and spacers made of a similar material. This complicated configuration makes it possible to correctly distribute the weight of the all-terrain vehicle, taking into account the transportation of additional cargo or passengers.
Self-made all-terrain vehicles with motorcycle-type pneumatic wheels allow the use of standard seats. However, the mounting method remains the same. They are placed taking into account the build and height of the average person and distance from each other. This ensures ease of boarding and travel. The factory seat handles are replaced with rigid bars 24 centimeters long.
This ensures the safety of the passenger, allowing him to be securely held when driving on difficult terrain. A box mount is provided as additional equipment. It serves as a reservoir for storing a first aid kit, tools and other useful items. An additional fuel tank with a capacity of 5-7 liters can be mounted on the rear of the frame.
Device
Before you begin building a homemade all-terrain vehicle, you need to familiarize yourself with its structure in order to make the right choice of design components.
Engines, transmission
The power unit is usually selected depending on the price. Moreover, the simpler the design, the easier it will be to repair and configure. Most often, when building an all-terrain vehicle with your own hands, they use car engines.
It is noted that the diesel engine will provide low fuel consumption, and the gasoline engine will be easy to start even during severe frosts. It is worth thinking in advance about a forced cooling system for the vehicle and purchasing a pre-heater.
Frame, body
To create the frame you will need steel pipes with a square or round cross-section. Both welded and screw type connections are used. The option of using a monocoque body is rarely used, because it does not provide resistance to heavy loads
In addition to strength, it is worth paying attention to such a point as resistance to destruction by corrosion: for this, as well as to reduce weight, plastic or aluminum cladding is used. If the vehicle must be buoyant, the lower part of the hull must be sealed - the entry of water is limited to the place where the drive outlet is located, using seals
Tires, tracks
If necessary, by reducing the pressure, you can transform the wheel - thanks to the expansion of the support, you can significantly reduce the load on the road surface. It is worth remembering that a low distance from the bottom to the ground creates inconvenience when trying to overcome a high obstacle. When building a crawler all-terrain vehicle, spring steel rods can be used. Drum brakes are often replaced by planetary gears. There are times when there is no factory caterpillar available from any equipment, and then you can make it yourself.
You can add many important and useful details to the design:
- windscreen wipers;
- autonomous stoves;
- rear view mirrors;
- acoustics and music centers;
- indicators and control devices;
- electric seats;
- lighting equipment and other additional elements.
How to make a pneumatic duct with your own hands from a motorcycle?
The rear-wheel drive of the unit in question is very simple in design and easy to manufacture. The main thing is to take into account the location of the axle shafts and the load on them when assembling the part. In this regard, the yoke should be welded after assembling the main unit. Analogs from GAZ-69 or 21 are suitable as axial elements.
If the installation of disc wheels is provided, it is better to use special studs, and connect the axle to the disc using a special flange. DIY pneumatic snowmobiles will also require a driveshaft tube with suitable bearings with a diameter of 76 mm. Each axle shaft will rotate independently, which will allow for reliable and practical operation of the unit’s chassis.