The cultivator is used for cultivating soil in garden plots. We are talking about an attachment for a mini-tractor, which allows you to loosen and plow soil layers without disturbing the fertile soil layer. This element of agricultural machinery can be made with your own hands. A homemade device will be no less effective than one bought in a store, but at the same time it will have a much lower cost.
Do-it-yourself mini tractor cultivator - main advantages
Without equipment such as a cultivator, it is not possible to efficiently and quickly cultivate the soil in garden plots. It allows you to carefully carry out plowing and harrowing without turning up massive layers of earth and without disturbing its fertile layer. Specialized stores offer a variety of models of such products to choose from, but not every summer resident can afford their cost. For those landowners who have available technical means in their working “arsenal”, it will be interesting how you can make a cultivator with your own hands for a mini tractor.
Tools and materials
To make your own cultivator you will need the following tools:
- drill with a set of various drills;
- electrodes, welding machine;
- metal wheels, grinder;
- spanners.
For the work you will need the following materials:
- nuts, bolts (at least 16 pieces);
- long pipe made of high-strength steel;
- metal plates (square - 15x15 cm);
- rectangular plates - they will serve as cutters (optimal size - 25x4 cm).
The prepared material must be not only durable, but also resistant to corrosion, since the working surfaces of a homemade cultivator will have to come into contact with moist soil, which is a strong oxidizing agent.
Operating procedure
After finishing the preparatory work, you can assemble the cultivator structure step by step. To begin with, holes are made in each metal plate (square, rectangular). Then they are combined so that cutters are placed on the side of all squares, which are fastened at the base with bolts or using a welding machine. But in the latter case, the connection will not be strong enough and then a homemade cultivator for a mini tractor will only be able to process loose black soil.
A homemade cultivator, specially designed for processing clay or rocky soil, must be reliable and durable, since its working part, including cutters and their bases, will bear the maximum load.
After all the parts are assembled into a single structure, you should make a hole in its central part through which a straight steel tube will be inserted. It is cut into two identical parts and platforms with cutters are “hung” on each of them. They are securely fastened with bolts or resistance welding.
Then steel tubes with cutters are attached to the shaft of the mini tractor motor block. To do this, using a metal drill, make through holes on the tube and shaft, through which the bolts are inserted and secured with nuts.
Necessary materials
Among the materials that will be needed to manufacture any equipment presented in the list, first of all there should be profiles of all types and steel sheets.
Metal pipes of at least three diameters will allow you to assemble strong and lightweight structures, make long handles, without fear of seriously shifting the center of gravity.
Using corners and channels, you can assemble excellent frames, which initially contain niches for attaching various parts and components. Also, for work you will need a grinder, a welding machine and a drill. Without the quiet, most in-demand tools, it will not be possible to assemble a single product.
Advantages of a homemade cultivator
Those land owners who found information on how to make a cultivator for a mini tractor and were able to build it with their own hands began to cultivate the soil much faster and, most importantly, with better quality and get rid of weeds.
A homemade cultivator has the following advantages:
- Availability of material and simplicity of design.
- Saving time when processing land plots.
- Good quality of loosening the soil and eliminating weeds.
With minimal material costs, it is possible to produce an effective cultivator for a mini tractor with the required cultivation depth and working width.
Such a means of small-scale mechanization as a cultivator will allow you to quickly perform a number of agricultural works, including loosening the soil, removing weeds, hilling vegetable crops, and saving moisture. One of the cultivator options for a mini tractor:
Cultivators for mini-tractors and their types
One of the main tasks of any tractor, regardless of its size and power, is soil cultivation. This fully applies to compact mini-tractors from different manufacturers. A cultivator for a motor tractor will help to qualitatively prepare the soil for growing various crops. This type of hitch:
- will ensure non-dumping cultivation of the land (without disturbing the fertile layer);
- will destroy weeds;
- promotes the growth of row crops and the preservation of moisture in the soil;
- will prevent wind erosion.
Cultivator: what is it, types, how to use it
Under this concept lies a type of agricultural machinery, the main purpose of which is soil cultivation. According to the operating technology, the presented type of equipment is divided into row-crop and steam products.
The use of the first type is relevant when cultivating the soil before sowing. The second representatives are used when cultivating the land with plants sown on it.
Cultivators are in most cases used for the following tasks:
- loosening;
- weed removal;
- moisture preservation;
- hilling.
A distinctive feature of such devices is loosening without turning over layers of earth.
Among the many varieties of cultivating machines, there are representatives with fixed cutting elements that perform work through traction forces, as well as with active knives driven by a motor.
By type of drive system, there are manual models, motor cultivators and elements used with more complex equipment, for example, a tractor.
The following types of cultivators are currently in use:
- with working disk elements;
- with lancet structures;
- ploughshares;
- milling;
- forest with a disk type of loosening and discrete micro-increase.
Forest type cultivators
The presented type is intended for soil reclamation on forest plots brought into use after cutting down trees. Features on such soils include carrying out work in notoriously difficult conditions - the presence of stumps and cutting residues.
Such devices are installed on skidders or forwarders and are driven by the hydraulic systems of the main machine units. As noted above, subdivided into disc leaveners and models with discrete expansion, such devices are designed to process significant volumes of soil with all sorts of foreign objects.
At the same time, a distinctive feature of these varieties is that loosening in the first case is carried out by means of a harrow with an active drive, and in the second through the implementation of micro-raising.
The presented term implies a double inversion of the humus layer with a special creation of a place for planting and rapid growth of future seedlings.
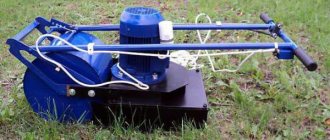
Motor cultivator
This model is a power unit, the main purpose of which is to process the soil using a cutter. The distinctive features of this model in comparison with the classic walk-behind tractor include its low weight and the absence of a power take-off shaft.
The listed advantages of a motor cultivator give the device greater mobility, which allows for a significantly smaller saving of labor resources and for processing in narrow areas.
Depending on the mechanism driving the power unit, the presented type is found in the following models:
- Gasoline with two- or four-stroke engines.
- Diesel.
- Electric with the ability to be powered from a stationary electrical network or battery.
Types of cultivators
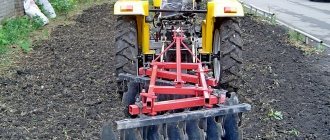
Manufacturers of agricultural machinery attach great importance to the development of attachments for mini-tractors. Every year new types and improved modifications of the attachment are released onto the market. This applies to both buckets, seeders, loaders, and mounted cultivators. On the domestic market, a cultivator for a motor tractor can be found in several modifications:
- disk (ensures good seed growth by breaking up large clods of earth, creating a more uniform topography);
- arrow-shaped (curved arrows installed on the body cut well into the ground, interrupt clods and unwanted vegetation);
- hedgehog (rotary design with a large number of working elements).
This hedgehog penetrates well into the soil surface, destroys weeds, and loosens the soil.
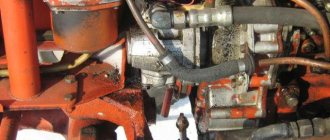
Features of use and principle of operation
Soil cultivation is carried out by cutting disk elements with a diameter of 45 to 50 cm into the soil. Placing the bushings with discs on the same axis allows the structure to rotate, which leads to more efficient tillage.
The installation of such batteries requires maintaining the angle of penetration into the ground, called the angle of attack. This indicator should vary from 5 to 20 degrees.
The angle is selected depending on the hardness of the soil. The denser the top layer, the greater the angle of attack should be.
The operating principle of the harrow, fixed at a minimum distance from the tractor, is based on the destruction of the upper layer and lifting of the lower layers. To increase processing efficiency, it is necessary to ensure uniform removal of the front and rear discs.
When the tractor moves along the perimeter of the cultivated area, the first line discs open the top layer of soil. The soil is lifted due to the spherical shape of each of the installed disks. Then such layers are shifted to the side and turned over.
The second battery returns the inverted earth to its original place. As a result of such actions, the required loosening is achieved to the required depth.
Homemade cultivator for mini tractor
Factory mounted agricultural equipment is quite expensive. You can avoid such expenses by assembling an arrow-shaped cultivator on a mini tractor with your own hands.
To make a hitch you will need:
- square metal plates;
- long steel pipe;
- flat rectangular plates up to 25 cm in length (for the manufacture of cutters);
- bolts, nuts;
- a set of equipment and tools (grinder, welding machine, drill with a set of different drills, emery with abrasive discs).
Materials should be selected with the utmost care (durable, corrosion-resistant). The durability of the device you assemble will directly depend on this.
After preparing the consumables, you can begin assembling the boom-shaped unit, which consists of several stages:
- creating a working diagram of the cultivator indicating the dimensions of all parts;
- aligning the plates with the cutters and securing the cutters with bolts (by welding);
- assembling all elements into a single structure, making a hole for the pipe;
- fastening the pipe on a platform with cutters;
- securing the tube to the mini-tractor shaft using bolts and nuts.
After making sure that all fastenings are secure, you can begin operating the device and processing the soil.
A disc cultivator is made according to a similar scheme. A rectangular steel frame is being welded to which the working elements will be attached. Future cultivator discs are cut from sheet metal. The cutting plates are assembled into a common section using a small diameter pipe. The number of cutting elements and the distance between them is selected individually (depending on the power of the mini tractor). The finished axle with discs is fixed to the frame with special bushings, after which you can start working.
The hedgehog cultivator removes weeds (with roots) and rake the soil between the rows. To make it you will need a 4 mm steel sheet (for disks), a strip of metal for jumpers, steel rods for future spikes, steel pipes for making a frame and an axle (20 mm metal rod). A cone-shaped structure is welded from steel disks and jumpers, along which the spikes are evenly distributed. The cones are attached to an axle made from a steel tube. Ready-made hedgehogs are attached to the frame structure at a distance of 50-70 cm.
Assembly of hand cultivators
Once you have prepared everything you need for work, you can begin making a hand cultivator. This is a unique product that has a number of advantages, for example, compactness, availability of materials for its manufacture and the efficiency of the finished cultivator.
A homemade cultivator will make it possible not only to remove weeds throughout the entire area, but also to thoroughly loosen the soil. But, as noted earlier, hand cultivators are not intended for large areas , so if your garden or vegetable garden has a large area, then it makes sense to purchase a gasoline cultivator. Manual structures are best suited for country work. At home, you can make such types of hand cultivators as rotary, disk, flat cutter and others.
Rotary cultivator
The main tasks of the rotary structure are to harrow the soil and further level it. The cultivator consists of special hemispherical disks in the amount of 2 or 4 pieces. Each pair of these disks is attached to an axis, due to which the base of the structure can move. This allows you to increase or decrease the angle of inclination of the disks during operation.
The base must be metal, since it is subject to a large load during operation. The base itself can be attached to the handle. If all the parts are made of metal, this will significantly increase the weight of the structure, which is why many summer residents make handles from wood. When working, grass will not cling to the discs of such a cultivator, which is very convenient, especially when cultivating areas covered with weeds.
Cultivator "Tornado"
An excellent cultivator with the simplest design, consisting of only three parts - a submersible element, a handle and a handle . In many ways, the principle of operation of a cultivator is similar to the operation of a corkscrew. You need to press the structure into the ground and rotate it, and then the cultivator can be lifted. During the treatment of the site, weeds are removed along with the root system. The product can easily be made at home if you follow the step-by-step instructions below.
Table. Manufacturing of the Tornado cultivator.
| Steps, photo | Description of actions |
| Cut 4 blanks from a steel rod, the length of which should be approximately 30 cm. Bend each blank using a vice. | |
| Sharpen each of the blanks on one side. This is required so that the structure fits well into the ground. All rods must be equally smooth and sharp. | |
| Weld the blanks to the metal pipe. A regular or profile pipe may be suitable. Make sure that all parts are welded at the same angle. This will increase the efficiency of the design. | |
| Treat the welding area with a grinding wheel or file to remove all irregularities. This will give the structure a more attractive appearance. | |
| Weld a handle to the profile pipe. To do this, you can take the same diameter. If desired, wrap the handle with duct tape, especially in areas where you will be holding it with your hands. It is also advisable to treat welding seams. | |
| Test the finished structure in action, and if any of the elements are not welded well enough, then during the test of the cultivator it will fall off. If the product passes the test, then paint it and safely use it for its intended purpose. |
On a note! If you need a larger structure, you can use larger pieces. The manufacturing technology will not change as a result, and the reliability of the cultivator will not suffer.
Disc cultivator
Another option for making a manual cultivator, the main part of which is steel discs. The standard design includes 5 discs, to which special teeth must be attached. Due to these teeth, loosening of the soil occurs. You can make such discs yourself or buy them in specialized stores. The surface of two disks must be smooth, and teeth must be attached to the rest. As an alternative, curved nails can be used instead of teeth .
The finished discs need to be put on the axle one at a time, and then the bearings are installed. The finished structure is attached to a handle made of wood. When cultivating the soil, the discs begin to rotate, and the teeth alternately stick into the ground. A disc cultivator is capable of cutting weeds and loosening the soil. It needs to be cleaned periodically to remove stuck plants.
Flat cutter
Another type of cultivator that you can make yourself. A flat cutter is a fairly effective piece of equipment; it requires an old bicycle and one wheel to make. Next you need to follow the instructions given below.
Step 1. Prepare two small semicircles made of hot metal. They must be durable, since they carry the main load.
Step 2. Bend two meter lengths of 15mm pipe for the handles. Then cut off the excess from the bike frame.
Step 3. Weld the handles to the bicycle frame, as well as a thrust rod that will take the load from the handles while cultivating the soil.
Step 4. Connect the two plates together by welding, sharpen the resulting blade and weld it to the bicycle frame. It needs to be installed on the seat so that you can adjust the blade in height.
Step 5. Paint the assembled structure, thereby protecting it from corrosion. If desired, you can wrap the handles of the flat cutter with electrical tape. At this stage, the process of manufacturing a manual cultivator can be considered complete.
Video - Homemade flat cutter or saving drowning people
Chainsaw cultivator
In case you have an unnecessary chainsaw lying around in your garage, some of its parts can be used to make a good cultivator. But, unlike previous options, those people who have at least a little knowledge of technology will be able to make a product from an old chainsaw . In addition, there are additional costs, such as the purchase of fuel and lubricants. Since the chainsaw runs on gasoline, the cultivator you make from it will also run on it.
- First, make a metal frame for the future cultivator using metal corners. The frame should have a cubic shape.
- Attach the engine from the chainsaw to the finished frame, or rather to its upper part.
- Make handles for your design. It is advisable to use metal pipes for this. This design will be more convenient to use.
- Prepare two sprockets, one of which should be driving, and the second should be driven and installed on the intermediate shaft.
Note! A chainsaw cultivator has a number of advantages over other designs, for example, high power and productivity, minimum effort, etc. But such a cultivator also has disadvantages, the main one of which is the need for regular refueling. Therefore, you should always have gasoline ready on your farm.
Cultivators for mini tractors
A mini tractor cultivator is an indispensable unit for every landowner. This device is designed to treat the soil surface without disturbing its top fertile layer. Practice shows that without the use of this equipment it is difficult to count on a good harvest. However, not every farmer can afford to purchase a cultivator. In this case, independent production of the unit will come to the rescue. Provided that all assembly rules are followed, the landowner has the opportunity to assemble an effective homemade cultivator, which will be practically in no way inferior to its factory counterparts.
How to prepare for self-production?
To make a rotary cultivator for a mini tractor, first of all, you need to prepare the materials.
Their list includes:
- 2-meter metal pipe;
- square steel plates, dimensions 15x15 cm;
- set of 20 bolts and nuts;
- flat rectangular plates, dimensions 20×5 cm.
The list of tools that will be needed for the job includes:
- grinder and a set of discs for working with metal;
- manual welding machine and electrodes;
- sandpaper;
- drill and drill bits;
- screwdrivers, wrenches, pliers.
The dimensions of the materials used for work directly depend on the dimensions of the cultivator for the mini tractor, on the type of connecting units, as well as on the type of replaceable attachments for the cultivator.
How to make a cultivator for a mini tractor with your own hands?
Assembling homemade equipment is quite simple. The procedure for making a cultivator for a mini tractor is as follows:
- In the center of all metal plates used, holes must be made through which they will be connected to each other;
- Then the square-shaped plate must be bolted to the rectangular parts. As a result, one cutter should be located on each side of the square plate. Welding cannot be used at this stage instead of bolted connections. It is less reliable, and therefore such a cultivator can only be used for cultivating loose soil;
- After connecting all the plates, you need to drill one more hole in each of them, the diameter of which should correspond to the diameter of the metal pipe. Next, the pipe, previously cut into 2 equal parts, is inserted into the holes. Thus, the cutters are “put on” it. The finished structure should be fastened by welding or bolts;
- At the end, the cultivator part must be connected to the mini tractor shaft. To do this, through holes are made in the shaft and tubes with cutters. Having combined them, you need to securely fasten all the elements with bolts. The video will tell you in detail about assembling the cultivator.
Types of replacement attachments for cultivators
A cultivator for a motor tractor can be equipped with various attachments.
They are divided into several types:
- paws - necessary for plowing the soil while simultaneously removing weeds. There are several types of these nozzles. Chisel-shaped devices are designed for loosening the soil to a depth of 15 cm. Lancet universal paws are used for continuous or inter-row plowing of soil to a depth of 14 cm. Devices of this type do a good job of chopping soil and cutting weeds. Single-sided flat-cutting paws are intended exclusively for cutting large weeds;
- harrows - nozzles of this type are used for processing the soil between rows and in protective zones;
- Feeding knives – used for loosening the soil between rows and simultaneously incorporating fertilizers into the soil. The maximum working depth is 16 cm;
- needle discs - designed to destroy the earth crust and destroy weeds. The processing depth is 4 cm, and the soil shift is 1–2 cm;
- Hillers - these attachments are used for cutting ridges and destroying weeds between rows. Maximum processing depth – 16 cm:
- furrow cutters - used to prepare furrows for further irrigation. The depth of the furrows does not exceed 20 cm.
All replaceable attachments are fixed on the cultivator stands using a bolted connection. To extend the life of your equipment, you should regularly clear it of weeds and avoid contact with soil that is too wet.
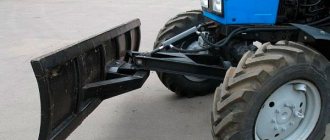
Types of hillers
The essence of the work of any hiller is that it allows you to make uniform furrows for planting potatoes, and then fill them with soil. You can find several models of such equipment:
- Lister hiller for mini tractor. One of the simplest types of this equipment. The design of such a canopy consists of 2 wings connected to each other and slightly spread apart. And the presence of a thin stand prevents the tractor from overloading when it is buried in the soil. It is impossible to adjust the working width on it; therefore, it is not the hiller that will need to be adjusted to the width of the rows, but vice versa. Often this type of hiller is produced with a working width of 25 - 30 cm, which is not enough when hilling.
- Hillers with variable working width. Of course, this model is more convenient to use. The presence of an adjustment mechanism makes it easy to adjust the width of the wings.
- Disc hillers. They are easy to use and very versatile. After all, hilling can be done not only after planting potatoes, but also during the period of active plant growth. It is best to purchase this type of hiller made of alloy steel and equipped with rolling bearings.
- Propeller-type hillers. The operating principle of such a device is as follows. Special propellers, rotating, crush the soil, and then transfer it from the rows to the beds.
Tips for making equipment
In order to make the manufacture of a homemade cultivator for a mini tractor faster, you must adhere to a number of important recommendations for its assembly and operation.
These include:
- All materials used for the manufacture of equipment should be pre-treated with an anti-corrosion agent. If you do not do this, the moisture contained in the soil will begin to affect the metal, and it will begin to rust;
- Replaceable flat-cutting paws have a working width ranging from 22 to 38.5 cm. Lancet universal attachments have the same width. However, there is one difference between them, which is the angle of grinding of the soil. In universal devices this parameter is 25–30, and in flat-cutting devices – 12–18 degrees;
- A weeding or loosening paw will help to level out the furrows that remain after using the knife paw.
Making and using a cultivator for a mini tractor is not that difficult. Among the advantages of homemade equipment are its low cost, adaptability to the specific needs of the farmer and versatility. This cultivator can be installed on the Dong Feng minitractor, MTZ and agricultural machines of other brands. During operation, it will show high efficiency and productivity in almost any weather conditions.
Recommendations for assembly and operation
Following the advice will help you avoid problems with your homemade cultivator. There are a number of rules that are useful to follow during assembly and during operation of the device.
All materials for the manufacture of the cultivator should be treated with anti-corrosion liquid. If this is not done, the metal will quickly rust upon contact with wet soil.
A loosening or weeding paw should be used if there is a need to level the furrows. Irregularities remain after tilling the soil with feeding knives.
When determining the dimensions of the metal plates, you should focus on the dimensions of the mini-tractor to which you plan to attach the manufactured device. It is also necessary to decide on the type of fastenings on which the unit will be supported.
It is advisable to connect the working elements of the cultivator, that is, plates and cutters, with bolts. In this case, it will have high strength and will be able to withstand work on hard soils. If you apply a welding seam, the tool will be suitable only for soft black soil. It will be unsuitable for processing clay and rocky soil types.
The cultivator is often attached to the MTZ and Dong Feng techniques.
What is a cultivator on a mini tractor?
Using a cultivator, you can carry out the process of plowing and hilling as accurately as possible without turning over massive layers of earth. The motor cultivator preserves fertile soil layers, so when using this tool you can achieve high yields.
Specialized agricultural stores offer a wide selection of a wide variety of models of these products, including:
- hand cultivator;
- ripper;
- rotary cultivator;
- motor cultivator and many others.
The procedure for making a cultivator
After the process of preparing materials and parts is completed, you can begin making a homemade cultivator for a mini tractor.
- The first stage of work should be to make holes in all the steel plates prepared for the cultivator.
- The square and rectangular plates are combined with each other in such a way that cutters can be placed on the sides of the squares, which, in turn, are interlocked with bolts or a weld. It is worth considering that when connected by welding, the seam will not be highly durable, which is why a homemade cultivator for a mini tractor will be able to work exclusively on loose chernozem soils. A self-made cultivator, whose plates are connected by cutters, will be able to cultivate both clay and rocky soil - it will be reliable and durable enough to withstand the maximum possible load.
- At the end of the process of connecting all the necessary parts and assembling them into one structure, it is necessary to make a hole in its central part - a straight steel pipe, which was mentioned at the stage of preparing materials, will pass through this hole. The pipe must be cut into a pair of equal components and each of them must be equipped with special platforms with cutters. These platforms are secured using bolts or welding.
- At the penultimate stage, steel tubes equipped with cutters must be attached to the shaft of the machine’s motor block. In this case, a metal drill is used, with which holes are made in the shaft and tube. Bolts pass through these holes and must be secured with nuts.
- The final stage of assembling a cultivator on a minitractor with your own hands should be a complete and careful check of all connecting elements of the structure. Only after the inspection can the cultivator begin to be tested - this is a banal safety requirement.
Advantages of a homemade element
The ability to independently manufacture a cultivator-hiller for a mini tractor allows you to significantly save money. In addition, such an element is easy to assemble: you need a diagram of the components from the Internet, but you can also draw up drawings yourself to construct a mini tractor with your own hands.
Among the advantages of homemade cultivators for mini tractors are the following:
- availability of necessary materials;
- ease of assembly;
- significant time savings when cultivating soil on a personal plot;
- high-quality loosening and hilling of the soil, quick removal of weeds;
- in order to make a good tool, minimal cash costs are enough - basically, the summer resident already has all the necessary materials and tools and uses them for other needs.
The main thing you need to remember before you decide to make a tool yourself is that without careful preparation you won’t get a high-quality cultivator. Therefore, before starting assembly, all materials must be treated with special anti-corrosion agents.
Remember a couple more recommendations that will help make the tool more effective in its work. When designing, you need to pay attention to the crumbling angles - they can be either universal or flat-cutting. And in order for the furrows to remain even after loosening, it is necessary to install a loosening paw on the walk-behind tractors.
What is a cultivator
Cultivators , of different designs and different specifics of work, are precisely the equipment that is rarely used, but brings great benefits.
Cultivation is on the list of priority tasks for any tiller, as it helps prevent the appearance of weeds, at least in large quantities, and helps saturate the soil with oxygen, thanks to loosening.
It’s not in vain that the most popular product drawings are a homemade cultivator for a walk-behind tractor and a homemade hiller cultivator. They are relatively easy to make yourself, at home, so there are a lot of variations of schemes on this theme.
The principle of operation and purpose of homemade cultivators is the same as that of industrially produced Patriot, Champion, Swift, Texas, Viking, Cayman cultivators.
Next, we will look at the most successful and simple options for homemade cultivators. Also see the articles “do-it-yourself harrow for a walk-behind tractor, drawings” and disk hillers for a do-it-yourself walk-behind tractor.
For more information about the operation of the cultivator, watch the video: