What should be done if the Mole cultivator does not start?
First of all, you should carefully inspect the candle. To do this, you need to unscrew it and check for carbon deposits or damage. If necessary, buy a new spark plug. Installation of a new element of the ignition system is carried out only after preliminary installation of the sealing ring. It is screwed in all the way, first by hand and then with a spark plug wrench. At the same time, there is no need to try to screw the element in as tightly as possible, as it may crack or the thread of the cylinder head will break.
Depending on the situation, experts advise taking a number of the following measures:
- If the spark plug remains completely dry, this indicates that fuel is not getting inside the cylinder;
- If, on the contrary, excess fuel drips from the spark plug, then you will need to “bleed” the engine with a manual starter to dry the cylinder;
- If there is carbon deposits on the candle, it must be removed using gasoline and a small piece of sandpaper.
After completing all operations, put a wire square on the spark plug and firmly press the spark plug with its base to the cylinder. Next, wrap the base of the part with electrodes, winding them in the opposite direction from the hole. Next, rotate the engine crankshaft several times using the starter cord. If the ignition system is working properly, you will notice a blue spark between the spark plug electrodes. If there is no spark, or it has a different color, then the ignition system of the Mole motor cultivator is not working correctly.
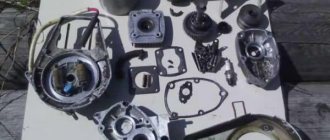
Device
The design of a motor cultivator consists of a frame, engine, transmission, fuel tank, wheelset and attachments. The frame is assembled from two identical half-frames, which are secured to the gearbox with bolted connections. Curved tubular holders are located on the rear of the walk-behind tractor. These handles are equipped with speed control and clutch levers. Wheels, plows and cutters can be attached to the ends of the output shaft, depending on the type of work being performed (plowing, hilling or transporting a cart).
A gasoline engine is mounted on the frame, which is connected to the input shaft on the gearbox using a belt transmission. The engine used is a classic version of a single-cylinder two-stroke engine with an air cooling system. The engine capacity is 60cc with a power of 2.6 hp. This is quite enough for working on simple soil areas. The engine is started manually using a rope. Thanks to a wide selection of power units, equipment manufacturers now have the opportunity to install more advanced engines on their products. Modern models of the Mole walk-behind tractor have begun to be equipped with more powerful Chinese four-stroke engines.
In this video we will look at installing the ignition on a Mole motor cultivator:
A gas tank is installed on top of the structure. To transport the motor cultivator, there are movable wheels that can rise and not interfere during field work. The baby has been serving people regularly for many years. The main disadvantage is considered to be the miniature electronic unit of the MB. The fact is that this equipment is installed in such a way that the electronic part of the circuit is located in close proximity to the engine crankcase. During long-term operation it heats up to 80 degrees, and the thyristor installed in the board is designed for a maximum temperature of 75 degrees. Hence the unstable operation of the engine.
Common causes of ignition system failure
Often the Mole motor cultivator cannot be started due to a number of other faults, all of which are related to the ignition system of the unit. Breakdowns include:
- The absence of a spark indicates a malfunction of the spark plug and the need for its urgent replacement. Often the cause of this malfunction is a violation of the gap between the ignition coil and the magnetic wire;
- Another common breakdown is a failure of the gasoline hose connection. You will need to carefully inspect this element and check its attachment to other cultivator components;
- The next malfunction is the contact between the magneto wire and the flywheel plates. You will need to achieve a gap between these elements.
Experts strongly recommend not to waste time and effort restoring an old spark plug. It is best to immediately go to a car market or a hardware store and buy a new part.
DIY starter repair
Repairing the starter of a Mole motor cultivator with your own hands is not a difficult task, and the main causes of problems are:
- Deformation of the connection points of the starter springs.
- Starter cord faulty.
- Failure of a device part.
To determine the nature of the failure, follow these steps:
- Arm yourself with the instructions from the walk-behind tractor and a wrench for unscrewing the nuts with which the starter is attached to the walk-behind tractor.
- Disconnect the starter, recording all the steps on paper or through photographs, so that when installing it in place you do not confuse or miss anything.
- Unscrew the top starter washer and disassemble the mechanism.
- Inspect parts for damage.
- If a defect is found, replace the part with a new one.
Important! Most often, springs and cords fail.
The spring has hooks at the ends that break off over time. Buy a new spring or bend the free end on the damaged one, after which it is ready for use again. The failed cord is replaced with a new one.
Features of self-repair of a cultivator
If you have figured out why your Mole cultivator won’t start, then it’s time to start repairs. Since most often the essence of the problem lies in the violation of the distance between the magnetic shoe and the stator, it is necessary to consider the features of repairing this breakdown.
The repair algorithm for the Mole motor cultivator is as follows:
- First, remove the fan housing;
- Do not completely loosen several mounting bolts;
- Install the feeler plate into the gap between the flywheel shoe and the stator, screw in the fasteners;
- Rotate the flywheel and observe the gap.
After completing these operations, you need to check for the presence of a spark at the body ground. To do this, use the starter to rotate the crankshaft. If there is no spark, then the starter will need to be replaced immediately.
1 Review
With proper and rational use of the Mole walk-behind tractor, it will serve you for many years. Remember that it is better to prevent ignition failure than to carry out repairs later.
Possible malfunctions, repairs
Despite the simplicity of their design, Krot motor cultivators are extremely sensitive to contamination of individual components, parts, mechanisms and other components of the unit. Many problems during operation arise due to untimely replacement of consumables and neglect of basic rules for caring for equipment. The ironic slogan “Tanks are not afraid of dirt” does not work in this case.
Let's look at the most common problems and breakdowns that occur in the main components of the cultivator.
Engine
The first samples of Mole cultivators had many complaints specifically from the motors, which were unreliable and had a short service life. Equipment owners modified agricultural machines at their own risk. Often, new engines were installed on the units to replace the ones that had fallen into disrepair from other garden equipment: Forza, Patriot, Sadko, Lifan.
Thanks to factory design developments, cultivator models with engines Honda GC 120, Honda GC 135, Greenfield, GeoTeck, Subaru Robin EY-15D, Hammerman, INNOMOTOR , Briggs & Stratton from well-known Japanese, German, American, Hungarian, and Italian brands appeared.
Thanks to modern engines and innovative developments, the Mole has turned from a once narrowly functional milling cultivator into a universal agricultural machine, which is capable of performing any agricultural work on tillage, cultivating crops, as well as transporting goods and clearing territory.
Therefore, if your Mole motor cultivator still has an old two-stroke engine, urgently replace it with a new model and feel free to expand the functionality of the unit. The most budget-friendly and fairly reliable option is Lifan; “Americans” and “Japanese” will be more expensive, but subsequently they will require much less attention.
If the engine does not start:
- empty fuel tank or poor quality fuel;
- difficulty with ignition;
- consequences of decompression in the form of deformation of the exhaust valve, breakdown of piston group elements - it is necessary to disassemble the engine and replace worn-out parts.
The mole won't start!
Started up:
Ignition
The ignition may be completely absent or not fire in the following cases:
- If the magneto fails, it is replaced, since the device cannot be repaired.
- If there is no spark, the spark plug may have simply burned out; you should replace it with a new one.
- A sooty spark plug must be thoroughly cleaned and washed with gasoline.
- If there is a spark, but the equipment does not start, pay attention to the condition of the spark plug - if it is damp or wet, it means the insulation has been damaged. To eliminate the defect, it is enough to change the tip. In turn, a wet spark plug is most often caused by low-quality fuel.
- Due to excessive wetness of the spark plug and fuel leakage, there will also be no spark; you should bleed the engine using a manual starter, thereby drying the cylinder.
- Increased gap between the electrodes - it is necessary to set the optimal gap size.
- A dirty air filter is the most common cause of lack of spark, so it is necessary to systematically check its condition and change it in a timely manner.
- The integrity of the fuel line is damaged - the hoses should be replaced.
- Electrical system insulation failure.
- Check the position of the flywheel plates - they may be jamming the magnetic circuits.
Replacing the magneto in the Mole cultivator:
Operation of the Mole cultivator with a repaired ignition
Carburetor
The consistency of processes when starting the engine and its further operation depends on the correct adjustment of the carburetor. The main function of the carburetor is to create a fuel-air mixture, which, after ignition, powers the heart of the cultivator - the motor. Therefore, it is extremely important to adjust it in accordance with the recommendations of the factory instructions. The carburetor requires adjustment after the first season of operation.
The adjustment consists of setting a consistent fuel supply and the required speed. The speed and fuel quality screws are used to make the necessary adjustments to the carburetor in idle mode. In addition, it is important to keep the carburetor clean at all times.
Video: Adjusting the Ignition of the Mole Cultivator
Engine selection
In the Union, only domestically produced two-stroke single-piston engines were used, which were not particularly powerful. Today you can find a “Mole” with a four-stroke imported engine. But if you also have the first model of cultivator in your arsenal, then upgrading your “Mole” by replacing the motor is quite simple.
And here a new question arises: which engine is better to install on the unit? This is not difficult to answer. Those models that are installed on newer machines are suitable.
It is best to replace the domestic engine with an imported one:
- Hammermann
- Geotec
- Subaru
- Honda
- Briggs&Stratton
- Lifan
An excellent solution would be to install a Lifan engine on a Mole cultivator. This engine provides the car with a long service life, because in addition to reliability and efficiency, Lifans are also unpretentious and, of course, do not require additional attention.
READ How Ignition Works on a Motoblock
Video review of replacing the engine on the Lifan 168 F-2 cultivator
Carburetor
What is a carburetor and why should I adjust it? Carburetor. This is a small device designed to produce a gasoline mixture. This mixture, with the help of a piston and a spark plug, will be compressed and ignited as much as possible, the engine will start and continue to run.
Carburetor adjustment is one of the mandatory items included in the “Maintenance” section of the device. Thanks to timely inspection and repair, the service life of the cultivator will increase. In addition, inspection and adjustment are necessary even when the engine roars loudly for no apparent reason.
Before starting the adjustment, you need to familiarize yourself with the design of the carburetor of the Mol cultivator:
Therefore, in order to adjust the fuel supply and ensure the required speed, you need to turn two screws: the number of revolutions (in the figure) and the quality of the fuel (figure). Using these two screws, we regulate the fuel supply to the carburetor of the Mol motor-cultivator at idle speed. You need to act very carefully, first check the state of the fire.
Car owners are often interested in how to start the Krot cultivator after winter. The reason for the lack of ignition is condensation in the carburetor, which accumulated during idle time at variable temperatures. Complete disassembly of the device and subsequent cleaning will help solve this problem. All types of additives contained in low-quality fuel and dust seeping through the filter will also not contribute to the operation of the device.
Transmission of infection
The main task of the gearbox is to transmit torque from the engine to the shaft. The transmission is carried out using a V-belt drive. You can learn more about the design and repair of the transmission of the Mol cultivator by watching the video.
Video review of gear reducer
Ensure regression
The first modifications of the "Mole" are not equipped with a reverse function (reverse), which somewhat affected their efficiency and ease of use with devices such as carts, snow blowers, mowers and much more. To replace the “Mole”, the manufacturer has released new modifications that have a reverse function, which significantly increases the mobility of the cultivator.
Video review of the inverse function on a mole
Drive belt
The drive belt transmits torque from the engine to the gearbox. The cause of failure of the Krot cultivator is often a rupture of the drive belt. This is due to the belt jamming during operation due to heavy loads on the working parts of the cultivator (hard soils, dull cutters). The cutter bends and catches the knife on the belt, making it unusable.
READ Adjusting the Carburetor of the Oleo Mak 941 Chainsaw
Mole cultivator drive belts can have various modifications, but their dimensions are strictly defined:
- 710 mm;
- 750 mm.
Description
The “Mole” motor-cultivator appeared in the early 80s of the last century and immediately gained popularity among rural residents and dacha owners. This is not surprising, because with the help of this agricultural technology, mechanized soil cultivation, as well as planting, care and harvesting, became possible.
Over more than 30 years of its existence, “Mole” has been modified more than once. Such parts as the engine, gearbox, handles, cutters, as well as other equipment (including attachments) were brought to perfection. Having gone through a difficult path of improvements, we no longer received the original motor cultivator, which has some limitations in operation, but a multifunctional motorized device, with which we can easily carry out the following field work:
- plowing the soil;
- cutting beds;
- planting potatoes;
- spud of plants;
- weeding plants from weeds;
- mechanized potato harvesting;
- mowing;
- irrigation;
- transportation of bulk and piece goods;
- snow removal.
In order to perform all of the above work, you need to acquire the appropriate tools. You can find out more in the article about attachments for the Mole cultivator on our website.
No matter how powerful your unit is, no matter how much you care for it, sometimes it still requires repair - the engine won’t start, the engine gets hot, or some other malfunction... To know how to repair a motor cultivator, you need to understand its structure.
Mole cultivator gearbox: device
The Mole motor-cultivator gearbox consists of the following elements:
- Shaft with gear and sprocket.
- 4 bearings.
- Two body parts.
- Roller chain.
- 3 seals.
- Vala.
- Shaft with an asterisk.
- Traffic jams.
- Gaskets.
- Plugs.
The gearbox is combined, and in it the gear drive precedes the single-row chain drive. The gearbox is gear-type, constructed of two shafts on which the gears are attached.
The gears on the driven shaft are statically fixed and do not move along. The design of the device provides a gear shift option.
Common breakdowns
What machine elements may require the operator's close attention?
Let's list them:
- motor;
- magneto, ignition system;
- carburetor;
- gearbox;
- air filter, etc.
Now let’s take a closer look at all those malfunctions that can affect the performance of the unit, no matter what model it belongs to.
Does not start
So, what to do if the “Mole” does not start, what could be the reasons for this? The ignition fails or there is no ignition at all in the following cases:
- No spark. This could mean the spark plug is burnt out. In this case, you need to unscrew it and simply replace it with a new working one.
- The spark plug is smoked. A good cleaning will bring it back to life (remove carbon deposits, clean the contact), after which the spark plug must be thoroughly rinsed in gasoline.
- If the cultivator does not start, but there is a spark, then most likely the reason is a lack of insulation. We look at the candle again, in this case it is wet or slightly damp. You don't have to change the entire spark plug; you only need to replace the tip.
- Poor quality fuel may cause the cultivator to fail to ignite. It is for this reason that the spark gets wet, after which you will have to change the tip.
- Fuel dripping from the spark plug is another reason why the car will not start. To rectify the situation, it is necessary to drain the cylinder by bleeding the engine using a manual starter.
- The reason for the lack of ignition may also be problems with the fuel supply hoses. To restore the operation of the cultivator, it is necessary either to properly tighten the hoses, or, in case of rupture, replace them with new ones.
- Poor insulation of the electrical system (high and low voltage wires) can also cause the unit to not start.
- Pay attention to the air filter. If it is dirty, then problems with ignition are guaranteed. It needs to be either cleaned or replaced. Most often they resort to the second option, fortunately, this spare part is available both in price and in availability in the store.
- Failure of the magneto itself. This part cannot be repaired and is immediately replaced with a new one. How to check the magneto of the “Mole” motor-cultivator to make sure it is faulty? Yes, it’s very simple - if all the reasons why there may be no spark are excluded, then the cause of the malfunction is in the magneto. Many craftsmen rework the working magneto, thereby increasing its service life.
This is what the Magneto ignition circuit for the “Mole” motor cultivator might look like
- There may be no ignition if the flywheel plates jam the magneto cores.
- An incorrectly set gap between the electrodes will not allow a spark to escape.
Video review of the modernization of the ignition of the “Mole” motor cultivator
As you have seen, setting the ignition is not so difficult.
Engine
The main reasons that the “Mole” engine does not start are:
- lack of fuel (or its low quality);
- ignition problems discussed above;
- the appearance of decompression and, as a result, piston wear and deformation of the exhaust valve.
In the first case, it is enough to simply fill in the required amount of fuel (a mixture of gasoline with M-8V autolom oil) and all problems will be resolved. In the case of a compression failure, you will have to completely disassemble the engine and replace damaged parts, and this could be a piston or an o-ring.
Deformation of the exhaust valve becomes another cause of compression failure, which leads first to a loss of power of the “Mole” motor-cultivator, and then to starting problems.
To restore engine functionality, it is necessary to completely disassemble it. Having assessed the condition of the piston, replace it if necessary. We change the piston rings and exhaust valve. We examine the engine head, in particular the gas distribution mechanism, and if there is carbon deposits, we clean it. If structural elements are damaged, we replace them with serviceable ones.
Motor selection
During the Soviet Union, only domestically produced two-stroke single-piston engines were used, which were not particularly powerful. Today you can find “Mole” with a four-stroke imported engine. But if you still have the first model of a cultivator in your arsenal, then upgrading your “Mole” by replacing the motor is not at all difficult.
And here a new question arises: which engine is better to install on the unit? It’s not difficult to answer - those models that are installed in newer cars are suitable.
It is best to replace the domestic engine with an imported one:
Any of them will not only give the motor-cultivator a new life, but will also significantly increase the power and service life of the unit.
An excellent solution would be to install the Lifan engine on the “Mole” motor-cultivator. Such a motor provides the car with a long life, because in addition to reliability and efficiency, Lifans also stand out for their unpretentiousness and definitely do not require additional attention.
Video review of replacing the engine on a Lifan 168 F-2 with a Mole cultivator
Carburetor
What is a carburetor and why do you need to adjust it? A carburetor is a small device designed to produce a fuel-air mixture. This mixture, with the help of a piston and a spark plug, will be maximally compressed and ignited, and the engine will start and continue to operate.
Carburetor adjustment must be carried out after the first working season.
Carburetor adjustment is one of the mandatory points included in the “maintenance” section of the unit. Thanks to timely inspection and repair, the service life of the cultivator will increase. In addition, inspection and adjustment are also necessary when the engine roars strongly for no apparent reason.
Before we start setting up, we need to familiarize ourselves with the design of the carburetor of the “Mole” cultivator:
So, to debug the fuel supply and ensure the required speed, you need to turn to two screws: the number of revolutions (in Fig.) and the quality of the fuel (Fig. ). Using these two screws, we adjust the fuel supply to the carburetor of the “Mole” motor-cultivator at idle speed. You must act very carefully; first check the state of the ignition.
Important! Thoroughly clean the carburetor, where necessary - strip it, wash it, where necessary - change parts. Then the Mole motor cultivator will serve you for a very long time.
Owners of the unit are often interested in how to start the “Mole” cultivator after winter. The reason for the lack of ignition is condensation in the carburetor that has accumulated during inactivity at changing temperatures. Complete disassembly of the device and further cleaning will help solve this problem. All kinds of additives found in low-quality fuel and dust that has seeped through the filter will also not contribute to the operation of the device.
General breakdowns
What machine components may require close operator attention?
List them:
- Engine;
- Magnetic ignition system;
- Carburetor;
- Transmission of infection;
- Air filter, etc.
Now let's take a closer look at all the faults that can affect the performance of the device for any model to which it belongs.
Doesn't start
So what to do if “Mole” does not start, what could be the reason. Unwanted or complete combustion in the following cases:
READ How to Adjust the Ignition on a Trimmer
Here's what a Magneto ignition circuit for a Mole cultivator might look like.
- Ignition may not occur if the flywheel plates have wedge magnetic circuits.
- An incorrectly set gap between the electrodes will prevent spark penetration.
Video review of the modernization of the ignition of the Krot motor cultivator
As you can see, setting up the ignition is not that difficult.
Engine
The main reasons why the Mole engine does not start:
- Lack of fuel (or its low quality);
- The ignition issues discussed above;
- The appearance of decompression and, as a result, piston wear and deformation of the exhaust valve.
In the first case, it is enough to simply fill in the required amount of fuel (a mixture of gasoline with M-8B oil with car glass) and all problems will be solved. If compression fails, you will have to completely disassemble the engine and replace damaged parts, and this could be a piston or seal.
Exhaust valve deformation becomes another cause of compression failure, which leads first to loss of power in the Mole tiller and then to starting problems.
To restore the engine, it is necessary to complete its disassembly. After assessing the condition of the piston, replace it if necessary. Replace piston rings, exhaust valve. We inspect the engine head, in particular the gas distribution mechanism, if there is soot, clean it. In case of damage to structural elements. Replace them with good ones.
Maintenance
What does maintenance mean? This is a series of measures that ensure proper operation and proper storage of equipment. Maintenance of the “Mole” cultivator means the following work:
- washing;
- cleaning;
- lubricant;
- control;
- gas station;
- control;
- fasteners;
- adjustment of all blocks and systems
Such work must be done as often as possible, especially if you have to work in unfavorable conditions.
Before starting the cultivator engine, it is necessary to check the presence of fuel, oil, etc. It is necessary to fill the mixture to a certain level, and if necessary, replace the fuel and oil. For cultivators, Avtol oil (M-8V) is used, which proved itself during the Soviet Union.
If it is difficult to get it, then you can use analogues:
- 10W-30 (do not use at temperatures above +27 degrees);
- SAE 30 (do not use at temperatures below +4 degrees).
Adjustment work involves adjusting the clutch, reverse gear, carburetor, spark, etc.
Cleaning work includes cleaning the filter, working surfaces, housing and all clogged parts on the surface of the Mole motor-cultivator. If malfunctions occur, or for preventive purposes (less often), it is necessary to clean the internal parts of the machine.
Before putting any part back in its original place, make sure it is in good working order.
Installation or replacement of any attachments must be carried out with the engine completely turned off. When preparing for long-term storage, the motor cultivator requires conservation. To do this, you need to prepare the engine in a certain way (see instructions), then clean (rinse) and dry all the external parts of the “Mole”, wipe them with a rag, drying them well. After this, you need to lubricate all accessible areas of the cultivator with grease. The unit is now ready for a long rest.
Why the walk-behind tractor won't start, there is no ignition and the spark is gone, how to start a walk-behind cultivator - reasons
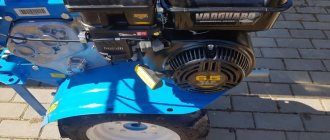
If you are looking for the optimal price-quality ratio, we recommend that you pay attention to the domestic Mole walk-behind tractor, which has been produced since 1983. The walk-behind tractor is still produced today in the Moscow and Omsk machine-building plants. In recent years, high-quality technical characteristics have allowed it to successfully compete with many foreign units. But there are also times when you don’t know why the Mole walk-behind tractor doesn’t start, or it doesn’t start well, or there’s no spark in it. Maybe the starter needs repair, or maybe the ignition is not working properly. In general, this issue and the reasons should be carefully examined.
The device of the Mole walk-behind tractor
Motoblocks, which were characterized by simplicity of design, began to be produced more than forty years ago. The first models were equipped with an insufficiently powerful engine and could only be used in a narrow range of jobs.
The first buyers of Mole were not very happy with the insufficient power of the power unit; as a result of numerous complaints, they began to improve the walk-behind tractor. Today, the Mole model is the most successful and versatile model of domestic cultivators among all those on the market.
Small in size, it can be used for various purposes: weeding, loosening, harrowing, leveling. The walk-behind tractor can be used even on a small plot of land, the area of which does not exceed 10 acres.
Walk-behind tractors Krot, Carver, Champion, Plowman, Profi, Huter, Don, Sadko can be used with a diverse line of additional attachments.
As standard, you will be provided with a coulter and a cutter for the Mole. Additionally, you can buy a plow to plow the land and a potato digger.
What are the main advantages of this unit?
- simple design,
- high efficiency,
- affordable price. This contributed to the fact that the model became incredibly popular among domestic buyers.
- There is nothing superfluous in Mole, thanks to which he regularly copes with all the tasks assigned to him.
For more information about the operation of the Mole walk-behind tractor, watch the video:
How to set the ignition
You can set the ignition using these methods.
Use a strobe
- It is worth warming up the engine to a temperature that is optimal for operation.
- Connect the power supply of the strobe to the walk-behind tractor network.
- The sensor that is responsible for the triggered sound must be placed on the high-voltage electrical wire of one of the cylinders.
- Remove the vacuum correction hose and plug it.
- The strobe light must be pointed at the pulley.
- Start the engine, the speed should be idle.
- Rotate the distributor housing.
- Create a fixation during which the pulley mark will reach the required mark on the cover of the device.
- Secure the fastening nut.
Using the lamp
- It is necessary to turn the crankshaft to a position during which the pulley mark will reach the required mark on the gas distribution mechanism, while the slider responsible for interrupting and distributing the ignition should point to the high-voltage wire of one of the cylinders.
- Reduce the force that secures the distributor housing nut.
- Connect one of the wires of the control lamp to a metal wire that serves to transmit electric current that goes from the switch-distributor to the ignition coil, and the next wire to the “ground” of the walk-behind tractor.
- Be sure to turn on the ignition.
- Rotate the body of the mechanism that determines the moment of formation of high-voltage pulses in the ignition system in the clockwise direction until the lamp stops burning.
- Slowly turn the breaker-distributor in the other direction.
- Create a fixation for the breaker-distributor, and the control lamp should light up.
- Tighten the nut that secures the distributor.
With a spark
- The crankshaft should be turned to a position during which the pulley mark will be identical to the same mark located at the base of the gas distribution mechanism, and the interruption-distribution slider will point to the high-voltage wire of one of the cylinders.
- Reduce the locking force of the nut, which preserves the body of the mechanism that determines the moment of formation of high-voltage pulses in the ignition system.
- From the cover of the mechanism that determines the moment of formation of high-voltage pulses in the ignition system, it is worth removing the high-voltage wire, which is located in the center, and its contact must be placed at a distance of 0.5 cm from the “ground” of the walk-behind tractor.
- Don't forget to turn on the ignition.
- The body of the mechanism that determines the moment of formation of high-voltage pulses in the ignition system should be turned 200 clockwise.
- Slowly turn the mechanism, which determines the moment of formation of high-voltage pulses in the ignition system in the other direction.
- The position of the mechanism, which determines the moment of formation of high-voltage pulses in the ignition system, should not move. In this case, a spark will occur between the contact of the wire that is located in it.
- It is worth tightening the breaker nut.
Ignition system - setting, do-it-yourself repair, diagram
One of the main components in the design of a walk-behind tractor is the ignition system. It is responsible for the formation of the spark required to instantly ignite the fuel mixture.
The ignition system of a modern walk-behind tractor has a fairly simple design, which allows you to configure or repair the unit yourself.
However, for this you need to follow the correct procedure, otherwise there will be a high risk of damage to system parts.
From time to time, the walk-behind tractor needs to adjust the ignition system.
Untimely adjustment of this unit will lead to accelerated wear of other, no less important mechanisms of the agricultural machine.
In order to be able to independently adjust the ignition system on a diesel walk-behind tractor and its gasoline counterpart, you need to study the design diagrams of this unit.
A properly configured walk-behind tractor ignition system is capable of creating a spark in the right place and at the right moment.
In this case, the magneto cover is responsible for distributing the resulting spark, and its lower part is responsible for interrupting the spark.
In order for the ignition system to work exactly according to this principle, it must be adjusted.
The ignition installation is performed in the following order:
- First, you need to check the operation of the flywheel in the engine until the contacts located inside the magneto open;
- After this, it is necessary to measure the distance between the “anvil” and “hammer” built into the ignition system;
- Next, you will need to turn the flywheel until the piston is compressed;
- As soon as the flywheel reaches the highest point, it needs to be turned again. As a result of this, a one-time knock will be heard, indicating the operation of the overrunning clutch included in the design;
- After this, the flywheel will need to be turned counterclockwise so that the second mark on it aligns with the mark located on the body;
- The next step is to adjust the distance between the breaker contact and the adjacent cam. The minimum gap between the parts for proper operation of the ignition system will be 0.25 mm, and the maximum will be 0.35 mm;
- At the end, it remains to secure the built-in cam with a special screw, which is located on top. The video will show you how to properly set up the ignition system on a walk-behind tractor.
The performed ignition adjustment will speed up the start of the walk-behind tractor engine and make it smoother, which will lead to slower wear of the piston group and other important elements of the engine of an agricultural machine.
Malfunctions and causes
If the Mole, Forza, Viking, Crosser, Foreman, Texas, Patriot, Cayman walk-behind tractors do not start and stall or there is no spark in the ignition system, this means that you did not carefully monitor the engine ignition system. You should conduct weekly:
- Control.
- Visual inspection.
- Measuring the distance between the spark plug electrodes and checking the set stage of magneto sparking. For these manipulations, a probe is required.
Ignition malfunction is the most common breakdown that occurs in the Mole walk-behind tractor.
What should you do if your walk-behind tractor does not start and the ignition system of the Mole walk-behind tractor does not work:
- First you need to check the spark plug. Unscrew and inspect it. If you need a separate spark plug for a mole walk-behind tractor.
- Installation of the spark plug must be carried out by first installing the sealing ring, screw it in by hand until it stops, and then use a spark plug wrench. When tightening, do not apply excessive force - this may cause the cylinder head threads to break.
- If the spark plug is dry, it means no fuel can get into the cylinder.
- If fuel drips from the spark plug, it is necessary to “bleed” the engine using a manual starter, this way you will dry the cylinder.
- If there is a lot of carbon on the candles, it should be cleaned with small sandpaper and gasoline.
- Place a square of wire on the spark plug and firmly squeeze the base of the spark plug towards the cylinder, wrap it with electrodes in the direction opposite to the hole. It should be located under the candle at the base of the cylinder.
- Rotate the engine crankshaft several times. The starter cord will help you with this. If the ignition system is working correctly, you will see a sky-colored spark with a white tint between the spark plug electrodes. If it is missing or it varies in color, this indicates that the ignition system is not working properly.
If you did everything correctly, then now you undoubtedly know how to start a Mole walk-behind tractor.
What other reasons could there be for the breakdown?
No spark
If there is no spark during ignition, this indicates that the spark plug is malfunctioning and needs to be replaced urgently. Maybe the problem arose due to the absence of an electrical circuit in the contact or the gap between the magnetic wire and the ignition coil is broken.
Problem with spark plugs if the starter does not work
You can purchase spark plugs for the Mole walk-behind tractor in a specialized store or at the automobile market.
Gasoline hose
The ignition of the Mole directly depends on the proper operation of the gasoline hose, insulated high-voltage wires and their contacts. All these connections and parts will need to be thoroughly checked. The flywheel plates must not touch the magneto cores. Pay attention to hide touch marks.
If you were unable to find a fault in the ignition yourself, and the starter for the mole walk-behind tractor still does not work, we strongly recommend that you contact a specialist. You cannot solve a more serious problem on your own.
Repair if the walk-behind tractor does not start or stalls
If your ignition does not work, the Mole walk-behind tractor does not start, and you want to repair the electronic ignition, check the stator and magnetic flywheel shoe.
Also check the distance between these elements, which should be from 0.10 to 0.20 mm.
The chainsaw is powered by an internal combustion engine. This is a simple device, the design of which does not have any special bells and whistles. Here you will learn how to start a chainsaw.
To prevent snow from becoming a serious problem for you, you should use snow removal equipment. Champion snow blowers provide excellent quality for many years.
Tractors were successfully used in agriculture on collective farm fields, in cowsheds, and for cleaning city streets by utility companies. Here is all the useful information about the Uralets mini tractor.
To set the gap between the stator and the magnetic type shoe:
- remove the fan housing;
- loosen (but not all the way to the base) a couple of fastening bolts;
- mount the probe plate into the distance between the stator and the flywheel shoe, tighten the bolts that are fixed so that the plate passes within this distance;
- turn the flywheel and pay attention to the gap that was built in around the entire perimeter.
After the gap has been set, it is worth paying attention to whether there is a spark on the “ground” of the housing:
- remove the spark plug square from the high-voltage cable and attach the freed edge at the base of the cylinder with a gap (0.3...0.5) cm between the head and the part of the cable that is not insulated;
- Using the starter, rotate the crankshaft, and a spark should appear, which ensures a breakdown of this gap.
If there is no spark, the starter should be replaced immediately. If a spark appears, it is necessary to check the contact of the high-voltage wire in the spark plug bracket or replace it.
The most common ignition defects:
- Breakdown of the end part of the starter spring at the point of contact with the drum.
- The starter cord is broken.
- Malfunction in the ratchet mechanism.
An unusable spring can be replaced or, if you have the necessary tools and knowledge, it can be easily restored.
To do this, it is worth annealing the end part of the spring at a distance of (10...12) cm on a simple burner using a file.
It is necessary to make the same profile for connecting the spring to the starter drum. Wind the spring onto the latter in the clockwise direction so that its unused edge is engaged and inserted into a specific mounting location on the fan housing.
Center the starter drum using the appropriate screwdriver. The claws (whiskers) of the restrictions must be adjusted to the fan housing, then cock the drum with the spring.
Fully release the spring that is charged several turns and connect the holes of the fan housing and the drum starter; all adjustments must be carried out extremely carefully.
Install the starter cord and make knots in the starter drum, then release it while maintaining tension in the cord handle. Replace the starter cord.
Please note that when purchasing a walk-behind tractor, you must carefully study the instructions for its use.
The ignition circuit of the Mole walk-behind tractor is also mandatory to study. The latter will provide you with the necessary knowledge on the design of the device, you will be able to quickly navigate during a breakdown.