The best place to place a lift
Before installing a car lift, you need to correctly select the installation location. The equipment must be installed on a concrete surface, the thickness of which is in the range of 25-40 centimeters.
The surface on which the equipment is mounted must not be uneven. This does not apply to lifts with a frame base, which are installed even on uneven floors.
In addition, when choosing a place, keep in mind that when servicing and repairing a machine on a car lift, it should not touch the ceiling surface when fully raised.
When choosing equipment for a garage space, you must consider the following characteristics:
- Maximum permissible weight. A lift designed for a passenger car will not be able to lift a minibus.
- Vehicle lifting speed.
- Dimensions, weight, configuration. Here, take into account the parameters of the garage space.
Which foundation to choose?
It is important to remember that all these measurements will be useless if you do not first take care of the foundation strength necessary for this very installation. The primary requirements for it are, of course, external integrity, density, the absence of any irregularities or differences, etc.
It is recommended to take this issue as seriously as possible - after all, even if installing a lift on a crooked or cracked foundation is successful, there is no guarantee that everything will not go awry when lifting the first load. So negligence and neglect are almost guaranteed to lead not to additional savings, but, on the contrary, to even greater expenses:
- it is not difficult to avoid this. So, for example, when installing a two-post lift with lower synchronization (in particular, installing a T4 and T4B lift), the optimal foundation thickness is approximately 15-20 cm (or more for working with the largest equipment). The required density is provided by concrete solution M300 and higher;
Foundation for the lift
- however, for devices with top synchronization (S4D, S4D-2), as well as lifts consisting of several individual racks, these measures will be insufficient. In particular, the minimum thickness of the foundation for such mechanisms should be at least 30-35 cm, and the minimum acceptable grade of concrete should be M400. Also, in some cases, it is recommended to additionally strengthen the foundation using metal mounting beams and other reinforcing elements, the required list of which is indicated in the appendix to the technical documentation.
It is prohibited to install lifts (as well as other massive structures) on a recently poured foundation. The optimal time required for compaction and hardening of concrete is about 30 days. To further strengthen and seal microscopic (and other) holes on its surfaces, polymer and paint coatings, silicone, rubber and ceramic tiles are used, which also contribute to less friction and abrasive wear of the floor.
Optimal dimensions and height
Not every garage will be able to install a car lift. For example, if you are the owner of a minibus, which almost touches the ceiling when entering the garage, there is no question of any single/two-post lift. The garage space must have appropriate dimensions.
Next, you can familiarize yourself with the minimum garage dimensions required for a certain type of car. Add to the height of the garage the value of the height to which you plan to raise the car. This way you will determine what minimum height the garage ceiling must have to install a car lift.
For passenger cars
The length of the garage should be three meters greater than the length of the car, and the width should be the same. The optimal height is three meters.
For jeep
The length, width, and height of the garage space for a jeep or other SUV should be eight, five, three meters, respectively.
For minibus
If you own a minibus, the garage should be large. The optimal length is seven and a half meters, width is five meters. The minimum garage height for a minibus is three and a half meters.
If you have a Gazelle cargo truck with an extended platform, the length of the garage space should be ten meters. The minimum height here increases to four meters.
Making a tipper
To create a lift-tilter you need to know what parts it consists of:
- front pillar;
- shoe;
- area;
- top, bottom and rear beams;
- connection elements.
- steel sheets 4 mm thick;
- corners;
- bushings;
- fasteners;
- welding tool.
First comes the metal shoe. A metal rod should be welded to secure the jack. The shoe needs to move on the post, so you need to stick to the inside width. Four corners are needed to create the rear beam.
We create squares from the corners, and insert a 26*21 mm metal square rod 35-36 cm long into one of them. Next, sheet metal 3-4 mm thick is used to create a platform. The coverage of the site will be approximately 350*150 mm, and the sides are made in a curved shape.
After this, it is necessary to weld a strip in which holes will be drilled to secure the inserted board. The dimensions between the guides must be observed.
Sheet metal 3-4 mm thick is used to create the rear connecting unit. Two halves are formed from it. The front part is left open, and a jumper is welded to the bottom part. The stand must be made from four 32 mm corners with a length of 1540 mm, as well as four 36 mm corners of the same length.
We use the corners to create a square using welding seams. The length of the seams is 30-40 mm. When connecting the corners, you should step back 31 mm from the edge and drill a hole with a diameter of 26 mm in the lower part. After this, the metal rod is welded inside the entire structure.
Next, holes with a diameter of 13 mm are made. A hole is also required to fully secure the shoe and top beam. A square profile is formed from the corner sections and connected to the drilled square profile. Spacers with a diameter of 36 mm are installed in the profiles. The top beam should fit easily between the square profiles.
By contacting a specialist in this field, you can get a device created for individual dimensions. It makes sense to do this if knowledge and experience are not enough to independently manufacture and install the structure.
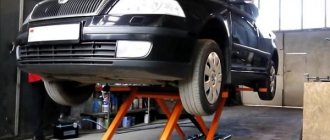
Step-by-step installation of a lift with your own hands
Having chosen the right car lift, you do not get a guarantee that it will work properly. For comfortable operation, the device must be installed. The main condition for successful installation is the high reliability of the garage foundation.
Installation of a solid base
The area of the garage in which the car lift will be installed using fastenings must have a thickness of concrete material of at least ten centimeters. In addition, when pouring concrete, the layer of material is additionally reinforced. Without reinforcement, the foundation may be pushed through. In such a situation, it will be necessary to dismantle the car lift and re-fill the foundation.
Calculation of the minimum height of paw lowering
When installing the lift, you need to determine the minimum height for lowering the legs. The plane below should be level. The minimum height to which the arms of the equipment can be lowered depends on the specific model of the device.
However, there is a standard: the maximum height is 11 centimeters, the minimum is 9.5.
Assembly of the structure
The equipment must be positioned according to the length of the machine. On average, the bumper of all cars protrudes about two meters from the center of the lift holders.
Differences between lift drives
According to the type of drive, the equipment is:
In turn, the types of lifts are graded into:
Electromechanical equipment according to the type of lifting supports is divided into:
- One-two-three-post,
- Multi-post,
- Scissor.
Based on the number of plungers, hydraulic technology can be:
- Single plunger,
- Two-three-plunger,
- Multi-plunger.
For optimal selection and installation of equipment, differences in drives must be taken into account.
Inexpensive lifts include electromechanical equipment, which is characterized by its simple design and ease of maintenance and operation. Among the features of electromechanical technology we highlight:
- Lack of stoppers included
- The need to regularly lubricate working parts,
- The presence of a transmission shaft significantly increases the safety of equipment.
If you want the equipment to operate smoothly and silently, then choose the option with an electro-hydraulic drive. A small overpayment will pay for itself during the operation of the equipment, and the installation of the equipment is practically no different from the installation of other types of equipment. Also, when choosing an electro-hydraulic drive, the speed of work increases, which in some cases is of value to the garage owner.
Note! If your choice falls on a twin-engine garage lift, then choose equipment with a high-quality synchronization program. If the engines are of the highest class, but the software is not very good, then the operation of the equipment will become not only ineffective, but also unsafe!
Stage 3 “Equipment testing”
The next step is to test the mounted and connected car lift. We perform a series of descents and ascents. We check the smoothness and speed of movement. Let's see how the lift works; the installation is considered successful if no failures occur during the diagnostics. In this case, the equipment is considered ready for everyday loads and is put into operation.
The car lift installation service does not include floor preparation, delivery of the lifting device to the installation site and wet cleaning.
Tips for choosing a garage lift
For an ordinary garage, the best option is to install a one- or two-post electromechanical lift, since such a unit is reliable and has a load capacity sufficient for repairing a passenger car. In addition, this type of equipment is compact (small room height is suitable and there are fewer requirements for the size of the garage box) and does not require special knowledge for maintenance. The small size of this equipment allows it to be installed even in small rooms with a ceiling height of 2 meters.
Strengthening the structure
Pipes of smaller diameter, which are located across the jack, are reinforced on all sides with metal plates. A thick plate is installed on top of a large pipe welded to the jack, and metal corners are installed below.
The structure is welded and ground with a grinder. To learn welding skills on your own, it is recommended that you familiarize yourself with the information in the useful DIY workshop
. Next, the stands are made.
Required materials for stands:
- Thick metal washers;
- Nuts for 20;
- Bolts 20.
Important: Choosing wheels for a walk-behind tractor and replacing them yourself: how to install Zhiguli wheels, video
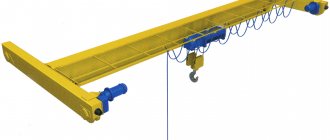
For the construction of lift stands for the inspection pit
the nuts are welded vertically to smaller pipes that run across the jack. Then the washers and bolts are fastened together.
Next, the resulting structure is screwed onto the nuts. Rubber cups are placed on top of the washers. This is a DIY pit lift
ready for use. Thanks to the jack used, the traverses are raised quite high.
It is necessary to treat the metal with a special anti-corrosion compound, due to which the structure will last longer. To give the lift for the inspection pit
aesthetic appearance, the structure can be painted. The ready-made traverse is easy to use, does not require significant effort in operation and provides good lifting of the car.
The nuances of installing a lift in the garage
Even the correct choice of a garage lift does not guarantee optimal operation of the equipment, since the equipment requires high-quality installation. First of all, the garage must have a solid foundation.
The area for lifting equipment must have a concrete thickness of 10 cm, plus during concreting, additional reinforcement of the concrete base is carried out. Without reinforcement, the lift will push through the foundation and the equipment will have to be dismantled before refilling the concrete, taking into account the recommendations.
If you are just buying a garage, then immediately check with the seller for information about the thickness of the screed and foundation. The golden rule is that the dimensions of the room and the dimensions of the equipment must be compatible!
From this data, the size, type of drive, height and features of the lifting equipment are selected. If the requirements for the foundation are ignored, you will damage the foundation, disable the equipment and may be injured when working with the lift.
Remember - a garage and complex equipment for auto repair require an appropriate approach; if you do not understand the types of equipment and do not know how to install it correctly, then it is better to spend money on a specialist.
When installing, also consider:
- Minimum paw lowering height,
- Dimensions of equipment and premises.
The lower point of lowering the paws is different for different manufacturers and is in the range of 95-110 mm. At the bottom point, the base should be smooth and strong (read about reinforcement above).
The height of the garage ceiling for the lift should be such that the car can rise to the desired height, while the lift should not freeze halfway through the rise due to the low ceiling in the garage.
If there is a basement in the garage, then it is better to make lower supports in it, which are installed between the base of the basement and the top slab and concreted. This reduces the load on the floor slabs and reduces vibration when equipment operates under the weight of the vehicle.
It is advisable to install the lift on M18 studs with a length of 30 cm. A metal plate with a metal thickness of 3-5 mm is also fixed at the bottom. This option is suitable for a small to medium sized and weight lift. In auto repair shops, in any case, a reinforced foundation is required and the equipment is not installed above the basement, since the floor slabs may not support the weight of the truck even with additional supports.
The lift that you install in the garage will help you maintain your own car on site, but it is important to choose the equipment wisely. The installation of lifting equipment also requires attention, taking into account its size, type, power and configuration.
Simple lift
For several decades now, the most common and durable method of lifting a car has been turning it on its side.
In fact, it is not only the engine that needs repair from time to time, but also other components that can only be reached using a test pit. But not everyone has such a pit, and folk craftsmen have constructed an elementary, if not primitive, system. At least 3 people are required for this lift. This method can hardly be considered ideal, because not a single person wants to tempt fate by scratching a car on a concrete flooring.
However, if there is no other way out, then such a lift can help you out. His system is as simple as possible, and the production method is clear even from photographs.
An alternative to a lift can be an inspection hole (of course, if the garage system makes it possible to dig it). If you make a hole as tall as you are, you can easily examine the bottom of the car. If it is not possible to properly equip the inspection hole, then you can limit yourself to an overpass (but it will require the presence of quite significant ceilings in the room).
Instructions:
- 1. For the base, embed metal corners into the side walls of the room so that the car hood is located just under them. Next, install a centimeter plate on the corner racks and secure it with eight “M8” bolts. It will not merge with the corners, so in the future you will be able to change its placement above the car engine.
- Fix the worm adjuster on the plate. Next, take the key, put it on the electric drive shaft, and secure it. Then make a 2 cm opening in the tile for the chain, then pass the chain through the finished hole and close it into a ring.
- Place another sprocket on the outgoing shaft, smaller this time, and combine them.
- Make 2 more holes of 3 cm in the slab, pass the chain over the key. The 2nd chain must end with a metal hook capable of supporting the weight of the motor.