DIY scissor lift installation
A scissor lift is the best hydraulic lift for small spaces, great for garages with narrow openings, this is the kind of universal scissor lift that is suitable for our garage co-ops.
In this article we will look at the complete installation of a hydraulic lift in our garage: Let's get started. The first thing we need is to buy a scissor lift, of course you can do it yourself, the design is not complicated, the lift is made from an arrangement of a system of levers (which are called “scissors”), a hydraulic drive, and of course the power supply itself is carried out from an alternating current network, just remember that the components for creating a lift with your own hands will cost more than two new lifts. Therefore, our choice is to buy a new one. How to choose the right hydraulic scissor lift
When choosing a lift of this type, you should pay attention to 2 factors: the lifting capacity, as a rule, is 3 tons, but there are also weaker 2.3 and even 1.9 tons, such lifts should not be purchased due to the fact that the average weight of a passenger car is 1.5 tons, the declared loading capacity from the manufacturer is the rules are not always true; often lifts with small tonnage do not last long.
Although the price is attractive, remember the miser pays twice. The second fact is the maximum lifting height of the platform, this is also one of the important factors because too low a height will not give you the proper clearance to inspect the bottom of the car. As a rule, Chinese lifts suffer from this problem. The normal height for inspection will be approximately 1850mm. The lifting height should be taken into account according to your height. We should not forget about safety, so the lift must have a parachute valve, provided in the design, it prevents the lift from suddenly lowering. Our choice fell on the ever-eternal lift, thanks to the guys from shop korch for helping us bring it. Preparing the garage floor for a scissor lift
The pit for the lift should be made based on the size of your lift.
Source
Car lifts for service stations and garages
Most often, an American manufacturer is chosen to equip service stations, while good Chinese lifts may be suitable for a personal garage. Due to their safety and reliability, such devices have performed well.
To facilitate repair work, the following devices can be used:
- Four-post lifts. Suitable for major car repairs or wheel alignment work. Used to perform maintenance on cars and trucks. Such devices have one motor and one control panel. Thanks to the cables, the level of lifting of the racks is adjusted, so this design is considered universal.
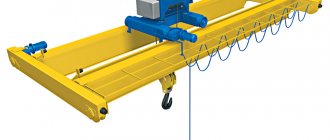
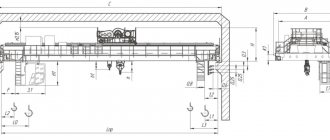
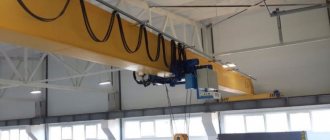
- A scissor car lift is used at wheel alignment stations or tire shops, since the device is mobile and has a hydraulic drive. A scissor garage lift is useful when performing car body repairs.
- Plunger lifts have a simple design and do not take up much space in the garage since they are mounted into the floor. They are reliable and durable, which distinguishes them from other designs. The cost of such a device is high, so their use has not yet gained much popularity.
The lifting and lowering speed is about one to two minutes. The height of the electromechanical lift is about 2 meters, but can be up to 3.5 meters.
Content:
What factors need to be considered during installation? How to securely secure lifting equipment? And what are the features of installing different types of car lifts? We'll tell you in this article.
Every workshop should have at least one car lift. Today, the work of not a single service station is unthinkable without it.
car service. This lifting equipment allows you to optimize work processes and significantly facilitate vehicle maintenance during diagnostics, repairs, and replacement of spare parts. And if the volume of work is large and the room is divided into several repair areas, then it is better if there are two or three lifts - this will allow you to lift several cars at the same time and not make customers wait. Of course, the technical equipment of a workshop requires certain investments, and you need to be prepared for this. Moreover, you often have to pay not only for the lift itself, but also for services related to its delivery and installation.
Simple arithmetic. For example, purchasing a mid-price car lift can cost from 80,000 to 150,000 rubles, its delivery from a warehouse can cost up to 3,000 rubles, and installation services can cost from 8,000 to 14,000 rubles. If you take equipment worth 90,000 rubles, you will end up paying more than 100,000 rubles.
Did you know that you can save a lot of money on installing a lift? If you carry out the installation yourself, you will not have to pay for this service. Knowing the basic rules and some subtleties, you can cope with this matter. So, evaluate your strengths and skills, think about whether you can devote enough time to this. Yes? Then get ready for some serious work. Let's start with planning...
Quality is the key to success!
This is exactly the motto that ours works under! Placing the quality of our work and the opinions of our clients above all else, we have gained the trust and reputation of a reliable contractor in the field of installation of lifts and elevator equipment. To successfully complete an order, we have everything: qualified personnel, the necessary set of special tools, a motor pool. The main thing is invaluable experience.
Contact us! And you will be able to appreciate our service, approach to installation/dismantling work, and pricing policy. At the same time, our company provides a warranty period for all work done.
Where to place the lift?
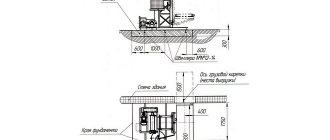
When choosing a location to install equipment, there are several important factors to consider. First, calculate how big the area with the lift will be. After all, you need to take into account not only the dimensions of the structure, but also the expected dimensions of the cars that will be serviced, and you also need to leave free space so that the technician can work comfortably. For example, the width between the racks is 3 meters, but this does not mean that this particular parameter should be taken when calculating the area. There must be a distance of at least 1 meter between the lift and the walls, as well as other equipment. Therefore, in this case, the width of the site should be at least 5 meters. As for the length, it depends on what vehicles the equipment is designed to serve. If these are passenger cars, then 6-7 meters will be enough; to work with SUVs, minibuses and gazelles, you need more free space (you can calculate more accurately, based on what vehicles you specialize in).
After this, think carefully about the location of the lift. Please note that there should be no areas nearby where washing, painting or spraying of any substances is carried out. Once you have found enough space based on the area required and measure the area with a tape measure, make sure that it is easy to drive your car into and that there will be no obstruction to traffic flow to other repair areas of the workshop. In addition, this area must have an outlet to connect the lift to the electrical network (if there is none, then it must be installed). Also be sure to provide bright lighting in the area.
Consider the distance to the ceiling. It must be high enough to prevent damage to the roof, open trunk or hood when the vehicle is raised to its maximum height. If the ceiling is too low, as is usually the case in small garage workshops, you can resort to a trick - make a recess under the lift, that is, a hole in which the technician will be when servicing the car (it will be convenient for him to work while standing at full height, without you will have to raise the car to too high a height).
Optimal dimensions and height
Not every garage will be able to install a car lift. For example, if you are the owner of a minibus, which almost touches the ceiling when entering the garage, there is no question of any single/two-post lift. The garage space must have appropriate dimensions.
Next, you can familiarize yourself with the minimum garage dimensions required for a certain type of car. Add to the height of the garage the value of the height to which you plan to raise the car. This way you will determine what minimum height the garage ceiling must have to install a car lift.
For passenger cars
The length of the garage should be three meters greater than the length of the car, and the width should be the same. The optimal height is three meters.
For jeep
The length, width, and height of the garage space for a jeep or other SUV should be eight, five, three meters, respectively.
For minibus
If you own a minibus, the garage should be large. The optimal length is seven and a half meters, width is five meters. The minimum garage height for a minibus is three and a half meters.
If you have a Gazelle cargo truck with an extended platform, the length of the garage space should be ten meters. The minimum height here increases to four meters.
A solid base is the key to proper installation
The foundation on which the car lift is mounted has very strict requirements. After all, not only the ease of installation, but also the convenience and safety of work depends on it. If the floor is lumpy, with cracks, or strong differences in height, then it is unlikely that it will be possible to install the lift struts level. As a result, misalignment may occur, and when the vehicle is lifted, one of the racks will be more loaded. It is possible that this could cause the vehicle being serviced to fall. Such cases are not uncommon. The machine falls to the bottom or on its side, resulting in severe damage. The client is furious, and the workshop will either have to eliminate the resulting defects at its own expense, or pay a large sum of money. In addition, as a result of overloading one of the racks, problems may arise in the operation of the lift itself, which cannot be corrected under warranty.
To prevent this from happening, you need to prepare the base for installing a car lift. The thickness of the foundation must be at least 15 cm when pouring
It is recommended to use concrete grade M 300 (or higher). These parameters apply to four-post frame-type models and two-post frame-type models with lower synchronization, since such structures themselves already have sufficient rigidity.
But to install two-post lifts with or without top synchronization (that is, two separate posts), you need a more durable base made of concrete grade M 400, which is used for critically loaded structures, and the pouring thickness can reach 30 cm (it is recommended to additionally use reinforcing grid). Sometimes, to give additional reliability to free-standing racks, special lower beams are mounted to them, reinforcing the base. This will allow you to work with heavy vehicles. You will find more detailed requirements for pouring the foundation in the manufacturer's instructions for the specific lift model.
It is important to know! After pouring concrete, you need to wait until it gains strength and not just hardens. As a rule, this period lasts at least 28 days. Only after this can the lift be installed on the base.
By the way, you can paint the floor or lay tiles on it - this will further extend its service life, and it will be easier to remove dirt from it. This also affects work safety, especially when lubricants drip onto the floor.
If the lift is a two-post lift, then for ease of entry of the car and the correct location of the wheels relative to the posts, you can draw two even guides on the floor. This way you will be able to place the car evenly on the lift and avoid overweight on one of the racks.
There is another installation option, which is used when installing scissor car lifts. Usually they resort to it if there is not enough free space in the room. A special feature of this type of equipment is the possibility of installation “in the floor”. That is, an opening is made in the floor, the dimensions of which are equal to the dimensions of the folded lift. The installation is carried out in such a way that the lift platforms are level with the floor level, and this area can be used for maintenance or left free for cars to enter. Such hidden installation also involves pouring the foundation in compliance with the strength characteristics of concrete.
Difficulties in making a lift
The cost of a finished car lift is high, but a self-made version can damage a person working under it if the design is unreliable. The weight of the car should not exceed more than a ton; if the structure falls on a person, irreversible injuries can occur.
A homemade car lift is made according to prepared drawings, or versions of finished products are used. In the latter case, one has to rely on the author's high computational skills. Incorrect calculation of the base or one of the fastened units can lead to irreversible consequences, at best, damage to the lifted unit.
For a homemade kit, made with your own hands, you will need parts and components, without which assembly is impossible. You can find this type of component in large stores that sell construction equipment. If there are not enough funds for new parts, you need to go to scrap metal collection points and enterprises that write off old parts.
If you find an error, please select a piece of text and press Ctrl+Enter.
A car owner may one day think about creating a crane in the garage. With its help, you can perform repair work better. Having the appropriate experience and knowledge, you will be able to independently repair your car.
To carry out a number of repairs, it is important to have access under the vehicle. Start building the lift before building the motorhome so that the dimensions of the structure correspond to the size of the room.
Assembly according to all rules
Once the location for installing the car lift is ready, you can begin installation. The detailed procedure should be described in the instructions for the equipment, so you will not have any problems with this if you read it in advance. We will briefly tell you what you have to do at this stage.
You will need the following tools: a level (laser or manual bubble), drill and concrete drill bits, torque wrench, hammer, and wrenches and screwdrivers.
Before assembling the lift, you need to mark the places for installing the racks and drill holes for attaching anchors using a drill. Please note that the depth of the holes should be 3-4 cm less than the thickness of the concrete base. Usually it is 12-12.5 cm; anchor bolts are taken the same length. The drilled hole must be cleared of concrete chips, for example, by blowing it with compressed air from a pneumatic gun. When installing the racks, the anchor bolt must be inserted through the hole in the metal base into the hole in the concrete floor and hammered in with a hammer. The nut is tightened with a torque wrench, and the tightening torque must be controlled (it must correspond to the value recommended in the instructions). Place the racks strictly vertically, use a level to check. When assembling the structure, tighten all nuts and other fasteners securely.
Please note that the installation of racks must be carried out taking into account the operator’s location from where he will control the operation of the lift. There should be enough free space so that no moving parts pose a threat to the vehicle when raising and lowering it. It is on this side that the command post will be located, that is, the one on which the controls are located. If the equipment has a remote unit, it is better to install it away from the lift so that the operator is at a safe distance.
By following these simple recommendations and the requirements of the instructions, you will easily cope with the installation of the lift and will be confident in the reliability of the installed structure. After this, you can move on to the final stage.
Choosing a design
Let's look at how to make a car lift. This device is used to fix the car and lift it to a certain height to provide access to the chassis, suspension, and mechanisms of the car.
First, choose a lift layout. The most popular devices are those with 2 stands. This design can have an electromechanical drive. There are designs with several racks; they distribute the load better. The scissor design is a platform with a lever system.
This device may have an electromechanical drive that will transmit the load. When making a homemade lift, you need to ensure that the device is safe and securely holds the car. It must be taken into account that when performing work, the master will be under a machine whose weight exceeds a ton.
Equipment connection and commissioning
Most car lifts only connect to electrical power.
And here we need to take into account the voltage: 220 or 380 V. Some models also have a pneumatic drive, so they need a source of compressed air. It is necessary to bring the highway to the installation area of the lift. Moreover, the operating pressure in the pneumatic network must be no lower than that required by the equipment manufacturer’s recommendations. When all conditions are met, you can proceed to the first launch. But first, make sure that the hydraulic cylinder is filled with oil, all moving parts are lubricated, and a stable power supply is ensured. So, let's get started! The performance of the equipment is checked without load. You need to make a series of ascents/lowers, make sure that the move is smooth, the ascent speed corresponds to the declared indicator, and no extraneous noise is heard. Only after this can you test the lift under load and begin servicing customer cars. Rest assured that if you follow all the rules during the installation stages, you can reduce the likelihood of problems during operation. Installing a car lift yourself is easy! See for yourself!
Source
Lift maintenance
Maintenance of lifts in a car service center is carried out regularly in accordance with the manufacturer’s regulations; timely maintenance extends the service life of the equipment.
Electromechanical lift - the factory recommends servicing the lift at least once a week to lubricate rubbing areas (screw-nut and sliders); grouting the bearings at least once every six months.
The electro-hydraulic lift is serviced at least once every three months (lubrication of the cable and sliders), oil is changed at least once a year.
Selecting a car lift, calculating dimensions and loads
First, choose the type and load capacity of the equipment, then a specific model. For a typical garage, one- or two-post electromechanical car lifts are suitable. They are compact, reliable and have a load capacity sufficient to service passenger cars. The maximum dimensions of the equipment being serviced are added to the dimensions of the model. The distance between the lift and walls and other installed equipment must be at least 1 meter. By adding up all the parameters, the width, depth and height of the area are calculated. The minimum values for passenger cars are 4*5*2.3 meters. After determining the size of the area for installation, the maximum load on the foundation is calculated. To do this, the estimated mass of the machine is added to the total mass of the equipment and divided by the area of the site. The result is multiplied by a reserve factor of 1.2. The resulting load value is used to determine the type and thickness of the foundation.
Ceiling height
For some types of lifts with upper posts, the height of the ceilings in the room is critical. In addition, when calculating the dimensions, you need to take into account the position of the machine on the platform. It may hit the ceiling when rising if the height was calculated using average values. As a last resort, they arrange a mechanic’s pit.
Layout diagram
Typically, four-post car lifts are placed next to the side walls, diagonally, at an angle of approximately 75 degrees, parallel to each other for easy entry and exit. Two-post models are installed in the center, when necessary, arranged in rows. In small rooms for scissor lifts, niches are sometimes installed in the floor and lowered into these recesses when they are not needed, closing from above. The best option is to place the devices at a sufficient distance from washing and painting areas, paint booths. If the service does not have enough space, equipment for heavy trucks is installed in open areas.
Foundation structure
A concrete foundation with potholes and unevenness that does not correspond to the design load will cause uneven distribution of weight between the racks, skewing and falling of the car. Typically, installation instructions for a lift include minimum requirements for the base. If the concrete does not correspond to them, the screed is removed and a new foundation is poured. The standard requirements are minimum thickness - from 25 cm, concrete grade - from M300, reinforcement is required. For two-post models (lower synchronization) these parameters are 30 cm, M400. Ditch equipment requires the installation of an internal bowl in which the lift will move. In this case, first fill the lower formwork of the base, and then the sidewalls. All work is carried out in one day to avoid cold seams. Installation of equipment begins after the concrete has completely set - 28 days after pouring. If the cars are heavy, extended beams are placed under the lower pillars to strengthen the base and distribute the load evenly.
Floor construction
To make work and cleaning easier, concrete floors are poured with topping. Another coating option is technical porcelain stoneware. Its advantages are strength, easy removal of contaminants, and frost resistance.
Installing a car lift yourself, how?
Before assembly, electricity and (if needed) a pneumatic drive must be supplied. As a rule, the delivery package includes instructions for self-installation of the car lift, in accordance with which the installation of the equipment is carried out. According to general rules, assembly takes place in several stages: Marking. The contours of the location of the base and holes are marked on the floor. Drilling for anchors. The depth of the mounting holes should be 4-5 cm less than the thickness of the foundation. After drilling, concrete chips are blown off the surfaces with a pneumatic gun.
Installation of anchors
The anchor bolts are threaded through the holes in the base and the drilled cavities, and then driven in with a hammer. All nuts are tightened using a torque wrench. The work is carried out by checking the level of horizontal and vertical planes. When the installation of a car lift with your own hands is completed, it is connected to communications and checked. First, the empty platform is lowered and raised. If the equipment operates smoothly, without extraneous noise or failures, it is tested with variable loads. After successful tests, work with the machines begins. Did you do everything according to the instructions? The installed lift will last for many years.
Source
Instructions for garage lift
When choosing a car lift for your garage, you should understand in detail the technical characteristics and capabilities of the device. The right choice is the key to quality work in the future. You can obtain information from the manufacturer or supplier of this mechanism.
Let's look at what types of lifts there are:
- A single post lift can be purchased at a specialty store. The mechanism is a compact crane that takes up little space, which is suitable for private garages.
- The two-post lift can be equipped with an electromechanical or electrohydraulic drive. This type of car lift is used in almost every car repair shop; it allows you to perform any metalwork work. During design, the height to the crossbars and the gaps between the posts are taken into account.
- The hydraulic valve is the most popular type. The unit has a high load capacity. Using this type of car lift, the owner will be able to control the leakage of fluid from the seals.
- Rack and pinion. They have a designed support-lever system. There is an interaction between the rack and the ratchet mechanism.
- Pneumatic. When constructing this type of lift yourself, you will need a pump. You can use wheels by screwing them to the bottom of the jack so that the system is movable.
- Screw designs are stable, compact and efficient. But they have a low load capacity, low lifting height and the need to constantly monitor the thread.
A homemade lift is made exclusively for the dimensions of the car, and primarily for the weight. Creating an individual design is possible by doing the assembly and installation yourself. Also, in the end, you will get a more economical version of the device.
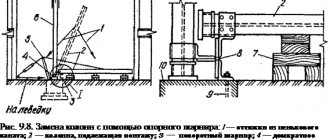
First you need to install prepared steel corners into the side walls of the room. As a result, the car hood should be under these corners. The centimeter plate is secured with eight bolts on the corner shelves. Its placement above the car engine can be changed if necessary.
After this, the worm gearbox is fixed on the plate. Next, the key is put on the drive shaft and secured. You need to make a hole in the slab for a chain with a diameter of 2 cm. Next, the chain is passed through the armhole and closed with a ring. After this, you need to put a smaller sprocket on the output shaft and connect them.
At the end of the work, you need to drill two additional holes with a diameter of 3 cm in the slab. A chain is passed through them and placed on a smaller key. The second chain ends with a steel hook that will support the weight of the car.
The principle of using the lift
Once a lift is created, it should be used properly for a longer service life.
Let's get started:
- unscrew the bolts that secure the engine to the frame;
- loops made of cable are brought under the engine, and then the ends of the loops are thrown onto the hook;
- the rotation of the drive shaft of the structure is started by sorting out the ringed chain;
- slowly and carefully begin to raise the engine;
- after the engine comes out from under the hood, stop lifting;
- drive the car 1 meter deep into the room, freeing up space for the table.
It is imperative to use a reliable table, since it will have to withstand heavy loads. It is recommended that the table has wheels to make it easier to move around the garage.
Large car sizes
If you once had to perform such a robot, you may want to modernize the design. It is possible to attach wheels to the steel plate in order to pull it to the side wall, and then lower the engine onto the table. To improve and simplify the operation of the lift, it can be equipped with an electric motor.
How is the lift installed?
Not a single warehouse or workshop adjacent to a complex or plant associated with the automotive industry can operate without the use of car lifts - not to mention all kinds of workshops, service stations, parking lots, etc.
This lifting mechanism is an ideal device used exclusively for working with small and large-sized automotive equipment - in many ways, it is thanks to it that work on assembling, diagnosing and servicing equipment becomes possible even in the most cramped circumstances.
It often happens that not one, but several such lifts are placed in the area of one production facility - for greater productivity and optimization of work. Accordingly, one of the main questions facing the owner of this premises concerns, first of all, the price of these mechanisms. And not only themselves, but also the work associated with their delivery and installation. Thus, the final price of equipment can no longer be calculated in tens, but in hundreds of thousands of rubles.
In this regard, a completely reasonable decision is to save on certain aspects related to preparing the mechanism for operation - in particular, on installation. In this article we will look at some rules and algorithm of actions when installing a lift yourself without the participation of special equipment.
Differences between lift drives
According to the type of drive, the equipment is:
In turn, the types of lifts are graded into:
Electromechanical equipment according to the type of lifting supports is divided into:
- One-two-three-post,
- Multi-post,
- Scissor.
Based on the number of plungers, hydraulic technology can be:
- Single plunger,
- Two-three-plunger,
- Multi-plunger.
For optimal selection and installation of equipment, differences in drives must be taken into account.
Inexpensive lifts include electromechanical equipment, which is characterized by its simple design and ease of maintenance and operation. Among the features of electromechanical technology we highlight:
- Lack of stoppers included
- The need to regularly lubricate working parts,
- The presence of a transmission shaft significantly increases the safety of equipment.
If you want the equipment to operate smoothly and silently, then choose the option with an electro-hydraulic drive. A small overpayment will pay for itself during the operation of the equipment, and the installation of the equipment is practically no different from the installation of other types of equipment. Also, when choosing an electro-hydraulic drive, the speed of work increases, which in some cases is of value to the garage owner.
Note! If your choice falls on a twin-engine garage lift, then choose equipment with a high-quality synchronization program. If the engines are of the highest class, but the software is not very good, then the operation of the equipment will become not only ineffective, but also unsafe!
Installing a post lift - where to start?
The main task that awaits the owner even before the actual purchase is to determine the optimal location. It is determined based on several factors - the dimensions of the mechanism itself, the required working area (depending on the specifics of the enterprise - for example, more space will be required for trucks and less for cars), as well as the area of the building itself and the availability of free space, not cluttered with anything else. , places.
At the same time, it is important to remember the safety rules, which are specified in detail in the addendum to the technical documentation of the product. For example, installation is allowed only on a flat, stable area, at a distance of at least one meter from walls and other objects. It is not recommended to install the lift under open areas without a canopy, since atmospheric and climatic phenomena can negatively affect its operation.
Thus, the width of the platform on which it is planned to install the lift should be approximately equal to the sum of the distance between its racks and the minimum permissible distance to the wall/walls. The length depends solely on the cars that are planned to be worked with at this enterprise. The standard option – 8-10 meters – is optimal for any passenger cars and many trucks; however, there are no average values in this matter - each decision is unique and depends on certain circumstances.
How to safely lift a car?
To service the chassis, body parts and transmission of the car, you need to lift it above the ground or be under the car, placing it on an inspection hole. But it is better to lift the car on a lift and secure it in this position using screw safety supports.
It would seem that everything is simple, but safety precautions when working with a car lift contain many important details. The most important thing is to know how to place the lift supports under the car, otherwise there will be no safe repair. Any service manual for a car or small truck will indicate where special points are located on the body for connecting the lift support pads.
On a relatively new car, the driver's door is equipped with a special sticker with places marked on it where it is recommended to place the lift's support platform at a service station or in a garage. Typically these points comply with SAE - Society of Automotive Engineers JRP-1284. This is the American Society of Automotive Engineers.
Here's how to properly lift a car based on the US standards mentioned:
Which foundation to choose?
It is important to remember that all these measurements will be useless if you do not first take care of the foundation strength necessary for this very installation. The primary requirements for it are, of course, external integrity, density, the absence of any irregularities or differences, etc.
It is recommended to take this issue as seriously as possible - after all, even if installing a lift on a crooked or cracked foundation is successful, there is no guarantee that everything will not go awry when lifting the first load. So negligence and neglect are almost guaranteed to lead not to additional savings, but, on the contrary, to even greater expenses:
Foundation for the lift
It is prohibited to install lifts (as well as other massive structures) on a recently poured foundation. The optimal time required for compaction and hardening of concrete is about 30 days. To further strengthen and seal microscopic (and other) holes on its surfaces, polymer and paint coatings, silicone, rubber and ceramic tiles are used, which also contribute to less friction and abrasive wear of the floor.
The best place to place a lift
Before installing a car lift, you need to correctly select the installation location. The equipment must be installed on a concrete surface, the thickness of which is in the range of 25-40 centimeters.
The surface on which the equipment is mounted must not be uneven. This does not apply to lifts with a frame base, which are installed even on uneven floors.
In addition, when choosing a place, keep in mind that when servicing and repairing a machine on a car lift, it should not touch the ceiling surface when fully raised.
When choosing equipment for a garage space, you must consider the following characteristics:
- Maximum permissible weight. A lift designed for a passenger car will not be able to lift a minibus.
- Vehicle lifting speed.
- Dimensions, weight, configuration. Here, take into account the parameters of the garage space.
Optimal for a passenger car
Now let’s decide what size a garage for a passenger car should be so that you can not only park the car there, but also store spare parts, tools, a bicycle, fuel and lubricants and a spare set of tires. The length of such a building should be 3-3.5 m longer than the length of the car - this will be convenient for taking purchases out of the trunk, looking under the hood, and also a place for tires, a workbench and everything that does not fit on the balcony at home, will remain.
How wide is the garage? The optimal width of the garage should be the same 3 m greater than the width of the car, so that you can open the door comfortably without fear of scratching it. And there will be free space for shelves with things necessary for any motorist.
What height should the garage be? The optimal ceiling height in a garage is three meters; even a fairly tall passenger car can be safely driven under such a ceiling. In addition, such a height of comfort for a person allows you to arrange a mezzanine. If we recall the “Priora” from the previous example, then the optimal house for it will have a length of 7.35, a width of 5-6 and a height of three meters.
In addition, such a room is well suited “for the future”, since a larger car, even an SUV, can fit into it without any problems.
For jeep
By the way, about SUVs, because owners of private houses often prefer such cars - either due to status or out of dire necessity. What can you say about the size of a garage for a jeep? Here, as for a passenger car, you need to take into account the size of the equipment.
SUVs usually add significant length and height, which is why the room for them should be higher and larger. For example, let's take the ToyotaLandCruiserJ200, its length is 4.95 m, its width is 1.97 m, its height is 1.88 m. We take the numbers we know and add them, and as a result we get comfortable garage dimensions with a length-width-height of 8-5-3 meters.
It makes sense to make it 2-3 meters wider and a meter higher for greater comfort. If you are the owner of a particularly large jeep, for example, with a pike body, then the convenient length of the garage can increase to 10 meters.