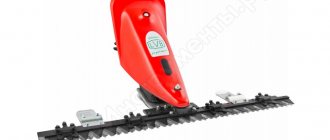
How to make light on a walk-behind tractor, since most models are not equipped with headlights? A walk-behind tractor (mini-tractor) is a mechanism that is designed for agricultural work (ploughing, cultivation, watering, etc.). Many models can be used as a vehicle using mounted trailers. In this form, walk-behind tractors transport people and cargo, which makes harvesting easier.
Electrical system of the unit
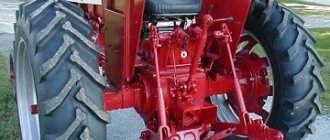
Medium and heavy walk-behind tractors are equipped with an electric generator that charges the battery and powers the headlight. The main function of the battery is to start the mini-tractor engine using an electric starter. On medium and heavy walk-behind tractors it is possible to connect several headlights (main and rear for a trailer) and turn indicators.
The power of the operating generator is sufficient for the installation of additional electrical equipment, as well as stable simultaneous operation of all electrical devices of the walk-behind tractor. Manufacturing plants have provided for the possibility of additional installation of electrical equipment and equip mini-tractors with generators with a power reserve of about 30%.
The battery capacity corresponds to the starting current of the electric starter. Most models of mini-tractors are equipped with generators without electrical excitation. It will be replaced by constantly spinning magnets. Most often, manufacturers install single-phase generators that produce alternating current.
Self-installation of headlights
If the unit was purchased without a lighting system, then do not be upset. You can install it yourself. Some manufacturers separately sell a lighting kit (headlight, wires and switch), earning extra money from this option, understanding that most owners will use the walk-behind tractor as a vehicle. There is a special place on the engine for connecting the factory headlight. The cost of such a kit, depending on the manufacturer, ranges from 1800 to 5000 rubles. It would seem that this is not a lot of money compared to the price of a mini-tractor, but why spend it if lighting can be made from improvised means?
Let's take a closer look at how to connect a headlight to a walk-behind tractor. The first step is to find the lighting element itself. Almost every owner of the unit has another mechanical vehicle (car, moped, scooter, tractor), which comes with additional headlights. If this is not the case, then a used headlight can be purchased at dismantling sites or in the automotive market to save money. If possible, it is best to purchase a new headlight, which can be matched to the color of the mini-tractor. A headlight for a small motorcycle or scooter is suitable for this.
Read also: Do-it-yourself Cnc on Arduino
It is necessary to purchase both a toggle switch and the required length of electrical wire.
The most convenient place to install the headlight toggle switch is the steering column near the gear shift lever.
Install and secure the switch. Next we move on to installing the headlights. Find a place that is convenient for her. The best place to install this equipment is the front of the engine or the steering column. Experts advise mounting the headlight on the steering column pipe, because one placed on the engine will become dirty when driving in the rain. Next we stretch the wires. If there is a place on the walk-behind tractor to connect the factory headlight, then we connect the wires to it, but if it is missing, then it is most convenient to extend the power from the terminal of the oil pressure warning lamp. Next, we connect the wires to the switch, and from it we pull the cord to the headlight, using the body of the walk-behind tractor as a ground. We fasten the wires to the steering column using clamps or electrical tape.
As an old boat motorist, I affirm that all boat motors I know have permanent magnets on the flywheel. Therefore, either there is an additional coil under the headlight on a magneto or it can be installed. I don’t remember what kind of pulse magneto this is.
If you remove the flywheel, then everything should be clear right away - or there are immediately contacts on the magneto under the headlight, but they are not involved. Or you can add an additional coil to generate voltage
Typically these coils produce about 14 volts of AC at maximum speed and simply power a car light bulb.
Modern snow removal equipment is equipped with many additional options that will be useful in certain operating conditions. However, not every snow blower is equipped with a headlight that allows you to clear the local area at night. Fortunately, this problem can be easily solved by making and installing a headlight on your snowblower yourself.
Instructions
For a detailed study, we use the simple design of a single-stage snow blower. The picture shows a factory model. The author of the project applies the same principles. The main difference from the options discussed above are the blades (marked with arrows), which are moved to the middle of the working shaft. When rotated fast enough, they will throw snow into a hole made in the top of the bucket. The following table describes how the project was implemented in practice.
| Photo | Step-by-step description with author's comments |
| To increase reliability, parts operating under heavy loads are selected especially carefully. Here the shaft is made from durable racks from a VAZ car. They are welded together to obtain the required length. | |
| A special coupling ensured the accuracy of the connection. Practical tests have confirmed the absence of runout during rotation. | |
| Next, two blades are welded to the central part to ensure efficient snow ejection. Metal blanks with dimensions 100x140x2 (width x height x thickness in mm) were used. | |
| For the drive, a converted sprocket from a Voskhod motorcycle was used. A metal disk is welded to one side (sheet thickness - 5 mm). A hole is made in the center using a drilling machine in accordance with the diameter of the main shaft. | |
| The author recommends paying special attention to alignment. The created parts are sawn in a circle. Burrs and irregularities have been removed from the ends. | |
| At the next stage, the sprocket is welded to the shaft. Next, auger blades are created from sheet steel 2-3 mm thick and installed in place. To do this, cut out a circle 100-120 mm wide. It is cut in half. Individual tapes are stretched from the star to the blade and attached with welded joints. | |
| The same structure is mounted on the second part. The total working width in this project was 53 cm. | |
| To create individual elements of the bucket, you can use a steel sheet of 1-1.5 mm. This thickness provides sufficient strength, but does not require excessive effort to create a product of complex shape. | |
| The shaft is mounted on suitable support bearings. The units are fixed using bolted connections so as not to complicate dismantling. At this stage, the free rotation of the assembly is checked. Improve appearance and corrosion protection by applying primer and paint. | |
| The hole for snow ejection is made with a diameter of 160 mm. The bent “petals” are needed to connect the next structural element. It is made from a plastic pipe of suitable size. | |
| The gutter is made of steel sheet (0.75-1 mm). To turn it in the desired direction, the author used a temporary solution, a circle with plexiglass slots. In the future, it will be replaced with a similar metal part. The upper part is fixed on a hinge. It rotates up and down to change the trajectory and range of the release. The power part of the frame is made of a steel square 20×40. Handles – 20×20. | |
| This snow blower has a gasoline engine from a chainsaw. The author cut off some unnecessary details. Later, the old paint will be removed and a new coating will be applied. | |
| The upper part of the chain drive uses a motorcycle gear with fewer teeth. The picture shows the process of creating a hole using hand tools. But it is better to use a machine to ensure accurate alignment. | |
| The prepared part is installed on the engine shaft instead of the standard gear. | |
| To eliminate unnecessary vibrations, the engine is mounted on the frame through damping pads. When selecting suitable products, use in sub-zero temperatures should be taken into account. The type of rubber must be designed for such conditions. | |
| To increase the level of comfort, the handles are connected to the frame via springs. Here we used parts from shock absorber struts that were removed during disassembly. | |
| Such handles and cable drive mechanisms are used to adjust the angle of the chute and fuel supply. Parts from a bicycle are used here. | |
| After completing the installation of the main functional elements, the performance of the snow blower is checked with your own hands in a workshop. Adjust the fuel supply, engine speed, and starting parameters. | |
| Next, the installation operations are completed. Install the gutter and check its functionality. To return the upper part to the lower position, attach a spring. Paint external surfaces. | |
| The verification is completed by testing under operating conditions. Eliminate identified deficiencies. |
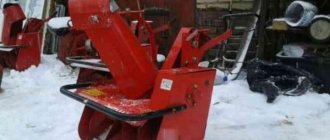
To clear snow with a walk-behind tractor, you can use the following attachment. In this design, the sprocket is installed in the center. It is driven by a chain drive, which is connected to the gearbox sprocket of the walk-behind tractor. A special power take-off shaft is also used.
Spiral ribbons are created as in the example above. To secure them, it is better to use separate spacers. Fixing directly to the body itself can damage the bucket. In a snow blower, you install closed-type axles with your own hands. They prevent moisture and dirt from entering the bearings.
The process of creating such technology is discussed in detail above. This section highlights nuances that deserve special mention. The chainsaw engine is well suited for the task at hand. It weighs little and is designed for long-term operation with varying load conditions. A high-quality power unit in this category starts up quickly in severe frost and is unpretentious.
Improved design
The author of this project installed rotating skids, which simplifies work in areas with difficult terrain. Wheels are useful for moving quickly without excessive physical effort. They also make it easier to overcome large bumps.
It’s not difficult to make it with your own hands in 1-2 days after good preliminary preparation.
Factory snow blower for walk-behind tractor
You can make such a mounted unit yourself using the drawings of a standard rotary machine. The advantage of this choice is its relative simplicity. The disadvantage is the relatively small width of the working area.
Ready to use kit
According to the manufacturer's standard instructions, you can connect a homemade snow blower to a walk-behind tractor of a certain brand. Below are excerpts from the accompanying documentation for the Neva brand equipment:
- There is a special rod in the front part of the walk-behind tractor. Nozzles are connected to it.
- Before installation, remove the protective cover.
- At the final stage, the drive belt is adjusted to ensure optimal tension.
- Reinstall the protective devices.
The feasibility of manufacturing individual structural parts raises reasonable doubts. As an example, you can use the process of creating a friction ring for a snow blower with your own hands.
Part for equipping CHAMPION equipment
Similar products are installed in the gearbox. They are subjected to heavy loads, so accelerated wear is quite acceptable. You can extend the durability by careful handling of the equipment. It will be too difficult to create a high-quality unit at home. It’s easier, and ultimately cheaper, to purchase a high-quality friction ring in a store with an official guarantee.
All manual mechanical snow blowers are easy to use. Simply roll the device in front of you, controlling the direction of movement and the height of the edge of the bucket. Care must be taken that it does not rise too high above the ground.
Before starting work, adjust the direction of the chute to remove the cleaned mass, then systematically “smooth” the area with a ladle.
Instructions for use
If you are using a self-propelled model, then the main task will be steering and switching speeds or operating modes according to the instruction manual. Reading the manual is the first thing you should do after purchasing your snow blower.
Only by following all operating rules can you achieve good and uninterrupted operation.
Important: An immutable rule is compliance with safety precautions. It is especially necessary to carefully monitor the condition of the power cord for electric models to avoid electric shock.
At the initial stage, you need to take care of the engine. If you do not have it in stock, you will have to buy a motor at a specialized store. The engine needs to be powerful enough to be enough to transmit rotation to the wheels or track pair, depending on your choice. If you do not have an engine, then click here and we will tell you how to assemble a mechanical snow blower with your own hands.
1.We make the frame. It is made by welding from metal corners 5x5 cm. We screw U-shaped profiles to the transverse parts of the frame - this will be the basis for the platform on which the engine will be located.
2. We make the control handle. To do this, we need a metal tube of small diameter, which is attached to the frame using M8 bolts.
3. We install the previously prepared engine on the platform located in the frame.
Snow Blower Bucket
4. We make a bucket in which the auger will be located. For this we need sheet iron of a suitable size (the width should be approximately 50 cm). The sheet is bent into an arc, and the ends are attached to the bucket using a welding machine.
5. Holes should be made on the sides with a diameter equal to the diameter of the metal pipe, which will act as a shaft for the screw mechanism.
6. A hole is made in the upper part for the outlet pipe. The diameter must be at least 16 cm, otherwise snow will clog in the pipe. Next, we install and secure the plastic sewer pipe to the bucket (the outlet pipe can also be made from sheet metal).
7. Let's move on to making the screw. It consists of a shaft on which there are spiral elements.
Connecting a headlight to a snow blower - what are the features of the work?
Installing a light on your snow blower will be very easy if you buy a light from the same brand as your snow blower. As a rule, the installation and connection diagram of the device is indicated in detail in the operating manual for snow removal equipment, and even a beginner who has no experience in working with electrical devices can connect a self-made headlight to an existing snow blower. For this purpose, a switch and suitable wiring are included with the devices, which is suitable for the connector provided in the design of the snow blower.
Read also: Operating temperature of LED lamps
In practice, the generator, which is pre-existing in the design of the snow blower, has a sufficient power reserve to supply the machine’s electrical appliances without any failures. This makes it easy and quick to connect the headlight to the snow blower without a battery.
How to avoid installation complications?
So, if you have a medium or heavy weight snow blower, then you probably have an electric starter that is powered by a battery. The battery is fed from an electric generator. The system is indeed not simple, but in practice it is the starting material so that you can carry out this simple electrical installation operation with your own hands, having only initial knowledge of how to install a headlight on a snow blower.
In the vast majority of cases, a running generator will provide enough power to easily install additional electrical equipment and ensure that all electrical appliances on the snow blower can operate without interruption. Today's practice is standard: the snow blower manufacturer provides for the theoretical possibility of creating additional load on the generator. In other words, often. This machine can be loaded up to a third more than originally intended, and it should hold up.
How to make a headlight for a snowplow?
You can make a lighting device with your own hands without experience or special expensive tools. At the same time, it is extremely important to prepare for work in advance, so as not to waste time searching for the missing tool.
To make the required headlight you will need:
- fiberglass – 3 kg;
- gypsum – 2 kg;
- epoxy resin – 1 can;
- 8 steel rods, 1 cm cross-section, or metal grate;
- self-tapping screws;
- household oven.
The procedure for making a headlight is as follows:
- First of all, take an old headlight from a car or other vehicle and carefully remove the glass partition from it;
- Next, make a plaster cast, the size and shape of which should match the old headlight as closely as possible. This can be done by applying plaster mass to the old device and removing it after the template has completely dried;
- Apply 3 layers of fiberglass fabric to the dried plaster template, coating each of them with a thin layer of epoxy resin. Place the resulting workpiece in a container with a vacuum and leave it in it for a day;
- After the workpiece has completely dried, carefully clean its surface from any irregularities with sandpaper;
- Preheat your household oven to 190°C and place a metal rack inside it. Separate the protective film from the fiberglass and clamp the material inside the grille;
- Once the fiberglass has melted and sagged, quickly remove it from the grill and carefully lay it on top of the previously prepared headlight blank. After this, place the product in a container with a vacuum;
- Once your homemade headlight is completely dry, sand it down again and install some halogen or LED bulbs in it.
Read also: The best works of wood carvers
Remember that the brightness of the light bulbs used largely depends on how well the surface of the workpiece is sanded.
Therefore, you should not save time, but perform grinding work as efficiently as possible and using the necessary pastes.
DIY snow blower: general principles and different designs
An elementary option is a wide shovel equipped with a screw mechanism and a comfortable handle. When moving forward, the auger rotates and throws snow to the side - there is no need to throw it away manually. Slightly more complex models have a pipe through which the snow is thrown to the side or in front of itself. There are models with the function of changing the direction of ejection.
Operating principle
Components of a gasoline snow blower:
- Engine.
- Fuel tank.
- Starter.
- Wheel and auger drive system.
- Bucket-shovel for capturing snow.
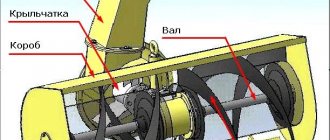
- Screw or rotary milling mechanism.
- Impeller for ejecting collected and crushed snow.
- Ejection guide pipe.
- Handle for movement control with power and adjustment buttons.
The principle of operation is that when the machine moves, the bucket captures snow from the surface, which is directed using an auger into the ejection pipe located in the middle part of the bucket.
The two-stage system involves the presence of an impeller, which prevents the pipe from clogging with snow and increases the ejection range.
Three stage system
With a three-stage system, large pieces of compacted snow are broken and ground into powder using an additional auger located in the central part of the bucket.
The parts of the snow blower bucket are made of high-quality, high-strength plastic or metal. The auger blades are rubber or metal with rubber pads that provide gentle contact with the surface being cleaned.
Some imported models of snow blowers equipped with an additional mains starter are not adapted to Russian conditions (starting from a voltage of 110 V)
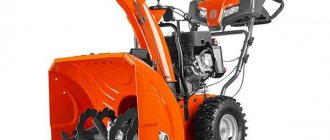
To study the main components and important parts, you can use a sample of standard equipment of this class in a good configuration
This list shows the design components with comments:
- The heating element built into the handles (1) increases the level of comfort when operating equipment in winter conditions.
- This lever (2) is used to change the range of torque on the drive shaft and the direction of movement; a gearbox (11) with several forward/reverse speeds is installed.
- A mechanical drive (3) is used to adjust the angle of inclination of the chute through which snow is thrown along the desired path.
- Trigger (4) controls the movement of the auger. If you release it, the rotation stops.
- Toggle switch (5) for supplying power to the heated handles.
- Use the rotating lever (6) to turn the chute in the required direction.
- Power unit (7). This model has a gasoline engine with a power of more than 5 kW. A tank (10) with a volume of 6 liters is installed for fuel reserve.
- Rotating chute (8) for throwing out snow with an adjustable angle of inclination.
- To ensure reliability and increase comfort, a combined starter (9) with electric and manual drive is installed.
- To improve maneuverability in difficult areas, the wheels on the axle can be locked with a special cotter pin (12).
- Off-road performance is improved by wide wheels (13) with large lugs.
- Knives (14) cut the snow. This is useful for separating high snowdrifts.
- The pads (15) on the screws determine the height of the bucket relative to the hard surface.
- A grate (16) is installed in this part for uniform distribution of snow flow and better ejection parameters.
- Adhered snow from the working elements is removed with a shovel (17). The tool is inserted into special grips on the back wall of the bucket.
- Stiffening ribs (18) strengthen the structure. This model is capable of clearing a path 66 cm wide in one pass. The maximum height of snow cover is 55 cm.
- Two bolts (19) – protective device. The heads are cut off by excessive force when hard objects get inside. This simple solution prevents damage to the auger, drive, and other expensive elements of the snow blower.
- The surfaces of metal parts are protected from corrosion by a multilayer coating (20).
- The force is transmitted to the screw using a worm gear (21).
- The lower scoring plate (22) wears out over time. To simplify replacement, a screw fastening is used.
- The toothed shape of the auger (23) of the snow blower makes it easier to cut dense snow and ice crust.
- The shaft (24) is fixed in the side walls of the bucket on bearings.
- The headlight with LED block (25) provides good visibility in difficult conditions.
Some parts are too complex for a homemade snow blower. Others can be easily applied in your own project. Thus, LED lamps are not only characterized by economical energy consumption. They are durable and vibration resistant. They can be safely used in a wide range of temperatures and in conditions of high humidity.
You should start studying structures with relatively simple models
Using this drawing, it is not difficult to make a snow blower with your own hands. Here the impeller (D) is mounted on the motor shaft. When rotating, it throws snow to the side through a chute (E) rigidly fixed to the body. The machine is assembled on a durable frame with skids (K). To move, the user applies force in the desired direction through the support handle (P).
Simplicity of design is the main advantage. Even without careful study, the minimum price of a snow blower is clear. Its creation is possible in a short time, using available materials and simple tools. Wooden parts are made using hand carpentry tools. For the drive, you can use an electric motor of suitable power from a failed trimmer.
Similar solutions are used in the design of professional equipment.
This design is more complicated. However, a self-propelled gasoline snow blower created on its basis will better meet the requirements of modern consumers. Here the rotor is supplemented with an exhaust pipe, which is useful for adjusting the inclination and throw distance.
They cut through snowdrifts with sharp edges, making complex work operations easier
The main disadvantages in this case are the complexity and corresponding increase in the cost of the project. To complete the review, it is necessary to note the features of different methods of moving a snowplow.
Compact models suitable for cleaning small areas
The choice of power unit is essential, so this issue must be studied in detail. The use of an electric motor has several advantages:
- Such units are cheaper than fuel units.
- Low weight is an advantage – especially when creating lightweight, portable models.
- A relatively simple, reliable design implies the absence of significant problems during installation and during operation.
- It is convenient to work with equipment that does not emit excessive noise and does not emit fuel combustion products.
It should be specially noted that some modern electric motors do not have replaceable parts. They do not need to be lubricated throughout their entire service life. To control speed, durable electronic circuits are used that do not contain mechanical components.
The need to connect to a power supply is the main disadvantage. It is necessary to use special extension cords and install weatherproof electrical outlets on the site.
If current trends continue, in the near future such technology will “win”
This snow blower comes with a removable battery and charger. This configuration provides the necessary autonomy. But if necessary, a wired connection to a standard 220 V network is possible. Interest in the equipment is growing as energy storage devices improve.
Complex combination of gasoline engine and additional components
Here are a few important features:
- This option requires a large fuel storage tank, which increases the weight.
- The power unit itself is quite heavy.
- The operating principle of the engine involves strong vibrations, loud noise, and exhaust gases.
- A large number of components and mechanical components increases the likelihood of breakdown.
- For long-term operation with normalized performance, it is necessary to monitor the cleanliness of fuel and air and replace filters in a timely manner.
- This type of equipment provides for the scheduled replacement of oil scraper rings and other parts.
- If the service is insufficiently qualified, starting the engine is difficult.
- The owner will have to learn complex troubleshooting, repair and adjustment technologies.
Despite these shortcomings, so far only a gasoline engine is capable of providing good autonomy with solid power. But the choice of such a power drive for a do-it-yourself snow blower is not obvious. In some situations, it will be quite enough to equip the equipment with an economical, long-lasting electric motor.
- What is the best engine to use as the basis for the future unit? The question is whether to install an electric motor or a gasoline-powered motor into the design. If you intend to clean only the paths around the house, then an electric motor may be sufficient.
- If the area is large, then it is better to use a gasoline engine. In addition, you will not be disturbed by the cord from the electric motor, which can freeze in winter and cause a short circuit.
- It would be more advisable to choose a gasoline analogue of a snow blower.
- The next point will be the choice of the basis for the future snowblower, i.e. you will have to make the entire structure yourself, including the main working units, or a walk-behind tractor or other means will be used as the driving force.
- If the basis is a walk-behind tractor, then the design of the snow blower will be reduced only to the manufacture of the bucket and the auger located in it. Naturally, you can’t do without an outlet pipe and a basic metal frame either.
How to connect a headlight to a snow blower - an algorithm for beginners
Installing the headlight on the snow blower must be done using a pre-purchased switch, which is necessary to turn the lighting device on and off. The steering column of the snow blower should be used as a place to mount a homemade headlight. However, if the car manufacturer has already provided a suitable place for installing the device, then it is best to install the latter there.
Immediately before installing and further connecting the headlight to a utility snow blower, carefully study the diagram described below.
To work, prepare 1.5 m of wires of the same cross-section in advance.
The headlight connection algorithm is as follows:
- Carefully strip the wires, then connect one of their ends to the light bulbs inside the homemade snow blower headlight;
- Connect the other end of the wires to the voltage relay. Carefully pull the remaining parts of the wiring to the switch you are using, and from there connect them to the generator in the snow blower;
- After this, check the operation of the headlight. If you are satisfied with the intensity of its glow, then disconnect the wiring and pull it inside the silicone tube, then reconnect the wires;
- Then carefully place the tubes with wires into the grooves in the snow blower structure. Be sure to ensure that the tubes do not touch the heated parts and mechanisms of the snow blower.
After finishing connecting the lighting device to the snow blower, check its operation again. Make sure that the headlight does not flash when the engine is under heavy load - this will indicate that you have done the job correctly.
Headlights (lighting) for a snow blower - manufacturing, diagram
- Types of manual snow blowers
- Rating of the best snow blowers of 2022
- Principle of operation
- Why should you buy a snow blower?
- Features of snow removal equipment
- Drive type selection
Installing a headlight on a snow blower - will there be any difficulties?
The process of connecting the headlights yourself will not take much time and effort if the optics are purchased from the manufacturer of the existing snow blower model. In this case, the headlight connection diagram will fully correspond to the capabilities of the unit. As a rule, a switch is included with the headlight. The kit may also contain wires that correspond to a special connector.
In most cases, the generator included in the snow blower design has sufficient power to uninterruptedly supply power to additional elements. Moreover, many manufacturing companies provide the possibility of installing headlights on snow removal units without a battery, equipping them with generators with a certain power reserve.
Making your own headlight for a snow blower
To make a headlight you do not need to have much experience or special tools. All you need to do before making a headlight is to prepare some equipment from the garage and find an old non-working headlight to act as a sample. Materials and tools you will need:
- 2 kg of gypsum;
- 3 kg fiberglass;
- Epoxy resin;
- Sandpaper and file;
- Metal grate or 8 narrow pipes with self-tapping screws;
- Oven.
Manufacturing the part looks like this:
- First you need to disconnect the glass partition from the old headlight;
- After this, it is necessary to make a plaster cast, which in shape and size must match the size and shape of the old part. To do this, it is better to pour liquid plaster along the bend of the old headlight, and remove the workpiece after it has completely dried;
- Next, apply 3 layers of fiberglass to the workpiece. In this case, its sheets need to be coated with epoxy resin. Place the finished product in a vacuum environment and leave it there for a day. As soon as the workpiece is completely dry, you need to take fine-grained sandpaper and remove all the irregularities;
- After this, preheat the oven to 190 °C, and make a small grill consisting of 8 narrow slats fastened together with self-tapping screws. In the resulting form, it is necessary to clamp a sheet of fiberglass, having previously separated the protective film from it. Next, you need to wait until the fiberglass fabric sag completely;
- As soon as the material melts, it must be quickly removed from the oven and placed evenly on the previously prepared workpiece and placed in a vacuum environment.
- After complete drying, the finished headlight needs to be sanded and one or more halogen lamps installed in it.
In order for the lighting of the unit to be bright and not dim for as long as possible, you will need to polish the manufactured part with high quality. To do this, you need to use special pastes that are sold in almost any auto parts store.
How to connect a headlight to a snow blower - the correct procedure
To connect the headlight without any problems, you will need a switch that will turn the lighting on and off. To mount the headlight itself, it is best to choose the steering column pipe. At the same time, if the design of the unit provides space for installing optics, then it is best to use it.
Before installing the headlight on the snow blower, you will need to study the diagram below, where instead of the DRL there is a headlight made for a snow blower.
To connect, you will need approximately 1.5 m of wires of the same cross-section. The further work algorithm is as follows:
- First you need to strip the wires;
- After this, one end of the wiring is connected to halogen lamps;
- We connect the second end to the voltage relay. The remaining pieces of wires also need to be stripped and pulled from the relay to the switch, and then to the generator;
- Be sure to test the headlight's operation. If its light is bright enough, then the wiring must be disconnected and inserted into narrow silicone tubes that will protect it from moisture;
- Next, the wires need to be reconnected to the lamps, relays, switch and generator;
- At the end, the wiring is carefully routed into the grooves between the snow blower components. However, it should not touch parts that heat up.
At the end of the work, you will need to check the operation of the headlights again. If the lighting works uninterruptedly and does not blink when the engine is loaded, it means that the installation and connection were completed successfully.
Headlight for walk-behind tractor - self-production
Many owners of walk-behind tractors use headlights from domestic and imported cars to install them on their units. This method is the simplest, but you should remember that an old headlight on a walk-behind tractor will not emit a bright enough light and will not last more than a few months.
It is much better to make lighting for an agricultural machine yourself. To do this, you do not need to buy expensive materials and equipment. You will need the same old headlight, the filling of which you will later replace with new parts. The operating procedure is as follows:
- Remove the existing glass surface and other elements from the old headlight that are attached to the base using plastic clips;
- Next, make a plaster cast based on the headlight frame. For this purpose, pour the still liquid material into the base of the headlight along its entire perimeter. After the gypsum mass has completely dried, it must be carefully removed;
- Apply 3 layers of fiberglass to the cast. Between each of the tiers there should be a layer of epoxy resin. Place the workpiece in a vacuum and wait at least a day - during this time the impression will completely harden. After this, level the workpiece so that there are not even the slightest chips left on it;
- Start making glass for your homemade headlight. To do this, preheat the oven to 190 °C, make a stand from 8 slats fastened together and fix a sheet of fiberglass in it. Before putting the pan in the oven, do not forget to remove the protective film from the material, otherwise it will become covered with dust particles;
- As soon as the material sag in the stand, remove it from the oven and apply it to the previously made workpiece. The product must be placed and kept under complete vacuum until it hardens.
After hardening, the manufactured headlight will need to be thoroughly sanded, degreased and dried. Next, 1–2 halogen lamps or LED strip are placed inside it. Installation of the headlight on the walk-behind tractor is carried out after a thorough check of the lighting device. To install the headlight on a walk-behind tractor, be sure to use a reliable frame and at least 4 fasteners.
Connecting the headlight to the walk-behind tractor generator
Installing a light on a walk-behind tractor with your own hands is quite simple if you use the standard electric generator of an agricultural machine. Especially for this purpose, many equipment manufacturers produce walk-behind tractors with generators, the power reserve of which is slightly increased specifically for the installation of lighting. Thus, the power of the unit is quite sufficient to uninterruptedly supply power to lighting devices and sound signals.
To install the headlights on a walk-behind tractor and connect them to the generator, you need to proceed in this order:
- Connect the generator via a wire to the switch, which should be fixed near the steering wheel or in another place convenient for the operator;
- Disconnect the wiring from the switch and connect it to the headlight, then check the operation of the lighting device;
- Then disconnect the wires and place them in a dense corrugation that protects the wiring from moisture and mechanical damage.
If the generator has sufficient power reserve, the headlight will shine uninterruptedly and brightly. If the unit's power is insufficient, the headlight will flash every time the engine starts running at low speeds. In this case, it is best to replace the standard walk-behind tractor generator with a unit from MTZ brand tractors. It should be remembered that to install a new generator in the walk-behind tractor structure, additional support frames will need to be welded, and a lighting coil must be used to connect the unit.
After connecting, regularly check the integrity of the wiring contacts, otherwise if moisture gets on them, a short circuit may occur in the power supply of the walk-behind tractor.
How to make light on a walk-behind tractor without a generator?
There is another way that allows you to connect light to a walk-behind tractor without a generator. It will require a 12-volt battery and an LED strip. You don't have to buy a new battery - an old gel cell from an electric scooter will work just fine.
In addition to the materials, you will need to decide in advance where to install the battery. Since it has small dimensions, it is best to place it between the engine and the gearbox of the walk-behind tractor. The further work plan is as follows:
- Make a mount from a steel corner that will match the size of the battery you are using;
- Position and secure the mount on the unit frame;
- Install the battery inside the mount, secure it with a steel plate and two bolts;
- Run wiring from the battery to the switch and headlight. Secure the connection points with soldering and insulate with tape. The video will help you learn more about connecting a headlight on a walk-behind tractor without a generator.
The light from the battery-powered headlight is quite intense and bright. However, this method has one significant drawback - the battery capacity will only last for a few hours of continuous operation, after which the power source will need to be charged.
In this case, you can make the light on the walk-behind tractor from the ignition. To do this, one end of the wiring must be connected to the ignition system of the unit, the other end must be connected to the switch, and from it to the headlight. A lighting device connected in this way will only work when the ignition of the walk-behind tractor is turned on.
All of the above methods for manufacturing and connecting headlights are suitable for Neva, MTZ walk-behind tractors and agricultural machines produced by other domestic and foreign manufacturers.
features and how to make it yourself
Contrary to popular belief, with the arrival of winter, the number of worries for owners of dachas, private houses and small farms does not decrease. There are more of them. And the main problem is dealing with freshly fallen snow and snowdrifts.
Previously, it was necessary to fight this natural phenomenon manually, armed with a wide shovel. Today, a compact mini snowplow can cope with landscaping and snow drifts.
Mini snowplows and their features
Mini snow blowers can be used to clear summer cottages, sidewalks, and pedestrian paths in city parks and squares. All work is performed with the help of the operator.
A manual snow blower differs from larger units intended for municipal needs with less power. However, the compact device successfully copes with the tasks due to:
- maneuverability;
- ease of control;
- functionality.
Due to this, mini snow removal equipment is indispensable as the main “winter” assistant.
The unit with a blade allows you to break up and discard snowballs without much effort.
Homemade snow blower for the dacha
Any farm has to deal with snow drifts and snowdrifts, but not every farmer can afford to buy branded snow removal equipment. But it is quite possible to assemble such a mechanism with your own hands.
How to make a convenient and effective device from available materials? First of all, you need to decide which manual snow blower you need - electric or gasoline. For a house with a small area, an electric homemade product is sufficient, which will make it easy to clear paths, approaches to the garage, and exit from the yard. To clear large areas, it is better to build a gasoline unit that will not depend on the electrical network and the location of sockets.
In the second case, you can take a walk-behind tractor available on the farm as the basis for the device. Moreover, making such a device with your own hands will be much easier.
You will need to make a body with an ejection hole, a frame, and snow blower blades from sheet metal or a steel barrel. The cutting element of the trimmer must be replaced with a rotor, which will allow the unit to throw snow to the side.
When making your own snow blower, you should remember that rotary models are not designed to remove ice. The rotor blades will scatter small debris and ice particles, which may result in accidental injury.
pro-motobloky.ru
Manual snow blower - types, pros and cons, do it yourself
Despite all the talk about global warming, winter is a no-no, and it will throw up some snow. In large cities built up with multi-storey buildings, the responsibility for clearing fallen snow falls on the shoulders of public utilities. But in villages and small towns, owners have to remove snow from their yards manually. Just 4-5 decades ago there was no alternative to a shovel in this matter, but today the situation is changing, and manual snow removal equipment is increasingly being used instead of a shovel.
Types of manual snow blowers
When purchasing a manual snow blower for your home, there are a number of important points to consider. There are two types of such devices:
- Mechanical;
- Driven.
Mechanical manual devices for snow removal include various types of mechanical shovels, mechanical structures with a blade, etc. Drive devices are divided into gasoline and electric.
The choice of device depends on the tasks facing it. If you need to clear shallow snow from a porch or clear paths, then you can get by with a mechanical manual snow blower. If, in addition to the above, you also need to clear the exit from the garage or even remove snow from the yard, then it is better to get a powered manual snow blower.
Non-powered mechanical devices for snow removal are easy to make with your own hands. However, such mechanical snow blowers can only work on shallow, loose snow, and then until the height of the snow cover on the sides of the paths becomes higher than permissible, after which they will no longer be able to throw the snow aside.
Unlike mechanical ones, manual powered snow blowers do not encounter such problems. They throw snow up to 5 m, so the height of the snowdrift on the sides of the path is not particularly important for them. The main thing is that the snow on the path itself is loose and its thickness does not exceed 25-30 cm.
Manual snow blowers: pros and cons
Manufacturers of mini-equipment are not too fond of manual gasoline snow blowers, preferring to develop more expensive self-propelled models. Thus, the Partner company is represented in this niche by only one model: SB 210. This model is equipped with a 4 hp gasoline engine, the working height and width are 27 and 51 cm, respectively, the ejection range is 4 m, and the weight is 30 kg.
Basically, manual snow blowers are mechanical or electrical devices. Thus, the Forte company has developed a special shovel without a motor, but equipped with a gear auger. Such a shovel costs from 500 to 1000 UAH.
A similar device made with your own hands will cost you a maximum of 100 UAH, and then only on the condition that you have to spend money on a shovel. Such a homemade unit will work no worse than a branded manual snow blower, so before you run out to buy a miracle shovel, it is better to first look for instructions on how to make it yourself, and then make your final decision.
Electric models of manual snow blowers are much more widely available on our market. Their detailed review is a topic for a separate discussion, but all of them, regardless of power and manufacturer, have one thing in common: they are tied to a source of electricity - either directly, through an electrical cord, or indirectly - through a battery. Therefore, they all have strict restrictions - in the first case - in terms of distance, and in the second - in terms of operating time.
What is the conclusion? The answer is simple - manual snow blowers are a wonderful thing, but it’s probably too early to completely abandon your grandfather’s shovel.
sadovij-pomoshnik.ru
Prices of gasoline self-propelled snow blowers: rating models
Finally, you should compare the prices of rating models to get the full picture.
Prices for gasoline self-propelled snow removal machines:
| Manufacturer | Model | price, rub. |
| Budget snow blowers | ||
| Interskol | SMB-650E | 44220 |
| Hyundai | S5560 | 41490 |
| Patriot | PRO 655 E | 40450 |
| Mid-class snow blowers | ||
| Husqvarna | ST 224 | 98990 |
| Champion | ST1074BS | 85800 |
| MTD | SMART ME 61 | 73200 |
| Premium snow blowers | ||
| Husqvarna | ST 330PT | 229990 |
| SNAPPER | SNM924E | 139990 |
| HONDA | HSM1390IKZE | 455510 |
Taking into account the previously reviewed models, their technical characteristics, prices and consumer reviews, we can come to the conclusion that the highest quality products belong to Husqvarna, Champion, MTD and Honda.
In each category, you can choose a reliable and practical design, regardless of its cost and class. After all, the optimal device is one that meets the capabilities of the wallet and the needs of the owner of a suburban area.
Trailer for walk-behind tractor
Trailer TP-1 500 for walk-behind tractors with a power of 3.5 kW (Agro, MTZ Belarus - 09N, Cascade, Neva, Salyut, MB-1, MB-2, MB-90, Oka, Luch, Sarmat, etc.), designed for transportation of various agricultural, construction materials and other goods. The trailer for the walk-behind tractor can be used in household plots, as well as in gardens and vegetable gardens for collective and individual use, on livestock farms, in greenhouses and public utilities.
A trailer for a walk-behind tractor (trailer trolley) is used for on-farm transportation and should not be used on roads and highways with heavy vehicle traffic.
Favorable price - 13,800 rubles. Retail price list
Wholesalers have a special offer. Wholesale price list
Technical characteristics of the trailer for the walk-behind tractor
The trailer components for the walk-behind tractor are made of the following materials:
- Drawbar (cart base) - profile pipes 60x40x3 GOST13663-86;
- Body - sheet material 1.2 mm thick;
- The base of the body (frame) is made from pipes 25x25x1.5 - reinforced, i.e. prevents it from tipping over to one side.
| Load capacity, kg, no more | 500 |
| Operating speed, km/h, no more | 5 |
| Overall dimensions, mm, no more: length width height | 2800x1550x1150 |
| Body dimensions internal, mm, no more: length width height | 1510x1130x275 |
| Ground clearance, mm, not less: | 315 |
| Wheel track, mm | 1405 |
| Wheel track narrowed (on order, without wings), mm | 1200 |
| Body tilt angle, degrees, not less: | 30 |
| Tire pressure, mPa (kgf/sq.cm) | 0,2(2) |
| Weight, kg, no more | 150 |
| Body unloading, direction | back |
| Number of service personnel, people. | 1 |
Photos of the trailer for the walk-behind tractor
Passport and instructions for use for a trailer for a walk-behind tractor:
Download in Word format Download in PDF format
The warranty period for the trailer for the walk-behind tractor is 12 months from the date of sale.
Homemade dump trailer for walk-behind tractor
Is it possible to deliver a digger to the Arkhangelsk region?
Answer: The PMB-1 adapter is included in the price of the KK-1A and KK-1B potato diggers. Delivery to Arkhangelsk is possible through transport companies... Read more
Question: I want to buy a potato planter from you for the Neva walk-behind tractor. Which model will suit me and how much will it cost?
Answer: The KS-1 potato planter will suit you. It is universal and can be aggregated with walk-behind tractors... Read more
Question: Do you deliver to the Tyumen region and how much will it cost?
Answer: Yes, we deliver throughout Russia via freight forwarding companies. As for the cost of delivery, it directly depends on the prices of the carrier. With delivery prices to major regions... Read more
All questions and answersAsk your question
Trailer for walk-behind tractor
Today, in almost any yard in rural areas you can find a walk-behind tractor. This is the name of a self-propelled unit, which allows you to carry out most field and garden work over large areas. Additional attachments attached to the walk-behind tractor only increase the functionality of the mini-tractor. And if there is a need to transport crops or other cargo in agriculture, it’s time to think about buying a trailer for a walk-behind tractor.
Such a necessary trailer for a walk-behind tractor
In general, a trailer for a walk-behind tractor is an additional device that performs two main functions. For example, when working in the garden, a two-wheeled walk-behind tractor has to be controlled on foot. However, purchasing a trailer with two wheels will allow you to move the unit in the desired direction, since it balances the walk-behind tractor and makes it stable. The speed of a walk-behind tractor with a trailer for medium-power models can reach from 2 to 5 km/h, for powerful ones – up to 10 km/h. In addition, a trailer is an extremely important component if you occasionally need to transport agricultural goods (fruits, grass, hay, etc.).
The most important thing is that if we talk about whether a license is needed for a walk-behind tractor with a trailer, then no documentation is yet required to travel on this vehicle. A tangible advantage for those who have not yet acquired a driver’s license.
How to choose a trailer for a walk-behind tractor?
The correct choice of trailer is the key to effective operation of the walk-behind tractor. The standard device consists of the following parts:
- body;
- drawbar;
- wheels;
- seats;
- wings;
- brakes
The most important criterion for choosing a trailer is its carrying capacity. It depends directly on the quality of the trailer and the power of your unit. For light, low-power devices, it makes sense to choose a mini-trailer for a walk-behind tractor with a load capacity of up to 300 kg and a size of 1x1 m. Most of these models do not have a seat.
For medium-power walk-behind tractors, as a rule, products are chosen whose load capacity is up to 450-500 kg.
Do-it-yourself trailer for a walk-behind tractor
The dimensions of such a trailer for a walk-behind tractor can reach 1 m in width and about 1.3-1.5 m in length.
For powerful units, you can choose a trailer with a one-ton load capacity. Its dimensions, as a rule, range from 1.2-1.4 m in width and 2-3 m in length.
Before purchasing, you should also pay attention to the material of the body. The best option is galvanized steel, although it is not cheap. Regular steel is also a good material for a trailer. The plastic models that have appeared quite recently are not designed for large loads.
In addition, when choosing a trailer, be guided by its type. The dump trailer for the walk-behind tractor is equipped with a special mechanism that allows you to instantly throw the load onto the ground. A tipping trailer does not provide this option. But if its sides are folding, there should be no problems with unloading.
Also, before purchasing the necessary “accessory”, pay attention to the fact that the towbar for the walk-behind tractor trailer, that is, the drawbar,
matched and suitable for your unit.
For ease of safety, it is important that medium-duty trailers have a braking system included.
The presence of a seat is another comfort factor. They are available in plastic or metal, with an additional tool box. Wheels can become a vulnerable part of a trailer. For heavy-duty trailers, reinforced wheels are recommended so that they do not fail in the first months of operation. The presence of wings provides protection from splashes of mud and impacts from stones if the wheels protrude beyond the edges of the trailer. Naturally, the wheels located under the trailer do not need such protection.
How to assemble a trailer for a walk-behind tractor with your own hands
By purchasing a trailer for a walk-behind tractor, you significantly expand the functionality of the equipment and reduce the amount of work performed manually. At the same time, the price of such structures can become burdensome for the budget, so many land owners are considering the possibility of making structures themselves.
Types and purpose of models
The design of a trailer for a walk-behind tractor depends on its load capacity and purpose. These parameters also affect the cost of products.
- For light walk-behind tractors, trailers with a width of 1 m and a length of 0.85-1.15 m are used. Their carrying capacity is 300 kg, and the cost starts from $200.
- The trailer for walk-behind tractors from 5 hp (medium category) is larger in size. With the same width (1 m), their length reaches 1.4-1.5 m. The price of such products is from $250.
- Trailers for heavy walk-behind tractors have increased length and width. Overall dimensions are 1.2x2.0-3.0 m. Such impressive dimensions require more reliable support, which is why such products are produced biaxial. When purchasing such models you will have to spend at least $500.
The division into categories can also be carried out based on the design of the body itself.
- The simplest models are solid. Their geometry does not change; the walls and bottom are fixedly connected.
- A body with folding sides is well suited for transporting large-sized cargo, the weight of which does not exceed the norms established for a specific product category.
- A dump trailer is most convenient for unloading work. Using it, there is no need to pick up a shovel or other hand tool. In addition, the dump trailer increases work productivity.
Read about other options for using a walk-behind tractor here
Design nuances
When planning to purchase or make a trailer yourself, it is important to take into account the connection of some design features with the load-carrying capacity of the products.
- Tipper trailers on dual-axle heavy-duty trailers are equipped with a hydraulic drive for easy tipping.
- In single-axis models, tipping usually occurs due to the specific location of the center of gravity; a manual device is sufficient.
- Trailers with a load capacity of over 350 kg are equipped with a mechanical brake. When driving a fully loaded walk-behind tractor with a trailer down a hill, it will be very difficult to stop them using only the vehicle brake.