Preparing the walk-behind tractor. 3 tips on how to prepare a walk-behind tractor for cultivation
In this article you can find answers to the most popular questions about how to properly cultivate a plot of land using a walk-behind tractor, and you will also learn about the basic rules for preparing a walk-behind tractor .
More and more modern summer residents and owners of private houses are deciding to purchase a walk-behind tractor. And this is not surprising, because this equipment is capable of performing almost all agricultural and technical work without taking a lot of time and physical strength of its owner.
Soil cultivation is one of the most important and frequently performed land cultivation technologies. This type of work is a non-dumping soil treatment that does not destroy the humus layer too much.
It is important that cultivation is carried out correctly and without significant errors. Otherwise, the cultivation of the land will be of poor quality, and the gearbox and engine of your walk-behind tractor may be subject to very serious overload. In addition, operators who do not cultivate the soil correctly experience physical fatigue and inconvenience at work. Proper preparation of the walk-behind tractor is the key to successful and efficient work.
First of all, you need to pay attention to several key points when preparing the walk-behind tractor:
– Preparation and installation of cutters;
– Adjustment of the depth level of the coulter when cultivating the soil;
– Setting the speed mode.
In addition, we will talk about the correct movement of the walk-behind tractor when performing this type of work.
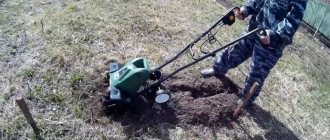
1. Preparation and installation of cutters.
The configuration of cutters for a walk-behind tractor is as follows: 16, 24 or 32 cutting plates. Which kit to choose depends entirely on the type of soil on the site, as well as the area of the cultivated area. If you have to cultivate a small area, it is not recommended to use more than 16 cutting blades for this. The optimal set is considered to have 8 plates on one side and 8 plates on the other side. If you decide to use sets of 24 or 32 plates for small areas, this will significantly increase the load on the walk-behind tractor engine, and, as a result, will greatly tire the operator.
The cutter preparation stage involves the correct assembly of sets of cutting inserts. You must be completely sure that their cutting part is located in the same direction.
Under no circumstances should the cutting parts of the cutter be sharpened. If you sharpen them, the weed roots will not rise to the surface of the treated soil. The root system will simply be cut off with a pointed cutter and remain in the ground. After some time, the weeds will grow again in the same place, and cultivation will be absolutely pointless.
It is also worth mentioning that sharpened cutters significantly increase the load on the walk-behind tractor engine.
Also, sharpening the cutters negatively affects the specified depth of processing of the area. If you sharpen the cutters, the walk-behind tractor will bury itself in the soil from time to time when moving forward. This is due to the fact that sharpened cutters do not grab the ground, but cut it. This leads to the fact that they begin to burrow deeply into the ground to a depth of more than 30 centimeters.
So, you have finished assembling the cutter set. Now you can move on to the next stage of preparing the walk-behind tractor - installing the cutters on it. You must carefully ensure that the direction of the cutting part of the plates is placed in the direction of movement of the walk-behind tractor forward. It is very important not to confuse the left-hand and right-hand cutters and install them in their places.
2. Adjustment of coulter depth.
The coulter is a mechanism for adjusting the depth of soil cultivation. It has several through holes, which are located at different heights relative to each other. When installing the opener in the holder, you need to secure it through one or another hole using a cotter pin.
The choice of hole depends on the depth of cultivation you need. If you want to set the minimum depth, you should install the coulter on the holder through the lower hole. Through holes, which are located slightly higher, are intended for deeper cultivation of the land.
What other factors should you pay attention to for correct and high-quality installation of the coulter? If your plot of land has fairly heavy soil or you applied organic fertilizers shortly before cultivation, then you do not need to bury the coulter too deeply into the soil. In such cases, it is strongly recommended to install the opener through the first hole so that the tillage is not too deep. If you install it through the second and above the second hole, then when cultivating the soil, the milling cutters will be buried in it (exactly the same negative effect will occur as when sharpening the cutters).
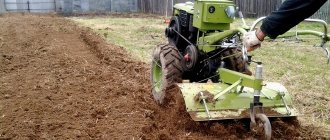
3. Setting the speed mode.
The optimal speed limit is the key to high-quality and proper cultivation of the land. That is why the correct setting of the walking speed of the walk-behind tractor is such an important factor in adjusting the walk-behind tractor. Based on practical experience, many walk-behind tractor owners recommend choosing second gear. This will help you increase the number of revolutions of the shaft on which you have installed the cutter sets. As a result, you will be able to enjoy easy, fast and high-quality loosening of the soil and uniform depth of cultivation of the cultivated area.
Preparing a walk-behind tractor for cultivation is a simple process. You should remember the basic rules:
1.Do not sharpen cutters
2. Correctly adjust the coulter
3.Set the optimal speed mode (most likely the second)
In this case, your walk-behind tractor will be light and maneuverable, and you will not get tired of work.
What to do if the cultivator gets buried?
If the cultivator is buried in the soil, the operator should take a number of measures.
The farmer will need:
- Remove the outer cutting knives from the cutters - this will reduce the weight of the equipment. Another way is to improve the balance of the equipment by installing any small weight at its rear. It is very important to secure the counterweight firmly, otherwise it will fall under the influence of engine vibration;
- To quickly pull the equipment out of the soil, you should switch the cultivator to reverse mode. If it is not provided for in the design, then the equipment will have to be pulled out of the ground yourself;
- During operation, the operator must correctly adjust the position of the cutters. Their cutting knives should always be directed directly in the direction of movement of the equipment.
To prevent the cultivator from getting buried, you need to carefully inspect the transmission before work. This mechanism must be fully operational. The cultivator must not be used if it switches speeds randomly.
If the farmer notices this breakdown, then the transmission gears will need to be inspected. Self-switching of speeds indicates that the gears are touching other equipment components. To fix the breakdown, you will need to adjust the distance between the channels and transmission gears.
ATTACHING IMPLEMENTS AND ADJUSTING THE HITCH MECHANISM
DT-75
TRACTOR Before attaching mounted and semi-mounted implements, depending on their type, the linkage mechanism is set up according to a two-point or three-point scheme.
With two-point adjustment, the lower and upper links are installed by shifting them relative to the longitudinal axis of the tractor by the required amount (for a given implement).
The implements are attached to the tractor in the following order. The tractor is installed so that its longitudinal axis approximately coincides with the axis of the attachment post of the mounted implement, and the lowered linkage mechanism is located at a distance of 1 - 1.5 m from the implement. Then, by rotating the adjusting couplings 44, the locking chains are extended as much as possible. After this, the tractor is slowly moved back until a distance of 10-70 mm is established between the axes of the rear hinges of the lower links of the hitch mechanism and the axes of the fingers of the connecting post of the implement. To facilitate the connection of the lower links to the implement, a telescopic linkage device is used. To do this, press the head of the finger 20 with your hand and, compressing its spring, turn the finger to remove the shank of the rod from the bracket and remove the finger. The rod is extended to the required amount, put on the pin of the attachment post of the implement and secured with a pin 41 installed in the hole of the post pin. Then, by rotating the adjusting couplings of the braces, set the front part of the implement frame parallel to the supporting surface of the tractor. In this case, the forks 19 and the lower screws of the braces must be connected with fingers 18. After adjustment, the couplings 16 are securely locked with locknuts. The upper link is connected to the gun rack in the following order. The rod retainer 51 is released from the bar 50 and the rod is removed. By rotating coupling 12, the rod length is set to such a length that allows you to connect its rear end with the eye of the gun rack. The pin connecting the rod to the stand is secured against falling out by a pin with a spring ring. Having connected all the rods, raise the implement to the upper position, insert and lock the quick-release pins of the 20 lower rods.
After lifting the implement, the length of the locking chains is adjusted. By rotating the adjusting couplings, the chains are slightly tensioned. The locking chains are tensioned so that during sharp turns of the tractor with a raised implement, the ends of the lower links with the implement move no more than 30 mm in one direction or another.
When adjusting the length of the chains, the cylinder piston must be in its highest position and the linkage mechanism must be fully raised, otherwise the length of the adjusted chains will not be sufficient.
By changing the position of the central head of the lower links on the lower axis of the linkage mechanism and the length of the braces, it is necessary to adjust the length of the locking chains. Therefore, before moving the central head (and the rods connected to it) and before changing the length of the braces, maximize the length of the locking chains and adjust them as indicated above.
The working position of the mounted implements is adjusted at the beginning of the first run of the unit. The quality of work performed by the unit largely depends on the uniform penetration of the working parts of the mounted implements.
The uniformity of penetration for implements with one support wheel is adjusted by changing the length of the upper link.
If the rear cutting elements are insufficiently deep and the front ones are excessively deep, loosen the bolts of the upper link adjusting coupling and, rotating it clockwise, lengthen the upper link until the depth of the working parts of the implement becomes uniform along its entire length.
Increasing the length of the upper link while keeping the length of the lower links constant causes the implement frame to rotate relative to the support wheel away from the tractor. This increases the depth of the rear cutting elements and reduces the depth of the front ones.
If the rear housings are too deep and the front ones are not deep enough, the uniformity of the deepening is adjusted by rotating the upper link coupling in the opposite direction. At the same time, the upper link is shortened and the implement frame is rotated relative to the support wheel towards the tractor.
Having adjusted the uniformity of the depth, tighten the coupling bolts of the upper link adjusting coupling.
The uniformity of penetration across the working width of implements with one support wheel or with two wheels located in the same plane along the length of the implement is adjusted by changing the length of the braces. If the right side of the implement is not deep enough and the left side is too deep, lengthen the right brace by rotating the adjusting sleeve, and shorten the left one until it is level. If the left side of the implement is insufficiently deep and the right side is excessively deepened, the left brace is lengthened and the right one is shortened.
After adjustment, the brace couplings are locked with locknuts. When operating a tractor with implements that have two support wheels across the working width, uniform tillage depth is achieved by setting the braces to free movement.
When working with mounted implements attached to the tractor using a two-point scheme, after adjusting the uniformity of the depth, check the stability of the unit. If the unit deviates from straight-line movement, the front head of the lower links is shifted on the lower axis. When the unit deviates to the left, the head of the lower links, together with the rods and stops, is shifted to the right and fixed in the new position. When deviated to the right, the head is shifted to the left. Before moving the head, as well as when there is a significant change in the length of the braces (more than 10 mm), the locking chains are lengthened, and after specifying the installation of the tools, their length is adjusted.
When working with wide-cut mounted implements that have two support wheels along the working width, the tilt of the implements in the longitudinal-vertical plane is adjusted by changing the length of the upper link. The tilt of the implement (in working position) towards the tractor is increased by shortening the upper link, and decreased by lengthening it.
When working with mounted and semi-mounted implements, it is necessary to remove the tow bracket and install it on pins 3 welded to the rods of the racks, otherwise the lower links and other parts of the linkage mechanism may break.
What needs to be done to prevent the cultivator from digging into the soil?
To eliminate the risk of the cultivator burying itself in the ground, the farmer must adhere to a list of certain rules.
These include:
- do not rush to cultivate the soil immediately after precipitation. The equipment will quickly sink into too soft, wet soil. In addition, high soil moisture will lead to the formation of rust on cutters and other metal elements of the cultivator;
- adjust the coulter correctly before each use of the cultivator;
- set the equipment gas regulator to the maximum permissible value and always check the gear shift mechanism;
- Cultivate the soil at least twice. When first processing, the opener should be set to the minimum depth position. The second treatment should be done with the opener set to the farmer's desired depth.
When using a cultivator, you must remember that careful checking and adjustment of the equipment are the main ways to help prevent the equipment from being buried.
Reasons for deep cutting cutters
In photo 10 you can see that the walk-behind tractor has stopped moving forward, the cutters have gone very deep into the layer of earth. To put it simply, the walk-behind tractor is buried in the ground! Why might this happen? Below are the main reasons why a walk-behind tractor breaks down, as well as ways to eliminate them.
1. The soil on the site is very moist and clogs the knives; you need to wait until the soil dries.
2. The coulter is deeply buried in the soil; it is necessary to adjust the coulter.
3. Insufficient speed, it is necessary to set the gas regulator to the maximum value and check the speed mode (select a higher gear for the walk-behind tractor).
4. The soil in the area is highly compacted, so it is necessary to cultivate the area in two times:
- Primary tillage with minimal coulter depth.
- Final tillage is carried out when the coulter is buried to the required depth.
5. The cutters of the walk-behind tractor are installed incorrectly; check that the cutters are installed correctly.
These are the most common reasons why the tillers of a walk-behind tractor go very deep into the ground and the walk-behind tractor stands still.
on “Soil cultivation with a walk-behind tractor”
Or rather what attachments to loosen
Tell me what attachments you used. Otherwise, you need to cultivate a large area of certified black soil. Instead of using a hand rake, you can process it with a walk-behind tractor
The cultivation depth of the “Champion” is 10-12 cm with the coulter completely lowered - clearly insufficient for planting potatoes! Therefore, the Champion cultivator is not suitable for these purposes. I bought it, but I just threw money away
And how to plant potatoes at such a depth of cultivation, and how to fight weeds, if not pull them out. Please share your experience.
Primary loosening and sowing of lawn grass. For these purposes, plowing is needed. Plowing is cheaper than covering hectares of fields with film.
I want to ask a question: why is soil cultivation carried out? I am a supporter of natural organic farming and have completely abandoned digging and plowing the soil, which destroys fertility and kills soil inhabitants. Even classical collective farm-industrial agriculture recognizes this fact and recommends crop rotation and “fallow” for the soil. Over several centuries of plowing, the black soil layer that fed many states was destroyed. Plowing virgin lands led to their erosion and loss of productivity. It is profitable for the state to mass produce tractors and walk-behind tractors, and compensate for the quality of the harvest with fertilizers and cheap labor. But does a simple summer resident need this? I do not copy collective farm methods; I have been cultivating the soil once a year for 4 years to a depth of no more than 5 cm (the height of a matchbox). I use a flat cutter and a motorized cultivator. After harvesting the vegetables, I plant green manure on the same day. I process them on the day of planting potatoes and mulch the soil. I don’t pull out weeds, I don’t pour water on the plot... I harvest potatoes from 4 acres, which is enough for 2 families (6 people) until the next harvest. All the neighbors appreciated the taste of such potatoes... To preserve the potatoes (another article), I recommend immediately washing them in water to remove traces of soil and immediately drying them in one layer in the sun, and covering them at the end of the day. The seed material should be greened to accumulate solanine, which will help the potatoes to be stored better and at the same time ensure better germination and seedlings.
How to properly set up a cultivator?
In order to prevent the cultivator from getting buried and a number of other common problems, the owner of the equipment needs to perform a number of steps to prepare and configure it.
These include:
- First, the cultivator must be installed on a thick board and the factory wheels removed from it. Instead, you need to attach one set of cutters on the left and right sides. One set of cutters includes 8 cutting knives - this number of elements gives the best result when processing soil;
- When installing cutters, you need to pay attention to the position of the knives. They should only point forward. The working part of each knife should not be sharp. Otherwise, the cultivator will not move forward, but will begin to bury itself in the ground. In addition, sharp cutters will cut weed stems rather than winding and pulling them along with the roots;
- Next, you will need to install an earring on the equipment, which is necessary for mounting the opener;
- The opener is a bar with holes made in it. It is necessary for precise adjustment of the position of the cutters when cultivating an area;
- To fix the opener, it must be installed in the shackle and secured with cotter pins and a bushing. To do this, select a second hole. The count is taken from the bottom of the opener. Thus, the cultivation depth will be 20 cm. This is quite enough for high-quality soil cultivation and the elimination of large weeds;
- To increase the depth of cultivation, the coulter must be lowered down and attached to the shackle through the upper hole of the element;
- To reduce the plowing depth, the coulter should be raised up and fixed to the shackle through its lower hole.
Having installed and configured the working equipment, you can begin operating the cultivator. To accurately determine the plowing depth, you should make a control run of the equipment across the site. At this time, you need to pay attention to the operation of the cultivator. If its engine vibrates strongly and smokes, it means that the equipment is subject to excessive loads. In this case, you will need to set the coulter to a shallower depth and check the operation of the cultivator again.
After the first tillage has been completed, the opener should be switched to deeper plowing mode. This arrangement will allow you to properly process the area without harming the working mechanisms of the cultivator.
Plowing depth adjustment
The depth of plowing of the garden is determined by various factors. The specificity of working with a motor cultivator is such that the cutters can plunge into the cultivated soil to different depths. They bury themselves. In this case, the depth of processing depends on different factors.
Movement speed. If the unit is kept in one place longer, it will burrow deeper, and vice versa. Therefore, the processing depth is mainly controlled by the operator himself during operation. In reality, the plowing depth ranges from 10 cm to 25 cm .
Also, adjustment of the plowing depth of the cultivator can be limited using limit wheels. Some models of motor cultivators have disc wheels at the ends of the milling shaft, limiting the depth of tillage.
Cultivator. On all others, this is done using a tiller mounted at the rear of the body, in front of the operator. It has degrees of adjustment. At a certain maximum depth, the tiller rests on the ground, the unit hangs on it, and the cutters cannot go deeper.
Also, the depth of processing depends on the total weight of the unit. The heavy weight pushes the cutter down, promoting depth of cut. With a light weight, the cultivator tends to move forward before the cutter has had time to dive to a significant depth.
Therefore, an additional load is sometimes attached to a light unit, which is especially required on heavier soils.
Also, the depth of processing depends on three more reasons:
- mechanical composition of the soil;
- design, condition of cutters;
- engine speed.
In loose soils, the cutters quickly sit down when rotating. In this case, the cultivator sometimes gets stuck and cannot move forward, and you have to swing it across the axis left and right, then it gets out on its own.
The depth in one place can be increased or decreased by lowering or raising the cutters, resting the motor-cultivator on the tillage.
Most cutters are from different manufacturers with a standard design. But there are varieties that differ in the shape of the bends, the location of the cutting edges, etc.
As a result, some cutters are oriented to quickly move the unit forward, without having time to dive to a significant depth. Others, on the contrary, due to the specific angles of attack (entry into the ground), predominantly work “to depth”.
Spiral cutters:
Types of cultivators for tillage
In the modern world, most areas of human activity have been automated.
Agriculture was not spared these processes either. Today on the market there are a large number of motor cultivators that help cultivate the soil in the garden, in flower beds or in greenhouses. Despite the fact that the equipment has appeared on the domestic market for quite some time, not everyone has managed to buy it yet. And even many of those farmers who purchased the unit still do not know how to properly plow a garden with a motorized cultivator.
Modern models of units are divided into 2 types:
The features of working with it on the site depend on what kind of motor your unit is equipped with. Below we will consider the general rules for operating equipment in the local area.
What types of cultivators are there?
Electric cultivators are not suitable for such heavy work. They are designed for light operations - cutting a bed, loosening, hilling. Moreover, only cultivated soil, virgin soil, and loam will not be tolerated.
Gasoline-powered vehicles are divided into classes based on engine power and size - light, medium, heavy.
Light-class cultivators are suitable for cultivating soil between rows and hard-to-reach places, for creating beds, hilling plants, and are very convenient for cultivating tree trunks, but you won’t be able to plow on them.
The cutters on them do not have the ability to till the soil to the required depth without overturning the mechanism itself.
Cultivators, which, according to their technical characteristics, can be classified as middle class, are the most popular among consumers and are universal in their functionality. They can easily cultivate 18-20 acres of vegetable garden, no matter what kind of soil there is, swampy, sandy or loam, virgin soil or cultivated land.
Units are produced that have reverse gear, which means they can access any bottlenecks that exist in each area.
One of the main parameters when choosing a cultivator is engine power. The work productivity, and, consequently, the maximum possible processing area depends on this. The amount of horsepower stated in the engine power also affects the price. The cultivator that has more power performs a greater number of operations and its price is an order of magnitude higher.
In addition, power affects the ability to attach a wide variety of attachments, which significantly increases functionality and, accordingly, the possibility of wider use. This cultivator is equipped with a tillage depth limiter rod that can be adjusted.
If the question of how to plow with a cultivator arises for a professional farmer, it will be more profitable for him from an economic point of view to purchase a powerful, professional motor-cultivator or walk-behind tractor. This universal agricultural unit is very easy to operate and reliable in operation.
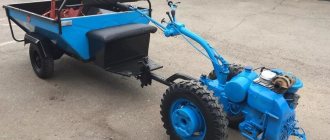
What attachments does the walk-behind tractor work with?
Any experienced farmer knows that with the help of a walk-behind tractor, cultivator or other motorized equipment, almost all agricultural work can be mechanized: starting with cultivating the land to prepare it for sowing and ending with transporting the harvested crop. Motor units have become universal due to the possibility of using a variety of attachments. In addition to moldboard and other plows, the following equipment has been created for processing plowed land and cultivating virgin lands:
- harrows;
- hillers;
- rotary cutters;
- flat cutters-weeders.
Harrows are used to plow virgin soil, as well as for pre-sowing (spring) or post-harvest loosening (autumn) of arable soil to a depth of 7-14 cm. Using harrowing with a walk-behind tractor or cultivator, the surface is leveled, moisture is covered, and weeds are destroyed. The working parts of such agricultural implements are metal teeth or spherical disks. In this video you can clearly see how to properly plow with a walk-behind tractor and a homemade harrow. And also from there you can learn improvements for the harrow.
The hiller is used to hill up potatoes, cut furrows for sowing seeds, backfill planting material, and also sprinkle weeds directly in the row area. Hilling devices come in single-row and double-row, with fixed and adjustable working widths, distinguishable both by their design and their efficiency. Here is a video of how the Neva MB2 motor cultivator performs processing with a mounted two-row weeder-hiller.
With a rotary cutter you can plow virgin soil, carry out pre-sowing and basic cultivation of plowed land. This agricultural implement allows you to mill, cultivate the land and qualitatively prepare it for sowing. It is capable of not only plowing the soil, but also mixing it with fertilizer, crumbling large layers, crushing stubble particles, and leveling the sown area. Rotators for cultivation come in different types, depending on the number of cutting elements. This video shows how to actually plow a walk-behind tractor with a cutter installed on it, as well as cultivation.
A flat weeding cutter helps to trim weeds, split and cut grooves without turning the formation, plow and crush the soil. Flat cutters come in all possible working widths and processing depths, which allows you to choose them for specific processing conditions of agricultural plots and crops. This video demonstrates well how to carry out processing with a mounted flat cutter in practice (using the example of a Dnepr walk-behind tractor).
In addition to the listed removable tools designed to plow virgin soil and cultivate arable land, rakes, wood splitters, seeders, shredders, cultivators, rotary and segment mowers, shovels, sprayers, sweeping brushes, snow blowers, etc. are used with the motorized unit. Having a basic set of mounted agricultural implements, you can use a walk-behind tractor or a powerful cultivator to perform all kinds of economic tasks, in particular, pre-sowing plowing, sowing and planting crops, applying fertilizers, inter-row cultivation of crops, harvesting root crops, and seasonal harvesting of green fodder.
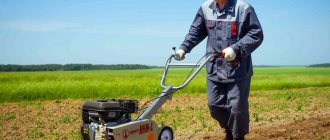
Operating a cultivator - rules and tips for beginners
Before plowing with a cultivator, you should prepare the area to be treated.
To do this, you will need to remove debris, clear the area of large stones and anything unnecessary that could damage the cutters. After this, the plowing algorithm looks like this:
- Check the unit for damage, screw in all fasteners securely, fill in gasoline and oil;
- To reduce the width of the covered strip, you need to remove the side knives;
- Start the engine and begin to slowly dig the cutters into the soil;
- Start a smooth movement without jerking;
- When processing, do not use the forward and reverse handles at the same time, as this may damage the transmission;
- Take short breaks if the weather is hot;
- After plowing, slowly pull the cutters out;
- At the end of the work, clean the unit from dirt and the cutters from wound weeds;
- If necessary, apply oil to the transmission device using a syringe.
There are a number of recommendations that should be followed when cultivating the soil.
Experts advise:
- Rectangular plots should be cultivated in a circle, and square gardens are best plowed in a zigzag direction;
- There is no need to plow the entire area if it is not necessary. It is best to cultivate the land in parts as you plant;
- Experienced farmers recommend making beds along the long side of the plot, placing them parallel to each other;
- If the garden is located on hills, then it is best to make beds along the rise;
- When preparing beds, leave a small strip of soil untouched so that at the right time you can leave the rows and move on to tilling the soil in another bed.
Compliance with all these rules and recommendations will allow you to properly plow the soil and prepare the land for growing crops.
Productivity of electric cultivators
The performance of electric cultivators depends primarily on power, and also on the gear ratio of the gearbox. The more powerful the model, the greater the depth and width of the soil you can plow in one pass.
The maximum plowing depth for electric cultivator models varies from 15 to 30 cm. The working width is from 25 to 60 cm. Many “professional” gardeners have in their arsenal a set of cutters of different sizes.
The choice of electric models is quite wide. Their power varies from 600 to 2500 W. Low-power cultivators do not have a coulter and are designed for simple loosening of beds. These are modifications with a power of 600-1000 W costing 3-5 thousand rubles. They are not suitable for plowing a summer cottage area of 5-6 acres. In this case, you need to purchase equipment with a power of at least 1.4 kW with a wheel set and a coulter. They provide a plowing depth of about 20 cm and a working width of 30-35 cm. The cost of such units is about 8 thousand rubles.
It should be noted that to cultivate heavily overgrown with weeds or virgin soil, the most powerful modifications (2 or more kW) are used - weaker electric cultivators will not cope with this task. Based on the type of motor, garden equipment of this type is divided into two large groups - cultivators with brush and asynchronous motors. The latter cost at least 15 thousand rubles, but are distinguished by high power, reliability and long service life. This is an ideal option for plowing large areas.
Brush models break down much more often and require regular cleaning of the commutator. After plowing 3-4 acres, it is necessary to remove the top cover and clean the collector. In any case, the smallest particles of earth will get there, which will mix with graphite, accelerating the process of contamination of the collector lamellas. No need to wait for the engine to start whistling.
If you plan to plow a fairly uneven, hilly area, then ask your sales consultant about the permissible level of inclination of the electric cultivator. Some models have limitations in this regard.
What to do if the equipment gets stuck in the ground?
In this case, you need to swing the equipment in different directions, which will gradually release it from the soil. It is worth noting that there are a number of motorized cultivators that will perform excellently on hard virgin soil. Usually, of course, during the initial plowing of stubborn virgin soil, a plow is used. But if the cultivator has good power, then it can also cope with such soil using conventional cutters. And in this case, many owners may encounter a problem with such soil cultivation: the unit begins to bounce due to the hardness of the earth. To hold the equipment in place and give it greater stability, you can use additional weight.
Design of electric cultivators
Cultivators with electric drive are designed on the same principle as gasoline ones, only instead of an internal combustion engine they have an electric motor, “powered” by a standard 220 V network.
Most cultivators are equipped with two cutters, a wheel pair and a coulter. With the help of the latter, the depth of plowing is controlled. In the design of electric cultivators, gearboxes with a worm gear are most often used. They are more reliable than their chain and belt counterparts, which are usually equipped with gasoline models.
Pros and cons of mechanical plowing
The method of mechanical tillage has a number of undeniable advantages compared to traditional manual tillage. First of all, plowing with a walk-behind tractor or cultivator requires significantly less physical and time expenditure, which increases the productivity of agricultural workers tens of times. Also, thanks to this technique, it becomes possible to carry out a number of additional works in parallel with plowing. For example, you can simultaneously loosen the soil and also add the necessary fertilizers to the soil. In addition, tillage with a walk-behind tractor or a walk-behind cultivator ensures more uniform and deep plowing of the land, improves its condition and structural quality.
Safety precautions
The safety rules recommended for compliance when using a motor cultivator are not complicated.
You should adhere to the following rules:
- Operation may only begin after full reading of the instructions supplied with the device;
- It is prohibited for children to use the device, as well as persons who do not have experience in handling the device;
- during plowing, it is important to eliminate the proximity of any animals and other people;
- work should be carried out in closed clothing with long sleeves and closed shoes without dangling elements or in special equipment; It is better to choose high shoes, for example, boots or ankle boots, the toe of which is covered with a metal plate; We must not forget about gloves, mainly in the case of cultivating difficult soils, as well as safety glasses;
- During operation, it is necessary to keep your hands and feet away from rotating elements, and also maintain balance in relation to the forward and reverse handles; they cannot be raised at the same time, since one must always remain lowered;
- Vibrations occurring during operation signal the presence of breakdowns; in this case, the engine is stopped, cooled and the problems are eliminated if possible; most often the problem is a weakened fastening, which is easy to normalize;
- If you have a model with reverse gear, it is important to adhere to one simple rule: before changing direction, you should wait until the cutters come to a complete stop.
You can learn more about how to properly plow with a motor cultivator in the following video.
Technique for proper digging of a vegetable garden
First of all, the site must be properly prepared by clearing it of weeds, stones and various types of debris. After this, stretch the so-called orientation cord along the first row of the site. This manipulation is necessary in order to make the arable row as even as possible. Then prepare the device. To check how correctly the adjustments have been made, it is recommended to plow a test plot of a minimum area. Moving to the main area, place the walk-behind tractor or cultivator at the beginning of the furrow.
Cultivator treatment of a trial plot of minimal area
When starting arable work, slightly deepen the device into the soil, lightly pressing it downwards. Next, follow the walk-behind tractor along the guide cord, holding the handles of the walk-behind tractor. Make sure that the mechanism runs in a straight line and do not allow it to sink excessively into the soil. When the length of the furrow comes to an end, you need to make a U-turn and continue plowing in the opposite direction. To cultivate the land as uniformly as possible, it is necessary to ensure that the speed of movement of the mechanism is low, and the rotation speed of its cutters, on the contrary, is quite high.
Cultivating a plot using a walk-behind tractor
Step one
Photo 8
To obtain high quality tillage with milling cutters, it is necessary to select the correct speed mode. Typically, there are two gears to move the walk-behind tractor forward:
- Low is first gear.
- Overdrive is the second gear.
Unlike plowing, when cultivating the soil, the walk-behind tractor must operate at increased speed, so in this case it is necessary to select a higher gear to increase the rotation speed of the cutters.
Selecting a higher gear reduces the load on the walk-behind tractor engine, and with an increase in the rotation speed of the cutters, the quality of loosening the soil significantly improves.
Step two
Photo 9
After passing the first strip, we check the depth of tillage. If the depth is satisfactory, then you can continue cultivating the land. The passage of the second strip must be done so that the cutters follow the line left by the coulter, since an untreated area of soil remains between the cutters of the walk-behind tractor.
Note:
When performing work on cultivating a vegetable garden, you do not need to press the steering wheel down, you should not push the walk-behind tractor forward - all this can lead to the walk-behind tractor starting to bury itself in the ground.
Additional recommendations for plowing virgin soil
When carrying out arable work, you can move both in a circle and in a zigzag manner. We can say that it all depends on your personal preferences; only experienced specialists advise taking into account the shape of the treated area. If the site has a rectangular shape, then circular plowing would be the ideal option. Owners of a square plot are recommended to give preference to zigzag digging. When cultivating a vegetable garden, it is best to create beds along the perimeter of the site and place them parallel to each other. This will facilitate the process of plowing and subsequent planting work.
In addition, many business owners are faced with the problem of excessively hard soil, which cannot be processed even with the help of special equipment; this is often typical for virgin soil. What can be done in this case? Knowledgeable people advise adhering to a system of stage-by-stage tillage. The soil also becomes softer and more pliable when wet. Therefore, carry out arable work either after heavy rainfall or after preliminary intensive watering. In addition, you can try to develop a virgin soil layer using a walk-behind mill. To do this, you should walk along the same strip several times in a row, gradually deepening the device into the soil.
When the work is completed, take care to clear the mechanism of soil, grass and other debris. Then rinse it with water and dry thoroughly. This is necessary to ensure the longest and most reliable operation of the walk-behind tractor or cultivator!
Preparatory stage
Before operating the motor cultivator, be sure to check the oil level in the crankcase. To do this, unscrew the dipstick and see if the oil remaining on the dipstick reaches the “minimum” mark. Oil cannot be poured above the “maximum” risk.
On some models there is only one probe mark without letter markings. On how to accurately determine the oil level on each model, there is information in the Operating Instructions for the cultivator (manual).
If it's time to change the oil, you need to do it. Replacement periods depend on the model and are indicated in the Instructions (from 30-40 to 100 operating hours).
The presence of fuel is checked. If necessary, add gasoline for 4-stroke engines or gasoline and oil for two-stroke gasoline engines in the proportion recommended by the manufacturer.
The working part is being configured. The condition of the cutters is checked. If they are new, you need to remove the factory grease by wiping it with a rag. It is undesirable for lubricants to get into the soil; mineral oils and additives in lubricants are toxic to plants. In addition, dirt may stick to the lubricant.
Assess the condition of old cutters. The blades must not be bent. The cutting surfaces must remain as sharp as new.
There are types of cutters that cut the soil not with the entire plane, but with special cutters. These are spiral cutters, crow's feet, etc. If the incisors are dull, they are sharpened in the following ways:
- on the abrasive wheel of a grinding machine;
- “monkey” grinding wheel (angle grinder);
- file
In the photo - crow's feet cutters:
At the same time, if the metal is easy to sharpen, then the cutters are of poor quality (principle: easy to sharpen, easy to dull). You can work with such cutters for some time, but in the future it is better to replace them with those made of high-quality metal or alloy.
It is not recommended to sharpen the cutters sharper than they were in new condition.
Any primer is an abrasive (erasing material), quickly erases the fine sharpening to rounding.
The cutter must be sharp enough to easily penetrate the ground. The quality of the soil itself also matters. The cutter penetrates loose sandstones easily, but it is the sand that wears out the cutters the fastest. For such soils, sharpening at an obtuse angle is recommended.
The transport wheels are removed. Serviceable cutters are put in place. For light loose soils, a full set of cutters is installed. For heavy dense soils - a narrower set, so as not to overload the engine.
Next, according to the manual, start the engine and get to work:
- The fuel supply valve opens.
- The air damper closes.
- The throttle is set halfway.
- If there is a start button, it turns on.
With a smooth jerk or several, the internal combustion engine starts and the unit is ready for work.
But before this, if necessary, the soil must be prepared.
Stems of large plants, tops, and climbing weeds are removed from the site. Otherwise, during work, they will wrap around the cutters, which will complicate the work. You will have to stop and remove the grass often.
If the grass balls cover the incisor, it will not be able to penetrate the ground. A large roll of grass wound around the cutter axis can completely jam the operation of the unit.
Stones, glass, plastic and other debris, if any, are removed.
For most soils (loams, chernozems, gray soils), except sandy soils, it is important to choose weather conditions. Heavy loams turn to stone in dry weather; it is difficult or completely impossible to cultivate them with a motor cultivator at this time. When wet, such soil becomes soft and crumbly.
But excessive humidity will also prevent it from working. Dirt will stick to the cutter and shoes. Instead of crumbly soil, dough-like lumps will form.
Therefore, choosing the right time between rains can be important. For some soils it is necessary.
This applies least of all to sandstones and sandy loams. The water in them quickly goes down, and they are free-flowing almost at any time.