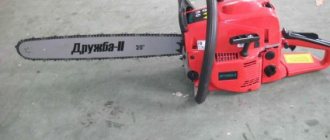
The walk-behind tractor is an effective assistant in the processes of cultivating the land, as well as further caring for the garden and garden. The easiest way to obtain this device is, of course, to purchase it. However, there is an option for making it using a chainsaw engine, in particular from the Soviet “Druzhba”. Its powerful engine, simple design and overall unpretentiousness make it well suited for this role.
Benefits of the product
The benefit of a homemade walk-behind tractor from Druzhba is that purchasing a factory-made device is quite expensive.
Having a small plot or using a walk-behind tractor infrequently, purchasing it is not always advisable. And you can assemble a generally productive homemade device from what you have lying around at home. Parts can be assembled absolutely free if desired. And it would not be a pity to spoil them under unfavorable circumstances. The chainsaw engine itself is quite economical and unpretentious. You can use inexpensive fuels and lubricants, which also affects the overall benefit.
A walk-behind tractor is not the only thing that can be made from a Druzhba chainsaw; using this tool you can make many other useful devices; read about how and what is needed for this in the article at this link.
Operating principle
A manual hiller works according to a seemingly primitive scheme. However, this has little effect on efficiency. One of the farmers presses on the traction handle located in front, and the other presses on the same handle at the back. As a result, the mechanism is set in motion, and the working disks are immersed in the ground. When moving, the soil layer is loosened, then, by installing or removing several special parts, they change the distance separating the disks.
Self-production of a hilling device is available to all farmers. All you need is basic mechanical knowledge and experience in day-to-day operation of agricultural machinery. Do-it-yourself equipment turns out to be much cheaper than factory-made analogues. There is no need to talk about satisfaction with one’s own skill.
What homemade products can you make from a chainsaw?
A chainsaw is a very convenient tool for making homemade items. By adapting it to a special platform with wheels and connecting the chain to the shaft on which the blades will be installed, you can get a powerful lawn mower. By the way, in order not to bother for a long time, you can install a sprocket from the rear wheel of a bicycle on the shaft.
In addition, a chainsaw can be used to make an excellent sawmill, since reworking this tool, in this case, is also reduced to a minimum.
In general, all homemade chainsaws can be divided into two large groups:
- The first group includes those homemade products, in the manufacture of which there is practically no need to disassemble and modernize the chainsaw;
- The second group of homemade products includes all kinds of equipment: snowblowers, mopeds, snowmobiles, ATVs, etc. In other words, complex mechanical devices, for the manufacture of which you will have to radically disassemble the chainsaw, make a water or air cooling system, in general, completely change this petrol tool.
Let's look at what can be made from a chainsaw, which will definitely come in handy in the household.
So, for example, based on the Druzhba chainsaw you can make the following homemade products:
- Powerful boat engine;
- Gasoline grinder;
- Sawmill;
- Motor cultivator;
- Lawnmower.
When it comes to car homemade products, then from almost any chainsaw you can make:
- Moped, if you install a chainsaw on a bicycle;
- Snowmobile and snowmobile;
- Snow blower;
- Quad bike;
- Scooter.
Of course, the second group of homemade chainsaws requires a thorough approach and a complete study of the design.
Also, you will need to purchase all the necessary materials, and in some cases, you cannot do without a welding machine.
Chainsaw sawmill
The easiest to make is a homemade sawmill from a Ural, Taiga or Druzhba chainsaw. The essence of how a homemade sawmill works is that there is one large guide along which the chainsaw moves back and forth on a movable sled.
As a guide, you can use a rail or several long but even metal corners. The platform on which the chainsaw will subsequently be attached is made of a piece of thick steel, the thickness of which must be at least 5 mm.
The moving part of the sawmill deserves special attention, the one through which the platform moves along the guide. Here you can use a metal pipe with a rubberized surface as rollers
It is very important that the width of the moving part matches the width of the guide
As you can see in the photo, a log located next to the sawmill is quite easily cut into several parts using a chainsaw moving along a guide. Thus, you can save a lot on the purchase of a sawmill, and, as you can see, the chainsaw practically does not need to be altered, disassembled, etc. in any way.
Walk-behind tractor from a chainsaw
As mentioned above, you can use a chainsaw to make various homemade products for your home and garden. Some of these homemade products are a mower and a walk-behind tractor. With a mower made from a chainsaw, things are not as difficult as with a walk-behind tractor, for the manufacture of which you will have to weld a metal frame, and then fit two wheels on the side to it.
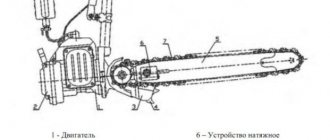
The principle of making a walk-behind tractor from a chainsaw is to use several sprockets that could transmit rotating force to the knives. For these purposes, the sprockets are located on the sides of a metal shaft on which several knives are welded.
A homemade walk-behind tractor from a Ural or Druzhba chainsaw will become a real helper for those who have a fairly large garden. Perhaps such a walk-behind tractor will not be very powerful, but it will be quite enough to solve the main task of cultivating the land.
Sawmill
Very often, chainsaws are used as the main element of homemade sawmills. The latter are assembled from a reliable metal frame, guide, fastening system and the saw itself. At the same time, there are several varieties of hand-made sawmills. In particular, they are:
- Stationary mobile. The attached chainsaw moves along a rail guide, thereby producing the desired cut. It is imperative to provide reliable fixation of the log or other workpiece. Otherwise, you can forget about cutting accuracy. This option is one of the simplest, but not every log can be processed in this way.
- Stationary, motionless. A feature of this installation is the stationary placement of the saw and the movement of the log towards it. Such sawmills are capable of processing workpieces of various lengths, but the only difficulty lies in creating a competent log feeding mechanism.
- Mobile. As the name implies, the saw itself moves along the workpiece. Due to its light weight, the sawing part can be moved without problems along the guide, which is used as the workpiece itself. This option is characterized by the need for significant effort from a person - the sawing device will not support itself. It is also worth noting that mobile sawmills, assembled by yourself, are only suitable for one-time work or an insignificant volume of logs.
The video below shows one of the successfully functioning sawmills, powered by a chainsaw engine.
Making a walk-behind tractor from a chainsaw with your own hands
According to the owners of land plots, who have already experienced all the features of handicraft motor vehicles from a gasoline saw, assembled with their own hands, “Druzhba” demonstrates excellent results after modernization. With the right choice of power plant for a homemade unit, it works no worse than its industrial prototypes.
The absolute advantages of this device are:
- high power, reaching up to 4 horsepower in some samples;
- lightness - a small mass will not make the unit heavier and will increase its mobility;
- compact size - a small engine does not require reinforcement of the frame, which reduces the financial costs of its manufacture;
- economical consumption of fuel and lubricants;
- performance, which is determined by readiness for prolonged loads;
- possibility of using all kinds of fuels and lubricants;
- functioning in a completely autonomous mode;
- applicability for various types of work.
The assembly procedure depends on the drawing used and may vary, but the main points of assembly include the following activities. The frame is assembled in accordance with the drawing.
The work process is organized as follows:
- we take a metal pipe with a cross-section of at least 20 mm and bend it so that the overall appearance looks like 2 spars, the end of which is directed upward;
- a motorcycle handlebar is welded in the rear area of the spar;
- we strengthen the base with crossbars;
- We electric weld the support platform for the battery to the rear bends of the side members.
Further work continues on the following points.
- Now we mount a specialized flange, with the help of which the shaft will be fixed to the main structure of the unit from a gasoline saw.
- We buy sprockets from a UAZ car at the used parts market. Through them, ground clearance (ground clearance) will be formed between the ground plane and the connecting wheel beam.
- We take bearings with a 30 mm diameter. We fix them to the main bridge.
- The gearbox, equipped with a gearbox, is assembled from a motorcycle engine.
- The wheels and cutters of a handicraft cultivator are installed on a metal pipe of the required diameter.
- Due to the fact that the walk-behind tractor has a low speed, a forced-type cooling system is required. The simplest solution is to install a fan. And so that the air flow is directed towards the cylinder, a protective coating is used. It could be an old motorcycle gas tank.
After completing the assembly work, be sure to test the equipment, doing this with extreme caution.
Motorcycle MP Dnepr, K-750, Ural. | Topic author: donatus
Motorcycle products MT, K-750, Ural
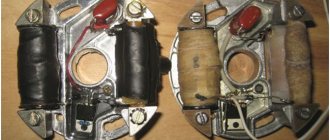
Adhyatman K-750 engine design
According to technical data, the engine of the K-750 motorcycle can be classified as a forced-type engine of the road type, despite the lower position of the valves of the gas distribution mechanism. A characteristic feature of the engine is the opposite arrangement of the cylinders, which ensures a good balance of inertia of the crank mechanism, uniformity of the suction stroke and working strokes, as well as satisfactory cooling in the absence of dirt on the edges of the cylinders.
The positive qualities of the engine include the simplicity of its design and reliability in operation, as well as ease of maintenance during operation. The installation of separate carburetors on each cylinder ensures easy starting of the engine at any ambient temperature and maximum power with satisfactory economy, but it is necessary to maintain the synchronization of the cylinders by adjusting them, which leads to overloading of individual cylinders and premature failure.
The most notable disadvantages are the engine's tendency to overheat when driving at low speeds and heavy loads, especially in summer, as well as the relatively limited durability and poor maintainability of the connecting rod bearings (they also cannot be disassembled for repairs). like the difficulty of assembling the crankshaft.
The engine consists of separate mechanisms that are installed in the crankcase and work in a specific interaction. The gearbox is connected to the engine by three pins and one bolt. Ignition devices are installed under the front cover; a generator belt is attached to the upper part of the crankcase, and carburetors are attached to the cylinders.
Step-by-step instructions for making a walk-behind tractor from “Friendship”
The manufacturing process depends on the chosen design option and drawing. Step-by-step analysis of one of the modifications:
- Two bases (spars) are made from a steel pipe or profile with a diameter of at least 20 mm. The bend is made so that the ends are bent upward.
- On the long part, a steering wheel is welded, either welded at random or taken from a motorcycle. The bases are connected and reinforced by cross members. Also, platforms for the battery and gas tank are welded or screwed to the bend of the base.
- To mount the engine, a structure in the form of a slide is made from pipes or profiles. The motor is attached to it, and then to the base.
- Next, the RU-32 collar flange from the VAZ car is installed. Thanks to it, the shaft transmitting forces from the motor will be fixed. It is also recommended to use a VAZ gearbox shaft as a shaft. To fix the shaft in the flange, bearings with a diameter of 30 mm are used.
- The transmission link is made from sprockets from any old car or moped. One is mounted on the gearbox shaft, the other on the shaft on which the cutters or wheels are located. A chain from an old motorcycle is connected to each other.
- Next, all parts are installed and connected.
- You can also make wheels and cutters yourself, using old wheels from a car or agricultural machinery as a base. The resulting parts are mounted on a steel pipe or circle of the required diameter.
You also need to consider an effective forced-type cooling system. Several options are offered. The simplest option is to install a fan. More complex designs offer the use of water cooling.
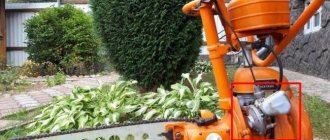
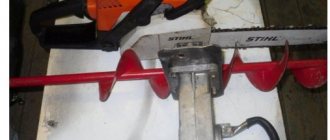
snow blower
If in the previous design you replace the shaft with plowshares or harrow spokes with an auger mechanism, add a casing, an intake device and a pipe for throwing out snow, the cultivator will turn out to be quite a decent snow blower. Many home craftsmen design their homemade products with replaceable attachments for different seasons. Motor from a Shtil saw with a power of 3-5 hp. It will cope quite well with cultivating the garden in spring and autumn, and with removing loose snow from a summer cottage in winter. The most important unit is the screw mechanism.
Homemade snow blower
If you are not a professional designer, then it is better to download ready-made drawings from the Internet. The auger blades are made of thick rubber, for example, from a conveyor belt. The intake device is made of galvanized steel. A plastic sewer pipe is suitable for the snow disposal pipe.
Creating a walk-behind tractor from a Druzhba chainsaw
The Druzhba chainsaw is considered the best choice for making a walk-behind tractor. This simple and very productive technique is probably in the arsenal of many owners. Using its structural elements, you can make a fairly powerful walk-behind tractor, as it has the following features:
- Due to its low weight, such equipment can be used for work of any complexity.
- Very productive engine.
- Compact and durable.
Based on this device, a high-quality walk-behind tractor is obtained, the speed of which is 2.5 km/h and the power is about 4 hp.
The process of creating a unit is similar to the method that is used for all other models, but it also has its own nuances:
- The main shaft of the future design is equipped with a special flange, which is of the collar type, RU-32, which will then make it possible to easily screw on bridge type gearboxes.
- Sprockets are taken from the UAZ and, together with a double-row chain, are installed on the future device and allow you to increase the distance from the gear axle to the ground. Timing sprockets allow you to increase the distance to the soil by 15 cm.
- The housing type bearings are screwed to the main axle and their diameter is 30 mm.
- The gearbox with gearbox can be constructed from the motor from the Karpaty motorcycle; it is necessary to provide a standard centrifugal clutch.
- To install the cutters and then install the wheels, you need to use steel pipe.
You need to install a load in front of the frame that can hold the center of gravity.
A pipe with a diameter of 30 mm is welded as handles.
As soon as the chainsaw walk-behind tractor is ready, it can be tested on the site. To do this, fill up with fuel and try to complete the work. Modify your device if necessary.
The advantages of such a unit are:
- the ability to use a variety of lubricants and combustible materials;
- work in completely autonomous mode;
- suitability for any type of work.
To create this type of technique from a chainsaw, you do not need specific knowledge. All it takes is a little ingenuity and the desire to get an effective technique. A homemade walk-behind tractor suitable for use on private plots and dachas.
Peculiarities
Before you start producing a motor cultivator, you should decide what type of agricultural unit you will design: with an electric motor or with an internal combustion engine.
It is important to remember the fact that a motor cultivator with an electric motor will only be effective if there is an energy supply system in the area that is planned to be processed. On the contrary, a device incorporating an internal combustion engine can be used in the field, since it runs on fuel, namely gasoline
Another important nuance is the method of tillage. There are cultivators that have driven wheels, as well as those units that are equipped with mounted tools (the latter can serve not only as walk-behind tractors, but also as vehicles).
What elements are needed for assembly?
If you decide to design a walk-behind tractor yourself, then you need to prepare the following set of components:
- motor or internal combustion engine;
- gearbox - it is able to reduce speed and increase forces on the working shaft;
- frame on which the equipment is mounted;
- handles for control.
These are the main parts - without them it is impossible to make a machine for agricultural cultivation at home. Therefore, before starting the manufacturing process, make sure that each of the elements described above is present.
What does it take to make a moped from a chainsaw and a bike?
For the most part, converting a bicycle into a moped with your own hands by attaching a chainsaw motor to it does not require any special skills of a mechanic or engineer. If you are new to this business, then numerous drawings of a moped made from a chainsaw, as well as educational video reviews, will help you. Also, not every man has everything he needs in his garage to make a motorbike from a chainsaw with his own hands. Therefore, before assembly, it is recommended to study the list of necessary parts, fasteners and spare parts and buy the missing elements.
Moped
In specialty stores you can find entire kits that include a ready-to-install engine, fasteners and other parts that are necessary to transform a bicycle into a moped. This kit will greatly facilitate the process of assembling a motorcycle, since there is no need to select an engine, suitable power, fasteners, battery, transmission belt, cable, etc.
Assembly instructions and drawings of a homemade moped
Firstly, we will first look at the simplest and most affordable option for how to make a moped from a chainsaw from the photo above. When assembling, the question often arises of how to install a chainsaw motor on a bicycle.
It is important that it is securely attached and does not move while riding. For this type of homemade motorcycle, you need to secure the following parts with clamps in certain places:
- the battery is installed on the top tube;
- the chainsaw bicycle motor itself is mounted at the intersection of the lower front and seat tubes;
- fuel tank - near the engine.
The next step in the conversion is to create and install the pulleys on the bike. They are needed so that engine operation provokes rotation of the rear wheel. Typically, pulleys use external barrier wheels, which are about the size of CDs.
DIY moped
When selecting wheels, take into account the strength and reliability of both the material itself and the fasteners. To install the pulleys, the front wheel is attached to the motor shaft, and the second pulley is attached to the rear wheel hub.
Next you need to put the belt on the pulleys. Sometimes men use a chain instead of a belt. In this case, the pulleys are replaced with a chain, and the principle of its installation is no different.
If we talk about a more complex option, then as a result you will get a homemade vehicle that is most similar to a real motorcycle. The main differences from the previous design are a more reliable and durable frame, wider wheels that can be removed from an old moped, the presence of shock absorption and the installation of an engine from a chainsaw.
The most convenient place for the engine will be a separate platform welded at the bottom of the frame. You can also place a fuel tank there. An exhaust pipe is also attached to the engine. As for the battery, owners of homemade mopeds recommend placing it closer to the steering wheel. The next step will also be the transmission and connecting the engine. You can watch all the nuances of how to properly make a motorcycle from a chainsaw with your own hands in the video.
Related Posts
With my own hands . How to do it yourself
How to do something yourself, with your own hands. home handyman website
Do- it-yourself plow-hiller drawings
How to make a hiller plow
The most popular equipment for summer residents and gardeners is a hiller plow. This is especially true for those whose areas for growing potatoes, for example, are large, and whose strength is no longer what it was in their youth.
I think that readers will be able to make a plow- hiller with their own hands .
The basis of the tool is the support angle (Fig. 1, item 3).
It is made of an equilateral angle 40x40 mm, in which the cold shelves are brought together at an angle of approximately 60...70°. The size of the corner and other parts can be determined by the general appearance.
Walk-behind tractor with chainsaw motor
So, we have a gasoline saw that is not used very often or is completely idle. In this situation, having made certain calculations and selected the necessary materials, our chainsaw becomes an excellent walk-behind tractor. The concept of creating handicraft agricultural machinery, depending on the manufacturer’s brand, may change, but the basic rules consist of the following steps.
- The most important step is to develop a drawing, following which you will manufacture the necessary device. Drawing documentation and diagrams of a walk-behind tractor from a gasoline saw can be made either independently or by downloading ready-made calculations from the Internet. Finding them won’t be the slightest bit difficult; just type a search query into your browser and select the assembly project you like.
- When the drawings are available, it is time to assemble the frame for the future walk-behind tractor.
- After the frame is ready, the saw engine and its fuel tank are fixed to it.
- Lastly, the auxiliary components of the system, which are responsible for control and other capabilities, are installed.
To implement the idea, prepare the following list of devices and materials.
- The engine is from an existing gasoline saw. The Druzhba or Ural chainsaw is best suited for this.
- A handlebar removed from a motorcycle or moped.
- Welding machine.
- Sheets of iron and pipes in the quantity necessary to construct the frame of the unit.
- Wheels from old equipment.
- Power transmission (transmission).
Having prepared all the structural components and mounted them according to the drawing, you will get a unit with good features.
- Powerful. Some handicraft devices have a power of 9 horsepower.
- Lightweight.
- Compact.
- The engines used in gasoline saws have a large margin of safety, which makes it possible to work on a homemade unit for a long time.
- Low cost.
As a sample for assembly, let's talk about the engine removed from the Druzhba chainsaw. It is more suitable for our idea.
How to make a walk-behind tractor from a chainsaw with your own hands
Having small plots available, purchasing a walk-behind tractor for crazy money is, in fact, unjustified. In addition to the actual device, you have to regularly buy other necessary elements:
1. Spare parts;
2. Additional equipment;
3. Lubricants;
4. Combustible substances.
That is why, to ease financial waste, you should try to create a walk-behind tractor yourself from a chainsaw.
The immediate active process begins with the manufacture of the frame. It has the shape of a cube with corners of 32*32 millimeters. The main engine is attached to the transverse upper frame corners. The fuel tank is mounted slightly lower on brackets. The vertical uprights of the front plan accommodate intermediate shaft supports. In order to install running shaft bearings, it is necessary to connect specially designed supports to the longitudinal angles.
As a result of the entire process described above, an excellent walk-behind tractor with a center of gravity located above the wheel support surface is obtained. It is quite possible to use a metal weight on the front frame element. By using pipe crossbars with diameters of thirty millimeters, you can achieve excellent manual control. A rubberized roller can become a material for the direct manufacture of wheels.
The self-made walk-behind tractor uses two specialized sprockets. One of them plays a leading role, and the second affects the intermediate shaft.
Pros and cons of homemade design
Having analyzed the results of this homemade product, based on reviews from owners and videos of operation, the conclusion suggests itself that the design is effective. With a competent approach to business, a walk-behind tractor with an engine from Druzhba is not much inferior in its characteristics to its factory counterparts.
The main advantage of homemade products, of course, is saving money. You can find the necessary parts and materials by simply rummaging around in your garage or shed, or you can purchase them for a small amount of money.
Also among the advantages of a homemade unit are:
- sufficient power of the resulting device – up to 4 hp;
- compactness, small dimensions of the walk-behind tractor;
- light weight, maneuverability, mobility;
- economical fuel consumption;
- the Druzhba engine is not whimsical in terms of the choice of fuels and lubricants;
- The walk-behind tractor is capable of performing various operations.
The engine used in chainsaws, especially in the Soviet “Druzhby” chainsaws, is durable and capable of withstanding long-term loads.
The main disadvantage of a homemade walk-behind tractor from a Druzhba chainsaw is that with any design you won’t be able to get a real walk-behind tractor. The power of the walk-behind tractor is enough to cultivate areas with good soil. There are also restrictions on operations. It will most likely not be possible to use the entire arsenal of attachments on a factory walk-behind tractor.
Application of cultivators
Since cultivating even a small plot of land requires a lot of effort, summer residents are thinking about making a motorized hoe. These workers come to the idea of making a homemade walk-behind tractor with their own hands because factory-made walk-behind cultivators are expensive.
Homemade walk-behind tractors are used to carry out the following procedures:
- plowing;
- hilling,
- mowing,
- application of fertilizers.
Also, a do-it-yourself motorized plow will help with snow removal and weeding, and if you add a trailer, you can use it to transport cargo weighing up to 200 kg. A light walk-behind tractor usually includes only a cutter and a weeder. On a medium-weight product you can find a milling cutter, a plow, a mower and a hiller. Heavy products are reliable, have high maneuverability and non-removable wheels. With this design of the walk-behind tractor, it is possible to use the following equipment:
- cutter;
- plow;
- harrow;
- rake;
- mower;
- semitrailer;
- snow blower.
Additional units
Before making a light motor cultivator, you will need to prepare drawings of this unit. The design of the manufactured machine is simple: the engine rotates the gears, transmitting increased traction force to the drive wheel.
To make a snow blower, it is recommended to decide on the design and loads that will be placed on the machine. If you need to clear a small area of snow, then a homemade snow blower can be equipped with a motor from Druzhba. To assemble a more powerful unit, you will need a Shtilev engine (power 3 kW). To create a simplified model, ordinary sled runners are used.
When carrying out the above work, special attention is paid to the screw unit. It begins to move due to a gear pair and chain
Thick cord rubber is used to make the blades. The intake device can be made of galvanized steel. For easy operation of the resulting machine, a sewer pipe is installed under the snow thrower.
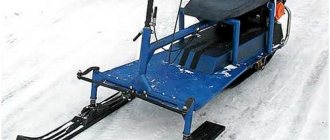
How to make a snowmobile from a chainsaw
The snowmobile is manufactured according to one of 2 schemes:
- single-track (2 skis in front, 1 track in back);
- two-track (1 ski in front, 2 tracks in back).
Any snowmobile device has the following design:
- Engine.
- Supply system.
- Oil injection system.
- Transmission.
- Chassis.
- Steering.
- Frame.
- Electrical equipment.
Before you begin making a homemade snowmobile from a chainsaw and its further assembly, you need to design drawings of all working components and the general appearance of the vehicle. It is better to draw each assembly unit separately and take out the dimensions.
During the development process, the brand of gasoline tool is taken into account.
The Druzhba chain saw has a simple design. The disadvantage is the low motor power (1 kW) with a large mass of the tool (12 kg).
The Ural has a weight of 11.7 kg and an engine power of 3.68 kW.
Advantages of the model:
- ability to work at low temperatures;
- high environmental friendliness.
When making a snowmobile from a chainsaw with your own hands, you can choose the Shtil brand. It is characterized by noiselessness during operation, a power of 1.5 kW, and has a nominal weight of only 3.9 kg.
Racks
The initial stage is the manufacture of the base of the frame structure from welded spars. For the middle part, corners 50x63 mm made of hardened steel are used, the front and rear are made of S2 steel with a flange at an angle of 90°. All elements must have holes of the same diameter for mounting with the track wheel and drive shaft. Brackets for road wheels are welded to the bottom of the frame.
The racks are made from 30x30 mm corners and connected by metal crossbars. The result should be a structure in the form of a small portal. A platform is required for the mounting location of the chain saw gearbox and the chain drive shaft. Sheet steel of the required size is selected, usually 2-3 mm thick, and welded to the center of the right side of the module and the portal.
At the back of the portal and at the same time in the middle of the module, a place is formed for the seat, which is subsequently made from boards and fabric or removed ready-made from old equipment, for example, a moped.
The front spar and the drive axle traverse are installed to the beam, which is a standard water pipe with a radius of 0.75 mm. Steering ski bushings are welded at both ends, and a stand for the engine subframe is welded in the center. The mounting points for the supports are reinforced with 2-mm metal gussets for strength and stability of the structure.
Caterpillar
The mechanism from the Buran unit is used as a caterpillar, the belt is shortened by 0.75-1 m. The gears of the gear drive are planted on the transverse shafts, then the web is laid. The caterpillar gear is made from a nylon sheet measuring 15 mm.
Drive shaft
To make the drive shaft, a metal pipe with a diameter of 14 mm is taken, and flanges are installed on top to fix the wheel teeth. At the ends of the mechanism, pin tips are pressed in and welded with space provided for bearings.
Engine
The snowmobile engine is the most important component that affects the operation of all self-propelled equipment. Therefore, experts recommend using a power plant from a Shtil chainsaw with an engine power of 1.5-3 kW. The motor is mounted on a stable support of the cross beam. The gearbox is rotated 180°, fixed on the platform, and the intermediate shaft of the 2-speed transmission is also mounted. The fuel tank is installed on top.
Asterisks
The drive sprocket with an internal key made of St20 is attached to the shaft with an M12 nut and a spring washer. For precise fixation, a thread of the required parameter is cut on the tip. It is taken into account that the 1st transmission stage corresponds to a large sprocket with the maximum gear ratio (on the Ural engine there are 38 teeth), the 2nd stage corresponds to a small drive sprocket with 10 teeth.
The chains are of a standard type, with a pitch of about 16 mm.
Brake system
If the snowmobile is designed to travel at low speeds of up to 30 km/h, then the braking system may not be provided. Vehicles are stopped by friction in the chassis and transmission systems.
Steering
Control - steering on support-steering skis. The support arms are rigidly connected to the steering shaft bipod. The steering wheel is two-handed, with a gas handle mounted on the right side.
Engine
This unit is considered the most critical mechanism of a snowmobile. Compared to other structural elements, such as a tire or chain, the engine must work properly and without it the snowmobile will not even move. Therefore, the long-term performance of the device will depend on the reliable and trouble-free operation of the engine. If you want to install an engine from an imported chainsaw, you can purchase a used Shtil.
Another important design element on which the trouble-free operation of a snowmobile depends is the gearbox.
Asterisks
Immediately noticeable is the fact that the right tip has a keyway for installing and securing the chain sprocket. This is the track shaft sprocket, which is securely fastened with a nut. To make fastening possible, a corresponding thread is cut on the tip.
The tip of the tension shaft has the same overall dimensions, and the fastening of the structural elements is carried out similarly to the fastening of the track shaft sprocket.
The first gear stage should have a sprocket with the highest gear ratio (number of teeth). The Ural chainsaw engine has 38 teeth.
Steering
On a homemade device you can install a steering wheel of any design, even from a bicycle.
In this case, it is very important to put manual control of engine speed on the steering wheel. In order not to bother too much, it is better to use a steering wheel from a moped, scooter, etc., which already has a mechanism for controlling engine power
This will make the design more reliable and easier to manage.
Improvement of the chassis
The first thing users of a walk-behind tractor think about is how to make a cart with a seat for it. Using equipment in normal mode using levers requires the application of great physical effort. However, the use of a trailer reduces the stability of the vehicle. This problem can be eliminated by extending the wheelbase.
This is done using extensions that are attached to the axle shaft with pins or bolts. Having solved the stability problem, the operator is faced with another issue: the unit is poorly controlled. The differential for the walk-behind tractor helps to give it good maneuverability. This device is made by analogy with components of passenger cars. Homemade unlockers for walk-behind tractors are made using ordinary household tools - an angle grinder, welding and a sharpening machine.
The low weight of the walk-behind tractor causes poor traction between the wheels and the ground. Slipping is a common occurrence when lifting virgin soil, working on wet ground or driving in snow. To avoid slipping, weights are attached to walk-behind tractors.
These devices are divided into the following categories:
- Wheeled. They are discs that are mounted on wheels or hubs. Disks are made monolithic from metal, concrete or hollow, filled with sand. The weight of wheel weights can be 30-70 kg.
- External. Made from any heavy material (steel, lead, concrete). Attached to the body using hooks or bolts. Some craftsmen weld a frame from a corner to the body. Sandbags, bricks, scrap metal and other heavy objects are placed in it.
You can improve the transmission by installing a homemade variator on the engine. The system of belts and discs will allow you to smoothly change the speed of the unit, without jerking or vibration.
Selecting a power plant
You can make a homemade walk-behind tractor with your own hands from almost anything that could be lying around in the garage, but the homemade products will be structurally different. Most often the following are used as power plants:
- automobile engine (mainly a four-wheeled, powerful design on a frame, which can also be used for transporting goods);
- a chainsaw of the “Friendship” type, which, despite its small dimensions, has good performance (a two-wheeled small-sized design that copes well with ordinary agricultural tasks);
- the power unit of a moped (often “Karpaty”), especially a motorcycle (“Minsk”, “Voskhod”) will make it possible to make a more powerful two-wheeled homemade product up to 13.5 liters. With;
- electrical installations (motoblock from a washing machine, for example) are also used, but are not very popular.
The most successful basis is a chainsaw and a motorcycle (moped), which allows you to make a non-bulky simple unit. The difference is in power and size. However, from the point of view of the feasibility of a homemade walk-behind tractor and its economy, the power plant of a chainsaw is undoubtedly better.
Blueprints
As a drawing, you can use your own design or proposed successful designs on the Internet. Here are some of them: