You don’t always get pleasure from working on a personal plot. Most people try to mechanize this difficult physical work by purchasing walk-behind tractors, cultivators or mini tractors. Some craftsmen, after working with a walk-behind tractor, decide to make a mini tractor from a Neva walk-behind tractor with their own hands. To make the task easier, you can buy a special adapter with a seat, thanks to which the walk-behind tractor will turn into a four-wheeled assistant.
Homemade mini-tractor 4x2 broken from a walk-behind tractor
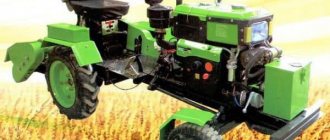
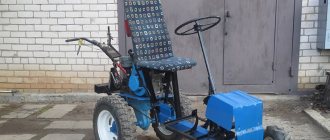
Dear visitors of the site “ Samodelkin Friend ”, from the material presented by the author, you will learn how to make a homemade mini-tractor from a walk-behind tractor with a breaking frame with your own hands. A mini-tractor is an excellent assistant in running a private farm, thanks to it you can plow and cultivate the land, as well as transport various loads around the site, and clear snow in the winter.
You can assemble a mini-tractor in a garage, having at the same time a minimum of spare parts from the domestic auto industry and some scrap metal) The basis for creating the presented MT was the time-tested OKA walk-behind tractor, changes were made to a minimum, namely, wheels from VAZ were installed and gas and clutch cables were transferred to pedals. Steering from a Moskvich-2140 car, Sobol steering wheel. The second half-frame is welded from a corner, and a towbar for transporting a car trailer is installed in the rear part.
In the front part of the tractor there is a blade with an adjustable angle of attack for clearing snow (standard from a walk-behind tractor) but equipped with a mechanism for lifting and fixing the blade in the transport position.
And so, let's look at the design features of a mini-tractor made from a walk-behind tractor.
Materials
- OKA walk-behind tractor 6 l/s
- steering “Moskvich”
- metal corner
- VAZ wheels 4 pcs
- sheet metal 2 mm
- driver's seat
- fog lights and generator
Tools
- welding inverter
- Angle grinder (grinder)
- set of wrenches
- drill
- measuring and plumbing tools
- skillful hands)
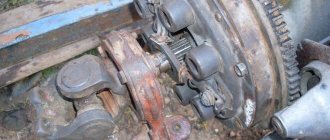
Step-by-step photos of assembling a mini-tractor from a walk-behind tractor with your own hands. A plow for clearing snow from a walk-behind tractor with a modified lifting mechanism. Making a breaking frame or, by and large, it’s more of an adapter. The gas and clutch cables are transferred to the pedals. Installation of hubs and production of rear wings from 2 mm metal.
Specifications
| Walk-behind tractor type (GOST 28523-90): | Average |
| Dimensions: | Length: 135 or 151 cm Width: 60 or 62 cm Height: 110 or 133.5 cm |
| Dry weight: | average 72 kg (from 62 to 81 kg) |
| Power: | 3.5-6.5 hp (2.6-4.5 kW) |
| Traction force: | 60-70 kgf (up to 100 kgf on lugs) |
| Fuel consumption: | 290-435 g/kWh |
| Number of gears: | 2 (4) forward gears, 1 (2) reverse gear |
| Maximum speed on pneumatic wheels (second value when working on a large pulley diameter): | First gear – 2.8 (3.5) km/h Second gear – 6.3 (7.8) km/h Reverse – 2.0 (2.5) km/h |
| Gearbox: | Mechanical, gear |
| Gearbox oil: | TM-5-18 (TAD-17I), MS-20 |
| BOM shaft: | Power take-off pulley (PTO) for V-belt drive |
| Cutting width: | 35, 60, 80 cm |
| Diameter of cutter cultivators: | 310 mm |
| Plowing depth: | 10-25 cm |
| Wheel diameter: | 39-41 cm |
| Ground clearance: | 11-12 cm |
| Steering gear: | Rod |
| Limit angle of inclination during operation: | 15° |
Engines
One of the main decisions of Salyut engineers is to use not only domestic, but also imported engines from foreign manufacturers (Briggs & Stratton, Honda, Subaru, Lifan, etc.) on a domestically produced frame. Thanks to the use of imported motors, the durability and reliability of the Salyut-5 walk-behind tractor significantly increases, and comfort during operation also improves.
According to reviews from walk-behind tractor owners, the most reliable engines are the American Briggs Stratton and the Japanese Robin Subaru and Honda engines.
The first Salyut 5 models were equipped with Russian-made engines (KaDvi) of the DM series. They were significantly inferior to foreign engines in technical and operational parameters, so in the first half of the 2000s they were completely abandoned.
Gearbox
The pride of the Salyut-5 walk-behind tractor is its gearbox, which has become legendary, the mechanism of which is made entirely of gears. This is the plant’s own development, which was initially manufactured at the main enterprise in Moscow, and then at the facilities of the Omsk Engine-Building Association named after. P. I. Baranova.
The gearbox is made in a single housing, all connections are bolted.
According to Salyut and many users, only a fully gear reducer is the most reliable, durable and maintenance-free for many years
Manufacturers note that during the production of the gear regulator, all technological processes for processing parts are observed, designer supervision and design support of production are carried out. Some factories tried to produce copies of this gearbox, which were significantly inferior to the original - both in service life and in technical and operational qualities
Transmission
On Salyut-5 walk-behind tractors, the transmission consists of a gearbox (gearbox) and a clutch mechanism. Through the V-belt drive and tension roller belts, the drive is driven from the drive pulley to the power take-off pulley (PTO).
The gear shift knob on Salyut-5 is located on the body of the walk-behind tractor, but the company has developed a special gear shift mechanism kit to transfer it to the steering wheel.
The plant has released a special gear shift installation kit, which allows you to move the gear lever to the steering wheel as on the MB Salyut-100.
The speed of movement of the walk-behind tractor and the rotation of the cutters can be adjusted by a 4-groove drive pulley: you need to rotate it relative to the BLOM, unscrew the fastening nut, install the belts in the grooves of a larger diameter and screw the nut back.
The gearbox pulley consists of 3 grooves, the middle one is free for attachments, the other two are for transmission belts.
Minitractor from the Neva walk-behind tractor. Overview of options
If a farmer has a walk-behind tractor, gardening work is much easier. However, walk-behind tractors have one drawback and that is that you have to walk behind them. And when it is necessary to carry out work on large areas, the legs are subjected to very great physical stress. To facilitate this process, many craftsmen are converting their walk-behind tractors into mini tractors.
Almost all Neva walk-behind tractors have sufficient power to be converted into a mini tractor. Many people believe that this is a labor-intensive process that requires practical skills, but this is not entirely true. On the Internet there are a large number of different drawings and diagrams for making a mini tractor from a Neva walk-behind tractor. These drawings have already been assembled by someone else, and their plausibility and correct dimensions have been confirmed by someone else's experience.
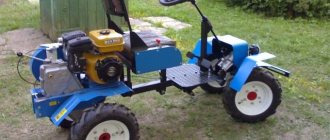
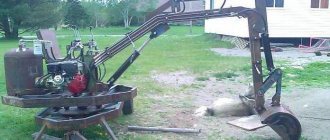
This is approximately what a mini tractor assembled from a walk-behind tractor looks like and its operation:
Which walk-behind tractor is suitable for conversion?
Here you should clearly determine the power that will be needed. After all, it’s not enough to just make a mini tractor. The engine must be capable of driving not only attachments, but also the weight of the walk-behind tractor itself with its frame and a person.
The Neva MB-23S 9.0 PRO model is best suited. It has a 4-stroke engine. And 9 horsepower is enough to generate traction force, which is sufficient to drive plows, cultivators, hillers, etc.
If the power is not enough, then the simplest solution is to simply buy an adapter. Convenience is certainly not at the same level, but you can move around while sitting. And that's a plus.
But the downside is that the use of some attachments is not compatible with it.
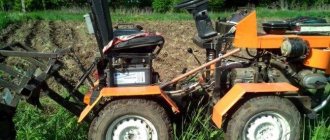
But it is compatible with a mini tractor:
Necessary consumables, parts and spare parts
To understand what is needed for manufacturing, let's look at the main elements of a finished mini tractor:
- Frame (made from any rolled metal)
- Device for making turns
- Any brakes
- Seat
- Metal for body trim
- A coupling that is used to connect other equipment.
All these components can be purchased at car dismantling sites or scrap yards. But their choice should be approached responsibly. Often they are not completely new, so they need to be carefully inspected for integrity and defects. After all, the use of damaged components cannot be allowed here. Otherwise, the entire device will not work correctly.
Drawings, diagrams, detailing, assembly
First of all, you need to understand what the walk-behind tractor will mainly be used for. For agricultural work with soil or for transporting various objects. Most often, they choose a universal model so that they can work in the garden and carry loads around the house. At the rear of the mini tractor, another towbar is added for coupling with a trailer. Which, if desired, can also be assembled according to ready-made patterns, because the materials for making a mini tractor and a trailer are similar and you can make two models at once.
Blueprints
First of all, when moving on to studying the drawings, you need to decide for what functions the mini-tractor will be used: what will be more included in its tasks - agricultural work or transportation of goods. The final design depends on this. Note that many users prefer universal designs that allow both working with agricultural attachments and transporting heavy loads in a trailer. Therefore, universal drawings are most often suitable.
By the way, if you don’t have a trailer on your farm, you can also assemble it yourself if you wish, since the design is not much different from a mini-tractor.
And since the selection of materials that will become components will be made in any case, you can make both a mini-tractor and a trailer at the same time. It is only important that all the selected parts fit together well. This is interesting: a homemade mini tractor from an MTZ walk-behind tractor.
To ensure proper operation of the device and high reliability, it is recommended to first draw a diagram of the future tractor. It should display the connection points between the axle and the gear shaft. It also makes sense to provide rear-wheel drive to increase the cross-country ability and maneuverability of the mini-tractor. And it is imperative to consider the design of the rotating device. Once its design has been selected, you can proceed to assembly.
Tags: pipes, creation, system, large, simple, tools, traction, time, doing, processing, ready, install, bodies, corners, hubs, soil, most, machines, independently, soil, apparatus, assistance, diesel, powerful, units, base, use, find, dimensions, reducer, welding, clutch, kinematic, drill, possibly, set, pair, gears, various, can, earth, is, small, install, installed, will need, wheeled, mechanism
How to make a mini-tractor from a Neva walk-behind tractor?
The existence of a walk-behind tractor greatly facilitates the cultivation of land. It’s just not very convenient to walk around behind him while working. Taking into account that most of the modifications are endowed with decent power, their owners strive to improve the unit. Even for specialists it would be useful to know that converting the Neva walk-behind tractor into a mini-tractor is not very difficult. Schemes and drawings for this will become the alphabet, making it possible to create a durable and multi-purpose unit.
Basic recommendations
First you need to navigate the choice of a suitable modification of the unit. It must have the necessary resource reserve to provide the required traction for cultivating the soil using attachments - hiller, plow, etc.
To find out what is required to create a full-fledged mini-tractor, you must first consider its basic components.
- Chassis. Made from available rolled metal.
- Rotating device.
- Simple disc brakes.
- Seat and body parts.
- A coupling device for mounting attachments, a system of levers for controlling it.
A considerable part of the parts can be purchased at scrap metal acceptance points or at auto scrap yards. In this case, you need to look at the quality and absence of damage.
DIY making
The first step is to decide on the options that the mini-tractor will perform. A multi-purpose practice that involves cultivating the soil and transporting goods is generally preferred. For the 2nd option, you will need a cart, which you can make yourself or buy an already working model.
Blueprints
For proper installation of all structural elements, a graphical diagram for displaying working units and blocks of the mechanism is developed. It reflects in detail the areas where the walk-behind tractor shaft merges with the chassis. It is necessary that all elements of the unit are correctly selected. If necessary, they can be processed using turning equipment. We must not forget that the service life and operating parameters of the unit under construction directly depend on the quality of the elements.
When creating a drawing, you need to pay attention to the rotating device. This node comes in 2 types.
- Breaking frame. It is characterized by strength, but the steering rack must be located directly above the unit. An agricultural machine created using this method will have little mobility when turning.
- Tie Rod. Its installation requires more time and additional industrial parts. However, it will be possible to choose the installation location (on the front or rear axle), in addition, the degree of rotation will increase significantly.
Having completed the optimal scheme, you can begin creating the unit.
Mini tractor
Before you start creating a mini-tractor based on a walk-behind tractor, you will need to prepare the necessary tools for the event. Conversion kit contains:
- welder;
- screwdrivers and wrenches;
- electric drill and a set of different drills;
- an angle grinder and a set of discs for working with iron;
- bolts and nuts.
The conversion of a walk-behind tractor into a mini-tractor is carried out in the following sequence.
- A unit on a walk-behind tractor must, of course, be equipped with a strong, durable chassis. It must carry an auxiliary pair of wheels plus a load moved in the tractor, which will exert pressure on the supporting frame. To create a strong frame, the best options would be a corner or steel pipes. Keep in mind that the heavier the frame, the more effective the unit’s traction with the ground will be and the better the soil will be plowed. The thickness of the frame walls does not matter much; the main condition is that they do not bend under the influence of the transported load. You can cut the elements to create a frame using an angle grinder. After this, all the elements are assembled together, first with bolts, and then thoroughly welded. To make the frame stronger and more reliable, equip it with a crossbar.
- Directly after creating the chassis, it can be equipped with an attachment, with which the miniature tractor will be provided with auxiliary devices. Attachments can be mounted both in front and behind the supporting system. If the unit being created is subsequently planned to be used together with a cart, then a towing device must be welded to the rear of its frame.
Materials and tools
To assemble a mini tractor based on a walk-behind tractor, you will need, in addition to the Neva itself:
- electric welding machine;
- grinding machine (for rolling and fitting);
- drill;
- a set of necessary simple tools;
- winch, jack system;
From the materials required for construction:
- Dashboard;
- A pair of wheels suitable in size and strength;
- Hub brake system;
- Steering rod;
- Steering rods;
- Transmission;
- Angles, pipes or profiles;
- Canopy system;
All-wheel drive 4x4 walk-behind tractor: a mini tractor from Niva with a do-it-yourself engine
The specifics of life in rural areas presuppose the presence of certain means of small-scale mechanization that help the summer resident in his daily work. This especially applies to farmers who have fairly large holdings, the processing of which by hand is simply impossible.
However, not everyone has enough money to buy a ready-made mini tractor in a store, because its cost can be really impressive.
In such cases, homemade mini tractors made by rural craftsmen are becoming increasingly relevant and worthy of attention. This is quite justified, because this approach to business allows you to significantly save on the purchase of the unit itself, which is the main reason for such homemade products.
This can also be interesting because the assembly process itself can be quite exciting, especially for those people who are partial to technology.
Assembly steps
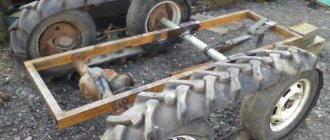
You need to start assembly from the base, and this, of course, is the frame. It is necessary to have pre-measured and cut pieces of metal strictly according to the level. To ensure rigid fastening and eliminate any backlash, they are fastened together using a welding machine. You can use regular bolts, but this type of fastening is more difficult to implement and requires more calculations.
By purchasing ready-made hubs, which also include brakes, you will save yourself a lot of time and effort on making mistakes. And attaching them is not difficult: hubs are attached to a pipe of sufficient strength and cut to size at the ends.
The pipe is attached to the frame through drilled holes, then the steering rods and brakes are attached. And at the end the steering column is installed.
For the rear axle, pressed bearings are installed into bushings on the prepared pipe. The axle, to obtain torque, is connected through a pulley to the motor. The wheels, depending on the power of the device, can be used on a small car. If the power is low and the area to be processed is small, then you can use separately sold wheels with an internal chamber of small diameter.
The ergonomics of the driver’s workplace is also of great importance. The seat and control complex in it, as well as being on the transport itself, should be as comfortable as possible. This means there is a need to design:
- seats;
- seat cushioning;
- steering wheel location;
- simplicity and accessibility of control levers.
To make working on a walk-behind tractor as comfortable as possible and avoid additional stressful hypothetical moments, the device can be modified at your own individual discretion, and this is:
- Protective shields or a full-fledged cabin for protection from the external environment;
- the ability to disassemble components in the field;
- universality of fastenings to simplify the search for spare parts and modifications;
- steering rod calculation;
- low center of gravity.
Of course, a self-made minitractor based on a walk-behind tractor will be inferior to factory-made copies in terms of reliability and optimality of design, but in terms of cost, the owner of such a project can independently vary the cost of components, as well as adjust it to exclusively subjective, and possibly non-standard needs.
With the proper skill, patience and diligence, almost every farmer, as well as a simple amateur, will be able to build such a thing, having, of course, invested the necessary amount of money in the material and the block itself.
What do they say on the forums?
There is an active discussion on the forums about the pros and cons of a mini tractor made from a walk-behind tractor. How best to build, what materials are best to choose, where to get them, etc.
Here are some comments from them.
Vladimir writes:
“I have had a walk-behind tractor for a long time. I wanted to buy an adapter for it so that I wouldn’t have to walk around all the time. But I came across an idea with a mini tractor. At first it seemed impossible to do it yourself. However, after not delving much into it, I realized that there is nothing heavy here. And I can do this on my own. I chose a drawing and bought all the components at a local scrap metal collection point. And in a month of leisurely work I assembled it. Now the neighbors are jealous. And those who say that you can buy an adapter and be happy, admit that your hands are simply not capable of making a mini tractor from a walk-behind tractor yourself.”
Vyacheslav says:
“I had a walk-behind tractor. I worked with him for about a couple of years and could not be happier with him. But I want to constantly improve and learn something new. And so I wondered, why do I constantly go after him, are there any alternatives? And I found it. The solution was to build a mini tractor. The design is as simple as 5 kopecks. I had everything I needed. Therefore, in just a couple of days I assembled my model using a ready-made scheme that I chose on the forums. I use it and enjoy it"
Step-by-step instructions for creating a mini tractor yourself.
The redesign of the Neva walk-behind tractor begins with the kinematic diagram of the intended equipment. Here you can make do with your knowledge (if you have it), contact specialists, or find the required drawing on the Internet.
Questions regarding the configuration of a minitractor come down to the manufacture of the frame and body, seat and steering wheel, arrangement of wheels and tires, and installation of levers.
Frame and body
The frame is created from metal pipes and corners. Fastening of components is based on bolted connections. Drill and welding equipment are involved in the work here. The weight of the frame and its strength should be in an optimal ratio. If desired or necessary, you can add a body to the package. This way you will protect various components from contamination. In addition, such a tractor will look more solid, and the driver will receive protection from dirt. The body is usually made of stainless steel.
Seat and steering
You can use the seat of an old car. Its main criterion is convenience. After attaching the chair, the steering wheel is installed and its tilt and height are adjusted. The principle of steering technology from go-karts is often used. In this case, the rods are made of shorter length and greater strength. The steering wheel can also be taken from an old car.
Wheels and tires
They are also usually taken from old cars. But there is an important nuance here - the front wheels of the minitractor must have diameters of 12-14. If this parameter is less, the equipment will go “nose” into the ground. If it is greater than the specified values, problems will arise with controlling this equipment. Take tires that match the dimensions of the installed wheels.
Installation of levers
The levers should make control obedient and comfortable. Their responsibility: clutch and brake. The best option for their device is a cable drive. It is in contact with the motor block. After assembly, the equipment is painted and attachments are installed. Then comes the run-in. It allows you to test all components and components. At this stage, all potential problems can be eliminated in a timely manner. If no incidents occurred during the break-in, you can attach the trailer and run in again. After these operations, if you have the desire and financial potential, you can “pump up” your mini tractor. Here it is possible to install a canopy, headlights, hydraulics, etc.
As a result, you will create high-quality and comfortable equipment that will significantly simplify household work on your suburban area.
And when for some reason you want to sell this unit, you can make good money and offset the costs of it. Today, the prices of such used tractors are determined solely by their owners. It is important to base it on the cost of the walk-behind tractor and other key components, as well as the degree of wear and tear of the equipment. If your mini tractor is in excellent condition and is sophisticated, you can put it up for sale for at least 80,000 -90,000 rubles.