Every farmer knows that it is easier and more convenient to cultivate dacha and personal plots of land with the help of a small tractor. And it doesn’t matter if you don’t have enough money to buy it - you can make it yourself from an inexpensive walk-behind tractor. Moreover, when you have an interest in technology, engineering abilities, the necessary equipment and tools, this will not be difficult at all. The main thing is to understand the technical aspects, prepare for the transformation and choose the right walk-behind tractor. Then the refurbishment can begin. By the way, the walk-behind tractor instructions may contain a drawing that will help you understand how best to make a homemade product.
Parameters of homemade mini tractors
- Of primary importance is maneuverability and the ability to perform various tasks in hard-to-reach areas, the size of which is small. That is why their dimensions are much smaller than their analogues.
- Engine and its power. Most instructions on how to make a homemade mini tractor recommend using diesel engines. Since, firstly, this type of fuel is a quarter more economical than gasoline, and, secondly, and even more important, the level of traction is maintained even at low speeds. In addition, the engine is durable in operation and causes minimal maintenance hassle.
Reviews
Oleg, Taganrog
I have been using the walk-behind tractor for several years now. I also wanted to buy an adapter for it, but I saw a homemade mini-tractor online and got excited about this idea. I thought it would be difficult to do this, but gradually, as I studied the material and delved into it, I realized that I could do everything myself. I chose a drawing, bought the necessary components and got to work. It took me about a month, but I achieved my goal. Now work on the site goes faster.
Ivan, Krasnodar
I bought a walk-behind tractor and was happy with my new “assistant”. But, I am a supporter of modernization, so I constantly improve my equipment. It was the same this time - I decided to assemble a mini-tractor. The design is simple, I found the components quickly. Now I have a new unit, and my neighbors are surprised that I was able to assemble it myself.
To create a mini tractor at home, you don’t need to turn to professionals. All you need to do is select a diagram and drawing, buy the necessary spare parts and get to work. Moreover, now you can find instructions where each step is captured in the photo.
Mini tractor project
The most labor-intensive thing is to correctly generate the drawings of a homemade mini tractor; they indicate not only the parameters themselves, but also the characteristics of all removable components for various agricultural works.
Such equipment is usually created from old vehicles. For example, various components from unused motorcycles, as well as parts from cars and various walk-behind tractors can be used.
The sketch begins with the need to schematically show the location of the engine and the gearbox itself. Next, the sketch should show a model of the box, which is considered a transfer case, as well as the chassis.
It is necessary to show how a homemade mini tractor from a walk-behind tractor will start moving. The diagram indicates the torque itself, which should connect the work of the core of the technology, namely the engine, and the wheels themselves.
Drawings and assembly
To make a mini-tractor from a walk-behind tractor with an engine with your own hands, you will need to prepare drawings and an assembly diagram in advance. You can work on this yourself, but the main condition must be met - there must be balance in order to avoid unpleasant “surprises” in the operation of the apparatus.
Creating a wireframe
To create a frame, you don't need a lot of material. At the same time, if something is missing, then analogues can be used. But the dimensions and properties should be similar. This is about:
- metal - you need to prepare corners, channels and a square-shaped tube. For cladding you will need steel with a thickness of at least 1.5 mm;
- rotating device;
- wheels and axles;
- bearings;
- tape measure, welding, drill, grinder.
Assembly is carried out only according to the scheme - you cannot deviate from it.
Once all the elements have been connected, you need to check whether the installation was performed correctly. To do this, you need to install the frame on the walk-behind tractor. If everything is as it should be, then you can continue to create a mini-tractor. if something went wrong, then the shortcomings need to be corrected.
Nuances of the mini tractor project
As a rule, a photo of a homemade tractor, in addition to the main components, also shows other parts, which means they should also be on the sketch. The optimal frame size must be calculated and indicated.
For a good output circuit, it is imperative to indicate the materials from which one or another component is supposed to be created.
All elements through which the components will be attached must be clear. But the frame sketch should remain the basic one, since it will be permanent, while the remaining details can be finalized as the equipment is manufactured.
Refurbishment
Creating a homemade product must begin with studying the kinematic diagram and drawings, as well as preparing the corresponding components, materials, parts and tools. You can prepare a diagram yourself or take this example as a model.
If you don’t feel very confident about alterations and breaks, you can purchase a special kit that contains all the necessary parts for converting the walk-behind tractor, namely:
- rear linkage with manual lifting mechanism;
- fenders, seats, footrests and pedals;
- front beam, brake discs, wheel hubs;
- frame with the necessary mounts for the engine;
- steering with rods;
- axle lock release levers.
Domestic offers kits for converting a walk-behind tractor into a mini tractor with various configuration options - basic, hydraulics, brake system. The price of the basic set is quite acceptable - within 7 thousand UAH.
Usually, when assembling a homemade tractor with a set of parts, even novice mechanics do not encounter any particular difficulties. In addition, today in many cities there are workshops that specialize in converting Salyut walk-behind tractors into mini tractors.
Naturally, this option is not suitable for those who want to make a unique sample and save a lot, for example, breaking a 4x4.
When remaking, you should remember that non-standard adaptation of the walk-behind tractor will require alterations and fine-tuning; many components need to be manufactured and connected in an unusual way.
Start of work on creating a mini tractor
- The design of the frame will be key, so production begins with it. It is necessary to weld the nodes that will be fastening and the metal frame according to pre-specified parameters.
- Installation of bridges. At this stage, both the rear and the front are installed simultaneously.
- The transmission elements, as well as the engine, must be secured to the structure.
- Next, they begin to assemble all the control components.
- Fastening of the tank where the fuel will be located.
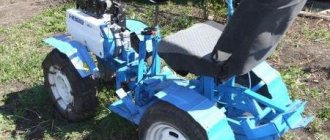
- At this stage, a chair is installed where the person who will subsequently operate this equipment is expected to be located. At this stage, the homemade mini-tractor Perelomka is already beginning to look similar to those shown in the photo in various sources.
- It is important not to forget about the casings, which should perform a protective function.
- Next, welding is carried out for attachments.
- One of the very important stages, namely electrics, on which the entire functionality of the equipment depends.
- Such a vehicle must also have lighting.
How to make a frame
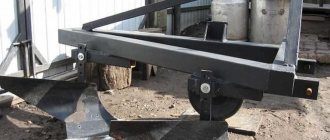
After preparing the tools and components necessary to create a mini-tractor, they begin to “reshape” the frame of the walk-behind tractor to adapt it to an additional pair of wheels. The platform of a future homemade machine can be made all-metal or fractured using channels or profile metal pipes. Longitudinal and transverse spars are easy to make - they are cut with a grinder and connected by electric welding or fasteners. For greater reliability, bolted connections are combined with additional welding of the seams. When transforming a cultivator into a mini-tractor, a fracture is often used, consisting of two independent semi-frames connected to each other using hinges. Thanks to this design, all four wheels of the tractor are almost always in contact with the ground, and they practically do not hang out when operating the homemade product on an uneven surface or slippery road. This allows you to increase the stability of a mini-tractor made from a walk-behind tractor, improve its maneuverability and maneuverability when carrying out arable and transport work. An attachment device is mounted to the front or rear section of the prepared frame according to the diagram, which will allow the tractor to work with auxiliary devices. You can immediately weld a towbar to the rear for towing a trailer - this will further expand the functionality of a homemade motor tractor.
Parts Layout Tips
All homemade 4x4 mini tractors are created according to the same principle, which means that the location of the main components remains unchanged. The engine of most standard models is located longitudinally, located directly on the axis, which is considered the front.
Next, it is connected to the gearbox, immediately after it comes the gearbox, which is considered the transfer case, and behind it the axle, which in the design is considered the drive axle.
All shafts of the component units are attached using cardans or special couplings.
Specifications
| Walk-behind tractor type (GOST 28523-90): | Average |
| Dimensions: | Length: 135 or 151 cm Width: 60 or 62 cm Height: 110 or 133.5 cm |
| Dry weight: | average 72 kg (from 62 to 81 kg) |
| Power: | 3.5-6.5 hp (2.6-4.5 kW) |
| Traction force: | 60-70 kgf (up to 100 kgf on lugs) |
| Fuel consumption: | 290-435 g/kWh |
| Number of gears: | 2 (4) forward gears, 1 (2) reverse gear |
| Maximum speed on pneumatic wheels (second value when working on a large pulley diameter): | First gear – 2.8 (3.5) km/h Second gear – 6.3 (7.8) km/h Reverse – 2.0 (2.5) km/h |
| Gearbox: | Mechanical, gear |
| Gearbox oil: | TM-5-18 (TAD-17I), MS-20 |
| BOM shaft: | Power take-off pulley (PTO) for V-belt drive |
| Cutting width: | 35, 60, 80 cm |
| Diameter of cutter cultivators: | 310 mm |
| Plowing depth: | 10-25 cm |
| Wheel diameter: | 39-41 cm |
| Ground clearance: | 11-12 cm |
| Steering gear: | Rod |
| Limit angle of inclination during operation: | 15° |
Engines
One of the main decisions of Salyut engineers is to use not only domestic, but also imported engines from foreign manufacturers (Briggs & Stratton, Honda, Subaru, Lifan, etc.) on a domestically produced frame. Thanks to the use of imported motors, the durability and reliability of the Salyut-5 walk-behind tractor significantly increases, and comfort during operation also improves.
According to reviews from walk-behind tractor owners, the most reliable engines are the American Briggs Stratton and the Japanese Robin Subaru and Honda engines.
The first Salyut 5 models were equipped with Russian-made engines (KaDvi) of the DM series. They were significantly inferior to foreign engines in technical and operational parameters, so in the first half of the 2000s they were completely abandoned.
Gearbox
The pride of the Salyut-5 walk-behind tractor is its gearbox, which has become legendary, the mechanism of which is made entirely of gears. This is the plant’s own development, which was initially manufactured at the main enterprise in Moscow, and then at the facilities of the Omsk Engine-Building Association named after. P. I. Baranova.
The gearbox is made in a single housing, all connections are bolted.
According to Salyut and many users, only a fully gear reducer is the most reliable, durable and maintenance-free for many years
Manufacturers note that during the production of the gear regulator, all technological processes for processing parts are observed, designer supervision and design support of production are carried out. Some factories tried to produce copies of this gearbox, which were significantly inferior to the original - both in service life and in technical and operational qualities
Transmission
On Salyut-5 walk-behind tractors, the transmission consists of a gearbox (gearbox) and a clutch mechanism. Through the V-belt drive and tension roller belts, the drive is driven from the drive pulley to the power take-off pulley (PTO).
The gear shift knob on Salyut-5 is located on the body of the walk-behind tractor, but the company has developed a special gear shift mechanism kit to transfer it to the steering wheel.
The plant has released a special gear shift installation kit, which allows you to move the gear lever to the steering wheel as on the MB Salyut-100.
The speed of movement of the walk-behind tractor and the rotation of the cutters can be adjusted by a 4-groove drive pulley: you need to rotate it relative to the BLOM, unscrew the fastening nut, install the belts in the grooves of a larger diameter and screw the nut back.
The gearbox pulley consists of 3 grooves, the middle one is free for attachments, the other two are for transmission belts.
Advantages of homemade mini tractors
Of course, one of the main advantages of this type of equipment is its size, which allows it to be used for small areas. Mini tractors consume fuel economically, which makes their use for various jobs extremely profitable.
In addition, the costs of its production are also generally low. Due to their maneuverability, mini tractors can perform various tasks on a small plot of land.
Review of Ural walk-behind tractors
The first Ural walk-behind tractors were produced in the early 90s, and continue to be produced to this day. Over the entire period of its long history, this technique has found application throughout the CIS countries, regardless of the type of soil and climate zone.
The popularity of Ural walk-behind tractors is determined by the ease of repair work, long service life and simplicity of design.
Due to the popularity of this model, the manufacturer has released several modifications of Ural walk-behind tractors, which differ in the installed engines.
The most popular are those devices that are equipped with domestic motors. The main reason for this choice is the availability of spare parts and their low cost.
Features of vehicle steering
Pins are installed on the bridge located in front, the lower part of which ends with axles, and the upper part ends with rotary levers, and between them, a thrust is formed, which is considered transverse.
The value of the transverse inclination angle must be within certain standard limits, namely, not exceed 10 degrees; as for the longitudinal inclination, it should also not deviate more than 3 degrees back. The rod, which is considered longitudinal, must be connected to the steering gearbox with a bipod.
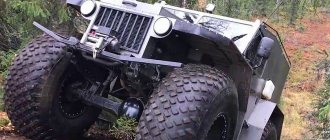
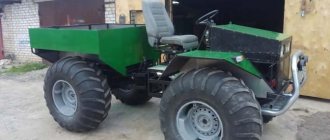
How to make your own mini tractor with a motorcycle engine
The design of a homemade tractor with an engine from a Ural motorcycle is as follows.
The base consists of 2 half-frames forming a rectangle. The front part should measure 90x36 cm, and the back - 60x36 cm. You can weld the half-frames yourself using a steel channel. To properly join the channels, you need to cut the ends at an angle of 45º.
On the front half-frame you need to install 2 crossbars, which are made from a rectangular pipe. It should measure 5x3 cm and be laid flat. Cross members are needed to make a subframe for the engine.
A wall made of steel should be installed on the half-frame. Brackets and platforms intended for installation of components, mechanisms, and assemblies must be welded to the wall.
A stand is welded to the rear semi-frame, which can be made from a pipe. Hinges are attached to the stand. They are necessary for attaching attachments. A vertical plate required for the swivel assembly is mounted on the front of the rear half-frame. It is strengthened with scarves.
The lower half-frame is covered with a steel flooring, and a platform with gas and clutch pedals is welded onto it.
The frames are connected to each other by a fracture unit, which in structure is a hinge or cardan mechanism.
The IZh engine requires rigid and dependent suspensions, which will allow the installation of wheels of the required size. A do-it-yourself minitractor involves installing the engine on the crossbars of the front half-frame, which is then bolted through the eyes.
The gearbox is installed nearby, for which you need to use bolts. It is necessary to set the chain clutch correctly for the gearbox and gearbox to work well. On the first link of the gearbox, you can use a splined end, which is removed from the Moskich gearbox, and the second - from its driveshaft. The spline connection allows the rear shaft to be made significantly longer.
Next we will look at how to make homemade mini tractors. The steering column must also be placed on the frame, which must be firmly secured with bolts. A hole must be made in the bearing adjusting nut, which will allow the column to be connected to the steering wheel.
The engine will be started through an intermediate shaft, at one end of which a shortened kick starter is attached, and at the other - a rod.
The cylinders should be equipped with a forced cooling system. From an IZH or Ural motorcycle, a fuel tank, a motor pump, and an additional gearbox are used.
To make a homemade tractor with an engine from a Ural motorcycle, you need to make your own attachments using sheet steel. These parts should be lowered and raised using a special lever, which is installed on the right side of the operator’s seat. The lever should be no more than 55 cm long, which allows you to adjust the attachment.
The engine will be controlled by motorcycle cables, which will be launched by pedals installed on the platform.
The wheel size for a mini tractor should be the same with the parameters: 6.15x13 inches. You can take wheels from Moskvich, which drive well on the ground.
Electrical installation features
The key factor is the match between the voltage directly in the generator of the device and those places where it should be consumed.
The battery itself, which is called a rechargeable battery, is a certain container of liquid, so it is important to firmly form its mount.
The most convenient way to do this is, for example, in the place where the driver is supposed to sit.
Installation of the brake system and electrical equipment
Once the engine is installed, you need to work on the brake system. You can use new brakes or use this component of a passenger car.
Initially, according to the diagram, you need to determine the place where the brake pedal will appear in a homemade mini tractor. The mount for it and the main brake cylinder should be installed on it. After this, connect it to the brake drums located on the front wheels using hoses
Attention!
Immediately after the procedure, you need to check the system for leaks. If it is violated, everything must be redone.
But in order for a mini-tractor made at home to be fully functional, you will need to connect electrical equipment and display sensors on the instrument panel. This is necessary to ensure the safety of the operator when operating the machine.
Photos of homemade mini tractors
Review of the model range of Ural walk-behind tractors
The base of this walk-behind tractor is called Ural UMB K, onto which various engines are simply attached.
It is made of high quality hardened iron that can withstand heavy loads. The overall dimensions of the UMB K are 1730×690×1280 mm.
Ural UMZ 5V
The most popular model of walk-behind tractors is the Ural UMZ 5V. This engine is produced directly at the plant itself.
- The power of this engine is 4.5 horsepower at 2000 rpm.
- The operating temperature of the engine is maintained by air cooling using a fan.
- The UMZ 5V walk-behind tractor is equipped with a speed limiter, which operates in automatic mode.
A special feature of this model is its unpretentiousness to fuel; it can easily work with AI-80 gasoline. The fuel tank capacity is 6 liters, which is enough for 4-4.5 hours of battery life.
Attachment overview
Ural walk-behind tractors have gained great popularity due to a wide range of compatible attachments and the ability to automate many agricultural works. Now this is no longer a luxury, but simply a necessity for many farmers.
Milling cutter
This is a basic attachment that is used by many owners of Ural walk-behind tractors. The milling cutter allows you to mix and grind the top layer of soil in order to increase productivity. This attachment is used when processing the prepared area.
A photo of a cutter with a Ural walk-behind tractor is shown below
If there is a need to plow virgin or hard lands, then it is better to use a plow for these purposes. Its immersion depth is usually up to 20 cm.
Plows have one drawback - they leave large clumps of soil after processing. Partially solving this problem is the ability of reversible plows. They have a special feather-shaped plowshare design, so during operation the soil layer is first turned over several times on it, crushed, and only then thrown aside.
Mower
Mowers are used to make hay for the winter and clear the area of grass. For Ural walk-behind tractors, there are two options for this attachment: segmental and rotary.
Rotary mowers allow you to cut grass using rotating blades that unwind and straighten. This attachment can cut medium-sized young grass.
If you need to process a heavily overgrown area, then it is better to use segment mowers. It has two rows of knives, which move towards each other in turn. Thus, segment mowers can cope with coarse vegetation and medium-sized shrubs.
Potato digger and potato planter
Potatoes are a very common crop in our region. However, the work of planting and digging it takes a lot of time and effort. In order to mechanize this work, appropriate attachments are used.
The following video review demonstrates one of the ways to plant potatoes using a Ural walk-behind tractor:
Snow blower and shovel
During the winter, many owners of Ural walk-behind tractors put them into storage because they do not see the point in using them. But this is a mistaken opinion.
With the help of a snow blower, you can effectively clear the snow cover from your local area. Ural walk-behind tractors do an excellent job even at sub-zero temperatures.
The snow blower picks up a layer of snow and, using a rotor, throws it to the side at a distance of up to 8 meters.
A simpler attachment for snow removal is a shovel blade. It simply clears the path of snow by throwing the snow next to the walk-behind tractor.
Trailer
Ural walk-behind tractors can be used to transport cargo weighing up to 350 kg. Special trailers are used for this.
The configuration of trailed equipment must be selected based on the material being transported.
- If these are long pipes or logs, then it is necessary to use carts on four wheels.
- If it is a bulk cargo, then it is better to use dump truck options with folding sides.
- If it is hay or something bulky, then the best option would be a model with high sides.
Adapter
The main problem when operating all walk-behind tractors is the heavy physical load on the operator. He must constantly push and direct the device, which causes rapid fatigue.
To facilitate the process of operating the machine, an adapter was developed. This is a special attachment with a seat for the operator, which allows operation while sitting.
Wheels, tracks and lugs
Since the weight of the Ural walk-behind tractor is not large, problems often arise with traction and maneuverability of the machine.
Standard wheels perform well for light work; if more complex tasks are to be performed, it is better to install lugs. This is a special metal rim to which iron plates are welded in the shape of a herringbone. Thus, during operation, they enter the ground and make the Ural walk-behind tractor easier to drive.
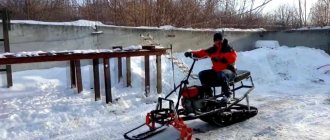
During the winter season, you can install a special tracked module, which increases the area of contact with the surface and provides owners of the Ural walk-behind tractor with the opportunity to move through a high layer of snow.
Weights
Another way to improve traction is to add weight by installing additional ballast.
The manufacturer offers its own weights, which are made in the form of pancakes and hung on the wheel axle.
Hitch
The popularity of the Urals is due to the possibility of installing attachments from third-party manufacturers. This possibility is achieved due to the fact that these machines are equipped with a universal type hitch.