Advantages and disadvantages of homemade trailers for walk-behind tractors
Many people who decide to acquire a walk-behind trailer do not know whether it is worth making it themselves. To understand this, you need to familiarize yourself with the main advantages and disadvantages of homemade structures. Among the main advantages are the following:
- the ability to create a trailer with optimal dimensions;
- using only durable and strong materials, which will significantly increase the service life of a hand-made product;
- the ability to create a design from scrap materials, which allows you to save money on branded parts.
Despite the above advantages, a do-it-yourself towbar for a walk-behind tractor also has disadvantages. The main disadvantages include the complexity of assembly. The fact is that not every person can make such a device on their own.
Also, the advantages of homemade products include the fact that additional devices can be attached to them. For example, quite often homemade structures are equipped with brakes or reflectors.
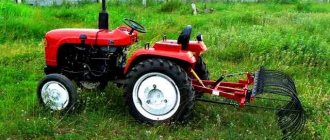
Solid-type structures - most often used for attachment to walk-behind tractors
Types of trailers for walk-behind tractors
People who decide to make a walk-behind trailer on their own should familiarize themselves with their main varieties in advance.
They are:
- Solid. They have the simplest design. All walls and bottom have a fixed connection.
- With opening sides. This is a universal model that is suitable for motor cultivators, as well as Neva and MTZ mini tractors. Used for transporting large cargo.
- Tipper. Such structures resemble the body of dump trucks. They are used for unloading bulk materials.
For attachment to a walk-behind tractor, one-piece models are most often used.
Assembling a trailer for a walk-behind tractor
Before you attach a car trailer to a walk-behind tractor with your own hands, you need to figure out how to make it.
Welding machine - often used when creating a homemade trailer
Required Tools
Before you start creating a walk-behind trailer, you need to familiarize yourself with the list of tools that will be used during the work.
You need to prepare the following in advance:
- welding machine for connecting metal components of a structure;
- grinder and cutting discs that will be used for sawing iron parts;
- tools for determining the size of a trailer for a walk-behind tractor - tape measure, ruler and square;
- drill for drilling mounting holes.
You may also need a hammer, vise, and welding clamps to create the towbar.
Homemade device option
What materials may be needed
Before making a tow hitch for a walk-behind tractor, you must be sure to familiarize yourself with the list of materials that can be used for this. For example, the frame is made of metal pipes, channels, steel beams and angles.
The wheel axle is made of metal rods with a diameter of 3-4 centimeters. Its length should not be more than 100 centimeters. The rod must be attached to the frame supports.
The body is made of ordinary wooden boards. However, some people prefer to use iron sheets. They make the structure more durable.
When choosing materials to create a walk-behind trailer, do not forget about the wheels. They can be removed from cars or mopeds. Quite often they use the rear wheels of motorcycle strollers.
Metal pipes - needed to create a reliable structure body
Drawing
Before you start assembling a trailer for a walk-behind tractor, you need to create a drawing of it. It is needed to determine the dimensions of the device and its design features.
First you need to develop a general drawing. It notes:
- wheels;
- frame;
- body;
- cardan;
- drove.
Then it is necessary to develop a detailed drawing of the frame. It indicates its dimensions and location of the main parts. An additional drawing of the carrier may also be useful.
Drawing of a simple trolley for a walk-behind tractor
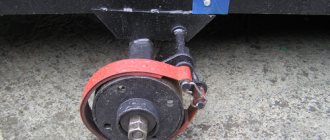
Chassis
When assembling a trailer, special attention should be paid to its chassis. First you need to prepare the wheel axle. In this case, any wheels can be used. However, to make it easier to control and increase driving safety, it is better to use rubber ones.
The axle must be welded to the hinge and side members. In this case, the products must be welded at several points to make the fastening more reliable. In order to make the fastening even stronger, you can use metal corners.
You should not make the axle too long, as this may cause it to begin to protrude beyond the body.
Approximate drawing of a universal hitch for a walk-behind tractor
Body and frame trim
The creation of the body begins with the installation of the sides. The front and side ones must be tightly connected so that they do not dangle. The tailgate is mounted on hinges and made removable.
The removable board is assembled in the following sequence:
- Installation of side frame.
- Fitting the metal sheet to the dimensions of the installed frame.
- Cutting and installation of side panel.
After fastening the sides, it is necessary to install the bottom. It is connected to the main frame by welding. The bottom should be welded every 4-5 centimeters. If desired, you can additionally use factory metal bolts.
Metal sheets are a high-quality material that is often used for body cladding
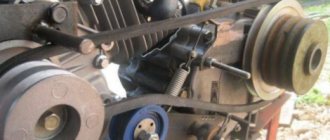
Other design details
After the creation of the body and installation of the chassis is completed, they begin installing the brakes. You can install a car brake system on a walk-behind trailer.
To make the brakes more reliable, another clamp is installed for the lever.
Motoblock hitch drawings
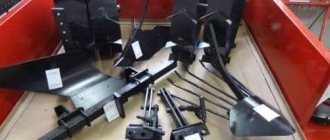
Let's look at a drawing of a universal hitch for the following types of walk-behind tractors: "Pubert Quatro", "Honda", "AGRO", "OKA", "CASCADE", "MB-90", "NEVA", "FAVORITE", "SALYUT".
The purpose of the universal hitch is in connection with a walk-behind tractor for attachments: a digger, a plow, a single- and double-row hiller, etc.
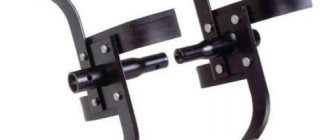
Installing a hitch on a walk-behind tractor
The hitch bracket is installed on the walk-behind tractor bracket and secured with pins. It is advisable to fix the hitch bracket with M12x60 spacer bolts, facing the walk-behind tractor frame.
Installing the implement on the hitch
A removable hitch axle must be installed on the implement rack bracket. You need to insert an axle with an M16 thread into the hole in the hitch body and screw a screw into this thread. You need to align the holes for the M16x40 bolt on the gun rack and on the hitch body. After which this connection is secured with an M12 nut and an M12x40 bolt.
Recommendations for work
Mounted implements are configured and adjusted individually, depending on the type of soil and the power of the walk-behind tractor. The special design of the hitch can be adjusted in different ranges. Using the initial settings, you need to set the radius grooves of the hitch to zero transverse engagement angle, and secure with an M12 nut and an M12 bolt. Also set the minimum longitudinal grip angle. During the first 3-5 meters of movement, carefully observe how the walk-behind tractor works with the implement.
If you need to deepen or raise the implement, stop the movement of the walk-behind tractor and adjust the implement by rotating the screw handle. After which you can continue moving and evaluate how the walk-behind tractor works with the implement. Also, if you need to adjust the transverse angle of the grip, you need to loosen the M12 nuts and M12 bolts.
Then adjust the angle in the required direction and tighten the nuts and bolts. Before starting work, all threaded connections must be tightened tightly. After work on the soil is completed, threaded connections need to be cleaned and lubricated daily. To do this, use Litol 24.
This is interesting: How to make a walk-behind tractor with your own hands with a box from a Lada and a VAZ rear axle (video)
Thule Xpress 970 bike rack with towbar mount: instructions, reviews
In order for the cart to be securely attached to the mini tractor, you will have to make a reliable coupling device. Of course, you can use a regular tow bar. However, many people prefer to create such a retainer themselves.
It is recommended to make a device with a built-in adjustment mechanism. Thus, it will be possible to connect almost any cart to the walk-behind tractor.
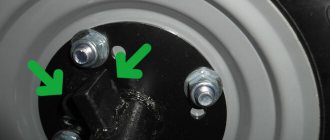
To install a spider hitch, the hitch bracket must be positioned to the side. It must be attached to the structure using strong metal pins. For additional fixation, you can use spacer bolts. This will allow you to get rid of strong vibrations during transportation of goods in the future.
A towbar is a special device that is used for attaching trailers or trailers.
Many people are interested in how to attach a homemade cart to a walk-behind tractor and what might be needed for this. To deal with this, you need to know in advance the main features of creating towed devices and the nuances of attaching them to walk-behind tractors.
Adapters overview
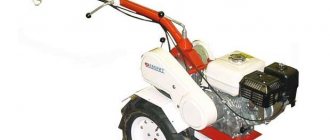
Walk-behind tractors have greatly simplified agricultural work on the field for many farmers. Thanks to them, processing, plowing and planting have become easier and faster. But the design of the walk-behind tractor is such that the operator has to walk behind it, which after a while causes fatigue and becomes difficult. The loss of strength is especially felt after processing large areas, since the weight of the walk-behind tractor often exceeds 100 kg.
To significantly facilitate work on the walk-behind tractor, and in Belarus in particular, adapters were invented that were attached to the unit and made it possible to perform all the work while sitting. The peculiarity of the adapters is that all attachments are attached to it, and not to the walk-behind tractor. Thus, when using the adapter, you get a mini tractor with a comfortable seat and the ability to work tirelessly for a long time.
Models from the manufacturer for MTZ
The manufacturer did not provide an official model, but those who want to upgrade their walk-behind tractor should pay attention to other manufacturers.
Analogs from third-party manufacturers for MTZ
One of the popular adapters is the Tselina arable module, which is adapted for use with the Belarus walk-behind tractor. The adapter is made of high-quality materials and allows you to sit comfortably on the seat and control the walk-behind tractor. Thanks to additional pneumatic wheels measuring 4*10, the structure will be stable on any soil.
To add versatility to the model and facilitate braking, the adapter is equipped with a band brake. The speed that the MTZ walk-behind tractor can develop with a connected adapter can reach up to 10 km/h. But since most of the attachments are not capable of accelerating like that, this will be enough to perform agricultural work. The weight of the arable adapter is 50 kg.
Adapter Khorsam IS-2
An excellent alternative that will turn a walk-behind tractor into a mini tractor is the Khorsam IS-2 adapter, produced by GMZ OJSC. The structure is equipped with a seat and a steering wheel, and the moving part of the walk-behind tractor is mounted at the rear. It is advisable to use it in gardens, orchards and personal plots. A comfortable seat and a motorcycle-style handlebar provide comfort and convenience during field work.
All important MTZ controls are located on the steering wheel, allowing the operator to sit comfortably. The operator can easily reach the gas, brake and start the engine, since Khorsam is adapted to connect the MTZ 09N. In addition, you can connect a plow, cutters, hillers, potato planter and digger, any snow removal equipment, mower and much more to it.