Adjusting the K-45 carburetor
Adjustment of the device to the Cascade walk-behind tractor type K-45 is carried out by analogy with other models:
- after preparing the unit for tuning, reduce the engine rotation speed using the throttle stop screw;
- when the engine is idling, set the maximum speed using the fuel mixture supply screw;
- completing the operation, change the engine rotation speed by turning the screw in the opposite direction by a quarter from the set position;
Setting up the power system unit will ensure stable, error-free operation of the power system unit.
When starting to operate a walk-behind tractor, you should remember that the carburetor is its important element. The ability to independently adjust the product will always keep your mini-equipment in working order.
With the advent of walk-behind tractors, the life of many rural gardeners, farmers and summer residents has become much easier. After all, such miracle technology made it possible to carry out all the hard work on sites not only efficiently and efficiently, but also in a short time with minimal effort. But as you know, sooner or later equipment can upset its owner with various kinds of breakdowns. There may be several reasons for this: either the part has already worn out and it’s time to replace it with a new one, or the oil was not changed on time, or the operating conditions were not observed correctly. One way or another, the equipment needs to be repaired. In service centers you have to pay a lot of money for this. Today we will tell you how to properly adjust the carburetor on a Cascade walk-behind tractor with your own hands, without seeking help from specialists.
Causes of carburetor failure
Any equipment is a complex structure consisting of many components, each of which requires special care.
An emergency situation can arise for various reasons:
- wear of assembly parts;
- The oil has not been changed for a long time:
- improper operation of the device.
As a rule, repairs of such mechanisms are carried out by service technicians. In some cases, it is possible to check and align some components of the mechanism. One of these parts of the walk-behind tractor is the carburetor, a device that controls the flow of air and fuel mixture, optimizing the capabilities of the engine at current speeds and loads. The "Cascade" walk-behind tractor is one of the popular assistants on the plots of summer residents and villagers. Correct adjustment of the carburetor will help ensure its perfect operation.
How can you tell if your carburetor needs adjustment?
The instability of the electric motor speed of a walk-behind tractor is a direct indicator that the carburetor on the walk-behind tractor needs to be adjusted.
As a rule, the need for such a procedure arises before the start of the agricultural season. And this can be explained quite logically: the agricultural machine has not been used for a long time. Also, adjustment is often necessary immediately after the end of the agricultural season - due to prolonged powerful loads on the walk-behind tractor, agricultural machinery begins to fail.
Step-by-step instructions for setting up a carburetor
- Warm up the engine.
- Screw in the maximum and minimum throttle screws until they stop.
- We unscrew the same screws back only 1.5 turns.
- Set the gear lever to the minimum travel position. However, the engine continues to run.
- Normal operation of the engine should be silent and continuous.
This operation should be carried out by Cascade units at each beginning of the season or at its end. Due to the fact that the screws are screwed in all the way, the fuel is enriched. But their slight weakening increases the air in the mixture.
In order to check whether you did everything correctly when adjusting, you just need to pay attention to the spark plugs. After prolonged hard work on the walk-behind tractor, after a short time, neither soot nor traces of fuel should form on the spark plugs.
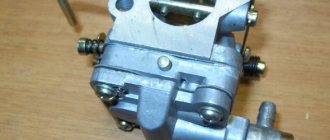
Carburetor of the Cascade walk-behind tractor: 1 - air pipe; 2 - body; 3 - drowner; 4 — idle jet; 5 — throttle stop screw; 6 — throttle lever; 7 — carburetor mounting flange; 8 — screw for adjusting the composition of the idle fuel mixture; 9 — fuel inlet fitting with filter; 10 - float chamber; 11 — throttle valve drive lever; 12 — sediment drain plug; 13 — air damper screw with spring; 14 — air damper lever.
Carburetor operating instructions
In order for the KMB 5 carburetor on the Cascade walk-behind tractor to function for a long time, it is advisable to use pure gasoline. If the device fails and you have repaired it, you should treat the elements with gasoline during reassembly.
Important! You should not use solvent for processing, as it damages the elasticity of washers and rubber elements.
Do not use solvent to work with the carburetor.
After repair or cleaning, assembly must be carried out evenly, so that bending and deformation of parts will not occur. To clean small holes, it is better to use a thin wire or needle.
The float chamber must be sealed with the housing during assembly. Before starting use, you need to check the air filter of the unit and the presence of gasoline leaks. To check for leaks, just open the fuel tap, close the valve and tighten the lever until it stops. If the performance test is carried out at a temperature below 0, you need to clamp the seal until fuel appears.
So, the check has been carried out, now you need to open the throttle slightly and start the engine, after warming up it can be fully opened.
Features of adjusting the KMB-5 Cascade carburetor
- All gasoline must be removed from the float cavity.
- We supply the air mixture through the fuel supply fitting.
Proper adjustment is confirmed by the unimpeded air supply when the walk-behind tractor is in operation and the blowing stops when the part is turned over.
Adjusting the K-60 carburetor of the Cascade walk-behind tractor
- We install the throttle valve so that we have a gap of 2 - 2.5 mm between its base and the air duct.
- We tighten the carburetor screws.
- We turn the screws back only 0.5 - 1 turn.
- Warm up the engine for 5 minutes.
- While unscrewing the adjusting screw, wait for the engine speed to decrease.
- We reduce the rotation speed and smoothly tighten the screw to the optimal state.
Adjusting the K-45 carburetor
- We need to reduce the engine speed by controlling the throttle stop screw.
- Next, you need to determine the maximum speed value using the screw to adjust the fuel mixture at idle.
- Then we turn the screw back about a quarter of the achieved position.
Such manipulations will allow the motor to operate smoothly, steadily and without sudden stops.
It is important to remember that each model has its own setting for the normal operation of all parts. To make quality repairs yourself, be sure to follow all the instructions in the manufacturer's instructions. If you don’t have it, then you should be extremely careful when repairing it. For those who do not have special knowledge in assembling and repairing such technical equipment, it is better to contact specialists at a service center. This will help you avoid many problems, and professionals will be able to quickly fix everything.
The advent of walk-behind tractors has made the life of farmers much easier. The technology made it possible to carry out all the work in the garden and garden not only efficiently, but also quickly. However, sometimes equipment presents its owners with unpleasant surprises in the form of breakdowns. Let's find out how to adjust the carburetor of the Cascade walk-behind tractor without the help of a specialist.
Features of operation of the walk-behind tractor after adjustment
For long-term operation of a walk-behind tractor, it is important not only to know how to properly configure the carburetor, but also to understand how to operate the equipment after adjustment.
First, you will need to control the operation of the motor. The owner will be required to identify any interference or malfunctions by the sound of the engine. For example, squeaks when shifting gears indicate stretching of the clutch cable. To avoid making it worse, you should stop for at least 20 minutes so that the cable returns to its normal state.
In addition, during operation you must:
- It is good to warm up the motor of the walk-behind tractor, letting it run for at least 3 minutes at idle speed;
- Stick to sequential gear shifting - do not “jump” between speeds;
- It is important to maintain a distance between the border of the garden and the cultivated soil - if the plow hits a hard compacted area, this will have a bad effect on the operation of the gearbox;
- Do not allow the level of gasoline in the tank to drop below the permissible limit. You can find out about it in the operating instructions for the walk-behind tractor.
- In order not to interfere with the stability of the gearbox, constantly monitor the engine oil level. It is better to top it up when the liquid in the tank is half its volume.
By adhering to all these standards, the owner of a walk-behind tractor will not have any difficulties immediately after adjusting the carburetor.
Setting up the carburetor - step-by-step instructions
Setting up one of the most important elements of a walk-behind tractor is not as difficult as it might seem at first glance. All you need to do is pay attention to the work and follow the procedure below:
- First you need to warm up the engine;
- After 5 minutes, you need to screw in the minimum and maximum throttle screws until they stop;
- Then you need to unscrew these same screws no more than 1.5 turns;
- After this, the gear shift lever is set to the minimum travel position. The motor must be running throughout the entire operation;
- Finally, turn off and turn on the engine again - you will immediately notice a change in the form of silent and continuous operation of the engine.
These procedures must be performed with Cascade walk-behind tractors before each season. Loosening the bolts enriches the fuel with oxygen, which is very important for stable engine operation.
To check that the procedures you followed are correct, you need to look at the spark plugs. After a whole day in the garden, soot or fuel residues should not appear on the candles.
Cleaning the carburetor of a walk-behind tractor
Frequent malfunctions in the operation of the power unit of a walk-behind tractor indicate the accumulation of blockages inside its carburetor. This fuel unit constantly interacts with engine oil, gasoline and air. They contain solid fractions, tar and small debris, which can be deposited on the walls of the carburetor chambers and inside the fuel channels. In this regard, the carburetor needs regular cleaning, especially if low-quality fuel is used to refuel the agricultural unit.
Before directly flushing the carburetor of the walk-behind tractor you are using, you need to remove the standard air filter and rinse it thoroughly in clean gasoline. After this, the part will need to be dried. The operator should also inspect and clean the spark plug. If a thick layer of carbon deposits has formed on its cap, this indicates oil leakage.
The further procedure should be as follows:
- First, you need to carefully remove the inoperative carburetor from the factory device and completely drain the remaining fuel from the standard metal float chamber;
- Next, you will need to inspect the built-in fuel fitting. If air does not pass through it, then the fitting must be blown out with compressed air from a purchased cylinder;
- Next, the operator must examine the condition of the float metal chamber and the “tongue” necessary to adjust the position of the float. The operator must check the level of the amount of refueling fuel that enters the chamber - its level must initially be no lower than 3.5 cm;
- After this, you will need to remove the needles responsible for setting low and full gas - this is necessary to completely flush the nozzle;
- Next, you need to unscrew the bolts and disconnect the standard upper part of the factory carburetor from the lower one. After this, the operator will be able to thoroughly rinse the built-in fuel supply valve;
- Then you need to blow out the nozzle with air from the cylinder. This and other carburetor elements should not be wiped with a lint-lined rag. Otherwise, the risk of damage to the chrome coating of the walls of the fuel unit will increase;
- After all the parts of the standard carburetor are completely dry, it can be assembled.
Immediately after installing the fuel unit, the operator must configure it and smoothly start the walk-behind tractor engine. Next, the user will need to check the operation of the node. If the built-in engine operates as stably as possible and does not make any extraneous sounds, it means that the standard carburetor was cleaned and adjusted correctly.
Detailed description of carburetor adjustment
The K-60 carburetor of the Cascade walk-behind tractor is not much different from the carburetors of other models. It consists of several important elements:
- Air pipe;
- Protective housing;
- Drowning device;
- Jet;
- Throttle stop screw;
- Throttle lever;
- Carburetor mounting flange;
- Idle fuel composition adjustment screw;
- Fuel inlet fitting with filter;
- Float chamber;
- Throttle drive lever;
- Plug for draining remaining fuel;
- Damper screw with spring;
- Throttle lever.
Having studied the design of the carburetor, it will be much easier to adjust it. To do this, you need to follow the following algorithm:
- First you need to remove all gasoline from the float chamber;
- After this, open the fitting to allow air into the carburetor;
- Next, install the throttle valve so that there is a 2mm gap between its base and the air duct under the damper;
- After this, tighten the fuel stroke adjustment screws;
- Unscrew the screws 1 partial turn;
- Warm up the engine for 3 minutes;
- Begin to slowly unscrew the screws until the engine speed decreases;
- After this, screw in the screws slowly as well.
The procedures performed will help stabilize the engine and eliminate “sags” in its speed. When working, you need to regularly check the operating instructions for the walk-behind tractor - this way you will not make mistakes.
To prevent the motor from whining immediately after tuning, maintain a smooth loosening and tightening of the screws. If you try to quickly remove the screws, this will increase the load on the entire engine during the first few starts of the walk-behind tractor after adjusting the carburetor.
Motoblock carburetor design
Knowledge of exactly how the carburetor for a walk-behind tractor works will help you independently eliminate any malfunctions, as well as clean and timely adjust the standard fuel unit.
Structurally, the mechanism consists of:
- a float, which is connected to a built-in steel shut-off needle valve;
- metal float chamber with chrome-plated internal cavities;
- an additional chamber required for mixing fuel with air;
- fuel distribution structure equipped with a diffuser;
- adjustable throttle valve;
- fuel and standard air pipes made of technical rubber.
Depending on the manufacturer and purpose of walk-behind tractors, their carburetors may be equipped with additional elements. But regardless of this, fuel hulas work on the same principle.
One of the most important elements of the mechanism is the float, the main function of which is initially to regulate the amount of fuel necessary for the proper operation of the walk-behind tractor. The fuel itself is located in the float chamber, and as soon as its volume decreases, the float opens the built-in needle valve. Through it, the missing volume of fuel being filled enters the chamber, after which the float rises and slowly closes the valve.
The carburetor on the walk-behind tractor is equipped with an output channel, which is located in the float chamber. For normal operation of the fuel unit, the amount of fuel in the standard float chamber must be continuously maintained at a level that is several millimeters below the location of the outlet channel.
The sprayer initially plays the role of a kind of fuel distributor, which enters the steel mixing chamber from the chrome-plated float. The latter is needed directly to enrich the fuel with air. Pre-cleaned air flows enter it through the built-in inlet pipe.