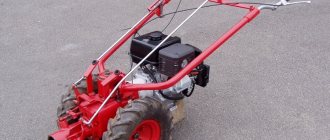
The use of small equipment in agriculture greatly facilitates the farmer’s hard work and saves time. A mower is an attachment for a walk-behind tractor. Depending on the variety, you can use it to get rid of weeds, any unnecessary vegetation on the site, make hay, and trim the lawn in front of the house. The design of such equipment is simple; anyone can assemble it. Therefore, many people prefer to make the unit themselves from parts available on the farm.
Rotary mower for walk-behind tractor - design description
A rotary mower for a walk-behind tractor is a type of attachment whose function is to mow weeds and bushes in meadows and fields. This device successfully copes with the removal of grass in large areas, the soil of which is not treated with herbicides.
Often, a rotary mower is also called a disc mower - this is due to the principle of its operation and design features. Depending on the method of connection to the walk-behind tractor, such a mower can be semi-mounted, mounted or trailed. Also, attachments of this type are classified according to the location of the cutting elements in relation to the walk-behind tractor used. According to this factor, rotary mowers with front, rear and side cutting blades are distinguished.
During operation on the site, the rotary mower is driven by the transmission and wheels of the walk-behind tractor. The design of such attachments is extremely simple - one or more cutting discs together with a support wheel are fixed to the frame. As soon as the support wheel begins to move, the disks that mow the vegetation begin to rotate along with it.
The areas of application of the rotary mower are quite extensive - it can be used in pastures, meadows and large vegetable gardens. At the same time, the more disks included in the design of the equipment, the larger the processed area can be.
Safety precautions
The main thing a master should worry about when assembling homemade equipment for minitratcore is not how well it will work, but, first of all, how safe it will be. Before you start working with a self-assembled mower, check the tightness of all connections. Take care of the safety of not only the tractor driver, but also the animals. When launching, there should be no one within 50 m.
When working with a homemade mower, make sure that there are no people in front. If the grass to be cut is tall, such as reeds. Don't be lazy to go and have a look. Remember safety first.
Assembling a mower for a mini tractor with your own hands is easy only for a person with the skills of a welder, technician, or mathematician. In addition, perseverance and hard work must be present. If you don’t have all these qualities, then just spare your nerves and buy a ready-made model of a rotary mower.
Segment mower for walk-behind tractor - areas of application
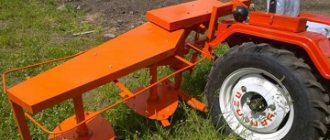
A segment mower on a walk-behind tractor is one of the simplest equipment options. Its design consists of a frame on which 2 bars are installed. Cutting elements are placed between them. In the process of making translational movements directly from the drive of the walk-behind tractor used, the cutting elements of the mower begin to move like scissors, thus cutting off the grass. In this case, one of the segments constantly moves left and right, and the second is in a stationary state. When grass gets caught between the mower's tines, the stems are cut quickly and evenly. This kind of design allows the segment mower to successfully work in areas with difficult terrain.
The entire device is supported on support wheels, and can be attached to the front or rear of the walk-behind tractor. Along the edges of the structure there are slides designed to adjust the height of mowing vegetation.
The segment mower is not distinguished by its modest dimensions, which does not allow it to be used effectively in areas with a large territory. However, this type of device successfully copes with mowing weeds with tall and thick stems, which makes it possible to use it for mowing dry grass. Thanks to this, a segmented mower for a walk-behind tractor is in quite high demand among farmers who own cattle.
The main advantages of a segment mower include ease of operation, no need for frequent repairs, and low cost. Among the disadvantages of the equipment are low productivity and low efficiency in areas with short grass.
Do I need to sharpen cutters for a cultivator?
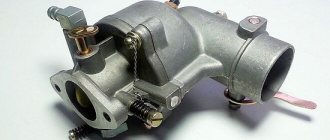
Having dealt with the cultivator and the types of cutters for it, let’s move on to considering the main issue that this article is devoted to, namely, whether it is possible and necessary to sharpen such a working piece of equipment as a knife. The majority of domestic manufacturers of agricultural machinery use cutters from a plant located in the Smolensk region. For their production, hardened steel is used, the cutting edge of the knives is processed with high frequency currents. The cutters are attached to the flange using bolts, since this material is difficult to weld. This point suggests that the welded cutters of most Chinese companies use metal of not very high quality.
Good hardened steel does not tolerate welded joints, only bolted ones
When creating the working edge of a cutter, it melts and cools quickly, as a result of which it looks uneven and slightly resembles a hacksaw blade, which can be seen with high magnification. During operation, a hardened steel blade does not become dull, but crumbles, which leads to the formation of deeper “saw” teeth. Many people call such cutters self-sharpening, although this definition is not entirely accurate.
Now, regarding whether it is necessary to sharpen the cutters and how to do it at home. If you sharpen using a grinder or on a sharpening machine, the result is overheating of the metal, and consequently, a violation of its structure and loss of strength. As a result, the cutters will become dull faster, and this is in the best case, but in the worst case, the knives may begin to break down and you will have to buy new ones.
Sharpening a cutter using a grinder causes the metal to overheat
Sharpening of cutters can only be done on a high-temperature sharpening machine, and such equipment is unlikely to be available on every farm. And you don’t need to grab a file, which will help remove small chips and make the edge smooth. As a result, this will lead to the formation of an even larger chip or breakage of the knife when it hits a stone during soil cultivation. If a notch appears on the cutter, then simply continue working. You will see that after a while it will disappear on its own.
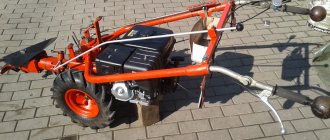
Front mower for walk-behind tractor - design features
This mounted walk-behind mower is used primarily for working with heavy equipment equipped with a water cooling system. The main tasks that a front walk-behind mower is designed to cope with are mowing a large number of tall and thick weeds, removing bushes, and preparing large volumes of hay.
Some models of frontal equipment are pre-equipped with a rake, thanks to which the work of a walk-behind tractor with a mower of this type allows you to collect the mown grass into felts, thus simplifying the process of working on the site. In the side parts of the front mowers for walk-behind tractors there are separate slides, the movement of which allows you to adjust the height of grass mowing. Most models of attachments of this type include special pulleys that replace the standard elements of walk-behind tractors.
Not so long ago, milling cutters began to be used for walk-behind tractors, which were called “crow’s feet”. They have proven themselves well and are most often used for processing hard and complex soils. These are the cutters that are used when cultivation needs to be carried out in difficult conditions, on rocky soils. The design of the “crow’s feet” is made solid, which ensures the highest levels of equipment strength. The cutters are available in standard sizes:
Crow's feet cutter.
- the width of the knives is 41 cm;
- the length of the knives is 38 cm;
- structure height – 38 cm;
- the weight of the cutter is 16 kg;
- The permissible operating speed of a motor cultivator with such blades is 2-5 km/h.
What are the advantages of a crow's foot cutter? Is it possible to install it yourself? It is convenient for cultivating soil and controlling weeds. Other models will not be able to do the job better. For rocky and hard soils, a crow's foot cutter is simply irreplaceable. Among the advantages, it should be noted that the steel of the cutter in this case can be welded. If necessary, you can carry out repairs at home rather than buying new knives, as this is expensive.
This type of cutter also has its disadvantages. The main disadvantage is that ordinary carbon steel is used for manufacturing. The strength of the structure itself is at a high level, but the material is slightly inferior to other varieties. Such a cutter should be regularly inspected when work is carried out on clay soils or when cultivating virgin soil. The cutter blades may be bent or simply broken. However, the repair is not too complicated; a welding machine is usually used for a broken knife, after which the fracture site is carefully polished.
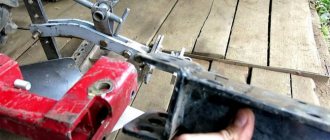
When assembling the circuit, two people should work together, since the weight of the structure is significant
It is important not to confuse the direction of installation of the knives on the axis. When assembling, the sharpening point should face the direction of the cultivated soil.
To strengthen the cutter, a stopper is used; it is placed on the output axis.
Installing a mower on a walk-behind tractor - details for beginners
Preparing the walk-behind tractor available on the farm before mowing the grass involves installing the selected mower on it.
Installation of attachments is carried out in the following order:
- First, you need to secure the tensioning device included with the mower;
- Next, you will need to put the device pulley on the upper clutch so that the front part of the hub “looks” at the tensioner flange;
- After this, it is necessary to fasten all installed parts with a screw;
- Then you need to install the mower and put on the belt, then secure the mower with pins;
- The next step is to put on an apron to prevent grass from getting on the operator and install the protective shield back on the walk-behind tractor. The video will tell you more about installing the mower on a walk-behind tractor.
When installing the mower, you will need to adjust the belt tension. This is done by turning the handle in the direction of movement of the walk-behind tractor. After this, you can start mowing the grass on the site.
Deep tillage
When developing new areas, it is necessary to develop virgin soil. Usually it is abundantly overgrown with turf, perennial grasses and weeds. It is quite difficult to cope with such areas with conventional tools. More often they resort to cultivation using deep processing with formation turnover. With reverse plowing, part of the layer is cut, lifted and turned around its own axis. As a result, the soil from the lower layer ends up on top. Weeds cannot grow for a certain period of time. Cultivated plants have a head start for advanced development.
Similar work is done in the fall. The rhizomes of nettle, wheatgrass, dandelion and other weeds freeze in November-December, when the air temperature drops below -15...-17 ⁰С (there is no stable snow cover yet). Subsequently, they lose the ability to grow.
In the future, a similar technique is resorted to every autumn. After 2...4 years of autumn fall plowing, the number of weeds on the site is reduced many times over.
Proponents of organic farming disagree with this approach. But the experience of several centuries proves that only such agrotechnical measures can clear the area of weeds. Otherwise, you will have to use chemicals to control weeds.
Deep plowing allows:
- wrap a layer of soil and allow plants to use for nutrition substances that gradually shift to lower horizons during the season. This operation makes it possible to reduce soil salinization using mineral fertilizers, as well as reduce the amount of fertilizer applied;
- aeration of the lower layers of soil contributes to the occurrence of aerobic processes of decay of plant residues. Usually in the lower layers the access to air oxygen is limited. Therefore, conditions are created when the rotting of taproots lasts for several years. Anaerobic processes (without air access) occur with the slow accumulation of humus;
- When the formation is turned over, weed seeds end up in the lower layers of the soil, and they cannot germinate. The roots remaining on the surface freeze. As a result, soil contamination sharply decreases;
- Freezing lumps of earth in winter crumble more easily in spring. A light, loose surface layer is formed in which cultivated plants can receive more abundant nutrition;
- adding organic matter before plowing allows for active rotting of manure or green manure if they were sown after harvesting the main cultivated crops.
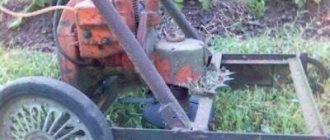
How to make a mower for a walk-behind tractor with your own hands - manufacturing options
Almost each of the listed types of mowers for the walk-behind tractor available on the farm is quite easy to make yourself. The only problem is that problems may arise when assembling the frontal equipment, since it is quite bulky and requires the purchase of many hinge mechanisms.
The most popular among farming enthusiasts are rotary and segmented attachments for walk-behind tractors. They have a simple design, and their manufacture does not require specialized equipment.
Hitch frame
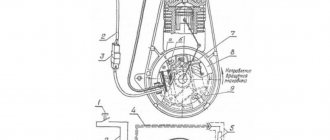
The mower is connected to the tractor linkage using the linkage frame (see Figure 4).
Figure 4 – Hitch frame: 1 – frame; 2 – stand; 3,4,5,7 – axis; 6 – bracket; 8 – hook; 9 – bracket.
Frame 1 is a bent pipe structure with 4 axles for attaching it to the lower links of the tractor hitch. On the right side there is an axis 5 for attaching the traction fuse. A post 2 is hinged to the frame on an axis 3, in the upper part of which there is a bracket 6 for attaching a hydraulic cylinder and balancing springs. Hook 8 is designed to fix the transport rod while the mower is operating.
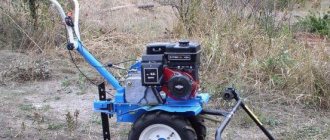
Rotary mower - how to make it yourself?
This type of common attachment will be most effective on any site. If short grass has sprouted on it, then the device will simply chop it up, and if the weeds are tall enough, the mower will mow them down.
To manufacture a rotary mower, you must study the drawings. They must indicate the dimensions of each structural part and methods of their fastening.
The further procedure for assembly is as follows:
- First you need to find 2 disks - they can be taken from an existing grain seeder or any other equipment on the farm. Also for work you will need a gearbox and a chain from a chainsaw;
- To make an axis on which the knives will be mounted, you should use a carbon steel pipe with a diameter of approximately 1 cm along the entire length. In order for the knives to rotate freely, the axis is tightened with a disk until it stops;
- The previously made disks will need to be mounted on a welded frame and connected to the drive of the power take-off shaft of the walk-behind tractor provided in the design. Make sure that as you rotate the discs, they will rotate towards each other - this way they will stack the mowed grass in neat rows.
A homemade rotary mower made in this way will allow you to quickly get rid of weeds and bushes of any height and thickness. The assembled equipment does not require frequent repairs or special maintenance.
About the elements
They are needed when cultivating the soil.
Therefore, the quality of processing and the complexity of the procedure itself depend on the model: load on the motor, ease of control and labor intensity. How to assemble cutters?
As a rule, the cutter is included with the walk-behind tractor. But this may not be enough. Sometimes it is necessary to increase the depth or width of processing, so the device can be supplemented with other products. This solution also makes it possible to improve the process of moving the walk-behind tractor forward. In addition, this will increase the service life of the mechanism.
If the soil is clayey, then it is better to use two pairs of cultivators. And even if the soil is light and has already been cultivated previously, additional elements will not become a hindrance.
Changing the depth is possible due to the adjustable coulter. It is a durable element located vertically in the walk-behind tractor coupling. And the final loosening depth is influenced by the diameter of the cultivator cutter.
If you want to make cutters for a walk-behind tractor with your own hands, you should start by determining their types. Two types of construction can be distinguished:
- "crow's feet";
- with saber knives.
The last option is the most popular and can be called standard. After all, these types of products are time-tested: their effectiveness is quite high. They have the optimal shape and material. The knives are made from high-quality, high-strength steel. Additionally, the material undergoes thermal hardening and high-frequency current treatment.
It should be noted that the cultivator cutters have a collapsible design. This feature is caused by the fact that the material does not accept welding well. As a result, before installing the product on the walk-behind tractor, its preliminary assembly is required.
As for crow's feet products, such products are used for hard soils. They have a solid structure, non-separable. Thanks to this, their strength is high.
Characteristics of crow's feet:
- weight – 16 kg;
- speed – 2-5 km/h;
- height – 38 cm;
- length – 38 cm;
- width – 41 cm.
Such products are effective in controlling weeds and processing virgin soil. However, their drawback is the material of manufacture – carbon steel. This affects the strength of the products: therefore, virgin soil must be processed very carefully so as not to bend the products. However, this allows, firstly, welding, and secondly, repairs.
It should be noted that the cutter is a self-sharpening tool. No additional manipulations in this direction are required.
Segment mower - sequence of actions during manufacturing
This type of attachment for the walk-behind tractor used is also as simple as possible to make independently.
To assemble the structure you will need:
- electric drill;
- Bulgarian;
- welding machine;
- set of bolts and nuts;
- several metal bars.
Before manufacturing the device, you need to study detailed diagrams, which should indicate the dimensions of the spare parts and their installation location in the structure.
The further assembly order is as follows:
- In each of the beams used, it is necessary to drill 12 identical holes - M8 bolts must fit into them;
- Next, you will need to attach a guide rail 89 cm long with knives and teeth to the bolts. All knives must be placed on both sides of the bars;
- Next, you need to make clamps and runners at both ends of the beams;
- A wheel is installed at the bottom of the frame - it can be taken from an old baby stroller;
- After this, the structure is connected to the power take-off shaft of the walk-behind tractor.
After assembly, the finished structure must be checked, since situations often arise in which a homemade segmented mower for a walk-behind tractor drifts to the side.
The reason for this is an incorrectly selected center of gravity. To solve the problem, you need to shift the center of gravity of the mower in the opposite direction, using any available weighting material. Rotary and segment mowers manufactured in this way are suitable for walk-behind tractors of the Neva MB-1 and MB-2, MTZ, Zarya, Salyut, Oka, Agat, Zubr, Agro, Patriot, Ural, Centaur and other units equipped with a power take-off shaft.
Design of the KRN-2.1 mower - passport data, diagrams and photos
The mower consists of the following main assembly units: hitch frame 1 (see Figures 1 and 2), subframe 3, rotary cutting bar 5, cutting rotor 6, shield 9.
Figure 1 – Appearance of the mower in working position (top view)
1 – hinge frame; 2 – traction fuse; 3 – subframe; 4 – axle left and right; 5 – rotary cutting beam; 6 – cutting rotor; 7 – knife; 8 – emphasis; 9 – shield; 10 – ski; 11 – gearbox; 12 – cardan transmission; 13 – filler plug; 14 – transport traction; 15 – suspension spring; 16 – hydraulic cylinder; 17 – casing; 18 – hole for removing the knife mounting axis.
Figure 2 – External view of the mower in transport position (rear view)
1 – hinge frame; 2 – knife; 3 – ski; 4 – gearbox; 5 – rotary cutting beam; 6 – cutting rotor; 7 – transport traction; 8 – suspension spring; 9 – shield; 10 – hydraulic cylinder; 11 – casing.
The hydraulic equipment consists of a hydraulic cylinder for lifting the rotary cutting beam and a high-pressure hose. The mower is supplied with spare parts.
Instructions for creation
A walk-behind lawn mower is not a very complicated unit, but even it can be assembled using different methods. Most often, it is still not made from scratch - attachments, that is, the mower itself is made using the factory method in a factory, while the task of a folk craftsman is rather to create an appropriate cart. The task does not seem difficult in light of the fact that drawings of such structures are freely circulating on the Internet, and if you wish, you can even find training videos on how to equip such a mechanism with your own hands.
The resulting device will belong to one of at least three types of mowers, each of which has its own design features, as well as its own advantages and disadvantages. Each of these mowers is worth a closer look - so we will do so.
Rotary
This type of mower is used primarily for lawn care and hay making. The unit is designed for use in areas with relatively low vegetation and a small number of small bushes. The performance of the structure is rated very highly, however, it is sensitive to the presence of slopes - 10-20 degrees is already the limit for it, and no more than 8 degrees of lateral tilt is allowed. Given the simplicity of the device and the minimal risk of breakdown, we are pleased with the ability of the unit to stack grass in rows, however, we should not forget that this particular type of mower is considered hazardous.
We suggest making knives from a regular chainsaw chain, cutting it into pieces of equal length.
Such improvised knives are usually attached 4 pieces to each of the rotating circles - most often they are made 2, using disks from a grain seeder. The chain fragments are attached to the disks at regular intervals, and they are not fixed perfectly tightly, but with a small gap of literally a couple of millimeters. The latter is necessary so that the knives are maximally exposed to centrifugal force, which will allow them to always be in a horizontal position. It is not worth fixing them more steadily simply because when they come into contact with something solid, they should be able to simply bounce back, otherwise breakdown of the unit cannot be avoided.
All fastenings of rotating parts must be made of high-strength steel with a high carbon content; the thickness of the pins, in order to avoid damage to the device and injury, should not be less than 8 or even 10 millimeters. After this, all that remains is to assemble the frame. The frame is usually made from a pre-prepared axle and two wheels, onto which metal corners are welded. The rotor body can be made using the same bottom from a metal barrel; it is to this that the axes for rotating the disks will then be welded.
When installing the frame, it is necessary to provide for the possibility of connecting the disks to the PTO drive of the walk-behind tractor - for this purpose, gearbox gears from an old Soviet car like a VAZ can be used.
The transmission of torque must be organized in such a way that the discs rotate in the opposite direction to each other - this is the solution that allows you to fold the mowed grass in neat rows. The last step is to install some kind of protective cover on the frame to ensure that an accidentally torn piece of the knife will not fly towards the operator.
Segmental
This home-made design is already noticeably more complex in its design, however, it also has its advantages. Unlike rotary models, here the knives do not move in a circle, but reciprocatingly, since they are fixed to the shaft. This unit provides extremely low pruning of plants, removing them at the root, and such a device will not be able to chop up already mown grass, as could happen with a rotary mower. The mechanism is convenient even when working on uneven ground, and turning it on and off is in no way connected with the walk-behind tractor itself, which allows you to quickly respond to potential emergency situations. Finally, such a unit hardly vibrates, which is also useful for its safety.
Necessary materials
The starting materials are:
- Seeder discs for planting grain, 2 pieces.
- Chain from a chainsaw gearbox.
- Metal knives (8 pcs.).
- Shinka.
- Opener.
In addition, you may need bolts, nuts and other small parts that are usually found in any owner's garage.
Specifications
Some of the most popular mowers that are presented on the domestic market are units such as “Zarya”, “KR 05” and “KN 1”
The Zarya rotary mower for the Neva walk-behind tractor has the following characteristics:
- travel speed - 4.0 km/h;
- weight - 32.0 kg;
- required power of the walk-behind tractor - 6.0 hp;
- processing width - 0.8 m;
- rotation speed of working bodies - 2000 ohm/min;
- working efficiency - 0.20 ha/h;
- height of mowed plants - up to 1.0 m;
- cutting height - 0.10 m;
- dimensions: length - 0.81 m, width - 0.93 m, height - 0.78 m.
The KR 05 rotary mower has the following characteristics:
- travel speed - 4.0 km/h;
- weight - 30.0 kg;
- the required power of the walk-behind tractor is 5.0 hp;
- working width - 0.56 m;
- disc rotation speed - 2300 rpm;
- nominal productivity - 0.15 ha/h;
- height of mowed grass - up to 1.0 m;
- cutting height - 0.07 m;
- equipment dimensions: length - 0.69 m, width - 0.54 m and height - 0.63 m.
The KN 1 segment mower is characterized by the following parameters:
- travel speed - 5.0 km/h;
- weight - 45 kg;
- recommended walk-behind tractor power - 7.0 hp;
- processing width - 1.1 m;
- performance - 0.35 ha/h;
- vegetation mowing height is 0.45 m.
Transport traction
The transport rod (see Figure 17) is designed to fix the cutting beam in the transport position when the tractor is moving or when storing the mower.
Figure 17 – Transport rod: 1 – rod; 2 – clamp; 3 – ear; 4 – finger; 5 – lock nut.
It consists of a rod 1, at the left end of which a lock 2 with a right-hand thread is screwed in, and at the right end an eyelet 3 with a left-hand thread is screwed in.
The transport rod is mounted on the axis of the subframe. The presence of threads in the opposite direction on the frame allows you to adjust the length of the rod when rotating the rod.
In the working position of the mower, pin 4 is inserted into the hole in the clamp 2. In the transport position, into the hole on the rotary cutting bar (see Figures 2 and 7).