Choosing a hitch for a walk-behind tractor
Any mounted or trailed device for a walk-behind tractor, be it a harrow, hiller, mower, trailer cart or any other equipment, is attached using a hitch. If the basic part is not suitable, the owner has a choice - purchase a suitable one or make a hitch for the walk-behind tractor with his own hands. In any case, when deciding which version of the unit can most accurately match the tasks that the unit performs, you need to take into account a number of points, including:
- features of a walk-behind tractor or cultivator;
- areas of application of the unit - the functions it performs;
- equipment that must be aggregated with it;
- loads;
- the need for versatility.
Based on this, you should carefully familiarize yourself with the most commonly used designs and guide your choice based on the characteristics of the one that is best suited in this case.
In this video you will learn more about the hitch:
Tips for assembling the adapter
Special equipment for a walk-behind tractor can easily be made by almost any craftsman. To create an adapter, you need to take a tube that has a straight cross-section, its length should be 1.7 m.
A pipe, the length of which will be 0.5 m, will have to be welded perpendicular to one of the ends. This part will be the basis for holding the wheel stands. The height of the racks from the axle to the top will be 0.3 m. At the new stage, braces need to be attached to the central pipe and wheel hub and secured. The length of the workpiece depends on the inclination and angle.
The square frame can be any size. In our version, the following dimensions will be disassembled: 0.4 × 0.4 m. If you are planning to make such an attachment for a walk-behind tractor yourself, then you need to attach a channel to the rear end of the frame, the length of which will be 0.4 m. Assemble the side pipes into one The construction can be done using bolts.
In order for you to have the ability to adjust, it is worth attaching a lever, which should have 3 elbows, their length will be: 20, 30 and 50 centimeters, respectively.
In order to increase the applied forces, the lever should be supplemented with a 75 cm lever. You can buy a coupling unit or make it yourself.
The length of use of our equipment depends on the quality of the coupling. You need to fix the seat on a metal support, which is attached to the central pipe. After these completed steps, we can assume that you have managed to create excellent equipment for the walk-behind tractor. Its advantages are low price and lightness of design.
Tips for creating a hitch
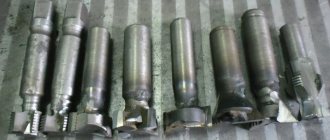
If you wanted to make this equipment yourself, then you should work more with the instructions for creating a coupling unit. The lightest design will be a 15-centimeter pin, which is placed in the hole in the tow bar of the device. The disadvantage of this option is very rapid wear, because under the influence of a spinning trailer, the holes for the hitch are broken.
Reviews
Nikolay, Gomel:
“Hello to all owners of Stanley walk-behind tractors. For some reason, there is very little information, as well as reviews, on these devices on the Internet, although their price is far from low. I’m not sure that the production is German; the user manual generally lists the USA, China, and Germany. Included with the walk-behind tractor I received a plow, cutters, and a two-row hiller. I decided to upgrade this device myself. Of the minuses: immediately after the purchase, for some reason, the “stop” button disappeared, I wrote it off as a defect. The cost of the equipment at the time of purchase was 67 thousand Russian rubles.”
Anton, Moscow region:
“I bought a walk-behind tractor so that it would be convenient to clear the area of snow in winter. Last year I bought a country house. At first I didn’t understand how to use this shovel-blade, then I cushioned the cart, installed headlights, and rebuilt the brakes. As a result, I got a beast of equipment, almost a mini-tractor. From observations: in wet snow, the walk-behind tractor does not twitch and drives smoothly, it slips a little if the shovel is lowered and you need to climb a hill, but everything suits me!
Advantages: smooth activation, easy starting from a standstill. I was able to assemble it very quickly, although at first it seemed difficult. The instructions are clear, a teenager could probably assemble it. It pulls the cart well, practically a small tractor, not a walk-behind tractor!
Disadvantages: does not go uphill if loaded. I changed the throttle cable almost immediately after purchase.”
How to attach a hitch for a walk-behind tractor?
After all the preparatory work, you can begin assembling the hitch on the walk-behind tractor. Use bolts to securely attach the bracket to the channel. If you have a hitch with an adjuster, attach that too.
You can begin installation; to do this, attach the bracket to the tow bar of the walk-behind tractor using pins and install the hitch.
Immediately before work, you need to adjust the equipment. After making a few circles, you will be able to adjust the acceptable position of the attachment for yourself.
This hitch is ideal for trailering walk-behind tractors, seeders, harrows, hillers and other useful agricultural accessories for walk-behind tractors MTZ, Neva MB-2, Agro and others.
Required tools and materials
There is a certain set of tools that are needed to make a hitch, but they do not include anything exotic. Usually, everything that is required to assemble such parts is available on the farm of any owner cultivating his plot of land. The following tools will be required:
- welding machine;
- Bulgarian;
- drill or drilling machine, metal drills;
- measuring instruments (tape measure, ruler, square);
- keys;
- fasteners (bolts, studs).
It must be emphasized that in this case it is very important that the holes that you will drill into the part coincide exactly with the bolts and studs - play in the diameter is undesirable, since it will shorten the service life of the attachments and trailers used. At the same time, during the manufacturing process, it makes sense to first make holes in the part with a smaller diameter (from 5 mm), and then expand them with wider drills (up to 12-16 mm, depending on the diameter of the bolts) - this approach will speed up and facilitate this part of the work, at the same time allowing you to align the holes as accurately as possible.
To make the body, you can use a channel of a suitable size, and if this is not available, you can cut the part out of a metal sheet.
The option of an adjustable hitch is very convenient - this design will allow you to attach attachments of different classes, generations and brands. Even if this design is not relevant at the moment, do not forget that different devices may appear on the farm over time, and the possibility of convenient aggregation of any of them will significantly expand the choice, allowing you to proceed only from the desired performance characteristics of the equipment.
Recommendations for use
To increase service life, do not forget about preventive maintenance - clean the connecting assembly daily and thoroughly lubricate the fasteners with high-quality machine oil. Paint the hitch with paint intended for metal products or coat it with an anti-corrosion compound - this will also significantly extend the life of this unit. Follow the recommendations for loads on the hitch - if the unit is designed to connect small-sized tools - plows, hillers, etc., you should not hang a trailer or cart with a large load on it: the fasteners or the part itself may not be able to withstand it.
Rules for installing and operating equipment on a walk-behind tractor
To install the hitch, you need to place the bracket of the hitch itself on the bracket of the walk-behind tractor. According to the diagram, all this should be secured with pins. It would be a good idea to secure the brackets with M12 x 60 spacer bolts.
To attach an additional implement to a hitch, you must install the axle on the implement rack bracket. And the installed axle must be inserted into the hole in the clutch housing. It should have an M16 thread in order to screw a screw into it without any problems. Having aligned the holes using a bolt and nut, you can begin to work.
Attaching the trailer to the walk-behind tractor
The trailer drawbar, like the frame, is made of 60×60 or 60×30 mm pipes. This is a double beam design with a connection in the coupling device. The coupling device is installed at the point where the drawbar beams meet. The rear ends of the pipes are welded with overlap and reinforcement to the trailer side members.
The coupling of the trailer with the hitch of the walk-behind tractor should ensure ease of rotation of the propulsion unit when moving and at the same time reliable connection with the trailer.
In a simple version, an earring made of a metal rod or reinforcement with a diameter of at least 20 mm can be used as a hitch to a standard trailer hitch. As an option, a standard car trailer hitch and tow bar are used.
For reliable articulation and ease of control of the walk-behind tractor, a pipe with a diameter of 40 mm and a length of 100 mm is welded at the junction of the drawbar beams. The axle of the towing device is installed inside the pipe on two bearings. On the trailer side, the pipe is plugged with a washer to fix the towbar axle; the diameter of the washer hole corresponds to the diameter of the towbar axle.
The axle of the trailer hitch, on one side, has a thread for fixing with a nut and a stud, and on the other, a welded hitch for connection to the walk-behind tractor.
The hitch at the end of the axle facing the walk-behind tractor is made of a square pipe 60x60 mm, 80 mm long. A through hole in the pipe, drilled through two opposite sides, must correspond to the diameter of the locking pin of the walk-behind tractor hitch and fit securely inside the towbar. Inside, the square pipe is reinforced with additional metal plates. The edges of the pipe are rounded so as not to create additional difficulties when turning.
On the trailer side, the towbar axle is secured with a nut and a locking pin.
As a result, when connecting the trailer hitch into the hitch eye of the walk-behind tractor and fixing the hitch with a finger, the walk-behind tractor and the trailer must be securely connected, ensuring stability and ease of control when moving.
About the node
Its main task is reliable contact between the attachment and the walk-behind tractor itself. There are several types of coupling. However, the most popular type is U-shaped. You can make such a universal hitch for a walk-behind tractor yourself or purchase it ready-made. If increased loads are planned, then it is better to make the unit yourself. This will allow for this aspect to be included in the design.
As noted above, there are enough manufacturers of walk-behind tractors, but it should be noted that the design of these devices is, by and large, identical: there are only slight deviations in one direction or another. Therefore, it is necessary to manufacture a universal hitch that can be used on various models when the need arises.
Making a Plow
Before creating such equipment, you will have to prepare drawings. In them you can indicate the main components - the ploughshare and the blade.
- For working parts, it is worth taking 3 mm steel, but first the craftsmen recommend working on the removable plowshare. A disc taken from a circular saw will act as a higher-quality material for it. If it is not available, you can take ordinary steel, which is not subject to special treatment.
- The cutting part will be the working part of the scythe, which is hammered on the anvil. The plow must have a moldboard; you can proceed to its creation after completing work with the ploughshare. As a material for this, you can take a pipe (50 mm), the thickness of which will be 5 mm. The blade can be prepared using a gas cutter. First, we cut out the template; at the last stage, the workpiece needs to be finished on an anvil, and then on a sharpening machine.
How to do it yourself?
When performing its functions, the hitch for a walk-behind tractor will bear heavy loads, which means that it is necessary to comply with the recommended strength and dimensional parameters of all components of the assembly.
Then the following properties of the coupling device will be ensured:
- guarantee of strong pairing with the walk-behind tractor;
- fastening to attachments;
- guarantee of the declared performance properties of the products;
- acceptable price;
- quality, long service life.
When choosing a modification, you need to check the dimensions of the towing device (towbar) of the walk-behind tractor and attachments (harrow, trailer, plow, etc.).
The specialist’s task is to ensure absolute compatibility of components, ease of use and the ability to quickly configure equipment for a specific task.
The main component of the multifunctional hitch is a U-shaped holder. Through the holes on one side, it is fixed to the motor vehicle using pins; on the other side, a rack of the required attachments is attached to the casing of the device.
Required tools, materials and accessories
There is a certain set of tools that are needed to create a coupling device. Basically, everything that is needed to assemble such elements is available on the farm of everyone who cultivates their own plot of land.
You will need the following tools:
- angle grinder;
- electric drill or drilling machine;
- measuring instruments: square, tape measure, ruler;
- welding machine;
- set of wrenches;
- fasteners (studs, bolts).
It should be noted that in this situation it is extremely important that the holes that will be drilled into the part coincide exactly with the studs and bolts. A gap in diameter is not needed, because it will reduce the operating period of the trailers and canopies used.
At the same time, during the work, it is important to first make holes in the element with the smallest diameter (from 5 millimeters), and then drill them with larger drills (up to 12-16 millimeters, in accordance with the diameters of the bolts). This method will speed up and simplify this part of the work, while at the same time allowing you to measure the holes as accurately as possible. To create the frame, you can use a channel of the appropriate size, and if it is missing, you can assemble an element from an iron sheet.
A modification of a custom hitch is very practical - such a design will make it possible to connect attachments of different generations, classes and brands. Despite the fact that such a design is not in demand at the moment, we must not forget that various devices will gradually appear on the farm, and the possibility of convenient aggregation of each of them will seriously increase the choice, making it possible to proceed only from the necessary functional features of the equipment.
Blueprints
Assembling a coupling device for motorcycles on your own involves the use of drawing materials. There are quite a few different options, but it is better to take the most suitable one as a basis and adjust it, taking into account the characteristics of your own equipment.
The drawing should reflect the following elements:
- 2 U-shaped parts, equal in all characteristics, but with a different number of holes - in the first 6, in the second 8;
- a housing containing 2 threads with diameters M12 and M16 and equipped with a mounting structure for fixation with one of the units;
- the adjustment element is a handle placed on the body of the element; its structure includes a screw connected to the holder and having a handle for comfort (it is important to calculate the exact direction of the holder - exclusively up or down and so that it does not interfere with the operation of the motorcycle).
Because motorcycles, under any conditions, require pairing with a hitch, you can find out the details of the location of the connection in its present instructions.
Step by step guide
To make a multifunctional connection, you need an extremely flat plane - a special work table. The plan for manufacturing a coupling device for a walk-behind tractor is as follows.
- Make the markings according to the drawing: mark the outlines of the elements on the workpiece.
- Using an electric drill or drilling machine, make holes according to the marks. Make sure they are correct by using a caliper and a pin (bolt) that will be used to fix them. Achieve a suitable hole diameter at which there is no backlash and the fasteners do not jam.
- Weld the connections. It is preferable to use electric arc welding, in which heating occurs exclusively in the joint areas without any harm to the working properties of the steel.
- Assemble the part. Connect the holder and channel with bolts. If the design has a setting tool, attach that too.
The fasteners by which the coupling device is attached to the walk-behind tractor through the holes in the units must be of the same quality and strength as the device itself.
Let us remind you again that the part is performed so that the versatility of the walk-behind tractor is maximized. If you have an ideally suited coupling device, it is possible to comfortably aggregate and long-term effective operation of each suspended or trailed equipment, including: adapter, hiller, harrow, plow, trailer, all kinds of mowers, potato planters and any other devices.
And for the reason that the fixation components on different equipment may differ, which usually makes it difficult for them to interact with the walk-behind tractor, the successful design of the coupling device and the ability to configure it solve this problem.
Installation of attachments on motor vehicles
After assembling the part, the main thing is to connect it correctly. The installation techniques are quite simple, but it is important to follow them. In essence, docking equipment to a walk-behind tractor comes down to a rather simple action: you need to make sure that the holes of the coupling device and the hitch match and secure them with bolts or pins. Radial holes make it possible to adjust the position of the connecting device during operation.
Upon completion of installation, it is necessary to tighten the components of the threaded fastening of the device to the motorcycle. Then the attachments are attached.
After the initial aggregation of the devices, final fixation will follow, which must be performed right before starting work. The adjusting elements (bolts) must be loosened, the ideal level of fixation must be found, and then tightened with wrenches.
Depending on the structure, a replaceable threaded pin can be placed on the holder, into which an M16 bolt is screwed.
Available modifications
Today, the Shtenli company offers its customers two types of heavy walk-behind tractors for household and professional use: diesel and gasoline, including pro series walk-behind tractors.
Shtenli petrol walk-behind tractors
| Shtenli 1800 pro series N (with PTO) | power 18 hp, engine HM192F (Intek OHV), weight 185 kg; |
| Shtenli 1800 pro series K2N (with PTO) | power 18 hp, engine HM192F (Intek OHV), weight 185 kg; |
| Shtenli 1800 pro series K2 (with PTO + third low gear) | power 18 hp, engine HM192F (Intek OHV), weight 185 kg; |
| Shtenli 1800 pro series K1 (with PTO + third low gear) | power 18 hp, engine HM192F (Intek OHV), weight 185 kg; |
| Shtenli 1800 pro series (with PTO + third low gear) | power 18 hp, engine HM192F (Intek OHV), weight 185 kg; |
| Shtenli 1800 pro series New Design (with PTO + third low gear) | power 18 hp, engine HM192F (Intek OHV), weight 185 kg; |
| Shtenli 1800 K2N (without PTO) | power 18 hp, engine HM192F engine (Intek OHV), weight 185 kg; |
| Shtenli 1800 K2 (without PTO) | power 18 hp, engine HM192F (Intek OHV), weight 185 kg; |
| Shtenli 1800 K1N (without PTO) | power 18 hp, engine HM192F (Intek OHV), weight 185 kg; |
| Shtenli 1800 K1 (without PTO) | power 18 hp, engine HM192F (Intek OHV), weight 185 kg; |
| Shtenli 1800 N (without PTO) | power 18 hp, engine HM192F (Intek OHV), weight 185 kg; |
| Shtenli 1800 (without PTO) | power 18 hp, engine HM192F (Intek OHV), weight 185 kg; |
| Shtenli 3000 (without PTO) | power 3.5 hp, two-stroke, single-cylinder engine, light weight category |
| Shtenli 1030 (without PTO) | power 6.5 hp, Intek OHV engine, weight 120 kg; |
| Shtenli 1800 pro series (with PTO) | power 18 hp, engine HM192F (Intek OHV), weight 185 kg; |
| Shtenli 1600 pro series (with PTO) | power 16 hp, engine AMS190F (Intek OHV), weight 178 kg; |
| Shtenli 1100 pro series (with PTO) | power 16 hp, engine AMS188F (Intek OHV), weight 175 kg; |
| Shtenli 1600 (PTO) | engine AMS901F (Intek OHV), power 16 hp, weight 178 kg; |
| Shtenli 1100 XXL Exclusive (PTO) | engine GX390 (Intek OHV), power 13 hp, weight 168 kg; |
| Shtenli HP 1100 tractor (PTO) | engine M182F (Intek OHV), power 11 hp, weight 165 kg; |
| Shtenli Plowman 1100 (PTO) | engine M177F (Intek OHV), power 9 hp, weight 140 kg; |
| Shtenli 900 (without PTO) | power 7.5 hp, engine HM170F, HM173F (two modifications), weight 94 kg; |
| Shtenli Plowman 1100 (PTO) | engine M168F (Intek OHV), power 8 hp, weight 90 kg; |
| Shtenli 500 (without PTO) | power 7 hp, engine HM170F, weight 76 kg. |
Shtenli diesel walk-behind tractors
| Shtenli 7000 (without PTO) | power 8.5 hp, Intek OHV engine, weight 120 kg; |
| Shtenli 8000 (without PTO, with electric starter) | power 8.5 hp, Intek OHV engine, weight 120 kg; |
| Professional, heavy, diesel walk-behind tractor Shtenli G-185 with PTO | power 10.5 hp, diesel engine, weight 290 kg; |
| Professional walk-behind tractor, heavy, diesel Shtenli G-192 with PTO | power 12.5 hp, diesel engine, weight 320 kg; |
| Professional walk-behind tractor, heavy, diesel Shtenli G-180 with PTO | power 8 hp, diesel engine, weight 250 kg; |
| Shtenli Plowman 1100 (PTO+big wheels) | engine M177FD (Intek OHV), power 9 hp, weight 140 kg; |
| Shtenli Plowman 1100 (PTO+ standard wheels 4.00-10) | engine M177FD (Intek OHV), power 9 hp, weight 140 kg. |
Specifications
For Zirka hitches in the shortened version, the height of the inner sleeve or the diameter of the hole ranges from 2 to 9.4 centimeters. At the same time, the weight of the structure is 4.6 kilograms. The size of the frame strip is 315 mm.
- This product is distinguished by an adjustment angle and the presence of a rotating mechanism, thanks to which the plow, regardless of conditions, cultivates the soil strictly horizontally, even if the walk-behind tractor moves. The hitch is widely used when it is necessary to adjust the operation of attachments or when uneven surfaces are plowed.
- There is an extended version of the described model on the market. The weight of the structure has increased to 7.5 kg, the internal diameter is 210 mm, and the sleeve has a height of 94 mm. The dimensions of the frame strip are also larger - 520 mm.
- The product is used in cases where it is necessary to adjust the operation of attachments.
- The design used a rotary type clamp. The plow always goes at a right angle and everything is thanks to the bolted connection, while the position of the equipment does not play a role.
- Universal hitches also have a bolt clamp, but they are attached to the equipment using a special adapter. The width can reach 0.9 meters, the maximum weight is 6.6 kg.
- If we consider the triple model, then it is installed on the walk-behind tractor using the front part on the rotary unit. This part must be purchased separately, since it is not supplied with any walk-behind tractor. The width of the described coupling is 900 mm. The mounting plate is 80 mm wide and 120 mm long. The weight of the structure is 7.3 kg.
- If you plan to use a walk-behind tractor as a snow blower, then you won’t find a better U-shaped hitch.
Harrows
The harrow is designed to mix the top layer of soil (for uniform fertilization, moistening or aerating the soil) and bringing it into a homogeneous state (removes crust on the ground, breaks up lumps, removes weeds). One official harrow model is presented on the official website of the manufacturer of walk-behind tractors Neva.
Harrow BD 850M (husker)
The harrow breaks large pieces (blocks) of soil into smaller ones, thanks to which the soil additionally absorbs moisture and oxygen. These two factors are mandatory for growing crops.
Harrow BD 850M
BD 850 is a disc harrow and is recommended for use in small or medium-sized fields. In this case, the width of the work can be adjusted from 70 to 96 cm.
The harrow is equipped with 8 high-quality steel discs. They are replaceable and, if desired, old ones can be easily exchanged for new ones. The discs are sharpened at the factory using a special technology, thanks to which they do not become dull over a long period of operation.
Discs are installed on the axle. These axles are mounted on heavy-duty Teflon bearings.
The furrow angle can be changed depending on the conditions:
- An inclination of 10° is used for aggressive furrowing;
- An inclination of 15° is used for standard furrowing;
- An inclination of 20° is used for soft furrowing.
If hard rock is being processed and the discs slip, then a weighting agent can be used to sink them into the ground. For this purpose there is a special well-thought-out platform on top.
To achieve maximum furrowing results, two furrows can be used in series. In this case, the first unit dumps the earth inside, and the second outside.
It is also recommended to replace regular wheels with lug wheels.
Installation of the Harrow BD 850M on the Neva walk-behind tractor
Is it possible to make a harrow with your own hands?
If desired, you can assemble the harrow yourself; there is nothing complicated in this design.
The easiest way to make a toothed harrow. It is slightly less efficient than disk, but the device is much simpler.
All you need is a square tube, teeth and bolts.
It is necessary to cut the pipes and connect them to each other at an angle of approximately 30 °. And at the place where they connect, insert the teeth and secure them with bolts.
To connect to the walk-behind tractor, you can use a regular chain or make a coupling device using a regular metal pipe.
But this structure will often jump out of the ground; it needs to be additionally weighted with something. The ideal solution to the problem would be cinder blocks or any heavy metal structures. But you should not overdo it, since the connecting elements must support the weight of the entire structure.
Video review
The video demonstrates the manufacturing process of such a harrow: And here is a video of the harrow in action and the result of the work done:
What the owners say
Here are a few opinions from people who have already worked with harrows on Neva walk-behind tractors.
Alexey writes:
“I decided to make the harrow myself, since its design was intuitive to me. Therefore, after thinking a little and collecting information on the forums, I was able to do it without any problems. All that was needed were pins and pipes to attach them. Simplicity is the key to success)"
Seat installation tips
You can make drawings of special devices for a walk-behind tractor with your own hands. From them you can find out that the adapter is attached to the equipment using a single hitch, which is made of 2 parts. The first is needed to connect the equipment, while the other is considered an adjustable adapter between the fixture and the lifting mechanism.
To increase the number of implements used, the adapter can be upgraded with a special double hitch. Such a device for the Salyut walk-behind tractor may also be suitable.
With a ledge of 80 centimeters from the front corner, the seat must be secured to a special frame. Bolts must be used for this work. When the entire system is completed, it needs to be tested for functionality.
Making a Plow
Before creating such equipment, you will have to prepare drawings. In them you can indicate the main components - the ploughshare and the blade.
- For working parts, it is worth taking 3 mm steel, but first the craftsmen recommend working on the removable plowshare. A disc taken from a circular saw will act as a higher-quality material for it. If it is not available, you can take ordinary steel, which is not subject to special treatment.
- The cutting part will be the working part of the scythe, which is hammered on the anvil. The plow must have a moldboard; you can proceed to its creation after completing work with the ploughshare. As a material for this, you can take a pipe (50 mm), the thickness of which will be 5 mm. The blade can be prepared using a gas cutter. First, we cut out the template; at the last stage, the workpiece needs to be finished on an anvil, and then on a sharpening machine.
Description
Shtenli walk-behind tractors are a development of the German company Shtenli, which began its activities in the 80s of the 20th century.
At the time of its creation, the main goal of the company was to develop engineering solutions for large industrial production.
Today the Shtenli company creates and produces walk-behind tractors, motor-cultivators, mini tractors, garden trimmers, generators, welding machines, concrete mixers, compressors, hammer drills and screwdrivers.
The company's partners are such large world-famous companies as Micro Instruments, Presto, ABB, Stenlypol, Atomtex and others.
In Russia, Ukraine, Belarus and other European countries, Stanley (Stanley) brand products are known and very popular due to such qualities as reliability and power.
Next, we will take a closer look at the modifications of diesel and gasoline Stanley walk-behind tractors available today.
The nuances of manufacturing other types of trailers for agricultural machinery
Let's look at the basic blocks that need to be used to create functional equipment.
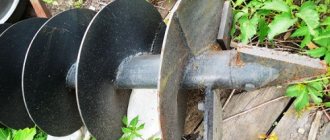
DIY cultivator trailer
A cultivator is a device for cultivating soil. A motor-cultivator has its own engine, the cultivator simply takes power from another device, for example, from a walk-behind tractor, which, therefore, must have a power take-off device, and the cultivator itself must be able to receive this power. This function is not present on all models of walk-behind tractors and cultivators.
But there are also passive attachments for the walk-behind tractor, which do not require power take-off. Samples and standard coupling are shown in the photo. If the hitch was not included in the sales package, then it can be made as described in this article.
Attachments for walk-behind tractor PHOTO: ok.ru
How to make a two-axle trailer for a walk-behind tractor
To transport cargo over 300 kg, a two-axle trailer should be made. The technology for creating it is the same as for a single-axis one - development of design documentation, selection of materials and suitable parts, manufacturing of parts and frames. Since the vehicle is designed for a large load capacity, the frame must be made more durable. It will require profile pipes measuring at least 50×50 mm². The wheel axles are welded to the frame side members.
An interesting option is obtained when the walk-behind tractor is placed behind the loading platform. This layout resembles an ATV. During the process of testing and modification, the front part of this miracle machine was equipped with a steering column with all the necessary mechanisms. The result was a self-running stroller. And you can attach a cargo trolley to the back of it.
Tipper trailer for walk-behind tractor
The peculiarity of a dump trailer is that its body is not welded to the trailer platform, but is mounted on a hinge. The center of gravity of the loaded body should be slightly behind the hinge. The tailgate must be folding or removable. The manufacturing technology is the same as for other designs.
Types and purpose of models of main structures of walk-behind trailers
The main types and models of trailers for self-made walk-behind tractors are classified according to the type of homemade body part design:
- one-piece structures;
- transformable structures with folding sides;
- tipper body types.
The one-piece design of the trailer includes a rigid, non-removable side body. Due to the rigidity of the design, the trailer allows you to transport cargo both in bulk and in packaged form. The body has a large rigid frame platform connected by a welded joint to the side guards. A folding tailgate is provided for loading and unloading.
Transformer structures are trailers for universal use; they have the functions of both a rigid body trailer and a platform for transporting large cargo. The frame base is a rigid base, and folding or removable sides during transformation form an additional area of the flat platform.
The tipper type of walk-behind trailers allows for tipping and unloading of bulk cargo without additional effort.
The simplest trailer model
To build the structure needed on the farm, you need to prepare:
- Steel pipes 60x30 mm and 25x25 mm;
- Springs and wheels (can be from a Moskvich car);
- Duralumin sheet 2 mm thick;
- Cut of sheet steel 0.8 mm thick;
- Channel No. 5;
- Fastening elements;
- Tools (jigsaw, grinder, welding machine and screwdriver).
- The trailer frame is a one-piece structure placed on a frame grid. To equip it, you need to make two traverses from a 25x25 mm corner, which will act as front and rear cross members, and spars from a 60x30 mm pipe. All elements are connected using five crossbars so that the result is a lattice.
- A simple trailer model with folding sides is a very necessary thing in the household. With its help you can not only transport boxes and bags with harvested crops, but any long cargo
- When arranging the lattice platform, you need to place the cross members and traverses relative to the side members so that small outlets remain. Longitudinal pipes will subsequently be welded to them.
- Four racks are attached to the longitudinal pipes by welding, and strappings from a 25x25 mm angle are welded to the top of them. To equip a trailer with folding sides, the frame of the structure is made separately from the frame. The platform grille is covered with a duralumin sheet, secured with bolts. To cover the sides, you can use thinner metal sheets, securing them to the straps and racks by welding.
- To make a beam, two channels of the same length are inserted into each other, equipping one of the ends of the structure with wheel axles. The finished beam is connected to the side members using springs. To do this, the ends of the springs are put on the bracket axis and the shackle axis, and the central part is welded to the beam with stepladders.
- The drawbar is made from rectangular pipes 60x30 mm. To manufacture a two-beam structure, the front ends of the pipes are joined and welded to the body of the unit’s towing device, and the rear ends with an overlap of 200 mm are welded to the front ends of the side members.
- The trailer is ready. If desired, it can be equipped with brake lights, turn signals and side lights.
Trailer frame
The trolley frame for the walk-behind tractor plays the role of its supporting structure. Dimensions and other elements are calculated based on its dimensions. Any inaccuracies must be identified and eliminated, because in the future serious problems may arise when connecting various parts, angles, pipes and channels.
Important Technical characteristics and features of the T-16 tractor
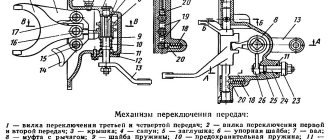
1 — brace (angle 21×21×W), 2 — seat frame (angle 21×21×3), 3 — riser (pipe 50×25×4), 4 — seat posts (angle 40×40×4), 5.14 — front struts (pipe 50×25), 6, 15 — longitudinal side members (angle 40×40×4), 7, 8 — right wheel axle supports (angle 32×32×4), 9.16 — struts rear (pipe 50×25), 10 — reinforcing cross member (angle 40×40×4), 11 — longitudinal hinge body (pipe 58×4), 12 — wheel axle (bar 0 30), 13.17 — transverse spars ( corner 40×40×4), 18 - scarves (s4).
The most ideal solution for creating a frame is rectangular pipes with a cross-section (60x30 mm). And for the traverse it is necessary to use a square steel profile (25×25 mm). To make the structure more reliable, these elements must be welded and reinforced with special cross-sections, while protrusions must be left above the side members.
For racks, a longitudinal profile must be welded to the front part of the outlets on both sides. Next, you need to weld the top trim of the racks with a cross section (25 mm).
The necessary materials must be selected according to certain characteristics that provide additional strength and also eliminate the likelihood of deformation under increased loads. A lightweight trolley for a walk-behind tractor is made of rectangular or round pipes, as well as metal corners.
In order to most efficiently attach a trailer for a walk-behind tractor to its supporting structure, you will need the following elements:
- axial reinforcement 30 mm;
- racks for the driver's seat (corner 40×40);
- solid triangle; brace (20×20);
- racks for the wheel axle (angle 32×32);
- corner (20×20) for the seat;
- front struts (tube 40×20);
- frame strapping (corner 40×40);
- rear braces (tube 40×20);
- transverse reinforcement (angle 40×40).
A high-quality supporting structure can provide the necessary margin of safety and will allow you to transport heavy and bulky cargo on a trailer. If the trailer is often used for driving over rough terrain, such a frame will cope with the assigned tasks perfectly.
To ensure the highest quality connections, you will need a welding machine, which will allow you to achieve high strength and durability.
Hitches for Neva walk-behind tractors, their types, what for what
To operate any attachment with the Neva walk-behind tractor, it must be connected to the unit. There is a special device for this - a hitch. It comes in several types, let's look at the features of each of them.
Hitch for the APM adapter (for working with a plow and hillers)
Hitch for the APM adapter (for the Neva, Kaskad, Oka, MB walk-behind tractor) This hitch is designed for connecting various attachments to the adapter. Such as plows, potato diggers and hillers. The design of the hitch allows you to securely fix the equipment to Neva walk-behind tractors using only three bolts.
Universal hitch
This type of hitch allows you to adjust the angle of the attachment using a bolt mechanism. This function allows you to tilt the Neva walk-behind tractor, and the plow will go perpendicular to the ground.
Universal hitch
Since this hitch is mainly intended for the use of plows and hillers, it is possible to install a double or triple hitch so that several working elements can be connected to it at once.
Universal hitch N
Universal hitch N
This is a modification of the universal hitch for the Neva walk-behind tractor. Its main difference is that you can not only adjust the height of the dive, but also change the angle of inclination in all planes. The maximum tilt angle in the horizontal plane is ± 20 °, and in the vertical plane ± 27 °.
MK hitch for working with hiller OH-2 and plow KROT
MK hitch for working with hiller OH-2 and plow KROT
This coupling is special in itself, since it was produced exclusively for coupling with their ON-2 and Krot equipment. The factory thought out a separate type of clutch, which is not supplied in the kit, but must be purchased separately.
Kinds
It is extremely important to choose a suitable hitch for the walk-behind tractor, since a lot depends on its quality.
It happens: It happens:
- single or double;
- with reinforced structure;
- adjustable;
- universal option.
Its difference from the previous one is greater thickness and length. Thanks to the design, the plow or cutter can sink deeper into the ground.
Adjustable allows the user to set the desired shaft angle. As a result, the attachments are installed at the required level, and work efficiency increases accordingly.
The universal hitch is used everywhere, it can be rearranged for different models. Due to this, the user has the opportunity to adjust the angle at which the attachment is installed. The main role is played by the bolt mechanism.
Precisely for the reason that such a hitch is used when hanging hillers and plows, it can be either double or triple, which means it is not prohibited to connect several working elements at the same time.
Most often, a U-shaped unit is used, which can be made either independently or purchased ready-made. There is also a hitch for sale for the APM adapter, which is necessary when working with a hiller or plow.
It is used on walk-behind tractors:
- "Neva";
- "Oka";
- "Centaur 1080D";
- "MTZ";
- "MB";
- "Cascade".
The product is attached to the rear or front adapter, and then additional equipment such as a plow or potato digger is attached. The design of the product is thought out in such a way that reliable fastening can be ensured through the use of three bolts. When the walk-behind tractor tilts during operation, the plow remains perpendicular to the ground.
For example, in the horizontal plane, the maximum permissible angle is +-20 degrees, in the vertical plane it is 7 degrees more. There is also a coupling option for walk-behind tractors on the market - MK, used for the Krot series plow and the ON-2 hiller. It is used exclusively in this version and in no other way, that is, it is not suitable for other attachments.
Installing attachments on a walk-behind tractor using a hitch
Attaching attachments comes down to a simple operation of aligning holes and securing structural elements with pins and bolts. During operation, the position of the hitch can be adjusted using bolts in the radius holes. First of all, the threaded connections of the coupling device with the tow bar of the walk-behind tractor are tightened. Then the canopy is installed.
Final adjustments are made before work. Having loosened the adjusting bolts, find the optimal position of the attachment and tighten the nuts using wrenches. In the process of cultivating the land, sometimes it becomes necessary to make two or more passes across the site with different hitch settings. A do-it-yourself hitch allows you to optimize work in all respects. Time is saved, labor intensity is reduced, and productivity is increased.
A hitch coated with metal paint or an anti-corrosion coating will last significantly longer.
Blueprints
Assembling a hitch for a walk-behind tractor with your own hands involves the use of drawings. There are quite a few different options available, but it is optimal to take the most suitable one as a basis and adjust it taking into account the parameters of your equipment. The drawing should show the following details:
- two U-shaped components, identical in all respects, but with a different number of holes - one has 6, the other has 8;
- a housing that includes two threads with diameters M12 and M16 and is equipped with a connecting structure for fastening with one of the units;
- adjustment component - a lever located on the body of the part; its design consists of a screw connected to a bracket and for convenience having a handle; it is important to ensure the correct direction of the bracket - only up or down and in such a way that it does not interfere with the operation of the walk-behind tractor;
Since the unit in any case provides for a connection to the hitch, details of the connection placement can be studied in its standard instructions.
Drawings of a trailer for a walk-behind tractor
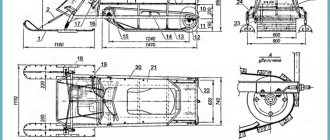
Conventionally, a trailer can be divided into several main components: carrier, frame, body, wheels.
The carrier includes several parts connected by welding. The main load here is borne by the junction of the drawbar with the body of the rotary unit, so this place is reinforced with 4 stiffening ribs.
Carrier
1
- swivel body,
2
- drawbar (pipe 49x3, L1850),
3
- footrest frame (angle 25x25x4),
4
- stop (pipe 58x4),
5
- stiffener rib (s4),
6
- trim (strip 25 ×4).
The frame is made of steel elements: pipes, rectangular and round sections, angles and rods. They are welded together and form a structure (frame), the design features of the frame are determined by the rural area, where when driving the road is replete with uneven spots, potholes, etc.
For the wheel axle, a steel rod with a diameter of 30 mm is used, which is connected by welding, gussets with side members and a longitudinal hinge housing, and corner supports. The length of the rod is 1070 mm, the length is chosen so that the wheels do not protrude beyond the contours of the body.
Trailer frame
1
- brace (angle 21x21x3),
2
- seat frame (angle 21x21x3),
3
- riser (pipe 50x25x4),
4
- seat posts (angle 40x40x4),
5.14
- front struts (pipe 50x25),
6, 15
- longitudinal spars (angle 40x40x4),
7, 8
- right wheel axle supports (angle 32x32x4),
9,16
- rear struts (pipe 50x25),
10
- reinforcing cross member (angle 40x40x4),
11
- longitudinal hinge body ( pipe 58×4),
12
— wheel axle (bar 0 30),
13.17
— transverse spars (angle 40x40x4),
18
— gussets (s4).
Trailer body - choosing material of manufacture
The trailer body is made of boards, 20mm thick, for greater strength, and at the corners it is reinforced with metal plates. The body is attached to the frame using three support frames made of 50*50mm timber and bolts.
This cart is mainly intended for transporting goods in bags, so its sides do not recline.
Also, the trailer body can be made from various available materials, sheet metal with a thickness of at least 1-1.2 mm, corrugated sheets, boards and even plastic. Any material is suitable for the body if it meets your goals and requirements. Here you need to calculate the load, type of cargo transported, etc.
— The most versatile option would be to fabricate the body and sheet metal, and to extend the life of the trailer, the metal should be primed and painted.
— For a wooden body, metal plates are installed on the corners, this gives rigidity and strength to the homemade trailer. Fastening to the frame is carried out with bolts and three support frames.
— When making a body from corrugated sheets, it would not be superfluous to install additional stiffeners.
Axle and wheels for walk-behind tractor trailer
The wheels in this trailer are borrowed from the SZD motorized stroller, the wheels come with assembled hubs, and the axle is machined to fit the landing diameter.
To make a wheel axle, you will need a steel rod 1-1.05 meters long. This length of the rod is determined by the size of our homemade trailer body. Make the corners and gussets into steel supports. Using a welding machine, weld the longitudinal hinge and side members to the steel rod using gussets and angles. The bracket axis and earrings are placed on the side members.
Wheels for a homemade trailer are suitable for any vehicle, as long as they are the right size. So, it’s quite easy to fit wheels from a Zhiguli or a motorized stroller; the latter version already has hubs with the axle diameter we need.
Those who are strong in technology claim that you can use wheels from a garden cart, the radius of which is 16-18 inches, and fits perfectly under the trailer.
The trailer is connected to the walk-behind tractor using a console, the console is made in such a way as to fit the standard hitch of the walk-behind tractor for attachments. The upper part of the console is an axis around which the carrier rotating assembly rotates in two bearings. The bearings are covered with anthers, and the space between them is filled with lubricant. Perhaps the topic “Do-it-yourself trolley for a walk-behind tractor” will be useful.
The carrier is connected to the trailer frame, pivotally, i.e. the drawbar is inserted into the tubular body of the longitudinal hinge, all this is secured with an M8 bolt and a thrust ring. On an uneven road, this allows the wheels of the trailer to be independent of the position of the wheels of the walk-behind tractor.
Do-it-yourself hitch for a walk-behind tractor
The great advantage of a home-made device is that the owner takes into account his needs and manufactures it based on the inputs he needs: the model of the walk-behind tractor, the load, the parameters of the attachment.
But the first thing that needs to be taken into account is that this unit will in any case bear an increased load, so it is important to pay close attention to the size, design and strength level of all parts of this part. Correctly specified parameters of the device will ensure the most reliable aggregation with the walk-behind tractor, the necessary mobility of the unit and the durability of its use.
When deciding on the design, pay attention to the dimensions of the towbar of your walk-behind tractor and the features of the attachments (those you already have and those you plan to purchase). The primary task is to ensure maximum compatibility of the unit with all necessary mounted and towed devices. Ease of use and the possibility of aggregation with equipment having different parameters are also important.
The main working part, as a rule, has a U-shape and serves as a bracket, which is fixed to the walk-behind tractor through the holes in it. The attachment stand is attached to its other side.
Possible trailer options for a walk-behind tractor with photo examples
There are as many homemade trailer designs as there are homemade mechanics. Everything is determined by the purpose, available materials and ready-made parts from old cars. The presence of a trailer frees the driver from worries about maintaining balance, but somewhat worsens the maneuverability of the car. But the trailer is convenient for transporting small loads.
How to make a universal connection?
The universal design of the hitch will adjust the attachment to the walk-behind tractor without play or free movement. This in turn makes working on the walk-behind tractor easier. Making such a hitch with your own hands does not require much time or excessive effort.
Using this device you can attach to the walk-behind tractor:
- plow;
- potato planter;
- mower;
- hiller;
- harrow.
To create a high-quality product for your walk-behind tractor, durable metal is used. You can also use channels, they have a sufficient margin of safety and are manufactured using factory technology. You need to make a few additional holes, the homemade hitch is almost ready.
Double universal hitch for walk-behind tractor
The device can be made of durable cast iron or steel. But such materials require special equipment for processing, so it is better to buy industrial blanks.
If you have special workbenches, you can make a steel blank of the desired shape. A good hitch for a walk-behind tractor trailer can be made from a car cardan. to menu
Tools and materials
The device consists of several complex parts. Before starting work, you need drawings that are suitable for creating a unit. They must be tested and working.
Materials required for assembly:
- bolts and steel studs are the main fastening elements; they create movable and fixed connections;
- adjustment element - a lever that will help change the position of the device;
- metal blanks - channels from which the main part will be welded.
Drawing of the hitch for the walk-behind tractor
To assemble the equipment you will need:
- metal drill for creating holes;
- ruler for measuring;
- metal welding;
- a set of wrenches for tightening screw connections.
How to connect a walk-behind tractor to a trailer?
The device is attached to the walk-behind tractor using pins. They must be made of durable steel. Studs and pins are threaded through the holes. The connection point is located either under the steering wheel or behind the main device. If there are any connection features, they are indicated by the manufacturer of the trailer or walk-behind tractor.
A self-made connection can be useful not only for connecting a plow, trailer and other similar devices, but it is also used for rural equipment or mini-tractors.
Before you start work, you need to check the reliability of the unit, turn all the nuts and screws.
If it is necessary to change the position of the movable joint, to do this, turn the screw handle in the required direction.
After agricultural work is completed, the threaded connections need to be cleaned and lubricated to prevent corrosion and breakage. to menu
Practical recommendations
If the power of the equipment does not exceed 5 hp. s., the optimal dimensions of the trailer in length and width will be 1.5 and 1 m. When the parameters of the body are calculated, pieces of the corrugated pipe are cut to the required length and a frame is welded from them. The design is quite rigid, so there is no need to install reinforcing elements in the corners. In order for the seam to be smooth and of high quality along its entire length, you should work on a flat surface, preferably using electric arc welding.
Body assembly and painting
The sides of the trailer are framed with a 25-30 mm profile. Sheathing is assembled from sheet metal, which is then attached to the corrugated pipe with threaded connections. The metal for the body must be free of rust. If there is corrosion, it is removed mechanically, and then the surface is coated with a priming rust converter. The body is fitted to the frame. If all dimensions match, perform a test assembly. Then they disassemble, set the body aside, and cover the frame with oil paint. It is necessary that there are no unpainted elements left anywhere.
The body flooring is also coated with paint, after which it is installed in its place. Fix the joints with fasteners, then paint the protruding parts of the bolts so that corrosion does not appear in these places. If the dried paint has come off in some places during installation, these areas are touched up. A drawbar is made from the thickest pipe.
Steering gear
Since the design provides for a tilting trolley, special axles are made from the bottom in the middle. To prevent the folding mechanism from jamming when lifting, it is necessary to maintain alignment. Reinforcement bushings are attached using a plate 5-6 mm thick. The same parts are welded to the coupling device (drawbar), which serves as the base frame.
Assembling a hinge joint with your own hands requires increased precision. The basis is a stainless steel circle with a diameter of 5 cm. The studs are also machined from steel, only hardened. Since the intensity of movement of the hinge will be low, you can do without bearings, the main thing is to regularly lubricate the mechanism.
When everything is ready, perform a test loading and check if there are any problems during movement, during turns, when starting, stopping, etc. If the equipment with a trailer works normally in all modes, the structure is ready for operation. If the power of the walk-behind tractor allows, the cart can be loaded with 300 to 700 kg.
A homemade trailer costs several times less than a factory one, and it will serve for decades. The main thing is to use high-quality materials, observe dimensions and carefully assemble.
Originally posted 2018-07-04 07:44:28.