Every motorist expects an ideal response to his actions from his car while driving: pressing the gas should accelerate the car, turning the steering wheel should change its direction, and pressing the clutch pedal should disconnect the gearbox from the engine to change gears.
Any malfunction that slows down this reaction, or even blocks it, not only leads to discomfort, but also increases the likelihood of an accident. To eliminate unpleasant consequences, many mechanisms are equipped with adjustment.
Let's look at common issues related to clutch adjustment.
Clutch diagnostics VAZ 2109
How to squeeze the clutch and how it works, exercises
Diagnostics should be carried out on all cars without exception. Regular implementation of this procedure allows you to minimize the likelihood of breakdowns of all kinds. It makes it possible to detect failures and problems at an early stage.
Thanks to this, repair work is carried out with minimal time and financial costs. Certain diagnostic procedures require special equipment. It can be found at any car service center.
It is not recommended to buy them yourself due to the fairly high price of these devices. Below are operations that you can perform independently without special technical devices.
Diagnostics of the VAZ-2109 clutch is carried out in several stages:
Turn off the engine, depress the clutch pedal several times, during this process, listen carefully to see if any extraneous sounds appear during these operations: clicks, friction, squeaks, etc.
d. You also need to pay attention to the pedal travel. It should not be accompanied by any jerks or interruptions
The lowering and raising of the lever should be smooth. If the pedal jerks or sticks, you need to check the clutch adjustment
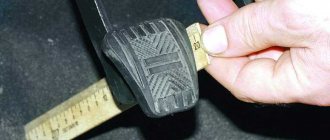
Using a ruler, check the distance from the car floor to the outside of the pedal. The exact required value is indicated in the technical documentation of the VAZ-2114. Press the pedal all the way, then release it and measure the distance; if it does not correspond to the stated distance, it is necessary to adjust the pedal.
Clutch replacement
Replacing a clutch in a car falls into the category of rather complex repairs, so if a person is a novice motorist and has never done such things before, getting to work without a qualified assistant is a very risky business.
But in any case, when changing the clutch on a car for the first time, the owner gains the necessary experience, and in the future this work will no longer be particularly difficult. Just keep in mind that replacing the clutch will take time, and even with the right approach, this work can take half a working day.
What obvious preconditions lead to replacing the clutch? First of all, this is its slipping, especially when the car is loaded. It is prohibited to perform maneuvers, in particular overtaking, with a faulty clutch, since the control in this case may fail at any time.
To carry out this repair, you will definitely need an overpass or a special lift. To get to the clutch itself, some components of the car will have to be dismantled, such as the driveshaft, starter and gearbox, the removal of which will require the help of a partner. To remove the box you will need a special tool.
Inside, before removing the box, you will need to disconnect the gear shift lever. When the box is dismantled, check the condition of its seals. If they leak, they will also need to be replaced.
Now you need to remove the clutch itself. Having dismantled the latter, subject it to a careful inspection. First of all, the driven disk wears out and needs to be replaced, but you should also pay attention to the release disk and the release bearing. Based on their technical condition, it may be advisable to change the entire clutch, that is, as an assembly. But this decision will depend entirely on the condition of the clutch discs.
Now you need to install a new clutch. The installation itself will take a little time, but you will have to spend at least another 2-3 hours to reassemble all the dismantled components of the car. As a result, the most difficult stage of assembly is installing the gearbox in its original place. It is at this stage that the driver will need the help of a partner, because it is almost impossible to cope with this procedure alone.
Clutch adjustment steps
How to adjust the clutch on a VAZ 2107-2101 with your own hands
Most often, modern cars have two types of clutches:
- with a mechanical drive
- the clutch fork is connected to the pedal in the cabin using a cable; - with a hydraulic type drive
- the gas pedal is connected to the clutch slave cylinder by a pipeline filled with working fluid.
The adjustment procedure depends on the type of unit.
Adjusting the mechanical clutch
First, let’s find out whether the pedal stroke decreases or increases. We press the pedal all the way and measure how far from the floor it stops. Let's release the pedal and take measurements again. From the second indicator we subtract the first. For most models, the normal stroke amplitude is in the range of 12 - 14 cm, this can be clarified in technical documents. If the number is less, the pedal stroke needs to be increased, if it is more, it should be decreased.
After the measurements, we move on to the adjustment procedure itself:
Stage 1
– open the hood, find a rod near the transmission lever that secures the cable coming from the clutch pedal.
Stage 2
– lubricate and loosen the nuts that secure the rod with liquid lubricant.
Stage 3
– using wrenches, turn the nut that was closer to the pedal. If you turn the nut towards the clutch pedal, the free play of the pedal will become greater, if in the opposite direction - less.
Stage 4
– again measure the amplitude of the pedal stroke. If it is within the normal range, tighten the second nut – the control one – until it stops. This is necessary to record the adjustments made. If the stroke is still too large or small, tighten the nut that is closer to the pedal.
Checking the clutch operation. The pedal should be pressed easily, without noise or friction. When starting, the car should not slip or move jerkily. Speeds should change smoothly and accurately.
Adjusting the hydraulic clutch
Hydraulically operated clutches are mostly self-adjusting. But you can also adjust them manually if the pusher on the working cylinder has a thread and a control nut. Here's how to do it:
Stage 1
– check the level of working fluid in the clutch. It should be at a normal level.
Stage 2
– we create conditions for working under the machine. You can place the car on a ramp or risers, use a lift or inspection pit.
Stage 3
– we look for the pusher of the working cylinder.
Stage 4
– unhook the spring from the fork with pliers. Push the fork forward as far as possible and measure the distance between it and the pusher rod. We release the fork and take the same measurements. We get the size of the clutch gap, which we check with the standard one. If it does not fit into the range specified in the technical documentation (usually about 5 mm), we make an adjustment.
Stage 5
– remove the spring installed on the bracket of the working cylinder and fork.
Stage 6
– loosen the fixing nut on the threaded connection of the pusher, turn the adjusting nut in the direction of the working cylinder to increase the size of the gap. Or in the opposite direction - to reduce them.
Stage 7
– tighten the control nut when the gap dimensions become normal.
At the end, we carry out a control check of the clutch operation.
The hydraulic clutch, like the mechanical clutch, can be adjusted manually
How does the ZIL-130 clutch work and how is it adjusted?
The clutch of the ZIL 130 truck must be periodically adjusted, and simple rules must be followed during operation. Then it will serve for a long time and will not bring bad surprises.
Before looking specifically at the Zil 130 clutch, I would like to say a few words about the car itself. Zil 130 is a legendary Soviet truck, simple and unpretentious.
The first series of cars was produced back in 1962, but even today you can meet these efficient workers on the streets of cities and villages. They are not afraid of bad roads and low-quality fuel. In addition, on the highway they can reach speeds of up to 100 kilometers per hour. Among the disadvantages of the model, it is perhaps worth noting the high fuel consumption, which can reach 30 liters per hundred kilometers.
Clutch ZIL 130
With proper care and timely maintenance, the Zil 130 can operate without problems for decades. There are living examples of this. However, it is advisable for any owner of this truck to have a good understanding of its structure in order to be able to carry out some necessary operations on their own. For example, you need to know how to adjust the ZIL 130 clutch. First, let's look at how it works.
Car clutch, device
This device is located in a housing that is installed between the gearbox and the power plant. It includes the drive shaft from the gearbox side, and the flywheel from the engine side. In addition, the flywheel includes a drive shaft limiter to maintain alignment between the gearbox drive shaft and the crankshaft.
The main element of the clutch is the basket in which the drive disc is located. This disk is spring-loaded, but has the ability to move longitudinally thanks to these springs, as well as levers. In passenger cars, a diaphragm spring is connected to levers.
The basket is rigidly attached to the flywheel using a bolted connection. A driven disk is placed between them. The gearbox shaft acts as an axis for this disk, and they are connected using splines along which the disk moves.
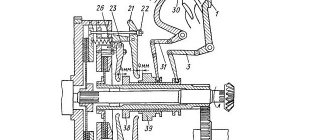
The procedure for installing and dismantling the coupling
To repair the clutch mechanism, it is necessary to roll out the tractor, that is, disconnect the clutch housing from the diesel plate. Then three technological bolts (M12X40) are screwed into the holes of the pressure plate through the holes in the support disk of the basket. Then the bolts securing the basket to the diesel flywheel are unscrewed and the clutch basket assembly is dismantled.
To maintain balance when disassembling the mechanism, it is first necessary to mark with marks the relative position of all clutch disks relative to each other, including the diesel flywheel. Subsequently, the assembly of the mechanism is carried out in accordance with the marks of the original location of the parts.
The coupling is installed on a diesel engine using an auxiliary device made in the form of a splined mandrel simulating the power shaft. This false shaft ensures the alignment of all disks in the basket package relative to the axis of rotation of the diesel flywheel.
Dimensions of the mounting spline mandrel for installing the MTZ 1221 clutch
The coupling is installed in the following order:
- The mounting mandrel is installed in the diesel flywheel bearing.
- Install the first driven friction disk on the splines of the mandrel with the elongated side of its hub facing the flywheel.
- Install the middle disk into the grooves of the flywheel.
- The second driven disk is installed on the mandrel with the short side of the hub facing the flywheel (that is, both driven friction disks are installed with the short parts of their hubs facing each other).
- Then install the release disk assembly with the thrust disk on the flywheel pins and tighten with nuts.
- Having completed the assembly, unscrew the three technological installation bolts and proceed to adjusting the position of the clutch tabs.
Preparing for work
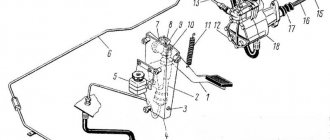
Initially, it is recommended to find a place where it is most convenient to inspect the car and replace the part. Since you will have to work not only under the hood, but also under the car, the best assistants will be a lift, pit or overpass. If you do not have the opportunity to use one of these options, you can simply raise the car using jacks.
Also, before starting work, you need to make sure that you have everything you need at hand. To replace the cable you will need:
- new part;
- set of wrenches;
- screwdrivers.
On average, you can replace this element on a VAZ-2109 yourself in 20 minutes.
When the trip actuator needs checking
The free play of the clutch pedal must be checked and adjusted every 20 thousand km. This also needs to be done if the car starts to move at the very beginning or at the end of releasing the pedal. A correctly adjusted clutch release drive causes the car to start moving when the pedal is released approximately halfway.
This is interesting: What to do and how to open the lock in the car if the driver's door is jammed
Adjustment of the drive with hydraulics and with a cable is slightly different. To adjust the hydraulic drive, as a rule, you need a pit or overpass. Cable adjustment is usually done in the engine compartment from above, simply by opening the hood.
Adjusting the hydraulic drive
To adjust the hydraulic clutch pedal, you first need to make sure that there is no air in the system. In the absence of air inside the system, the pedal should not be soft when pressed, and after releasing it should return to its original position on its own.
If the tests have convinced you that the hydraulic drive is working properly, check the free play of the clutch release fork. For many models, this parameter should be in the range from 4 to 5 mm. What it should be for your car, check with its manufacturer. After this, check the pedal travel without load; for many models it should be within 25–30 mm. If the free play of the clutch release fork is normal, and the idle value of the pedal does not fall within the recommended limits, look for a malfunction in the clutch master cylinder piston pusher or in the clutch release fork.
If the drive adjustment is incorrect
- Too little free play of the clutch, as well as its complete absence, leads to the fact that the release bearing is almost constantly in contact with the petals of the diaphragm spring of the basket. Therefore, it rotates even when the clutch is engaged and wears out much faster than in a normal situation.
- Too much free play of the clutch leads to insufficient squeezing when disengaging the clutch and, as a result, the disengagement is incomplete, that is, the friction linings touch the driven disk of the flywheel and the pressure plate of the basket. This causes the flywheel and pressure plate to wear out much faster than usual. This means that too much movement without load, as well as too little, will bring the repair of this system of your car closer. In addition, incomplete disengagement of the clutch makes it difficult to change gears (especially reverse) and contributes to rapid wear of the gearbox synchronizers, as well as reverse gears.
Which side to install the clutch disc ZIL 130 - Avtomaster
hello bull breeders, this is a question: the clutch is constantly depressed, the PGU rod is removed (disconnected), the fork is retracted all the way, the clutch is retracted all the way, the new sensation is that the flywheel has moved towards the gearbox and why the bearing is also retracted all the way
Bychok (Vanaspati) read the clutch adjustment more carefully. if the adjusting bolt is missing, then remove the rotary lever from the splines and set it one tooth further. This kind of garbage can also be due to warping of the driven disk and breakage of the basket springs. the second is possible only on a lever basket.
Bychok (Vanaspati) I have a feeling that I didn’t understand correctly at first... if your flywheel has unscrewed and moved away, then there should be a very large runout.
Veniamin (Admiral) please help me with the problem. The clutch gets in, I bleed it, then it lasts for 200 kilometers and again it’s gone, and the barrel doesn’t go down and there’s no leak, what’s the matter?
Pasha (Martyn) misses!
Petr (Elgan) Goby, please tell me what the problem is with my goby. I turn on the clutch, turn on the gear, release the clutch, the car stands still! the air shows 6. then he eats after driving a little and gets up again. and what is pgu?
Bychok (Vanaspati) Petr, pgu - pneumatic-hydraulic clutch booster. principle of operation: you press the pedal (this is called DISENGING the clutch - spell it correctly), the rod presses on the piston of the clutch master cylinder, the fluid presses on the piston of the hydraulic part of the clutch and presses to open the air.
the air presses on the membrane, which presses on the rod, which presses on the piston of the hydraulic part of the pgu. in this way, air will be supplied until there is enough of it to push the piston of the hydraulic part of the pg a little further than you pushed it with your foot movement. All this may not be clear the first time.
Do-it-yourself clutch adjustment on a VAZ 2109
The essence of the work is to set the required pedal pressure and measure the cable tension. Figuratively it looks like this:
- pedal height measurement;
- cable tightening;
- examination.
You can also watch a detailed report on the procedure in the video:
Clutch cable adjustment
Clutch cable calibration is performed as follows.
- The necessary tools are prepared: 2 keys No. 17, a ruler or tape measure, WD-40 or an equivalent.
- The car is driven onto a flat section of the road and the parking brake is put on.
- For safety, you can disconnect the battery terminals.
- On the left as the car moves, you need to find the cable itself - the part is attached to the gearbox housing with a special bracket.
- After this, the adjustment unit itself is located (the place of fastening to the gearbox). There is a rubber casing and two nuts that are tightened on the sides of the bar.
- Threads are filled with high-pressure fluid for better unscrewing.
- Next, simultaneously loosen the nuts using two No. 17 wrenches.
- Side No. 1 rotates clockwise to loosen the cable (the pedal falls down), to tighten it, you need to turn it in the opposite direction - the lever rises.
- When the required pretension of the structure is established, all nuts are tightened until they stop.
- Then you need to get into the car, squeeze the clutch all the way 5-6 times and check that the settings are correct, and adjust more if necessary.
Adjusting the clutch pedal free play
The position and free play of the clutch lever on the VAZ 2109 is set in this way.
- A tool is prepared - a ruler or tape measure, two keys No. 17.
- Inside the car, you need to attach a measuring tape to the side of the pedal.
- When not pressed, the height from the floor is about 180-190 mm - this is normal.
Next, you need to press the lever all the way and remember at which mark the lower part of the pad stops. For example, 50-60 mm.
The factory has established that the clutch pedal stroke length should be 125-135 millimeters. This means that to calculate, we subtract the smaller number from the larger number and get the actual living. For example: 190-50=140 – this is acceptable (no more than 160mm is allowed). If the value differs from the standard by 15%, the cable tension needs to be adjusted.
After manipulating the tensioner, it is necessary to check the correct engagement of gears and the timing of the release bearing. If all standards are met, no additional calibration is required. It happens that the adjustment does not bring the desired effect, in this case it is necessary to contact a qualified technician - perhaps the problem is hidden inside the clutch unit itself.
What is regulated
The procedure for recycling cars at the legislative level is regulated by the following regulations:
- Federal Law No. 7 of January 10, 2002 - introduces requirements for environmental protection when operating vehicles.
- Federal Law No. 89 of June 24, 1998 - provides legal regulation of recycling and waste management.
- Government Decree No. 938 of 08/12/1994 establishes the requirement to deregister a car with the State Traffic Safety Inspectorate for disposal.
- Order of the Ministry of Industry and Trade of Russia No. 8 dated January 14, 2010 - establishes the procedure for obtaining a discount on the purchase of a new car when participating in the state free recycling program.
The main signs by which you can understand that it is time to adjust the clutch
The approximate mileage interval at which it is recommended to check and adjust the clutch operation is 10,000 kilometers. It is worth checking the car maintenance schedule established by the manufacturer - other numbers may be indicated here.
Clutch adjustment is required after replacing/repairing the clutch or its elements, for example, the drive cable. The procedure is required even if there is a suspicion of deviation of the pedal amplitude from normal values:
- the car starts moving jerkily;
- the clutch pedal sinks or moves with difficulty;
- the fluid level in the hydraulic drive decreases;
- When changing gears you notice shock, noise and vibration.
A simple test will help you determine if the clutch needs adjustment. We start the engine, smoothly release the clutch pedal and slowly move away. If the car remains in place when the clutch is fully released, then the pedal travel has increased. If the car starts moving before you even take your foot off the pedal, its travel is too slow.
Types of clutch drives
Clutch operating principle:
- Pressure is applied to the fork through the drive system.
- The fork, in turn, moves the release bearing and its clutch to the release springs of the pressure plate.
- Unhook the springs (basket legs) from the support bearing, disconnect it from the flywheel with the pedal pressed.
- Once the clutch pedal is released (whether the gear has been shifted or not), the bearing no longer puts pressure on the springs and the basket returns to rigid engagement with the crankshaft flywheel.
Adjustment Guide
The mechanical principle of the clutch is driven by a cable. By adjusting the cable, the pedal stroke length is adjusted. So:
- We find the corresponding cable under the hood, at its end we see a bolt with lock nut 1. Turn the adjusting nut 2 and set the free travel distance of the pedal to 13 cm. To increase the length of the idle stroke of the pedal, the nut must be tightened, and, accordingly, to reduce the length of the idle stroke of the pedal - unscrew.
- After adjusting the pedal distance, you need to press and release the pedal three times. Then, again measure the distance from the floor to the pedal. If the distance has changed, we adjust it again so that the distance is 12-13 centimes.
Setting the hydraulic clutch drive
The main problem in hydraulic systems is the formation of an air lock. The method for adjusting the clutch hydraulic drive is to set the required clearances between the rod and the piston of the master cylinder. The required distance between the friction ring of the pressure plate and the release bearing is also set.
- Remove the spring from the master cylinder bracket and fork.
- Measure the gap between the pusher and the release fork. The normal distance is 5 mm.
- Turn the adjusting nut on the rod and set the gap to 5 mm. 5 mm is the gap, that is, it is the free play of the fork.
There are drives of a different principle of operation, but in cars either hydraulic or mechanical clutch drives are installed. On VAZ 2101, 2102, 2103, 2104, 2105, 2106, 2107 cars there is a hydraulic clutch drive. On VAZ 2108, 2109, 21099, 2110, 2111, 2112, 2113, 2114, 2115 cars there is a mechanical drive.
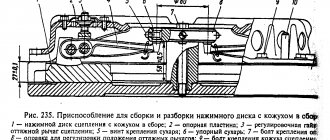
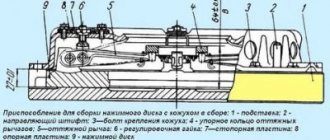
Assembly and installation of the ZIL-5301 clutch
Assembling the pressure plate should be done in the reverse order of disassembly, on an auxiliary flywheel used as a device, placing a steel disk with a diameter of 300 mm and a thickness of 9.8 mm under the clutch pressure plate to adjust the position of the levers
Place the flywheel on a bench, place a steel disc on it and install the clutch pressure plate on it (see Fig. 1).
Assemble the needle bearings by inserting a technological ball made of soft oil-resistant rubber with a diameter of 8.8...9.5 mm into the lever hole, then insert nineteen needle rollers lubricated with Litol-24 grease between the rubber ball and the wall of the lever hole.
In a similar way, insert nineteen needle rollers into the second hole of the lever.
Align the hole in the support fork with the hole in the lever; in this case, the spherical protrusion of the inner end of the lever should be directed in the same direction as the threaded rod at the fork.
Insert a short finger into the aligned holes, pushing out the rubber ball.
Pin the finger.
Following the markings made during disassembly, install the lever in the groove between the pressure plate lugs, aligning the holes in the lever and the lugs.
Insert a long finger (see Fig. 2, a) into the aligned holes, pushing out the rubber ball.
Pin the finger.
In the absence of rubber balls, the assembly of needle rollers can be carried out by applying a layer of lubricant to the surface of the holes, to which the rollers seem to be glued. Moreover, needle rollers must be placed in the second hole after assembling the lever with the fork (see Fig. 2, b).
Install the remaining levers in the same way. In this case, the heads of the fingers should take a position in the direction of rotation.
Place heat-insulating washers on the protrusions of the pressure disk (Fig. → 3, a), and put pressure springs on the washers (see Fig. 1, e).
Having aligned the marks on the casing and the disk made during disassembly to maintain balance, install the clutch casing on the springs (see Fig. 1,e), directing them to the protrusions on the inner surface of the casing; in this case, the threaded ends of the support forks must fit into the holes of the casing.
To prevent the threaded rods of the lever forks from jumping out of the casing holes, it is advisable to put extensions on them in the form of thin-walled tubes
Align the holes on the casing support legs with the threaded holes of the auxiliary flywheel, install extended centering bolts and tighten the casing legs to the flywheel, tightening all the bolts gradually and sequentially.
Install the bushings into the shaped holes of the paired tangential spring plates, screw in the bolts securing these plates, tighten the bolts (the tightening torque should be 10...15 Nm), then lock them by bending the thin shoulder of the bushing onto the edge of the bolt head.
Screw the adjusting nuts onto the threaded rods of the forks until the end of the nut coincides with the end of the threaded rod of the fork.
Install the support clamping plates and locking plates on the adjusting nuts, screw in the bolts securing these plates and pre-tighten them until the ends of the support plates touch the casing.
Adjusting the clutch release levers
Without removing the assembled clutch pressure plate from the auxiliary flywheel, which is used as a device, it is necessary to adjust the position of the ends of the levers relative to the working surface of the pressure plate.
Clutch adjustment VAZ 2109
Clutch adjustment VAZ 2109
While operating the car, you may notice that the clutch pedal changes its position over time and the stroke increases. This indicates wear on the friction linings of the clutch disc, but this does not mean that it needs to be replaced. It is enough just to make the correct adjustment, and the clutch will operate normally for some time until the linings are completely worn out.
- We will get acquainted with the design of the clutch drive mechanism later, but now we will consider the adjustment process. It is not complicated and will take a few minutes of time. To adjust, we need a set of keys, more precisely, two 17 keys and a ruler.
- We measure the working stroke of the clutch pedal. To do this, measure the distance from the center of the pedal working platform to the floor, then press the pedal with your hand all the way and measure this distance as well. As a result, we should get a clutch pedal travel of no more than 135 mm. This is the factory norm, and in this case, if the clutch operates normally, no adjustment is required. If the working stroke differs from the norm more or less, then you need to make a simple adjustment.
- Open the hood and find the bracket to which the clutch cable housing is attached. The bracket is fixed to the gearbox and has a groove in which the cable casing is secured.
- Unscrew the locknut. It is located towards the end of the cable.
- By rotating the adjusting nut located inside the bracket, we achieve the required length of the cable casing.
- We actively press the pedal several times and re-check the working stroke of the clutch pedal.
- Having achieved the desired value of the working stroke, tighten the locknut, fixing the casing in the new position.
When to adjust the clutch on a VAZ 2109
The need to adjust the clutch does not arise instantly, but gradually. But if you miss the moment, the consequences can be disappointing
A few signs that it's time to pay attention to the clutch drive:
- the clutch is driving - a clutch that is not completely disengaged results in torque from the engine being constantly transmitted to the gearbox, which can result in difficulty engaging first gear when starting off, as well as when changing gears while driving. The gearbox input shaft will rotate all the time, preventing the gears from engaging. In this case, you can hear the characteristic grinding of gearbox gears, and this is not difficult to understand by the difficulty of shifting gears. In this case, the pedal does not completely disengage the clutch, therefore, the length of the cable casing must be reduced.
- the clutch slips - when the clutch pedal is fully released, the engine cannot transmit all the torque to the gearbox. This happens because the clutch disc is not pressed tightly enough to the engine flywheel and slips. At the same time, it overheats, emitting a characteristic odor that cannot be confused with anything else. To eliminate clutch slipping, lengthen the cable housing.
Malfunctions of the VAZ 2109 clutch drive
Despite the fact that the clutch drive of front-wheel drive VAZ models is designed as simply as possible, there are some parts that can cause the clutch to not operate correctly.
First of all, this is the drive cable itself. The factory cable can last quite a long time, but it also does not last forever. Moreover, the cable always breaks at moments when we do not expect it. Therefore, experienced owners of nines must carry a spare drive cable with them. A broken cable, as a rule, cannot be repaired, and this is not so necessary. There are many drive cables on sale, but not all of them are of decent quality.
The main thing you should pay attention to when buying a new cable is the careful workmanship in the places where the cable is attached
Maintenance of the VAZ 2109 clutch drive
Only the cable needs maintenance. When replacing it, it is worth lubricating the cable itself, then placing a certain amount of grease under the bellows cap. This lubricant will be enough to ensure that the cable in the housing moves effortlessly and smoothly.
By performing these few simple operations, you will get rid of problems with gear shifting, and you will also be able to adjust the position of the clutch pedal as convenient as possible for driving. Take care of your grip and have smooth roads!
What happens if you don't adjust the clutch?
Adjusting the clutch is a futile exercise for some drivers. They do not notice that the transmission response has decreased, so they are in no hurry to carry out the procedure. What happens if you ignore any clutch related problems?
First, the friction disc will begin to slip. The box will receive torque “with losses”. A correctly adjusted cable will not save the situation, since the car’s dynamics will still disappear due to a decrease in the disc hooks. The car will not be able to accelerate normally. As a result of ignoring the problem, it will be necessary not only to replace the worn part, but also other expensive elements.
There will be a lack of engagement between the discs. A strange sound will appear when changing speeds. In this situation, you need to adjust the pedal free play.
Problems with the clutch lead to late or early engagement. Late represents a situation when the mechanism is triggered when the pedal is released. Early hooking indicates triggering in the down position. Lack of tuning causes the car to move away abruptly. This leads to wear on the gearbox, engine and basket elements. As a result of this, accidents occur.
You can adjust the clutch yourself. But before the procedure, you should make sure that the problem is related to a settings failure and not to a mechanism malfunction. It is best to turn to the experts. If you decide to repair and adjust the clutch yourself, you will need tools. The driver should stock up on a tape measure, lubricant, and keys 13-17.
Clutch adjustment steps
Most often, modern cars have two types of clutches:
- with a mechanical drive
- the clutch fork is connected to the pedal in the cabin using a cable; - with a hydraulic type drive
- the gas pedal is connected to the clutch slave cylinder by a pipeline filled with working fluid.
The adjustment procedure depends on the type of unit.
Adjusting the mechanical clutch
First, let’s find out whether the pedal stroke decreases or increases. We press the pedal all the way and measure how far from the floor it stops. Let's release the pedal and take measurements again. From the second indicator we subtract the first. For most models, the normal stroke amplitude is in the range of 12 - 14 cm, this can be clarified in technical documents. If the number is less, the pedal stroke needs to be increased, if it is more, it should be decreased.
After the measurements, we move on to the adjustment procedure itself:
Stage 1
– open the hood, find a rod near the transmission lever that secures the cable coming from the clutch pedal.
Stage 2
– lubricate and loosen the nuts that secure the rod with liquid lubricant.
Stage 3
– using wrenches, turn the nut that was closer to the pedal. If you turn the nut towards the clutch pedal, the free play of the pedal will become greater, if in the opposite direction - less.
Stage 4
– again measure the amplitude of the pedal stroke. If it is within the normal range, tighten the second nut – the control one – until it stops. This is necessary to record the adjustments made. If the stroke is still too large or small, tighten the nut that is closer to the pedal.
Checking the clutch operation. The pedal should be pressed easily, without noise or friction. When starting, the car should not slip or move jerkily. Speeds should change smoothly and accurately.
Adjusting the hydraulic clutch
Hydraulically operated clutches are mostly self-adjusting. But you can also adjust them manually if the pusher on the working cylinder has a thread and a control nut. Here's how to do it:
Stage 1
– check the level of working fluid in the clutch. It should be at a normal level.
Stage 2
– we create conditions for working under the machine. You can place the car on a ramp or risers, use a lift or inspection pit.
Stage 3
– we look for the pusher of the working cylinder.
Stage 4
– unhook the spring from the fork with pliers. Push the fork forward as far as possible and measure the distance between it and the pusher rod. We release the fork and take the same measurements. We get the size of the clutch gap, which we check with the standard one. If it does not fit into the range specified in the technical documentation (usually about 5 mm), we make an adjustment.
Stage 5
– remove the spring installed on the bracket of the working cylinder and fork.
Stage 6
– loosen the fixing nut on the threaded connection of the pusher, turn the adjusting nut in the direction of the working cylinder to increase the size of the gap. Or in the opposite direction - to reduce them.
Stage 7
– tighten the control nut when the gap dimensions become normal.
At the end, we carry out a control check of the clutch operation.
The hydraulic clutch, like the mechanical clutch, can be adjusted manually
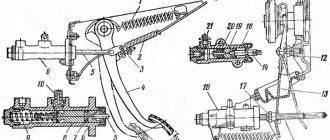
Clutch mechanism design
First, let’s briefly talk about how the mechanism works. How it works is discussed in a separate review . In the classic version, the clutch has one disc on which a friction lining is attached. He is called a follower. The leading role is played by the flywheel - a disk with a crown at the end, fastened with bolts to the flange of the spindle.
In a quiet position, both discs are pressed tightly against each other. When the engine is running, the friction disc rotates with the flywheel because it is pressed by the pressure plate. The drive shaft of the transmission is installed into the drive disk using a splined connection. This element receives torque from the power unit.
To change gear without having to turn off the engine, the driver presses the clutch pedal. The cable attached to it moves the lever to which the fork and release bearing are connected. The force is applied to the pressure plate. It disconnects the friction disc from the flywheel. Thanks to this, torque does not come from the engine, and the driver can easily change gear.
A conventional manual transmission (manual transmission) operates on this principle. As for automatic transmissions, there are several varieties. In them, torque transmission is provided by slightly different or fundamentally different mechanisms. More details about the types of such transmissions are described here .
Many manual transmissions have a power clutch pedal. It works on the same principle as its mechanical counterpart, only the force is increased thanks to hydraulics. In this case, there are two cylinders at the ends of the line. The main one perceives the effort from the pedal. When the pedal is depressed, increased force is transmitted to the working cylinder, which is connected to the clutch fork lever.
Here's a short overview of how the mechanism works:
How does the clutch work?
When is clutch pedal adjustment needed and how is it done?
During operation, as well as after repair work (for example, replacing a cable or cylinder, depending on the type of clutch), the pedal stroke, and therefore the operation of the clutch, may change. Moreover, if there is too much free play, the clutch may not disengage completely. That is, the disk will come into contact with the engine flywheel in any case.
The driver does not have to wait until the incorrect pedal stroke becomes noticeable. It is possible and necessary to carry out preventive maintenance, as well as, if necessary, adjust the free play of the clutch. To do this, you will need a ruler, with which you can determine the amplitude of the total pedal stroke.
The procedure is simple: you need to fully depress the pedal by hand and measure the distance from the floor to the pedal. After this, carry out the same measurement when the pedal is in its highest position. The difference between these two numbers is the stroke amplitude. For most cars (the classic version, so to speak), it is 16 cm. However, it is better to check the instruction manual in each specific case.
Free play is checked a little differently. To do this, you will have to measure the gap between the fork and the pusher (clutch elements). When the fork is pulled out, it should be 4-5 mm.
Adjustment of the overall pedal travel is also necessary. Before adjusting the clutch pedal, for convenience, it is better to install the car on an overpass, lift or inspection hole. The tools you will need are wrenches of different sizes (depending on the make of the car).
If the clutch is hydraulic, then the full pedal travel is adjusted inside the car with a stop screw. The free play is also adjustable from the cabin, but you will have to first determine its value. This can be done by pressing the pedal with your hand and noticing the moment when pressure resistance appears.
The amount of free play should not exceed, as a rule, 15 mm. Adjustment is made by rotating the master cylinder pusher rod
After all adjustments, it is important to tighten the locknuts well
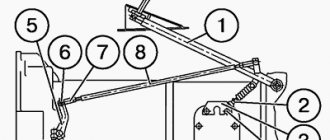
Adjusting the clutch basket feet
The housing with parts that makes up the clutch basket is one of the most important elements of the entire mechanism, which directly connects and separates the disc and the flywheel. Thus, the basket is responsible for turning the mechanism on and off and is a mandatory component of its design. If a malfunction occurs in this unit, the entire system may fail.
The paws in the basket sometimes begin to twitch. In this case, it is possible to adjust them. Let's look at the adjustment using the GAZ-53 model as an example. In general, there are 2 ways to adjust the claw clutch on a work vehicle. Let's look at the first method, which is documented:
- The car is driven into a pit.
- The clutch housing pan is dismantled.
- To access the paws, the fork is removed.
- A piece of wire slightly longer than a match is prepared for use as a measuring instrument.
- By rotating the flywheel, the most loose leg is found, and its height from the surface of the flywheel is measured using a piece of wire.
- The two remaining levers are being adjusted. They are installed at the same height as the very first one. To do this, the nuts located outside next to the legs are turned in the required direction.
- After adjusting all the levers in height, the operation of the mechanism is checked. If the on-the-go check shows normal adjustment, the locknuts on the basket are finally tightened.
- The final step is to put the oil pan in place.
This standard method does not always allow you to fully adjust the clutch due to wear of the needle bearings that connect the paws. In this case, the second, more effective method, often used in car services, can help. In general, the sequence of actions is approximately the same, but the essence of the work here is somewhat different. An assistant will be needed here.
So, the algorithm is as follows:
- A set of automotive probes for adjusting the valves is selected in advance.
- The oil pan is removed.
- Approximately 1.5 mm is obtained from several probes.
- An assistant sits behind the wheel and holds the clutch pedal depressed. At this time, probes are placed under each lever of the basket between the flywheel and the disk. They need to be inserted tightly, with the same force.
- When the gaps are set using feeler gauges, the operation of the mechanism is checked while running.
- If everything is in order, the adjusting nuts are locked and the oil pan is put in place.
If the paws are not too worn, this method will help you adjust the clutch correctly the first time. Naturally, the disk should not be deformed.
How to adjust the free play of a car's clutch pedal?
Clutch actuator adjustment can be done in a variety of ways depending on the specific actuator type.
1. Clutch cable adjustment
The cable drive is adjusted if there is a mechanical clutch. To do this, you need to find the adjusting bolt located under the hood. First of all, unscrew the lock nut to gain access to the adjusting nut.
To check the work done, the stroke amplitude is measured again, but before this you need to press the clutch pedal three times. The adjustment procedure is as follows:
- The tools determine the distance between the end of the damper and the shutdown fork - the value should not exceed 8.6 cm, the maximum deviation in one direction or the other is 5 mm.
- The distance between the tip of the cable and the end of the damper is determined. The result should be around 6 cm with the same maximum deviation of 5 mm.
- If the measured distance exceeds the norm, the cable must be adjusted. To do this, use an adjusting nut, turning which reaches the permissible value.
- The clutch pedal is then depressed several times, after which the distances are re-measured. If necessary, the adjustment is repeated. If everything is in order, the locknut is tightened.
Sometimes the cable is completely faulty and has to be replaced. But there shouldn’t be any difficulties with this even in a garage. You need minimal tools in the form of a set of screwdrivers and wrenches, as well as a new cable.
First of all, you need to remove the plastic floor elements under the pedals to provide access to the cable attachment point. Further operations are performed in this order:
- The cable end is disconnected from the release fork.
- The cable sheath damper is removed from the mount located in the gearbox housing.
- The cable end is separated from the clutch pedal.
- The released cable is removed.
When installing a new product, all steps are performed in reverse order.
2.Adjusting the hydraulic clutch
Before adjusting the hydraulic drive, you need to make sure that there is no air in the system. This is checked by pressing the corresponding pedal. If it is elastic enough and returns to its original position after being released, there is no air in the system.
Clutches in hydraulic drives often have automatic adjustment, but in some cases these mechanisms can be adjusted manually, thus compensating for wear on the friction plate. If this is possible, the working cylinder pusher should have a thread and a lock nut. The procedure is as follows:
- Check the fluid level in the clutch system - it should be sufficient. Place the car on a ramp or on axle stands.
- Located under the bottom of the car, find the elements of the mechanism - the working cylinder with a pusher.
- Using pliers, disconnect the breakout spring from the fork, then push the spring all the way forward.
- Take a measuring ruler. Keep the clutch fork depressed and at the same time measure the distance between it and the edge of the slave cylinder.
- Release the fork and repeat the measurement again. The difference in the measured values will be the size of the gap.
- Compare the calculated distance with the passport value and, if necessary, make adjustments.
- Locate the locknut on the pusher thread and loosen it.
- There should be an adjusting nut on the same end. Rotate its screw towards the working cylinder or towards the fork, respectively increasing or decreasing the clutch adjustment gap. Achieve the correct distance and tighten the locknut.
After completing these procedures, take control measurements again. Re-adjust if necessary. Press the clutch pedal several times and check its operation again.
Useful materials about cars
here:
Source
The procedure for adjusting the clutch on different car models
Each car can have its own free play of the clutch pedal, different from others. The specific value of this distance should be found in the vehicle documentation. We will analyze step by step how to adjust the mechanism of some VAZ models.
1. "Lada Kalina"
Follow these adjustment steps:
- Open the hood and release the air filter housing by unscrewing the corresponding mounting bolts.
- Disconnect the mass fuel flow sensor along with the clamp.
- Pull the cable towards you as much as possible, holding onto its threaded part. In this case, the clutch pedal spring may exert resistance, which should be overcome if possible.
- Using a caliper, measure the distance between the fork lever and the plastic leader. The result should be 2.7 cm.
- If the measured value differs from the required value, tighten or loosen the nut with an open-end wrench until the desired result is achieved.
- Take measurements again with the pedal pressed.
- Finally, secure the air filter in place.
2. "Lada Priora"
There are two ways to measure the position of the cable in the Priora. In the first case, when adjusting, you should focus on the pedal stroke equal to 123-125 mm. Another method is to measure the length of the section of cable coming out of the casing - when the pedal is released, this distance should be equal to 2.7 cm. The first method is most often used because of its greater reliability.
3. VAZ-2107
To adjust the engine clutch, you will need to drive onto an inspection hole or overpass. If this is not possible, you can raise the car on supports using a jack.
- Once the pedal free play is adjusted, the next important task will be to adjust the distance between the uppermost position of the pedal and the stop by 0.4-2 mm. To do this, use a 10 mm wrench to unscrew the lock nut.
- If the car uses an injection system, remove the protective shield.
- Next, apply lubricant to the threads of the pusher, having previously cleaned the surface of dirt.
- Be sure to evaluate the stroke of the pusher, since the movement of the release bearing depends on its operation. The distance that the pusher travels should be between 4 and 5 mm. To measure, push the fork back as far as it will go. In order not to exert unnecessary effort, it is advisable to temporarily unhook the spring from the lever.
- Using a 17 mm wrench, adjust the pusher stroke while locking the adjusting nut. Loosen the locknut with a 13 mm wrench.
- Using 8 mm and 17 mm wrenches, respectively, fix the pusher and set the required distance (4-5 mm).
- At the end of the adjustment, tighten the lock nut and evaluate the pedal travel - there should be a distance of 3 cm between the uppermost position and the shutdown position.
This is interesting: Car maintenance: daily, periodic, seasonal maintenance
4. VAZ-2108, 2109, 2199
The clutch of these models is adjusted as follows.
- Depress the pedal fully and measure the distance between its bottom edge and the floor. Ideally, it should be in the range of 18-20 cm.
- Next, press the pedal all the way with your hand and measure the distance again - it should be 6-7 cm.
- The difference between the measured values will ultimately be 13-14 cm.
- If the obtained value does not fit into the norm, it is worth adjusting the mechanism by tightening or loosening it.
- To adjust, use 2 wrenches: fix the adjusting nut with the first, and unscrew the lock nut with the second. If you want to increase the pedal stroke, the adjusting nut should be rotated clockwise. At the same time, the pedal will lower to the floor.
- After the settings have been completed, perform control measurements. If all distances are correct, tighten the locknut.
5. VAZ-2114, 2115
Adjustment steps for these models:
- The car is placed on the handbrake and the battery is removed to ensure maximum safety during operation.
- Next, the hood opens and the drive cable is located.
- The nuts securing the tip of the found cable are loosened using two keys.
- By tightening these nuts in one direction or another, the distance is brought to the range of 125-135 mm.
- Then the clutch pedal is pressed all the way - at least three times.
- Control measurements are performed and adjustments are repeated if necessary.
If all of the above procedures do not help, you should contact a service center.
Features of clutch in automatic and manual transmission
The clutch can be single or double disc. Depending on the principle of operation, it is divided into “wet” (in the presence of oil or lubricant) and “dry”. So, automatic transmissions most often have a multi-plate wet clutch.
Due to the absence of a pedal, the force in the automatic transmission is transmitted by a servo drive, or actuator. The entire installation is controlled using a control unit and a hydraulic distributor. In a manual transmission, two types of clutch operate alternately. Actuators differ in their operating principle:
- Electric (otherwise known as a stepper motor). The control unit constantly receives data on engine speed, and at a certain speed the servo drive receives a corresponding signal. The transmission mechanism disconnects the crankshaft and input shaft.
- Hydraulic – hydraulic cylinder. In the drive mechanism, the oil pump transmits pressure to the distributor, under certain conditions to the servo drive. After changing gears, the pump force decreases.
What's the result?
Adjusting the free play of the clutch, as well as the general one, is a simple procedure. To carry it out, you need minimal knowledge of the car's structure and a small set of tools: wrenches, a ruler. In addition, it is advisable to have an instruction manual that indicates the full and free pedal travel values.
Finally, we note that a well-adjusted clutch pedal allows you to drive a car with a manual transmission more comfortably, gears are engaged more softly and easily, it becomes possible to start and drive as smoothly as possible at low speeds and in lower gears (without slipping), the load on the transmission is reduced, the wear of the clutch itself is minimized and etc.
Types of clutch drive. If the clutch pedal falls, the clutch has become soft, problems have arisen with the clutch: causes and repair of major faults.
How to change gears without a clutch: driving a manual car without a clutch in case of malfunction. Tips and tricks.
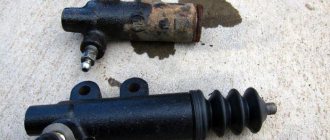
Clutch master cylinder (MCC): how it works and works. Signs of malfunctions of the clutch hydraulic master cylinder, diagnostics, repair, replacement.
Car clutch: purpose, types, design, principle of operation. Frequent clutch malfunctions in the vehicle transmission system, signs of problems.
Clutch disc: purpose and device. How to replace a clutch disc, replace this element yourself. Recommendations.
How is the clutch implemented in the transmission device on cars with automatic transmission compared to a manual or robotic transmission. Features and differences.
Purpose of the clutch
The clutch, as many drivers know, is a complex mechanical device. It is installed between the gearbox and the engine. The operating principle is based on the transmission of torque to the gearbox shaft from the motor shaft.
The clutch includes a large number of components. These include the drive and driven disks, flywheel, bearings, casing, bolts, etc. Most modern vehicles are equipped with a single-disc clutch, consisting of a drive and a mechanism. Drives, in turn, are also divided into types.
The operating principle of a standard mechanical device is quite simple. With its help, the torque of the “engine” is transmitted to the gearbox shaft. The system forces two disks to interact: the master and the slave. The force is transmitted through the drive.
As for the multi-disc clutch, it is installed on automatic transmissions. It is also called "wet". Since there is no pedal on a car with an automatic transmission, power is transmitted through a servo drive.
Thus, we can say with confidence that adjustment is needed for cars with a manual transmission. Most often, drivers carry out the procedure in relation to domestic cars.