- cultural - used for long-cultivated lands, crumbles the soil well, wraps to a medium degree;
semi-screw moldboard bodies are used for cultivating virgin soil, plowing heavily turfed soil, it wraps the soil well, crumbles it moderately (models with an elongated feather wrap the layer completely);
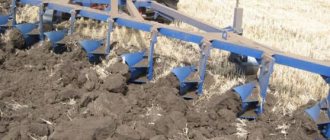
Types of plowshare plow bodies
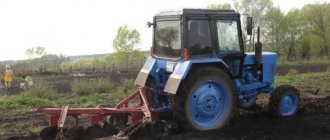
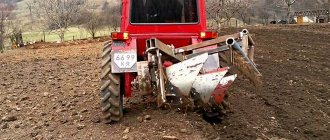
Tractor disc plow
When planning to make a plow with your own hands, the design of the plow body is chosen based on the type of soil and the goals set. Sometimes the choice depends on the type of plantings being grown. For example, root crops require enhanced loosening, which none of the above plow bodies provides. Then a special one is used - combined. It has a shortened blade and share, as well as a rotor. When plowing, the rotor additionally crushes the soil that comes from the ploughshare.
Blade
The plow blade is one of the working parts of the plow (a component of the body). His job is to cut off a layer of soil from the wall, crumble it and turn it over (turn it around). That is, how well the soil will be prepared largely depends on the quality of the dump. When making your own plow, this is worth remembering.
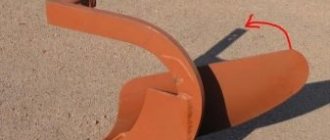
Shape and drawing of a blade made of 3 mm thick sheet steel
The blade is made from sheet carbon steel or special three-layer steel. It has a complex curved shape, on which the degree of soil grinding and its turnover depend. Structurally, a plow moldboard is distinguished between a chest and a wing (spout).
The blade breast cuts off a layer of soil from the wall of the furrow, crushes it, and begins to wrap the cut layer. The blade wing finishes its revolution. As you can see, the chest does most of the work, and therefore wears out, on average, twice as fast. Therefore, the blade is made of two parts. In this case, if there is severe wear, the blade breast can be replaced. Another nuance: at the factory, to reduce friction between the formation and the surface, it is polished.
There are four main moldboard shapes, each of which imparts specific plowing characteristics:
- Cultural dump. It crumbles the layer well and wraps it quite completely. It is used for plowing large areas of long-developed land.
- Cylindrical. It crushes the soil well, but does not wrap well. As a result, plant residues in this case are evenly mixed with the soil. A similar blade is used on light soils.
- Half-screw and screw. They wrap the layer completely (plant residues are laid upside down), but crumble very poorly. After plowing with a plow with such a moldboard, the field has pronounced “waves”. Before sowing, it must be further processed - leveled (harrows, cutters, etc.).
When choosing materials, keep in mind that both the blade and the plowshare must have almost the same thickness: the permissible “step” size is 1 mm. Also, the gap at the junction of the plowshare and the blade can be very small - no more than 0.5 mm.
ploughshare
To make a plow with your own hands, you need to decide on the shape of the ploughshare. A ploughshare is a part that cuts a layer of soil; along it, the cut layer of soil also rises and ends up on the dump. High-strength hardened steel is used for its manufacture.
Position the ploughshare as follows:
- to the bottom of the furrow at an angle of 22-30°;
- the choice of inclination angle relative to the furrow plane depends on the type of blade: for a cultural dump - 40°;
- cylindrical - 45°;
- screw and half-screw - 35°.
This arrangement provides the least resistance when moving, while the blade cuts roots well and breaks up lumps of earth that slide along its surface.
Ploughshares come in different shapes (pictured above). When making a plow with your own hands, they are chosen depending on the type of soil and the complexity of production:
- Trapezoidal. The easiest to make, the good thing is that when used, the bottom of the furrow is smooth. The disadvantage is rapid wear and difficulty in deepening. Therefore, trapezoidal shares are most often used on long-cultivated lands. To compensate for rapid wear, a certain supply of material is made on the reverse side - a magazine. The next time it is pulled back, part of the reserve goes away.
- Toothed and with retractable chisel. These types of plowshares are used on heavy soils (clay, loams) and where there are a lot of stones.
- Chisel-shaped. It is distinguished by the presence of a sharp, forward protrusion-nose. This protrusion protrudes towards the field by 5 mm and downwards by 10 mm. Such a bend ensures that a plow with such a plowshare penetrates deeper better and faster and goes smoother. To compensate for wear, they also make a “magazine” - a reserve of length. Plows with chisel-shaped shares are used on heavy soils.
Of all these types, chisel-shaped shares are the most common. They are more stable in operation, there are no problems with them when going deep: the plow easily lowers to the desired depth.
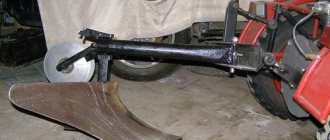
Dimensions of a blade made of a thick-walled pipe with a diameter of 50-60 mm (a gas cylinder is suitable)
As they wear, the plowshares pull back and sharpen the cutting edge. This is done regularly, since with a dull blade (width more than 3 mm), the resistance of the plow increases by 50%. Therefore, it is more profitable to inspect and maintain equipment on time.
Blueprints
When planning to make a plow with your own hands, you need to have some kind of role model. If you have an old plow, you can make new ones in its likeness. And if this is not the case, drawings will come in handy. Just take into account the parameters of your equipment on which you will hang it.
General purpose plow for tractor (single-body)
Detailing of some sizes.
Assembly drawing of a single-body plow
Plow drawing with dimensions
How to make a homemade plow and other equipment for the T-25 tractor - we cover in detail
A homemade plow is not only economically profitable, but also not difficult to produce. You will always be confident in the reliability of such equipment, but let's figure out how to build it.
A plow is used in agriculture to plow the land.
If you have ever read newspapers and magazines intended for rural residents, you have probably noticed an abundance of advertising for the sale of mini tractors and walk-behind tractors. Not surprisingly, the land has to be cultivated. But the attachments for such equipment on sale are not always of high quality. The most popular unit is the plow. And when purchasing it, the future plowman faces a lot of problems: one cannot always expect high-quality plowing from such a device, although the cost of an industrially produced plow is quite impressive. A homemade plow can be an excellent alternative to a low-quality product.
Plow design
Before we start making the plow, let's look at its design features. Its main parts are: a ploughshare, a blade and a field board.
Types of plow moldboards: 1 – cylindrical; 2 and 3 – cultural; 4 – half-screw; 5 – screw.
The ploughshare is the main cutting part of the plow. It is located under the dump. The angle of inclination of the cutting edge of the ploughshare should be about 40 degrees. At a smaller angle, the product will rush upward. When working on a walk-behind tractor, you will constantly have to lift the handles, which will lead to rapid fatigue of the worker. A homemade plow for a mini tractor with the mentioned ploughshare must be kept in the soil all the time using hydraulics. The ploughshare is made from high-strength steel grades. It can be difficult to find such material at home, so it is recommended to use an industrial-made plowshare from old equipment. A part from a skimmer may be ideal. In the old days, agricultural machinery was not very powerful, so for heavy soils, equipment was used, in front of which skimmers were installed - small plows for pre-cultivation of the soil, due to which the turf was loosened.
The plow moldboard plays an important role. His work is based on the shape of the leaf. The better the sheet is bent outward, the easier it is for the product to turn over the plowed land. The blade is made from low-carbon steel with a thickness of 3 mm (this is the critical thickness that is suitable for a walk-behind tractor). The tractor will require a blade with a larger sheet area and thicker material.
The plow board is needed to ensure its stability in the soil. If your walk-behind tractor has wheel locking, then if you have a properly installed field board, you will not have to experience much physical exertion. It is enough for the block to “show” the direction and set the recess, and then it will work itself until the end of the plowing strip.
DIY cabin
For the manufacture of the cabin frame, the best material is a profile pipe to which the glass seal is attached. The dimensions of the glass pattern are determined by the size of the cabin and the thickness of the seal. It is best to use chipboard sheets as a template, which will allow you to most accurately select the desired size.
To fix the seals, thin steel strips are used, which are welded to the supporting pillars of the cabin frame. The cabin structure is welded separately, in parts, and then assembled into a single structure. Corner beams must be made of durable material that is not subject to deformation when shaking. After the cabin body is welded, you can begin cutting out the glass and glazing itself. To install the stove, it is necessary to additionally insulate and seal the tractor cabin.
Stove for tractor
Air heating in the T-25 cabin is done by many amateurs. The main heating element will be a cooling fan, from which a tube is passed into the cabin, which will pump warm air. It is important to insulate the tube with sealant at both ends so that the efficiency of the homemade stove increases. This will prevent exhaust gases from entering the cabin. The on and off function can be adjusted by installing the damper from the stove of any passenger car.
Required tools and materials
Drawing of plow parts.
Now let's move on to the actual production of the plow. We will start with mathematical calculations taking into account the technical characteristics of your walk-behind tractor. If your equipment has a good coefficient of adhesion to the soil, then you can use any drawings of attachments for mini equipment as a basis. Otherwise, take your time to make a plow with a wide grip and a large recess. For a conventional walk-behind tractor, the following proportions must be observed: 8 kg of equipment weight per 1 cm of recess and per 0.5 cm of plowing width.
To assemble the plow you will need:
- a finished ploughshare or a piece of durable steel;
- electric drill;
- steel for making a blade and field board;
- electric welding;
- Bulgarian;
- bolts and nuts;
- metal stand for making the base.
Structure and types of plows
To make a plow with your own hands, you need to have information about its structure and the purpose of its parts. General purpose arable implements are most often used. It consists of several parts, which can be divided into working and auxiliary:
- workers: body - consists of a stand to which a ploughshare with a blade and a field board are attached;
- knife - the main cutting part;
- skimmer - an additional cutting part that cuts the turf layer of soil;
General purpose plow design
- frame - the base on which everything is mounted, consists of longitudinal beams, stiffening beams and spacers;
How does this plow work? The skimmer removes the top layer of soil with plants growing on it, turns it over and places it at the bottom of the furrow, which is the result of the work of the body. The body with the equipment cuts off part of the soil from the side of the furrow, loosens it, turns it around a certain angle (depending on the design), and lays it on top of an inverted layer of turf (laid with a skimmer). To level the furrow wall, a knife is placed in front of the last plow body.
General purpose plows can provide a plowing depth of 20 cm to 30 cm, plowshares - from 16 cm (they also do not have a knife and skimmer).
Housings
According to the number of bodies, plows are single-body, double-body and multi-body. The body consists of several parts:
- rack;
- working surface - ploughshare and blade;
- field board.
Body with share and blade
The ploughshare and blade are the working surface - this part is responsible for the quality and type of plowing. The soil layer is cut with a ploughshare, along which it rises to the dump. Here the soil crumbles and turns over. The degree of formation rotation depends on the shape of the dump. A field board is attached to the bottom of the body. Its task is to prevent the plow from moving towards the already plowed area.
If you are going to make your own plow, you need to choose a design based on the type of soil you are going to cultivate. Plow bodies are:
- Dump. For plowing with full or partial rotation of the formation. Such plows promote soil formation (grown plants are cut and placed at the bottom of the furrow, where they rot), and enrich the soil with oxygen (due to loosening). cultural - used for long-cultivated lands, crumbles the soil well, wraps to a medium degree;
- semi-screw moldboard bodies are used for cultivating virgin soil, plowing heavily turfed soil, it wraps the soil well, crumbles it moderately (models with an elongated feather wrap the layer completely);
- screw - good for cultivating virgin soil - the layer is completely wrapped;
Types of plowshare plow bodies
Tractor disc plow
When planning to make a plow with your own hands, the design of the plow body is chosen based on the type of soil and the goals set. Sometimes the choice depends on the type of plantings being grown. For example, root crops require enhanced loosening, which none of the above plow bodies provides. Then a special one is used - combined. It has a shortened blade and share, as well as a rotor. When plowing, the rotor additionally crushes the soil that comes from the ploughshare.
Blade
The plow blade is one of the working parts of the plow (a component of the body). His job is to cut off a layer of soil from the wall, crumble it and turn it over (turn it around). That is, how well the soil will be prepared largely depends on the quality of the dump. When making your own plow, this is worth remembering.
Shape and drawing of a blade made of 3 mm thick sheet steel
The blade is made from sheet carbon steel or special three-layer steel. It has a complex curved shape, on which the degree of soil grinding and its turnover depend. Structurally, a plow moldboard is distinguished between a chest and a wing (spout).
The blade breast cuts off a layer of soil from the wall of the furrow, crushes it, and begins to wrap the cut layer. The blade wing finishes its revolution. As you can see, the chest does most of the work, and therefore wears out, on average, twice as fast. Therefore, the blade is made of two parts. In this case, if there is severe wear, the blade breast can be replaced. Another nuance: at the factory, to reduce friction between the formation and the surface, it is polished.
Types of dumps
There are four main moldboard shapes, each of which imparts specific plowing characteristics:
- Cultural dump. It crumbles the layer well and wraps it quite completely. It is used for plowing large areas of long-developed land.
- Cylindrical. It crushes the soil well, but does not wrap well. As a result, plant residues in this case are evenly mixed with the soil. A similar blade is used on light soils.
- Half-screw and screw. They wrap the layer completely (plant residues are laid upside down), but crumble very poorly. After plowing with a plow with such a moldboard, the field has pronounced “waves”. Before sowing, it must be further processed - leveled (harrows, cutters, etc.).
When choosing materials, keep in mind that both the blade and the plowshare must have almost the same thickness: the permissible “step” size is 1 mm. Also, the gap at the junction of the plowshare and the blade can be very small - no more than 0.5 mm.
ploughshare
To make a plow with your own hands, you need to decide on the shape of the ploughshare. A ploughshare is a part that cuts a layer of soil; along it, the cut layer of soil also rises and ends up on the dump. High-strength hardened steel is used for its manufacture.
Position the ploughshare as follows:
- to the bottom of the furrow at an angle of 22-30°;
- the choice of inclination angle relative to the furrow plane depends on the type of blade: for a cultural dump - 40°;
- cylindrical - 45°;
- screw and half-screw - 35°.
This arrangement provides the least resistance when moving, while the blade cuts roots well and breaks up lumps of earth that slide along its surface.
Shapes of plowshares
Ploughshares come in different shapes (pictured above). When making a plow with your own hands, they are chosen depending on the type of soil and the complexity of production:
- Trapezoidal. The easiest to make, the good thing is that when used, the bottom of the furrow is smooth. The disadvantage is rapid wear and difficulty in deepening. Therefore, trapezoidal shares are most often used on long-cultivated lands. To compensate for rapid wear, a certain supply of material is made on the reverse side - a magazine. The next time it is pulled back, part of the reserve goes away.
- Toothed and with retractable chisel. These types of plowshares are used on heavy soils (clay, loams) and where there are a lot of stones.
- Chisel-shaped. It is distinguished by the presence of a sharp, forward protrusion-nose. This protrusion protrudes towards the field by 5 mm and downwards by 10 mm. Such a bend ensures that a plow with such a plowshare penetrates deeper better and faster and goes smoother. To compensate for wear, they also make a “magazine” - a reserve of length. Plows with chisel-shaped shares are used on heavy soils.
Of all these types, chisel-shaped shares are the most common. They are more stable in operation, there are no problems with them when going deep: the plow easily lowers to the desired depth.
Dimensions of a blade made of a thick-walled pipe with a diameter of 50-60 mm (a gas cylinder is suitable)
As they wear, the plowshares pull back and sharpen the cutting edge. This is done regularly, since with a dull blade (width more than 3 mm), the resistance of the plow increases by 50%. Therefore, it is more profitable to inspect and maintain equipment on time.
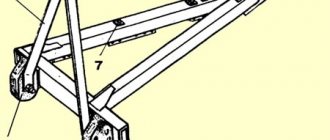
Work order
Method for determining the center of gravity of a plow: 1 - plow body; 2 – beam; 3 – plow handles; 4, 5 and 6 – ropes; 7 – hook; 8 – plumb line.
We install a vertical stand on a flat horizontal surface, place a field board on the left side in the direction of the intended movement, and a ploughshare on the right side. Sometimes you can come across advice that all parts must be welded to the rack. If you are also planning to do this, then give up this idea: the plow must be collapsible. Then, if any element is damaged, it can be easily replaced, which will reduce forced downtime.
In order for the plow to be easily disassembled and assembled, weld a base for it; the product will include triangular shapes designed to ensure the rigidity of the entire structure. We screw the ploughshare and the field board onto this base in the previously marked directions. The blade must be secured above the plowshare. It needs to be given a certain roundness, which can be done on a special machine or by forging. Cold forging is not suitable here for two reasons:
- Cold metal is very difficult to deform.
- It will not be possible to give the product a certain shape: you will create irregularities that will prevent the soil from sliding along the dump sheet.
It will be better if the metal is heated, forged and immediately hardened. The holes in the blade (3 of them are needed) can be made directly in the forge, but do not make mistakes with the accuracy of the markings.
Now let’s fix the blade on the body. For fastening, it is necessary to use bolts with a head that fits tightly into the hole. All protrusions will interfere with the operation of the plow, so they must be cut off to fit the base and the areas sanded.
If you work in your garden with a tractor, then you need to have twin plows that are mounted on an axle that runs at an angle to the equipment.
Here, fastening is carried out using strong metal clamps (do not use welded fastening elements - they will break under load!). The position of the bearing axis should not be stationary. Here it is necessary to provide at least a small angle of rotation so that you can adjust the position of the plows.
If desired, the master can also make a reversible plow by placing a hydraulic drive for turning in the gap between the axle and the tractor. But such a design is popularly recognized as irrational: it breaks down too quickly. It’s better to use factory-made plow turning elements. If they are available, then there is no problem; there is no need to make such a complex device yourself. It will cost a waste of time and nerves, and the result of the efforts will be short-lived.
When cultivating land, one of the most tedious operations is plowing it and preparing it for sowing. If you have equipment - a walk-behind tractor or a mini tractor - everything can be transferred to them, but for plowing you need a plow. Buying a ready-made one is too expensive. The prices for finished products are considerable. To save money, you can make a plow yourself. And there are two ways. First: do everything yourself completely. This is a difficult path - the shape of the plow parts is nonlinear, with bends of a certain radius, and bending thick metal at home is very difficult. The second way is to buy ready-made cases, and assemble the frame and all other auxiliary parts yourself. This is a simpler option that is relatively easy to handle.
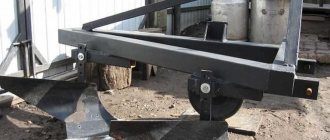
Homemade frame for a plow on a mini tractor
Double-furrow homemade plow for a mini tractor
Installing the support wheel
DIY trailer
The single-axle cart design for the T-25 tractor is the most suitable option. The average weight of the standard design is 800 kg, which will allow it to transport loads up to 2 tons. The cart frame is made by welding spars at least 10 cm thick. A complete axle of a small tractor can be used as an axle and wheels for the cart.
To equip the trailer with a blade option, it is necessary to reinforce the frame with a beam in the middle part. A socket is welded to the beam for installing a cylinder, which will be responsible for the dump of the body, and a reinforced support for installation. The hydraulic cylinder most suitable for a small-sized cart blade is PTS-9. The maximum output of the cylinder is 85 centimeters, which will allow the body platform to become at an angle of 50 °.