People who do not have experience working with wood processing machines do not understand how to work with a wood router: they will be helped by techniques, tips, and devices recommended by experts. Knowledge will allow you to master this difficult task at home. Gradually, the young master will learn to cut patterns on the material, engrave, carve, saw straight and spiral grooves. Below you can find information on what you can do with a wood router at home and the basic rules for working with the tool.
Using a router you can make balusters for stairs
Why do you need a milling machine?
What can be done with a router? This question often interests people who first learned about a wood processing machine. Milling equipment makes it possible to cope with a wide range of tasks. Machines will be needed not only by owners of large enterprises, but also by those who like to work with wood in their free time.
Milling cutters are widely used in:
- furniture and door production (cutting material, trimming, drilling holes, making grooves for edges, engraving);
- making plinths, balusters (applying various patterns on wood, making complex ornaments);
- production of bas-reliefs, high reliefs (removing the top layer from wooden blanks, thanks to the immersion of the cutter to different depths, a pattern is formed that will protrude above the main surface);
- souvenir production (figurines and wooden structures, engraving of images).
Note! Even handmade craftsmen who make wooden toys and jewelry can use a milling machine.
Wood coating after milling
Wood easily absorbs moisture and dries, changing its geometry. Even after milling the product, it may warp, which is most often unacceptable. To prevent this from happening, wooden blanks and products must be stored at constant low humidity.
Another important process is coating, which serves several purposes at once:
1. Protects wood from moisture.
2. Gives the product a smooth surface and removes micro-irregularities.
3. Creates a layer that protects the part from external mechanical influences.
Different coatings can be used for different purposes: paints, varnishes, primers.
Wood milling on CNC machines ensures high manufacturing accuracy and is good for the production of serial products: parts are made according to the same program and have excellent repeatability. Often it is visually impossible to distinguish whether a product is produced on a CNC router or made by hand.
How to set up the instrument
Working with a milling cutter is a rather complicated process. The master must not only skillfully handle the instrument, but also set it up correctly. In cases where there is a need to use a cutter whose diameter exceeds 10 mm, the pin should be lowered until it touches the turret stop.
Step-by-step tool setup process
If the work uses a cutter whose diameter reaches 16 mm, and the final milling depth should reach 14 mm, the master must:
- Set the router to the zero mark.
- Lower the pin until it touches the turret stop.
- Set some indicator of a whole value.
- If a slight play is detected above the stop, it is recommended to lightly tighten the screw and fix it.
- Now you can begin to remove the lock of the coarse adjustment scale, which should be raised by 14 mm, which will increase the gap between the turret and the pin.
- Using a revolving stop, you need to set the immersion depth, which will be equal to 3 mm. The presence of steps on the stop allows you to increase the depth of immersion gradually.
Note! The fine adjustment screw allows for additional precision.
What can you do
Having figured out how to work with a router, you can start creating grooves, grooves and quarters. Such slots are used in the manufacturing process of detachable and permanent type connections. With this tool you can create:
- complex surfaces and contours;
- edges;
- clamps and spikes.
Complex surfaces and contours most often have to be made by workers in furniture factories and workshops for the production of artistic wood products. If you follow all the rules and recommendations regarding the use of the tool, working with a hand router will be easy and interesting.
Operations for creating edges are performed during the manufacture of cornices, platbands and glazing beads
Open groove
When you plan to process a workpiece, forming grooves from the very edge, you need to properly fix the tool. The main cutting element should hang over the edge of the tree. Next, the wizard needs to follow the step-by-step algorithm:
- Having lowered the knife to the required depth, you will need to fix the position of the basket.
- Now you can start the engine and process the wood.
- After completing the edge processing process, you should raise the cutter and loosen the lock. Only after this can you turn off the engine.
The blind groove is made in a similar way. However, the master does not begin work from the outermost part of the part.
Deep groove
To carry out this type of wood processing, at the end of each pass of the processed area, you should set a new indicator for the immersion depth of the cutter. At this point the tool should be turned off.
Experts recommend not setting the depth level to more than 5 mm, which will allow the master to do the work carefully. When processing the last layer, it is worth setting the depth to 1.5 mm, which will help create a clean surface.
Advice! Working with a manual wood router requires the attentiveness of the master (especially a beginner).
Narrow groove
To form a narrow groove in the workpiece, an additional device will be required. A flat base is attached to the sole of the instrument. Guide rods must be installed on both sides of the accessory. This will allow you to achieve a straight trajectory of the milling machine.
It is important that the axes are located in line with the central part of the knife. During operation, it is recommended to guide the router in such a way that the rods are evenly pressed against the side parts of the workpiece.
End surface
Often carpenters need to process the end parts of the workpiece. This process requires the craftsman to obtain a clean edge.
- The first step is to make a shallow cut. The milling machine should be driven in the direction of rotation of the knife. This will ensure an even layer on the main part of the wood.
- To clean the end surface, it is necessary to move the router against the direction of rotation of the knife. Soon the appearance of the wooden product will take on the desired shape.
Working with a hand router is not an easy process, but following the recommendations of experts, anyone can master it.
How to correctly install a cutter on a specific machine model can be understood from the instructions
Curved edges
What can you do with a router at home? In addition to forming narrow, deep and open grooves in the workpieces, the master can make curved edges.
To form a curved edge in the workpiece, the master must prepare templates with a thrust ring (a round plate with sides). The ring will move along the template and set the correct trajectory.
Note! You can fix the part on the base of the milling machine using special fasteners.
When working with the material being processed, the structure must be pressed against the table with clamps. The use of templates allows each craftsman to create absolutely identical products from which furniture or other interior elements are made.
Decorative finishing
Patterns on wooden surfaces decorate carpentry. The most interesting method of processing natural wood is patterned and artistic milling. Working with the tool is quite simple due to the fact that the wood is pliable in work. During the decorative finishing of the material, the master will need:
- jigsaw;
- vice;
- chisel.
You need to transfer the image you like onto a wooden canvas. The patterned canvas is fixed on a stable surface. The router must be moved smoothly along the contour of the image, removing the wood layer by layer. This gives volume to the workpiece.
To create a variety of patterns, you need to use cutters of different sizes.
Work on milling wood blanks for tongue-and-groove joints
Another purpose of a manual milling machine is to process the edges of wooden products to connect them to each other. A groove is cut out on one workpiece, and the second is milled for the corresponding tenon.
Parts for the tongue-and-groove connection
The work takes place in the following sequence:
- The first block of wood will go under the tenon. The length of the protruding part is set off from the edge, and markings are applied. It is recommended to measure up to 40 mm for furniture legs, and 60-70 mm for doors.
- A shallow cut is made along the marked line with a hacksaw.
- Install the wood cutter in the collet of the hand-held machine. For such work, tongue-and-groove attachments are used on the router, two in one set: one for the tenon, the second for the notch.
- The workpiece is placed on the workbench. It is worth fastening another wooden beam of similar thickness perpendicular to it - it will serve as a support for the sole of the router.
- On the milling machine, the immersion depth of the cutting attachment is set. This indicator is set taking into account the fact that after turning the workpiece over and the second pass with the cutter, the result should be a tenon of the same thickness as the width of the groove. After setting the depth, the limiter is set.
- The router is turned on and tenon sampling begins. The required depth is not achieved immediately, but gradually, with an increase of 3 mm after each time.
- After the nozzle has completely passed to the specified depth, the machine is turned off, the workpiece is turned over and a sample is made on the other side using a similar method.
- Since the groove in the center of the wooden piece will have rounded edges, the tenon should be given the same shape. A well-sharpened knife or sharpening machine is suitable for this. If the groove and tenon run along the entire length or width of the wooden parts, there is no need to round the corners - the notch will be rectangular.
Tenon and notch roundings
- The groove is extracted using a groove cutting attachment according to the standard procedure already mentioned.
One of the options for a tongue-and-groove connection is the so-called. dovetail. A special groove attachment known as a dovetail is installed on a manual machine. An additional metal template with slots specifically for this type of recess is also required. To ensure that the cutting head fits into the template slots without displacement, a copy sleeve is installed on the wood router. The selection of the tenon and groove is done as standard.
Dovetail pattern
Basic rules of work
Before you start working with the tool, you should familiarize yourself with the information on how to use the router. Below are the basic rules for working with woodworking machines.
Rotation speed adjustment
When starting to work with woodworking tools, you need to set the basic parameters. First of all, you should adjust the rotation speed.
When choosing this parameter, you should take into account the level of material rigidity and the characteristics of the router. The table presents expert recommendations regarding the speed level depending on the type of material being processed.
| Material | Cutter diameter | Recommended speed |
| Hardwood | 4-10 mm 12-20 mm 22-40 mm | 5-7 mm 3-4 mm 1-2 mm |
| Soft woods (spruce, pine) | 4-10 mm 12-20 mm 22-40 mm | 5-7 mm 3-6 mm 1-3 mm |
| Gypsum boards | 4-10 mm 12-20 mm 22-40 mm | 3-7 mm 2-4 mm 1-3 mm |
| Plastic, lining | 4-15 mm 16-40 mm | 2-3 mm 1-2 mm |
Advice! When choosing a device, it is worth remembering that high-quality equipment has up to 8 speed settings.
Fixing the cutter
Before starting to work with the tool, you need to take care of fixing the cutter. It is worth considering that each model has its own characteristics. For detailed installation information, please refer to the instructions.
Modern wood processing units contain a shaft rotation lock button, which makes it easier to fix the cutter. The device must be unplugged from the outlet and placed on the set marks. If there are none, then ¾ of the length of the cylindrical part will be required.
The part is inserted to the required depth. The shaft is fixed. Using an open-end wrench, you need to tighten the cutter until it stops.
Milling depth adjustment
Adjusting the milling depth does not take much time. The master will need:
- Place the device on a flat surface.
- Release the clamps and press the cutter until it rests against the surface.
- Then you need to unscrew the lock and release the turret stop.
- When choosing a turret stop leg, it is necessary to give preference to the one that will correspond to the depth of machining. The disk with legs returns to the correct position.
- The bar must be held with a finger, and the screw must not be fixed. The moving pointer moves so that its value coincides with the zero mark.
At the final stage, you will need to raise the rod to the mark corresponding to the milling depth indicator. The turret stop lock is lowered.
When fixing the power tool, the equipment must be disconnected from the mains.
Working methods
Before using the woodworking machine, you need to check that the screws and all threaded parts are tightly pressed. The safety nut and collet are removed. The master must make a control cut. You may also need to use a copying sleeve in your work, which helps to confidently guide the cutting elements of the device along a complex trajectory.
Milling cutters can use various cutters when cutting wood and wood-plastic products:
- compression;
- chipbreakers;
- end;
- with straight knives;
- single-pass.
Advice! To apply an image to wood, it is best to use a carpenter's pencil.
Rotation speed selection
The quality of wood surface treatment depends on the speed of rotation of the router. An even and perfectly smooth surface is obtained at a higher speed of the milling cutter. A beginner should start with low speeds, because when milling wood, you need to apply a certain force, direct the router in the desired direction and hold it securely in your hands. Once you have mastered the tool, you can move on to higher speeds. The router speed setting depends on the wood being processed, the depth of processing and the diameter of the cutter. It can range from 7000 to 24000 rpm. There is a special knob in the milling cutter body for adjusting the speed. The minimum speed is used when milling large depths or engraving with a large diameter cutter.
If the carving is carried out along the grain of a wooden workpiece, the average speed of revolutions stops. Cross carving requires maximum speed to avoid chipping the edge of the wood piece. At the same time, it is necessary to reduce the speed of movement of the tool, since the speed of rotation is interdependent on the speed of movement. Different types of wood require different processing approaches. Hardwoods such as oak, walnut or beech should be milled at a minimum speed of movement of the router. Soft woods such as pine or birch are milled at a faster feed rate.
Edge processing using templates
To perform wood edge processing, experts recommend using templates. Below you can familiarize yourself with the processing features of the outer parts of the product.
If the width of the part is no more than the length of the cutting edge
The sample is securely mounted to the table. The cutter is installed in such a way that the roller can move along the template, and the cutter can move along the surface being processed. Next you will need to decide on the speed of movement. After the tool is turned on, you need to carefully move it along the workpiece. You can not only pull the woodworking machine, but also gently push it.
The width is greater than the length of the cutting part
After the first pass, the workpiece must be removed and a second pass must be performed. The processed part can perform the functions of a workpiece. The bearing must be guided along the machined surface. In cases where the cutting part is again missing, an additional pass should be made.
At the final stage, the product being processed is turned face down. The part is fixed with clamps. The craftsman will need a cutter with a bearing at the end, which will move along the treated surface. In this way, thick parts can be processed.
Obtaining a figured and curved edge
In order for the curly edge to turn out beautiful, it is important to process the workpiece well. There should be no cracks, bevels, or uneven edges. This will avoid the appearance of flaws during milling.
Important! If it is necessary to create a curved workpiece, it is recommended to carry out rough processing, bringing the product profile closer to the desired sample.
Next comes the finishing of the edge parts, during which you need to use templates and be as careful as possible.
Climb milling is rarely used, only when there is a possibility of obtaining a flake
Helpful Tips and Tricks
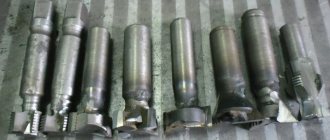
- The more cutters in the workshop, the more opportunities the master has. Only a few cutters are shown above, but there are hundreds of varieties on sale today;
- You shouldn’t waste your money by buying cutters on the principle “maybe they’ll come in handy someday,” but you shouldn’t limit your capabilities either. The cutters that are required are purchased;
- cheap cutters do not last long;
- if the wood begins to burn and smoke, the cutter is dull;
- if a new cutter smokes, it is thrown away, because It's a fake copy;
- blunt cutters are sharpened on a fine abrasive from the reverse side. With a complex profile, it is impossible to sharpen it.
Working with a router requires care and high precision. With its help, you can achieve adjustments down to fractions of a millimeter. You immediately need to get used to precise depth adjustment.
As a result, a router has become an indispensable tool in a modern carpentry workshop. With its help you can do a variety of things, including expensive ones. You can start using a cheap router. But working with a high-quality tool is much more convenient and interesting.
Caring for a hand-held milling device
The milling cutter is an unpretentious device that does not require complex maintenance. It will be enough if the technician takes care of cleaning the device from chips and dust, and also promptly replaces the brushes on the motor and checks the condition of the bearings on the motor shaft and cutters.
Hoses can be cleaned with a brush previously soaked in turpentine, which dissolves tree resin and removes dust deposits.
Milling is an interesting and exciting process that anyone can learn. The expert advice listed in the article will help beginners who do not know how to properly handle the tool. Having gained experience working with a woodworking machine, a young specialist will be able to create real masterpieces from wood (for example, Russian nesting dolls, boxes, etc.), mill tabletops, or independently cut out parts for furniture.
Important Specifications
Main technical parameters that matter during operation:
- Electric motor power. The powerful milling cutter easily, without overload, performs shallow sampling and copes with deep ones. Costs – higher energy consumption, weight and cost. There are milling cutters on sale with power ranging from 500 W to 2,500 W.
- Speed. The higher the speed, the cleaner the processing. The downside of the advantage is that the higher the speed, the less the rotational force of the cutter, the greater the load on the spindle bearings. The maximum speed of modern milling cutters is from 20,000 rpm to 33,000 rpm.
- Weight . For hand tools, this is important, since it is more difficult to work with a heavy tool. It is less maneuverable and your hands get tired. There are milling cutters on sale weighing from 1.2 kg to 6.5 kg. Weight depends not only on power. High-quality models use expensive, lightweight and durable magnesium-aluminum alloys, while cheaper ones use heavy ferrous metal.