Probably, many of you have already seen that the walk-behind tractor is useful not only for cultivating the land. It also helps solve a great many other business problems. But this unit becomes even more valuable if in addition to it you have a trailer.
However, not all users have yet managed to acquire a trailer. Someone else is just planning to buy it. It is to them that our article today is intended. Because in it we will tell you what points should be taken into account when choosing a trailer for a walk-behind tractor. Moreover, we will also tell you about the best brands of these devices. That is, as they say, we will present you the TOP, consisting of the five best manufacturers.
What it is?
A towbar refers to a towbar or towing equipment. They are necessary to ensure reliable fastening between the walk-behind tractor and the trailer.
The towbar must guarantee the user safety and reliability; accordingly, its design is carefully thought out, and special requirements are imposed on the material.
Installing a hitch on a walk-behind tractor
To the walk-behind tractor brackets, the hitch brackets are installed using pins. For more reliable fastening, it is recommended to fix the bracket using M14 bolts.
Installation of equipment on the hitch
To install additional equipment, the hitch axle must be mounted to the equipment bracket; by the way, it is removable. Next, the axle is inserted into the outer hole of the hitch. It is necessary to tighten the bolt, aligning the holes on the housing and the equipment rack. Next, all that remains is to secure the contact with an M12 bolt and a corresponding nut.
Why does a walk-behind tractor need a hitch? no need to explain, the same adapter, an irreplaceable thing, but without a hitch you can’t go anywhere.
Kinds
It is extremely important to choose a suitable hitch for the walk-behind tractor, since a lot depends on its quality.
It happens:
- single or double;
- with reinforced structure;
- adjustable;
- universal option.
If various hitches are used during operation, then it is better to purchase a single or double hitch. When the additional equipment is large or a large load needs to be transported, then it’s time to use a reinforced one.
Its difference from the previous one is greater thickness and length. Thanks to the design, the plow or cutter can sink deeper into the ground.
Adjustable allows the user to set the desired shaft angle. As a result, the attachments are installed at the required level, and work efficiency increases accordingly.
The universal hitch is used everywhere, it can be rearranged for different models. Due to this, the user has the opportunity to adjust the angle at which the attachment is installed. The main role is played by the bolt mechanism.
Precisely for the reason that such a hitch is used when hanging hillers and plows, it can be either double or triple, which means it is not prohibited to connect several working elements at the same time.
Most often, a U-shaped unit is used, which can be made either independently or purchased ready-made. There is also a hitch for sale for the APM adapter, which is necessary when working with a hiller or plow.
It is used on walk-behind tractors:
- "Neva";
- "Oka";
- "Centaur 1080D";
- "MTZ";
- "MB";
- "Cascade".
The product is attached to the rear or front adapter, and then additional equipment such as a plow or potato digger is attached. The design of the product is thought out in such a way that reliable fastening can be ensured through the use of three bolts. When the walk-behind tractor tilts during operation, the plow remains perpendicular to the ground.
When using some hitches, the user has the opportunity to adjust the height and change the angle of inclination in the desired plane.
For example, in the horizontal plane, the maximum permissible angle is +-20 degrees, in the vertical plane it is 7 degrees more. There is also a coupling option for walk-behind tractors on the market - MK, used for the Krot series plow and the ON-2 hiller. It is used exclusively in this version and in no other way, that is, it is not suitable for other attachments.
What are APM adapters?
Any work on dachas and areas of country houses requires a lot of physical effort. It is difficult to make it lighter, faster, easier and simpler without special mechanisms. One of them is motorized units equipped with adapters of this type. These units help you get the job done, doing it with convenience and comfort. An adapter is an axle that has wheels and a seat attached to it. The trailer is then attached to it. The adapter is also used for other mounted units. With the adapter, the monoblock resembles a mini-tractor, to which it is inferior in power, but gains in fuel consumption. Thanks to the versatility of the adapter, the owner receives certain benefits from this unit.
Features of the TPM trailed trolley
This trailer is an improved model of a single-axle truck. It is used without an adapter as it has a seat. The body height is ideal for the Neva walk-behind tractor. The trailer has a weight of 100 kg and a load capacity of 150 kg. The speed of transport with a body is ten kilometers per hour. The dimensions of the trolley are:
- width – 125 cm;
- length – 270 cm;
- height – 120 cm.
The rear door of the trailer folds down because it is used for unloading heavy objects and bulk materials. The body is used to transport various heavy materials and objects for construction and agricultural work. The cart comes with a maintenance manual.
Modernized trailer TPM-M
The letter “M” in the name indicates the modernization of the mechanism. Its essence lies in reducing the dimensions of the Neva walk-behind tractor with a trailer while maintaining operational capabilities. The overall dimensions of the trailer are:
- length – 222 cm;
- height – 120 cm;
- width – 112.5 cm.
The weight of the modernized trolley was 85 kg. The kit comes with a manual for servicing agricultural equipment.
Cart with seat
About the characteristics of the VRMZ trailed trolley
This modification is produced by VRMZ. This is a significantly improved TBM trailer. Its distinctive features are:
- Load capacity of 400 kg. This parameter exceeds the TMP indicator by about two times. Thanks to him, the trailer of this modification is popular among entrepreneurs who own construction companies, warehouses and barns in which large loads are transported.
- The body is also good because it does without an adapter. The trailer is secured to the gearbox shaft.
- The seat when driving the walk-behind tractor is the side of the body.
- The bottom of the cart is located at a distance of thirty centimeters from the ground.
- For the body track it is 117 cm.
- The weight of the trolley is 95 kg.
Stop the cart using the brake attached to the frame. The trailer is sold unassembled with instructions for equipment maintenance, assembly and disassembly.
What types of trailers are there and what are the differences?
As already mentioned, there are a lot of options for assembling trailers for walk-behind tractors in modern times. That is why, after deciding to start work, first decide what exactly your trailer will be like.
You can decide among the many possible types only by studying the design features of each individual type. In the video on how to make a trailer for a walk-behind tractor with your own hands, you will see different models.
Here are the most common variations of trailers for walk-behind tractors that you create yourself:
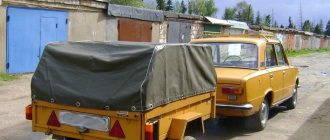
Completely solid. They provide a non-separable type of body. This option is considered the most reliable when transporting bulk cargo. All connections and seams are securely welded when assembling the sides. To make it more convenient to unload such a trailer, it has a folding side at the back.
Transforming structures are notable due to the fact that they can create additional horizontal space. The sides are folding and thus, when folding up several or all of the sides, a larger flat bottom is obtained.
The most convenient type for unloading any bulk cargo is the dump truck type.
Using a mechanism, the body is raised to such a height that all loose parts are completely unloaded from the trailer. A do-it-yourself dump trailer for a walk-behind tractor is chosen more often than other types.
Choosing a trailer design
The main selection parameter is the ratio of its maximum load capacity to the power of the walk-behind tractor. In addition, you need to pay attention to the following indicators of the trailer:
- On the quality of the braking device. This precaution will protect you during a steep descent.
- On the material used to make the body. Galvanized steel is considered the best because it is not susceptible to moisture and rotting, like wood.
- A dump truck body that saves human energy when loading and unloading vehicles.
“Neva” trailers for motorized agricultural machinery with 5-7 hp engines.
or more powerful VRMZ units are indispensable for garden plots and summer cottages. They not only provide agricultural work, but are also used as vehicles. Walk-behind tractors are often equipped with hillers, cultivators, and carts. When purchasing a walk-behind tractor, you need to choose motorized agricultural machinery based on size, ease of assembly and disassembly, reliability and durability, which can ensure a service life without unnecessary hassle in repairing the equipment. It is important to take care of your equipment on time, based on the operating instructions, so that it lasts for many years. Facebook
Advantages and disadvantages of a homemade trailer
When there is a need to use a trailer for a walk-behind tractor on a farm, many are faced with a choice: what is more profitable - buying a device or making a trailer with your own hands? Everyone makes their own decision, depending on their skills in craftsmanship and existing prices on the market. The advantages of a homemade unit are the ability to:
- determine its dimensions according to your needs;
- change some parameters;
- choose strong and durable materials that will provide the walk-behind tractor trailer with a long service life;
- use improvised devices that will save money on factory samples.
Homemade trailer for walk-behind tractor
A DIY trailer can be equipped with other useful devices, for example, reflectors and brakes. To manage, you need to acquire some skills that will take a little time.
Selecting a hitch
Any trailed or mounted device for motor vehicles, be it a trailer cart, a mower, a hiller, a harrow or any other equipment, is fixed using a hitch. If the base element is not suitable, the owner has a choice - buy a suitable one or make a hitch for the unit with his own hands.
Be that as it may, when deciding which of the mechanism options can best meet the functions performed by the unit, it is necessary to take into account a number of factors, the list of which includes:
- distinctive features of a cultivator or walk-behind tractor;
- scope of use of the unit - the duties it performs;
- equipment that will be integrated with it;
- loads;
- need for versatility.
Based on this, it is necessary to carefully familiarize yourself with the most frequently used devices and choose, taking as a basis the properties of what is best suited in this case.
Features of creating a trailer
A walk-behind trailer is a rather complex system when assembled independently. It is for this reason that preliminary preparation for the process is required.
Here are the steps that must be present in the algorithm for creating such an important assistant:
- First of all, you should think about drawing up an accurate and complete plan and diagram.
- Next, prepare all the necessary materials for the parts, which we will talk about a little later.
- Organize a workplace for assembly where nothing will disturb you. You should have quick access to all tools.
- Next, the previously made drawing is transferred to the parts. They are cut and sawn, welded and other preparation work is carried out.
- The next step is assembly and adjustment of all components of the selected trailer.
- Surface painting and varnishing work.
Specifications
For Zirka hitches in the shortened version, the height of the inner sleeve or the diameter of the hole ranges from 2 to 9.4 centimeters. At the same time, the weight of the structure is 4.6 kilograms. The size of the frame strip is 315 mm.
This product is distinguished by an adjustment angle and the presence of a rotating mechanism, thanks to which the plow, regardless of conditions, cultivates the soil strictly horizontally, even if the walk-behind tractor moves. The hitch is widely used when it is necessary to adjust the operation of attachments or when uneven surfaces are plowed.
There is an extended version of the described model on the market. The weight of the structure has increased to 7.5 kg, the internal diameter is 210 mm, and the sleeve has a height of 94 mm. The dimensions of the frame strip are also larger - 520 mm.
The product is used in cases where it is necessary to adjust the operation of attachments.
The design used a rotary type clamp. The plow always goes at a right angle and everything is thanks to the bolted connection, while the position of the equipment does not play a role.
Universal hitches also have a bolt clamp, but they are attached to the equipment using a special adapter. The width can reach 0.9 meters, the maximum weight is 6.6 kg.
If we consider the triple model, then it is installed on the walk-behind tractor using the front part on the rotary unit. This part must be purchased separately, since it is not supplied with any walk-behind tractor. The width of the described coupling is 900 mm. The mounting plate is 80 mm wide and 120 mm long. The weight of the structure is 7.3 kg.
If you plan to use a walk-behind tractor as a snow blower, then you won’t find a better U-shaped hitch.
Hitch drawings for walk-behind tractor
Below are drawings of a universal hitch suitable for most popular brands of walk-behind tractors, such as: Tselina, OKA, Neva, Salyut, Favorit, etc.
The purpose of the universal hitch is in connection with a walk-behind tractor for attachments: harrows, plows, diggers, planters, etc.
Materials and tools
To make your own unit, you will need consumables that can be found in every garage:
- square pipe
- corner
- wheels
- bridge
- plywood
- bolts
- nuts
- stainless steel
- fittings
Of course, all of them will be useless without the right tools:
- Bulgarian
- drill
- welding machine
- hammer
- set of wrenches
- lathe
To know how to use all consumables correctly, you need to create a drawing and look at it. There are many training videos on the Internet.
Drawing up a drawing
So, we’ve sorted out the features of the model and the materials, it’s time to start drawing up a drawing of a trailer for a walk-behind tractor or a sketch of a diagram of the proposed equipment. The best option would be to depict the trailer from different sides with marks of the selected dimensions of the components of the hitch.
Here you don’t have to be a real engineer or draftsman; a thoughtful sketch will be enough.
What kind of UAZ Patriot tuning can you do yourself?
In order for the cart to be securely attached to the mini tractor, you will have to make a reliable coupling device. Of course, you can use a regular tow bar. However, many people prefer to create such a retainer themselves.
It is recommended to make a device with a built-in adjustment mechanism. Thus, it will be possible to connect almost any cart to the walk-behind tractor.
To install a spider hitch, the hitch bracket must be positioned to the side. It must be attached to the structure using strong metal pins. For additional fixation, you can use spacer bolts. This will allow you to get rid of strong vibrations during transportation of goods in the future.
A towbar is a special device that is used for attaching trailers or trailers.
Many people are interested in how to attach a homemade cart to a walk-behind tractor and what might be needed for this. To deal with this, you need to know in advance the main features of creating towed devices and the nuances of attaching them to walk-behind tractors.
How to make a trailer for a walk-behind tractor with your own hands
Let's look at how to make a trailer for a walk-behind tractor with your own hands. It is important to be able to read drawings and diagrams, as well as have the skills to use certain tools.
A homemade trailer for a walk-behind tractor is made according to diagrams and drawings, which can now be found in large quantities on websites on the Internet. Before you get to work, you need to develop a drawing of a trailer for a walk-behind tractor. In addition, it is necessary to prepare all the small parts for fastening, tools and a welding machine.
The dimensions of the trailer for the walk-behind tractor must be clearly drawn on the diagram, each detail is marked and highlighted from different sides.
You need to assemble the trailer based on the power and dimensions of the walk-behind tractor. Equipment with insufficient traction power will not drag a heavy semi-trailer.
Having understood the diagram, you need to decide on the leading parts of the trailer. The basis is the frame and hitch for the walk-behind tractor trailer. These are followed by the frame, driver's seat and wheels (2 or 4 pieces).
They usually start with the main component of the cart - the frame, since it is on it that the entire load falls during the transportation of goods, so it must be extremely strong. The ideal option would be a ready-made axle with wheels, in which case you will not have to waste time and effort on additional settings. It is important that the materials are hard and not deformable. You can use pipes or a thick channel.
The simplest method is a trailer assembled from 60x30 mm pipes welded together to form a frame. A traverse (steel crossbar) is attached to them. Transverse pipes are attached from different sides, which in the future will serve as racks. For piping, pipes with a cross-section of 25 mm are welded to the posts, and at the end - corner supports.
It is preferable to weld the trolley parts together; bolted fastening is considered not very reliable and short-lived. To strengthen the cart, braces are added from below and a reinforcement is welded.
Once the supports are completed, they move on to assembling the body. Any materials are suitable for this: wood and metal, and a combined option is possible. It is advisable, of course, to make the base metal. For strength, it is preferable to make the bottom double. To make the sides attach better, corners are welded along the edges. For easy loading and unloading, the sides can be folded by placing them on a movable mount.
There is no need to choose very heavy materials, since the weight of the assembled trailer will overload the engine of the walk-behind tractor. The simplest body can withstand weight up to 500 kg, and this is enough for a small farm.
It is better to take wheels from used equipment; they already have hubs. The rods on which the wheels will be supported are prepared. It is desirable that the wheels are located directly under the sides. To attach the wheels, the rod is pre-sharpened to the size of the wheel bearing. Instead of a rod, you can use devices from a VAZ beam.
Brake system
The brake system is standard from Oka. The parking brake drive is used. The brake pedal is welded from 6mm metal. It is fixed on a footrest (30x60cm), this plate was found in a landfill. Two corners of 32 mm and a length of 37 cm are welded under it. A pedal is attached to them in front, and a plate with two holes for the brake cables at the back. The ends of the cables are screwed using special clamps to a T-shaped plate, from which there is a pull to the brake pedal. There is nothing complicated in the design of the brakes, I think everything will be clear from the photographs.
Preparation of body components
To assemble a trailer for a walk-behind tractor with your own hands you will need:
- iron pipes with characteristics of 25x25 mm, as well as 60x30 mm, metal profiles;
- fastening components;
- steel sheets (thickness about 0.8 mm);
- suitable boards, pieces of plywood or duralumin sheets, corrugated sheets (for the body);
- two (or four) wheels on a walk-behind tractor trailer (from an old Moskvich, Zhiguli, scooter, motorcycle cradle, from garden equipment);
- channel, corners, etc.
When choosing materials, it is worth taking into account their characteristics in order to eliminate the possibility of deformation under the applied loads during operation. Only high-quality load-bearing elements can provide the necessary safety margins, especially when driving on bumpy roads.
Seat - tool box
All metal parts are painted with black primer-enamel for rust, and the body and tool box are sheathed with galvanized iron roofing, which is mounted on ordinary blind rivets. The frame of the tool box is welded from a 20 mm angle and has dimensions: L 70 x W 34 x H 30 cm. The seat is made of a piece of chipboard and foam rubber, covered with dermantine. There is a lock embedded on the side (see photo).
The dimensions of this box were not chosen by chance, because there is a need to transport a chainsaw, an ax and a can of gasoline. And as it turned out later, the long seat is more comfortable when turning. The bottom of the trailer was made from two scraps of waterproof OSB 12mm thick. Subsequently, I will screw a sheet of galvanized roofing on top.
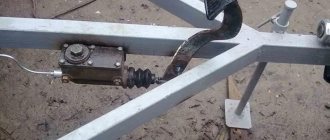
Tow hitch for walk-behind tractor
A trailer for a walk-behind tractor is useful on the farm, so it must be durable. The main load falls on the frame, which is the basis of the structure. The towbar also receives enormous loads. The service life of the structure depends on the quality of materials used to create it, as well as the method of fastening.
The trailer hitch for a walk-behind tractor can be purchased ready-made, or you can make it yourself. Drawings and dimensions are easy to find on the Internet, one example is in the photo:
The coupling mechanism can be made in different ways, for example, from a cardan, a cross, or a part in the shape of the letter “P”. The last option is considered by many to be more reliable. The towbar must be made of stainless steel.
Varieties
When selecting a hitch for a unit, you should take as a basis the most relevant type of element.
There are several varieties.
- Single and double – used when there are different models of attachments. It all depends on which ones are practiced and in what numbers.
- Reinforced – ideal for heavy motorcycles. Its distinctive feature is that it is more impressive - it is longer and thicker, which allows the auxiliary equipment to sink deeper into the soil.
- Customizable – with the option to change the angle of the shaft, through which you can adjust the level of fixation of attachments and thereby increase work productivity.
- Universal coupling device - involves aggregation with many modifications.
If a coupling device for a motorcycle of the required modification is not commercially available or there are individual requirements for it, creating it on your own will not be difficult, since we are talking about a rather simple mechanism.
Craftsmen, who make most of the “accessories” for motorcycles with their own hands, construct the “pipe-in-pipe” trailer coupling device from a crosspiece, from a cardan and other improvised elements preserved from various devices. The owners of such devices claim that it is possible to create such a unit without any problems by sharing personal experience and drawings of the coupling device on the Internet.
How to make trailer brakes
Motoblock trailer brakes. The braking system facilitates and increases the safety of cargo transportation. There are many options for brakes, but as practice has shown, the most effective are motorcycle brakes.
How to make brakes on a trailer for a walk-behind tractor? Homemade trailer brakes are made from a cable, rod and drum. The drum must be attached to the rear wheel hub. The free spaces between the protrusions are filled with large wire. Next, a piece of pipe is welded to a pre-sharpened disk, which is installed on the axle. The brake pads are also attached to it, from which the cable will come to the lever. The brake is installed only on 1 wheel and this is quite enough to perform this function.
You can make any seat on a walk-behind tractor with your own hands. It can be short or oblong. It is made in the form of a box or chest, into which you can later put tools or improvised items. If the side of the cart is too low, then it is better to come up with a seat with a backrest so as not to strain the spine. To increase comfort, it is better to cover it with soft material.
If a chair or armchair is used as a seat, then 2 deep connectors are made for the legs for immersion inside. Thus, the chair becomes removable.
To attach a trailer to a walk-behind tractor, you need a hitch and a console. They can be removed from any decommissioned equipment.
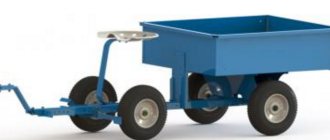
A trailer device may have 1 axle, which has a weak center of gravity. It is important to install the body correctly so that there is no overstress at the coupling point. Therefore, the center of gravity must fall under the axle of the wheels. It is much more reliable with two-axle trailers. The weight distribution of the load falls not on 2, but on 4 wheels. They are suitable for transporting loads up to 1400 kg. You can use a car trailer.
Tips and recommendations when choosing a trailer for a walk-behind tractor
When choosing, you should remember where and how often you plan to use the adapter, and what walk-behind tractor it will be connected to. So for large areas where there is a lot of work to be done, you need a model with folding sides and a tipper function. Shipment and loading will be much faster.
Trailer with drop sides and tipper function
The size of the future purchase depends not only on the volume of planned work, but also on the walk-behind tractor itself, or more precisely, its potential. If it has a maximum towing capacity of 300 kg, a large cart will be useless.
Important! If you plan to transport a load of 350 kg or more, mechanical brakes are required. Hubs also matter—it’s better to choose steel ones.
When making any purchase, most Russians place the main emphasis on price, but it is also important to keep in mind the brand and the reputation of the manufacturer. The price for products from popular companies is usually higher, but it should be remembered that these are the trailers that can be combined with almost any walk-behind tractor - this is on the list of priorities of any self-respecting manufacturer.
Assembling a homemade trailer for a walk-behind tractor
When starting to implement a project, a DIYer needs:
- create a working draft or drawing (drawing);
- prepare material for the frame and other main components;
- prepare the workplace;
- mark the main structural elements of the trailer;
- lay out and adjust alignment angles;
- collect part templates;
- carry out the adjustment of the purchased entire units to the structural elements.
Required tools and materials
To carry out the work, you need to prepare all the necessary tools:
- welding machine;
- grinder with a set of cutting and abrasive discs;
- measuring instrument - tape measure, metal ruler, protractor, square, marker and chalk, metal scriber;
- hammer, chisel, pliers;
- bench vice, set of clamps, welding clamps;
- drill, set of metal drills;
- riveter
The required materials will be:
- steel square or rectangular pipe 60×60 or 60×30 mm;
- steel square pipe 30×30 or 25×25 mm;
- corner 25×25 mm;
- channel;
- springs of the Moskvich passenger car;
- steel sheet 2 mm thick;
- galvanized sheet 1 or 0.8 mm thick;
- fasteners, bolts, nuts, rivets.
For a rigid body model, instead of a spring-loaded wheel set on springs, you will need a regular beam.
For trailer wheels, ready-made car wheels from a Tavria, Moskvich or Zhiguli passenger car are suitable.
The wheels need to be selected immediately with the hubs, this will facilitate further assembly of the homemade product.
Frame
The trailer frame is an all-welded structure in the form of a frame lattice made of a square pipe. Traverses made from a 25×25 mm square form the cross members of the frame, and the spars are made from a 60×60 or 60×30 mm pipe. After marking, all structural elements are cut and laid out on a flat surface, the joints are welded with small seams, and each joint of the elements is checked with a square. After assembling the structure, final welding of all parts is carried out along the perimeter of all planes. The frame is painted after treating the surface with a metal primer.
Chassis
In making a homemade trailer for a walk-behind tractor, the chassis is the most difficult element.
The basis of the chassis is a beam with hubs at the ends. The channels are joined to each other in such a way that they form a square. The joints are welded with a continuous seam. Wheel hubs are installed at the ends of the axle and welded.
The accuracy of the axle assembly is checked by checking the parallelism of the planes of the wheel rims. The connection between the frame and the beam is carried out using springs, while the ends of the springs are installed in welded brackets on the frame, and the beam is pressed against the central part of the springs using an earring.
The chassis installed on the frame is additionally checked for resistance to overturning. As in a car, the axle spring group must have rubber bushings in the frame mounting bracket.
Body, frame trim
The platform is marked relative to the grid in such a way that allowances are left for attaching the side posts. The front and side boards are firmly installed, and the rear board is made removable on door hinges.
The sides of the trailer have a frame structure made of 25x25 mm corners. The corners are butt welded, the seams on the inside are cleaned to the level of the metal plane.
Removable sides are assembled in the following sequence:
- side frame;
- The galvanized iron sheet is adjusted to the size of the frame;
- The side panels are cut out and secured with rivets through the corner.
The bottom of the body, made of a 2-mm iron sheet, is installed on the frame and welded with a small seam around the perimeter every 3-5 cm.
The installation of the boards begins with the installation of the front board, then the side boards are installed and connected with a welding joint.
The tailgate is secured last - first the hinges are marked and welded, and then the latches.
Other design details
After assembling the frame and body, a folding seat is installed - a wooden bench placed on top of the front side with support on the sides.
As a trailer brake system, it is recommended to use elements of the brake system of a car whose hub and wheels are used in the design. To ensure reliable operation of the brake system, it is recommended to provide an additional lever lock.
Body and frame
The body and all other structural elements are made of profile pipes, which were purchased at the nearest construction market. First, I made two side sides of the body from a pipe with a cross-section of 20x30 mm and a wall thickness of 2 mm.
Drawing of the side and rear side of the trailer
Two pipes 120 cm long and two pipes 31 cm long. I cut the ends of the pipes with a grinder, as shown in the diagram above, at 45 degrees, and placing them on a sheet of furniture chipboard, I made tack welds (with a triple electrode) in several places. I checked the squareness of the connection with a regular construction square. After checking their straightness, I finally welded the resulting workpieces, and to prevent them from moving during the welding process, I pressed them with clamps.
I sanded the welding seams with the same grinder. For convenience, I used an angle grinder with a disk with a diameter of 125mm.
Then from the same pipe (20x30mm) I cut five pieces exactly 1 meter long. These are blanks for the bottom and front side of the cart. I welded them between the two side boards, first also lightly gripping them with welding and pressing them against the chipboard sheet with clamps. Right angles were also controlled with the same construction square. I placed the two central pipes, indicated in the figure by red arrows under numbers 3 and 4, not vertically like the others, but horizontally and made spacers (1 and 2) and aligned them with the lower plane of the bottom. I also made spacers from the same pipes on the side and front sides.
To secure the bottom, I welded it in the corners of the body and in the center of the pipe cuttings, they can be seen in the photo. The rear board was made similarly to the side boards from the same 20x30mm pipes, only its dimensions were taken locally, it turned out to be 990x270mm.
The rear side of the trailer is attached to ordinary door hinges and closed with latches; for safety, reflective stickers are glued to it, which are clearly visible at night. For convenience, the side is made removable, allowing you to quickly unload the cargo being transported.
On the side and front sides I welded pieces of 25x40mm pipe for the racks of additional wooden sides (see photo below).
I did not increase the length of the body, since when it is raised the angle will be too small and the contents will not fall out of it. The body frame is ready, let's move on to the trailer frame.
Additional drawings of a homemade trailer
Additional materials with detailed descriptions and diagrams of individual components of the trailer hitch for a walk-behind tractor will help you decide on the design and give an idea of the assembly stages.
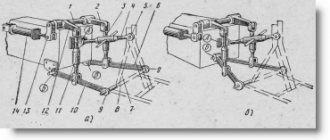
General view drawing
1 — hinge body; 2 – drawbar (pipe 43x43x5); 3 — footrest (corrugated sheet (steel) s5); 4 — frame (pipe 43x26x5); 5 — trunk (seat lid is not shown); 6 — side (steel sheet s1.5); 7 — handrail (pipe 21×1.5); 8 — stand (pipe 18×1.5, 8 pcs.); 9 — bottom (steel sheet s1.5); 10 — axle shaft housing (2 pcs.); 11 — scarf (sheet (steel) s5, 6 pcs.); 12 — bead liner (wire 3mm in diameter); 13 — back wall of the box (sheet (steel) s1.5).
Trailer swivel
1 - body; 2 — bearing 180205E (2 pcs.); 3 - axis; 4 — trailer drawbar; 5 — washers; 6 — nut M20x1.5; 7 - cotter pin; 8 — spacer sleeve; 9 — fork of the walk-behind tractor articulated unit.
Seat cover and trunk
1 — upholstery (artificial leather); 2 - foam rubber; 3 — hinge loop (2 pcs.); 4 — base (plywood/fibreboard s12); 5 edging (aluminum profile); 6 — trunk box (sheet (steel) s1.5); 7 bead liner (wire 3mm in diameter); 8 — back wall of the box (sheet (steel) sl, 5).
Running unit
1 - axle shaft; 2 — bearing 206 (2 pcs.); 3 — oil seal (felt ring); 4 — axle shaft housing; 5 — spacer sleeve; 6 — stopper (M8 screw, 2 pcs.); 7 — spring ring, thrust; 8 — trailer axle (pipe 49×4.5); 9 - frame.
Brake pedal
1 - axis; 2 — footrest; 3 - pedal; 4 — shock absorber (rubber ring); 5 - drawbar; 6 — return spring; 7 — pedal lever; 8 — bracket for mounting the main brake cylinder.
Hydraulic brake drive device: 1 - brake pedal; 2 — brake cylinder, main; 3 — connecting fitting; 4 - pipeline; 5 - tee; 6 — bracket (strip 60×14, s2); 7 — rubber bushing.
Motoblock trailer hub, how to choose
In order for the cart (trailer) to move, you need to attach wheels to it. You can take wheels from any inexpensive car. It was mentioned earlier that you can take wheels from an SZD motorized stroller.
They already come with the hubs we need. You can also buy separately similar wheels or a used rear beam from a VAZ2109, complete with wheels. Nowadays, the rear beam with the VAZ2109 is very often used due to its availability and low cost.
Assembly Tips
It’s worth starting with analytics of examples of drawings that can be seen in different sources. Next, based on what you have viewed and the elements that are available, you need to create your own sketch.
The more detailed all fasteners are described in it, the fewer difficulties will arise in practice. The optimal dimensions of the trailer for the walk-behind tractor must be worked out. To assemble the structure, it is important to know how to use a welding machine.
It is worth noting that it is one of the key factors for obtaining a high-quality output result. A trailer can have either two wheels or 4. What number will be on a particular model is determined by the expected loads on it. But still, the basis that carries the entire structure is the frame.
It is most reliable for use if it is a cast structure, where space for wheels is already allocated.
Sources
- https://stroy-podskazka.ru/navesnoe-oborudovanie/pricepnye-ustrojstva/
- https://vsesvoimirykami.ru/pricep-dlya-motobloka-svoimi-rukami/
- https://lizing-spectehniki.ru/motobloki/kak-sdelat-pricep-k-motobloku-svoimi-rukami.html
- https://www.mihali4.ru/obsluzhivanie/pritsep-dlya-motobloka-svoimi-rukami
- https://jamaster.ru/pricep-dlya-motobloka-svoimi-rukami/
- https://SpecMahina.ru/motoblok/pritsep.html
- https://MoyMotoblok.ru/navesnoe-oborudovanie/samodelnyj-pricep-dlya-motobloka-svoimi-rukami/
- https://mtz-80.ru/bez-rubriki/pricep-dlya-motobloka-svoimi-rukami-chertezhi-samodelnyh-teleg
- https://motoblok-kultivator.com/pricep-k-motobloku-svoimi-rukami/
- https://ludacha.ru/priczep-dlya-motobloka/
[collapse]