The question often arises of how to make brakes on a trailer for a walk-behind tractor, since over the past few years walk-behind tractors (including homemade ones) have been used to care for summer cottages, for which trailers are often made by hand.
Motoblocks have become widespread among summer residents and farmers. This is due to the relatively low cost of this device and the wide range of tasks that it can solve. It is worth remembering that the walk-behind tractor itself consists only of a driving pair of wheels (with an engine whose power allows the unit not to be registered as a vehicle), and all agricultural tasks (hilling, harrowing, transportation, etc.) are performed by additional tool trailers. At the same time, almost all types of trailers are manufactured by various companies and are available for free sale, however, the relatively high cost and not always successful designs of trailers have not given them wide popularity among the people.
Most people prefer to make such devices for a walk-behind tractor with their own hands. This is not only economically justified, but also allows you to create equipment that is designed to work in specific conditions (in a specific area). However, do not forget about the rules for the safe operation of such homemade products - you should definitely provide homemade brakes on the trailer to the walk-behind tractor to ensure the safety of using this device.
How necessary are brakes?
First you need to understand why trailers need brakes. The need for braking devices for towed vehicles, primarily due to the requirements of regulatory documents, appears in accordance with the rules of the road: all trailers must have braking systems.
In addition, if there is a slope, then the presence of brakes completely ensures the safety of the device. As a starting material, you can use brakes from a motorcycle or car. In this case, attention should be paid to the different types of brakes. For example, the parking brake (also known as the “handbrake”) does not provide complete braking of a loaded trailer (if the trailer with a walk-behind tractor is moving). Therefore, you should not use such a device for brakes on a walk-behind tractor.
Some craftsmen use various belt mechanisms of their own design to solve the problem, however, they are not a way out of the situation. The belt mechanism is not capable of stopping a moving trailer immediately, regardless of its load; in addition, as the belt wears out, braking will occur with an increasing braking distance. This is unsafe, so it is recommended not to implement such braking devices.
Another interesting article: What should be the belt for a walk-behind tractor?
You should also take into account the fact that in rural areas it is easier to get an old motorcycle and spare parts for it; motorcycle brakes are cheaper in auto parts stores, which makes them more accessible.
Converting a brake from a motorcycle into a braking device for a walk-behind tractor with your own hands does not require large investments and a significant investment of time. Trailer brakes are much simpler to make from motorcycle brakes. If the trailer uses motorcycle wheels, then the modifications will be minimal. Such a device will provide quick braking while moving and reliably hold the trailer motionless when parked.
Photos and descriptions of interesting options
DIYers have already come up with a considerable number of original trailer options. Perhaps one of the following will suit you as a sample.
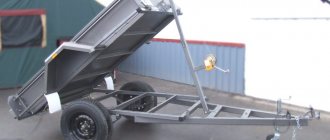
The small dump truck has small wheels, a simple frame design and no brakes. At the same time making a tipping trailer is not at all difficult; you just need to provide turning hinges and provide for fixing the body when moving.
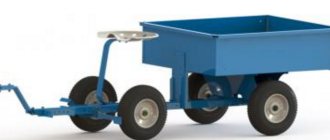
A two-axis option is also possible. Such a trolley is suitable for transporting heavy and bulky cargo paired with a powerful walk-behind tractor; in this case, a rotating mechanism for the front axle is required and a braking system will obviously not be superfluous.
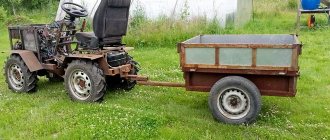
It is very smart to use part of the structure from a heavy motorcycle. In this case, a soft suspension with springs and shock absorbers is provided. The wheels of the motorcycle are light in weight and fit well with the load. A luxurious car seat increases the comfort of movement.
Seeing a wide bench, it’s hard to resist saying: “Give us a ride on your tractor, Petrusha.” If two people are going to use the walk-behind tractor, of course, you should provide appropriate seating.
If you have to transport hay, you should provide high sides. To do this, you need nests along the perimeter of the sides.
Just like a mining dump truck, not a trolley for a walk-behind tractor. However, the powerful water-cooled engine allows for the transportation of large amounts of soil.
This unsightly-looking option seemed the most practical. The loading platform is located low, which makes loading easier and increases the trailer's stability when driving. Suspension with springs and shock absorbers plus a car seat promise comfort to the driver of the motor vehicle. In general, if not a Mercedes, then it will definitely be a cool bike.
Probably, such a car is not even a “Zaporozhets”?! At least he has a trunk in front, but here, where should I put the cargo? The owner will have to sit on a pile of sand...
What will you need?
To install brakes on a trailer, you first need to acquire the following materials for their manufacture:
- Brake drum from a motorcycle.
- Motorcycle brake pads.
- Motorcycle wheel spokes.
- It is recommended to make a trailer with brakes on each wheel - this will avoid problems when braking (the block with the trailer will not turn).
It is worth highlighting the following tools that are necessary to remake these brakes:
- Welding machine.
- Pliers.
It is better to order disc sharpening from a professional technician at a car service center - they have all the necessary equipment.
Rework
Before starting work, it is necessary to perform some preparatory operations with finished materials. To do this, remove the cables and rods from the disks, after which the disks must be sharpened. Installing such brakes on a trailer is quite simple - to do this, you need to put the machined drums on the hubs and secure them in their rear part. This creates free space between the ribs of the drums. It must be closed by winding a strong metal wire around the ribs. After this, the disk is placed on the axle and secured with bushings. It is necessary to take measures to prevent the disc from moving in any direction. To do this, a piece of metal (angle or pipe) is welded onto the axle using a welding machine.
Next, the cables are mounted on the drums and pulled to the control point. To implement the control system, a lever with a gear must be used. For these purposes, a control mechanism (with a lever) for the parking brake of a car is suitable, but you can make a control system yourself using available means. It is important that a two-wire trailer brake control valve be installed along with the control lever. This is a simple way to create a trailer with practical brakes.
Another interesting article: How to make a trimmer coil with your own hands
Main parts of the cart
To assemble a cart for your walk-behind tractor yourself, you need to compare the dimensions:
- If the walk-behind tractor itself is light and compact, the trailer is made 1×1 meter length to width ratio. Industrial options are smaller than 85 - 115 cm. The capacity is then 300 kg.
- For medium-sized devices, with a power of 5 liters. With. A larger trolley 1×1.4 - 1.5 m, capacity 500 kg is suitable.
- For heavy models, it is better to make biaxial structures 1.2 - 2-3 m, with a load capacity of 1 ton.
Standard trolley.
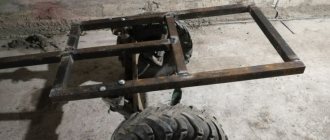
Assembling a frame for a trailer to a walk-behind tractor
The correct option would be to use rectangular pipes (60x30 mm), for the traverse - a square steel profile (25x25 mm).
Weld the structural parts together and strengthen them with special diameters, leaving small protrusions above the side members.
What else will you need:
- axial reinforcement - 30 mm;
- pillars for the driver's seat - corners 40x40 mm;
- solid triangle - brace - 20×20;
- wheel axle stands, corners - 32×32;
- corner under the seat - 20x20;
- front struts (pipes) - 40×20;
- frame strapping (corner) - 40×40;
- rear braces (pipe) - 40×20;
- transverse reinforcement (corner) - 40×40.
On the front posts, weld a longitudinal type profile and an upper trim with a cross section (25 mm) on both sides. Most materials for a cart can be found in any craftsman's garage.
It is better to select parts that are durable, not exposed to moisture and can withstand heavy loads.
Trailer frame drawing
The manufacture of the frame is shown clearly. The main material is pipes - round and rectangular. They are connected by welding.
The body can be assembled from boards 2 cm thick. Connect the sides tightly.
Axle installation
An axle should be attached under the frame, which will serve as the chassis.
It must be installed so that the wheels do not stick out from the edges of the cart.
Wheels are attached to the finished axles and the body is assembled from boards or metal sheets.
The diagram shows the entire structure with a description of the parts
Hitch and seat
You can also do the coupling yourself, following the instructions step by step. Taking a piece of metal of the required size, make a hole, the diameter of which should freely accommodate the console.
You will need several bearings; their outer side should be installed inside the hitch, and the console should be inserted into the inner plane without play.
Install the seat in front of the trailer, securing it to the axle by welding.
It’s easier to buy a ready-made seat or take it from non-working agricultural machinery
Brake system
Brakes are installed on a finished trailer as an additional element. The entire operating mechanism should be considered, including manual control from the driver’s seat. Consider the emergency stop function at high speeds and when the trailer is loaded.
Rotary unit diagram
How do these brakes work?
An important difference between the use of such devices on vehicles and trailers is that on motorcycles and cars this system is a “backup” system and is rarely used to stop the vehicle. Its main purpose is to immobilize the vehicle in the parking lot. This is due to the fact that such a mechanism is quite primitive and “rigid” - only emergency braking is provided.
However, this mechanism is quite optimal for a brake on a walk-behind tractor. Such a system can function not only with manual control (lever), but also with the use of a pedal (if there is a desire to implement foot control). In this case, the driver applies the braking device as needed, based on an assessment of the situation. Such brake options for walk-behind tractors are used quite often on the traction mechanism.
Transmissions in such devices are mechanical, carried out using cables. Conventionally, we can distinguish 3 transmission sections: the first is the lever-valve, the second is the valve-drum, the third is the drum-wheel. In this case, it is important to ensure interaction between these sections; for this, an equalizer is used. It is recommended to include a special nut in the mechanism to adjust the length of the drive. Such circuits are commonly used in automobile brakes.
Since cables usually wear out quickly, it is highly recommended that you purchase and install new cables on your trailer with brakes.
Control of such brakes is quite simple: to release the brake, move the lever, loosening the cable tension. In order not to waste significant forces to move the lever, it is recommended to provide a return spring in the design, which can be placed anywhere: directly on the brake mechanism, cable, equalizer, etc.
When using brakes from a car as the main material, it is possible to install a warning lamp switch.
It is always installed on car brakes, but it is superfluous for a trailer.
Another interesting article: Main types of gearbox for walk-behind tractor
It can be installed, but it will not affect the performance of the brake, so it is recommended to remove it.
How to make a trailer for a walk-behind tractor yourself: step-by-step instructions
A walk-behind tractor is a very useful and multifunctional equipment for private households. With its help you can perform various work on cultivating the land. But it can also be used to transport considerable cargo. And for this you need a cart for the walk-behind tractor. There are many ready-made trailer models on sale. But their cost and quality are not always satisfactory. We will tell you in this article how to make a high-quality trailer for a walk-behind tractor with your own hands, spending a minimum of money and effort.
Some aspects of preparation
Many people cannot work without diagrams or drawings. However, in this situation they are, in principle, not needed. This is due to the fact that to create the braking system of a walk-behind tractor with your own hands, ready-made braking devices are used, the dimensions, weight and design of which are known.
In addition, it is quite easy to find drawings for specific brakes. However, it is recommended to first draw a diagram of the future braking system.
The diagram should indicate such important additional data as the dimensions of the axle, the dimensions of the pedal or lever, the installation location of the return spring, the installation locations of shock absorbers (rubber seals are usually used), and brackets for fastening the brake cylinders. Such a scheme significantly simplifies the installation process, which allows for correct assembly of the braking system without errors.
Otherwise, you can make mistakes that will lead to the braking mechanism not working, which can lead to injury. Therefore, it is extremely important to approach the implementation of this system with maximum responsibility and care, paying attention to even the smallest details.
This will make it possible to create a device that will be highly reliable and ensure safe operation of the trailer. This is especially true since in this case the mechanism is manufactured independently.
Tipper trailer for walk-behind tractor
In order to make your trailer a dump trailer, when constructing the frame, weld ordinary “droplet” door hinges to beams 1 and 2 (shown in the photo below). To prevent the body from tipping over during driving and loading, it can be secured by welding a latch (such as a door latch) to the edge of the frame.
Such a trailer is ideal for such models of walk-behind tractors as Neva MB-1, Neva MB-2, MTZ, Oka and other models from well-known manufacturers.


