Every person who has his own plot of land, be it a farmer, a summer resident, or a simple villager, knows what planting potatoes is, what hard and not easy work it is. In villages, potatoes are generally planted in large quantities since they are the boss of everything in the village. The tubers are used for food and to feed domestic animals, and they also make a supply of seed material for subsequent planting next year. It’s not like you went to the city to buy what you need, here you work from morning to night so that there is a harvest in the bins. The smallest potato garden in the village is about thirty hundred square meters. It’s scary to think how much work and effort you need to put into this area. But people in the countryside live okay and don’t complain, since they are accustomed to physical exhausting work from childhood, unlike a city dweller, as they say, to each his own).
Since ancient times, humanity has been trying to facilitate and simplify the work of the villager; all sorts of devices and units have been invented for sowing and harvesting. And in the twenty-first century, our agriculture is, to put it mildly, in decline after the collapse of collective and state farms. There is not so much equipment on the move, and fuel and lubricants cost a penny. In private households, walk-behind tractors are increasingly being used. This technique is popular among people for its productivity and simplicity. There are also many different attachments for the walk-behind tractor, for example a potato planter.
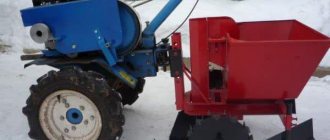
This attachment greatly facilitates physical labor, but it costs a lot of money for a villager and is only a dream. But our author does not agree with this. If you wish, you can do everything yourself, and the potato planter was no exception to his principle. After surfing the Internet and consulting with a neighbor, I decided to assemble a similar unit with my own hands. So what does the author need to bring this idea to life?
Materials:
metal corner, tank from a Soviet washing machine, gear, chain, fittings, steel wire, channel, wheels.
Tools:
welding machine, grinder, drill, hammer, set of keys, screwdriver, wire cutters.
First of all, the author studied the drawings taken from the Internet and began to carry out his work based on them.
Reading time: 7 minutes No time?
If you want to make the process of growing potatoes easier, pay attention to the capabilities of a potato planter for a walk-behind tractor. This functional device, together with a potato digger, allows you to mechanize the process of planting and digging such a popular vegetable. We invite you to get acquainted with the design features of such devices and the procedure for making them yourself.
Read in the article
Design and principle of operation of potato planters for walk-behind tractors
Such devices consist of:
- frames;
- a bunker in which potatoes intended for planting are placed;
- wheel base;
- a mechanism that ensures loosening of the soil and planting tubers on the site.
Most models have a similar device
Attention! In addition to those listed, other elements may be present - for example, a container for fertilizer.
The operating principle of such a device is very simple. The sprocket mounted on a wheel base is part of a chain lift. When the wheels rotate, the tubers from the hopper rise through a vertical pipe and then are dropped down into the prepared furrow.
The main types of potato planters for walk-behind tractors
Such devices can be single- or double-row. The first type is suitable for a small area. It has small dimensions and low productivity.
Some potato planters for walk-behind tractors allow you to plant sprouted potato tubers. Others focus exclusively on unsprouted ones. Also, a number of models allow connection to a certain line of walk-behind tractors. Others, if they have a universal hitch, can be aggregated with various units. The loading hopper can be rectangular or cone-shaped.
Depending on the type of tuber feeding, such attachments are usually divided into units with:
- flat belt system . Tubers are planted using horizontal belts;
- spoon system . To serve potatoes, a design consisting of spoons attached to a belt is used;
- shaped belts , which have a special recess resembling a spoon. An operator must be present when planting, but there is no fear of damaging the tubers;
- piercing mechanism . Such devices are relevant when planting cut potatoes;
- multi-belt design . Such attachments allow you to simultaneously plant two rows of potatoes.
Feeding mechanism may vary
Specific points of using a potato planter for a walk-behind tractor
If you decide to use a potato planter for a walk-behind tractor, familiarize yourself with the features of its use in order to understand how to set up the device and the planting process itself.
Setting up a walk-behind tractor and potato planter
Before planting, the soil is plowed, harrowed and moistened. The unit and device are configured to ensure the following points:
- forming a furrow of suitable depth;
- ensuring sufficient distance between furrows;
- stable operation of the planting material supply mechanism.
Read also: Elenberg microwave works but does not heat
Recommendations for planting potatoes
To ensure that the walk-behind tractor does not change its position and is stable due to the large weight of the potato planter, you should immediately take care of the ballast, which is attached to the front of the unit. The speed of the unit should be about 1 km/h. Forming a furrow and covering the planted potatoes with soil is carried out using special sealing discs. Special cultivation paws should prevent the formation of marks after the walk-behind tractor passes.
If possible, planting potatoes should be uniform in size. It should be carefully prepared for the growing process.
Tips and tricks
The landing process using such a device is as follows:
- Place another 2-3 bags of potatoes on top of the filled tank to save time when the tank is empty.
- One person should be on the potato planter, and the second on a walk-behind tractor or mini tractor.
- Do not exceed the speed of 1 km/h.
- It is desirable that the design of the device include discs that bury the holes.
- To change the planting depth, adjust the stepladders or change the angle of the discs.
Potato planter for walk-behind tractor: popular models
It is not necessary to make a potato planter for a walk-behind tractor with your own hands. You can purchase a ready-made one. We invite you to get acquainted with the technical characteristics of the most popular models to make it easier for you to choose the appropriate option for your garden.
You can always choose the appropriate option
Potato planters KS-1A and KS-1: technical characteristics
The KS-1A potato planter weighs 33 kg and has a hopper capacity of 34 liters. The distance between the wheels is 0.6 m. Allows you to plant up to 5 tubers per 1 linear meter. Special discs allow you to bury potatoes and form an even ridge of soil. The model can work with walk-behind tractors “Salyut”, “Neva”, “Oka”, “Favorit”, “Kadvi” and a number of others. Allows you to plant 0.2 - 0.25 hectares of potatoes in an hour.
KS-1A - single-row model for a small area
Attention! Before purchasing, make sure your walk-behind tractor is compatible with the KS-1A potato planter.
The KS-1 model is designed to work with heavy and medium-heavy walk-behind tractors. The device weighs 25 kg. Allows you to form rows 0.6 - 0.7 m wide with a productivity of 0.2 ha/hour. For each linear meter, 5–6 potatoes are planted.
KS-1 has sufficient performance for a small area
We invite you to watch a video that shows the process of planting potatoes using a walk-behind tractor with this potato planter:
Potato planter KSM 1A: technical characteristics
The device weighs 44 kg with a hopper volume of 41 liters. The distance between planted furrows is 0.25 - 0.3 m with a row width of 0.4 - 0.6 m. The KSM 1A potato planter has a productivity of 0.25 ha/hour. Can be connected to the Neva, Cascade, M2, MB walk-behind tractors, as well as to the Mustang and Zirka with a special coupling.
KSM 1A: reliable design
Potato planter for the Neva walk-behind tractor
A specialized potato planter has been developed for the Neva line, designed to be connected to a walk-behind tractor using an appropriate hitch. Unlike universal models, this device is small in size and weighs 25 kg. With its help, you can form rows of 0.6 - 0.7 m with a productivity of 0.2 ha/h. The price of a potato planter for the Neva walk-behind tractor is higher than that of universal analogues.
Light weight and compact dimensions
What is a potato planter
A potato planter is a special device used for precise and quick planting of potatoes. This technique is in great demand on farms.
Description and characteristics of the device
Different models may have additional mechanisms. But most units have similar designs:
- Furrow cutter. This is the part that creates the furrow for the potatoes. Usually the keel version is used. During movement, this element pushes the soil apart.
- Rippers. These parts loosen the soil compacted by the wheels or tracks of the tractor. They are mounted opposite the wheels on steel stands - behind all elements of the potato planter.
- Planting mechanism. Often the elevator type is used, which consists of a transport element and gripping parts. The latter scoop up the potatoes from the bottom of the hopper and move them into the planting tube of the opener.
There are also disc models where tuber turners and shaking doors are used to move potatoes. The turners are located at the bottom of the hopper at the exit. They are made in the form of a rotating shaft with “cams” that lift the flaps and move the tubers.
The productivity of the potato planter depends on the speed of movement. For tractor models, the operating speed is 4-10 km/h. In one hour, such units are capable of planting up to 1.3 hectares of potatoes. Options designed for walk-behind tractors have a productivity of up to 0.2 hectares per hour of operation, that is, one hundred square meters of area is processed in approximately 3-6 minutes. Manual planting will not give this result.
What is it for?
Thanks to the potato planter, work is greatly accelerated. The distance between rows and planting depth are automatically maintained. But such units are used only on previously prepared soil.
Reference. In addition to planting potatoes, the device is capable of performing other operations, for example, applying mineral fertilizers and treating tubers.
Application Features and Benefits
A homemade potato planter has the following advantages:
- Planting becomes easier, simpler and faster, regardless of the soil structure.
- Planting is done at the same depth.
- The tubers in the row are distributed evenly.
- The device has high performance at low cost.
- If you use high-quality materials to make the unit, it will last for many years.
The planting speed is not affected by the potato variety. Thanks to the device, productivity increases, as it plants tubers evenly and at the same distance.
Potato planters for mini-tractors and walk-behind tractors: main differences
Many models of potato planters can be connected to both a tractor and a walk-behind tractor. As a rule, these are small structures that allow you to form two rows. Models designed specifically for mini tractors have greater weight and dimensions. With their help, 1 – 2 rows can be formed simultaneously.
Potato planters for mini tractors allow you to change the speed of movement, as well as the distance and depth at which tubers are placed in the holes. With its help, you can simultaneously form up to four rows, while models for walk-behind tractors do not have such capabilities.
Models for mini tractors are more productive
How to make a potato planter for a walk-behind tractor with your own hands: manufacturing technology
If you can’t buy a potato planter for a walk-behind tractor, you can make it yourself. We suggest you understand the intricacies of the technological process so that you can begin assembling such a useful device.
A homemade device can be very functional.
How to prepare a drawing of a device for planting potatoes with your own hands: useful tips
To make such a useful device for planting potatoes with your own hands, you must first develop a drawing. When developing it, you should decide on the operating principle of the device, overall dimensions, and method of attachment to the unit. If you have never had to assemble such structures before, you can use ready-made documentation.
When developing a drawing, the operating principle of the device is selected
Making a frame and hopper for a homemade potato planter for a walk-behind tractor
So let's get started. The work process will be shown in photo instructions.
| Illustration | Description of action |
| We weld the frame for a homemade potato planter for a walk-behind tractor from a profile square pipe 40 by 40 mm. We additionally weld to the frame seats for bearings in which the lower axle with the drive sprocket of the chain drive mounted on it will rotate, and vertical posts designed to install the upper axle with the driven sprocket. The racks are made from pipes 20 by 40 mm. | |
| A potato bin can be welded from metal sheets or made from scrap materials. Many people use tanks from old washing machines and other similar containers. |
Making your own rippers and holders for potato planters
A metal rod is used to make the ripper holder. Clips holding the paw stands are attached to it. To make a rod, use a corner or a square pipe 50 by 50 mm. The holder is attached to the frame using bolts.
Rippers for potato planters can be made with your own hands from rebar
Seats and wheels of a homemade potato planter for a walk-behind tractor
To make planting potatoes comfortable, you should take care of a seat and suitable wheels. The latter, together with ball bearings, are mounted on the axle and installed on the frame. For protection, wide locknuts or cuffs can be provided.
Wheels must have the correct diameter
Advice! Instead of wheels, it is better to use lugs.
The seat can be made from boards and then covered with foam rubber and any material that is comfortable for sitting.
Read also: How to tighten a bolt without a torque wrench
We also suggest watching videos that describe in detail the process of assembling a homemade potato planter with your own hands:
Instructions
Do-it-yourself homemade potato planters for walk-behind tractors are a regular cart on wheels, which is attached to a walk-behind tractor. The apparent simplicity is a little deceptive, because the design of this unit has its own nuances and features that are worth paying attention to.
Frame design
You need to start assembly by making the frame structure. It will consist of channels welded together, as well as longitudinally located spars, which are connected by three transverse elements.
Thanks to a lawn mower, you can trim the grass and remove weeds - this is a suitable device for mowing unnecessary plants near the fence, at home, between the rows in the garden in a flower bed, and so on. Learn how to spool a line onto your lawnmower here.
The MAZ-500 can rightfully be considered one of the iconic cars of the Soviet period, which became the first cabover truck produced in the Soviet Union. MAZ-500 is a Minsk legend from the 60s.
Cultivation is on the list of priority tasks for any tiller, as it helps prevent the appearance of weeds, at least in large quantities, and helps saturate the soil with oxygen, thanks to loosening. Here's how to make a cultivator yourself.
There will be an arch and a fork in front, and on the sides of the structure there will be racks of elements for planting and digging holes. The wheels of the potato planter must be equipped with lugs. Between them there is a wooden disk 6 cm thick with four semicircular grooves located on it.
This disk will capture potato tubers, moving them into the dug holes.
Next you need to make a container for potatoes - a bunker. It can also be made from plywood, but for structural strength it is best to use sheet metal 3 mm thick.
The four sides of the hopper are measured and then cut out. They are connected by welding. The bottom can be covered with rubber so that the potato tubers are not damaged. It is necessary to strengthen the frame with steel strips, placing them from the middle transverse part to the arch in front.
There you need to weld linings and corners with a thickness of 4 mm. DIY drawings of a potato planter for a walk-behind tractor, which can be found on the Internet, describe this process in sufficient detail. Next, you need to attach a support and a footrest, consisting of a sheet of metal 5 mm thick, to the side members.
Making a seat
We make a seat. To do this, we need a metal corner with dimensions of 4.5 × 4.5 × 0.4 cm. To this support we need to attach boards covered with foam rubber for greater comfort. For the wheel axle, you can use a steel pipe that is sized to fit the frame.
At the ends there should be spikes secured with steel pins. As wheels, you can use any wheels from old equipment that has served its purpose. To hold the rippers, a metal rod measuring 5x5x0.5 cm is used.
On the sides of this rod there are elements holding the blade struts. They are made from metal plates 0.5 cm thick. As a seeder, you can use a regular 10 cm pipe, the wall thickness of which will be about 0.3 cm.
A furrow cutter will be located at the bottom of this structure. Digging elements, for which discs from a seeder can be used, must have two bearings. In principle, this description is quite schematic, with an approximate indication of dimensions and parameters.
On the Internet you can find quite a lot of detailed drawings, where other markings are indicated, so there are no strict recommendations in this process.
How to make a potato digger for a walk-behind tractor with your own hands: video instructions
Having planted potatoes, you need to prepare to dig them up. In order not to do this with your hands, it is worth making a special digger for a walk-behind tractor, which will help you harvest potatoes without much effort. We invite you to get acquainted with the process of creating such a device.
Potato digger makes harvesting easier
Homemade potato digger for walk-behind tractor: features of creation
If you decide to assemble a potato digger for a walk-behind tractor with your own hands, you should first decide on its design features. Such devices can be:
- simple, lifting the tubers upward using teeth or rods. Can be installed on any walk-behind tractor;
- vibration.
We invite you to watch a video that tells you how to make a homemade potato digger for a walk-behind tractor:
Conveyor potato digger for walk-behind tractor: design features
This is a vibration type device. The conveyor potato digger for the walk-behind tractor is equipped with a special grid through which the soil is sifted. The ploughshare, installed at the front, cuts through the soil and lifts it up along with the potatoes. After sifting out the tops and soil, the tubers are discarded to the ground.
The conveyor model allows you to clear the tubers from the soil
Advice! By providing a special bunker for collecting potatoes, you can simplify the harvesting process.
Additional Tips and Warnings
Due to the fact that the weight of a homemade potato planter is quite impressive, it is necessary to install additional weighting on the walk-behind tractor, which will not allow it to tip over. In addition, there are certain recommendations that help make the process of planting potatoes more simplified.
Potato container
You can additionally put a couple of bags of potatoes on the container in which the tubers will be placed for planting, so as not to waste time filling in new ones. It is recommended to drive at low speed, approximately one kilometer per hour.
The closing discs can be adjusted, for which they need to be rotated along the axis of rotation. In addition, you can adjust the inter-row distance and the location of potato tubers from each other.
To do this you need:
- Loosen the stepladders that hold the posts to the supports.
- Slightly adjust the angle of entry of the planting elements into the soil.
Assembling a homemade potato planter is advisable in cases where there is not enough money to purchase a ready-made device in specialized stores.
If we consider that the average cost of a potato planter is about 13 thousand rubles, then making it at home becomes more and more justified.
At what price can you buy a potato digger for a walk-behind tractor?
The price of a potato planter for a walk-behind tractor depends on its design features, size and manufacturer:
| Model | Characteristics | Price (as of September 2022), rub. |
| KSM 1A | Suitable for walk-behind tractors "Neva", "Oka", "Cascade", "Luch". | 8300 |
| FORZA KSMB | Elevator type. Weight 35.9 kg. Hopper 20 l. Forms a track of 550 mm. Dimensions 625 × 870 × 500 mm. | 8000 |
| VRMZ 00.70.04.00.00 | Weight 37.5 kg. Dimensions 680 × 570 × 790. Designed for installation on Neva walk-behind tractors. | 11750 |
Perhaps reviews from summer residents about the use of potato planters will also help you make your choice.
Review of the model IP Kryuchkov APK-3
More details on Otzovik: https://otzovik.com/review_3269716.html
Review of the KSM-1 model
More details on Irecommend: https://irecommend.ru/content/sadim-mnogo-kartoshki-i-bystro-delyus-sekretami-uspeshnoi-posadki
Share in the comments, do you have a potato digger for a walk-behind tractor, or have you just decided to buy one, or maybe assembled it yourself?
A do-it-yourself potato planter for a walk-behind tractor is a convenient unit used by summer residents and gardeners.
Such a unit consists of the following components:
- Frame with metal wheels equipped with lugs;
- Bunker for planting material;
- Chain with cups (conveyor) - mounted on 2 sprockets, one of which is fixed to the wheel axle, and the second - in the upper part of the hopper;
- Seed line - serves to move the chain with the cups and the tubers placed in them from the hopper until planting in the soil;
- Opener (furrow maker) - cutting into the soil to a certain depth, forms a groove into which the tubers are placed;
- Hatchers - discs or blades placed behind the frame that fill the furrow with the tubers placed in it, forming a triangular ridge
Drawing (diagram) of a standard potato planter for a walk-behind tractor
Produced independently, it has a number of advantages and several disadvantages.
The advantages of this unit include:
- Convenience and speed of planting - a potato planter allows you to plant areas that are quite large on the scale of a dacha or farm much faster and without significant effort;
- Minimizing soil tillage - such a unit allows you to avoid using a cultivator, hiller or harrow once again. During planting, he himself loosens, makes a furrow, plants tubers in it and “covers” them on top with a fairly thick layer of soil;
- Equal depth - a properly configured homemade unit will plant tubers at the same depth, which will subsequently ensure more friendly and healthy shoots;
- Maintaining the distance between planted tubers;
- Ease of use - planting with such a unit does not require special knowledge and skills.
Minuses:
- It is mandatory to have sufficiently powerful equipment - to use both a homemade and factory-made potato planter, you need a walk-behind tractor or
Motor cultivator with a power of at least 5-6 hp;
- Availability of welding skills - to assemble the frame, minimal skill in using a welding machine is required;
- Difficult to use on heavy soils - compared to more powerful and durable units mounted on large tractors, small potato planters have low efficiency when used on heavy clay soils.
How to make a potato planter for a walk-behind tractor with your own hands
A potato planter for a walk-behind tractor is a unit that you can not only purchase, but also make with your own hands. To do this, you need to prepare all the necessary materials and tools,
Materials
- Corner or channel for the frame;
- Support metal wheels;
- Bearings;
- Sheet steel for the rear wall of the bunker, 1.5-2.0 mm thick;
- Galvanized sheet;
- Sprockets with 19-21 teeth;
- Timing chain;
- Axle for drive wheels;
- Steel wire 3-4 mm thick.
Tools
In order to make a potato planter for a walk-behind tractor with your own hands, you will need the following tools:
- Grinder (angle grinder);
- Welding machine (semi-automatic);
- Drill or powerful screwdriver;
- Compressor with spray gun.
A reliable welding machine is the main tool for making a homemade potato planter
Manufacturing process
- A rectangular frame is welded from a channel or corner, its size is selected taking into account the size and capacity of the hopper;
- The first sprocket is attached to the center of the support wheel axis;
- On both sides of the sprocket, bearings are pressed onto the axis of the support wheels in cages made of a thick-walled pipe of suitable internal diameter;
- Metal support wheels are attached to the axle;
Read also: Which hole to drill for an 8 mm dowel
Important! A belt drive with pulleys instead of sprockets for the tuber planting mechanism instead of a chain drive is not suitable, since the belt is more susceptible to stretching, slipping and damage in wet spring conditions.
The axle is welded to the frame; for this purpose, the bearing races are welded by resistance welding to a transverse corner specially provided for this purpose in the frame.
- A spiral of 12-15 turns is wound from the wire using a vice and a pipe with a diameter of 50-60 mm;
- The spiral is cut lengthwise, obtaining 12-15 individual rings;
- The rings are welded to the chain at a distance of 8-10 cm from each other. To prevent small potatoes from slipping through the ring, a bottom made of the same wire or pieces of sheet steel is welded to it from below;
- For the seed tube, a pipe is used with an internal diameter 10-55 mm larger than the diameter of the cups (metal rings with bottoms for tubers), and with a length equal to approximately half that of the chain. A longitudinal cut is made in the pipe, 20-30 mm wide;
- The seed tube is welded to the frame using two thick-walled metal plates;
- In the upper part of the seed tube, the cut is increased to a width of 40-50 mm;
- Using the lock located on it, the chain is disconnected and put on the lower and then the second sprocket. At the same time, it is carefully passed through the seed tube;
- The upper sprocket with an axle and two bearings is welded to the seed tube using angles;
Conveyor tension mechanism
Important! The upper sprocket can be attached rigidly to the seed tube or have chain tension adjustment. The latter option is preferable, since it helps, if necessary, to adjust the tension force of the chain in case of its stretching.
- Parallel to the seed tube near the lower sprocket, a pipe is welded to the frame, into which a chain with cups is inserted;
- The rear wall of the hopper is welded to the pipe and to the ends of the corners on which the upper sprocket is attached;
- A hopper with a capacity of 20-30 kg is riveted or welded from tin, 0.8-1.0 mm thick;
- In the upper part of the seed tube, two limiters are welded parallel to the movement of the chain, which are necessary so that the potatoes, falling out of the cup when turning over, fall into the pipe and not past it;
- Sealers are welded to the rear of the frame; for this, two convex plates are welded to the racks. The harrows are positioned at an angle so that when they cover the furrow with the planted potatoes with soil, they form a ridge 40-50 mm high above it;
- A towbar is welded to the front of the frame for attaching the unit to the walk-behind tractor (it can be used to adjust the height of the potato planter’s attachment to the walk-behind tractor), as well as a coulter. The body of a conventional hiller is used as a coulter. The central axis of the opener should be located under the center of the pipe from which the chain with cups emerges;
- On the wheel rims, lugs are welded in a checkerboard pattern - plates 20-30 mm high, located on the rim with a pitch of 40-60 mm;
- The frame, hopper, support wheels are cleaned, degreased and covered with 2-3 layers of paint.
Ready-made homemade potato planter
The approximate dimensions of a potato planter manufactured using the technology described above are as follows:
- Frame – 580×300 mm;
- Drive wheel diameter – 310 mm;
- Distance between wheels (track) – 585-600 mm;
- Seed tube length – 770 mm;
- The distance between the axes of the sprockets is 570 mm;
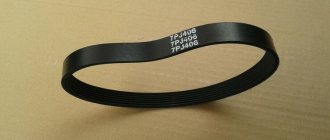
- Hopper (length×width×depth) – 370×400×400 mm;
- Covers (length×height) – 275×140 mm;
- The upper sprocket is 19 teeth, the lower sprocket is 21 teeth;
- Bearings – 4 standard 205 size bearings.
Important! When using both a factory-made and a home-made model of potato planter, it is imperative to install a heavy counterweight in the front part of the walk-behind tractor to improve the traction of its wheels with the soil.
How to make your own potato planter
Many vegetable growers and farmers prefer not to spend money, but to make potato planters with their own hands.
Required materials and tools
For production you will need:
- Corners and metal pipes from which the frame will be created. They are also needed for the installation of other structural elements.
- Gears are elements that ensure the operation of the landing mechanism.
- Bunker for storing potatoes. Take a ready-made container or make it from sheet steel.
- Parts designed to create holes and bury them after planting.
- Wheelbase.
The listed elements are mandatory for a home potato planter. They are made independently or removed from old agricultural equipment.
To work you will need:
- Bulgarian;
- welding machine;
- spars;
- channels;
- pair of axes;
- bearings;
- chain from a car engine;
- two sprockets for the chain;
- wire with a cross section of 6 mm;
- sheet metal 2 mm thick;
- profile steel pipe;
- any cone-shaped container for a bunker.
Drawings, dimensions and main elements
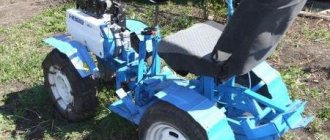
Externally, a homemade potato planter looks like a cart on wheels attached to a walk-behind tractor or mini tractor. Let's look at what the simplest design consists of.
The “trolley” is placed on a frame made of channels. A steel arch and fork are mounted to its front part. On the sides of the frame, stands of closing discs and supports for the tuber feeding system are installed.
Important! Closing discs are an important element. Thanks to them, the furrows are even, and the potatoes are not buried more than necessary.
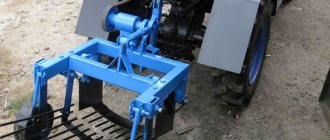
Photo 1
The frame, in turn, is installed on an axle with two wheels at least 15 mm wide, equipped with lugs. Simple rubber wheels will not work as they will slip.
Photo 2
Using ready-made drawings with dimensions, you can make a cool potato planter with your own hands, practically from scrap metal (see photos 1, 2, 3, 4).
Photo 3
Photo 4
Step-by-step instruction
Many craftsmen supplement the “basic assembly,” for example, with a fertilizer dispenser. This device allows fertilizing to be carried out simultaneously with planting.
Let's take a closer look at the process of assembling a planter for a walk-behind tractor and a mini tractor.
For walk-behind tractor
First, the frame is made. To do this, use a channel (steel size 8). Longitudinal spars with three cross members are attached to the frame.
Sheet steel is usually used for the bunker, but 10 mm thick plywood is also suitable for small equipment. This will be enough for 20 kg of potatoes.
An elevator is installed in the bunker, which is secured in a vertical position. Bowls with a diameter of 5-8 cm are placed on it. For everything to work, the mechanism is connected through a chain drive to the drive wheel. To remove the tubers, the seed tube is fixed under the elevator.
A sprocket (8 cm) is connected via a chain to the walk-behind tractor to transmit force. This element transmits the movement to the digging discs.
This design allows you to use a regular bicycle chain. The distance between tubers will be 35 cm.
Important! After the main installation, the frame must be strengthened with steel strips. The arch also needs reinforcement. For this purpose, sheet steel plates are used.
For mini tractor
The diagram of such a unit is shown in the photo:
Algorithm of actions:
- Manufacturing begins with a frame on which the remaining elements will be placed. To do this, longitudinal spars are welded from channels. They are connected to each other by steel strips.
- An arch with forks directed to the central rod is welded at the front.
- The frame is reinforced with steel beams. They are fixed on the other side and to the middle of the arch.
- A seatpost support is made from the corner and mounted on the spar.
- A bracket on which the bunker will be placed is welded to the inclined beams.
- The potato tank is welded from sheet steel 2 mm thick.
- The hopper is secured to the bracket with bolts.
- Now the ripper and wheel axle are mounted to the bottom of the frame. For the axle, an ordinary steel pipe is used as a base, at the ends of which axles are placed. For the wheelbase, you can take wheels from old equipment.
- Ripper holders are made in the form of squares made from rods. Clips with a steel thickness of 6 mm are welded at the ends. They will house cultivator stands.
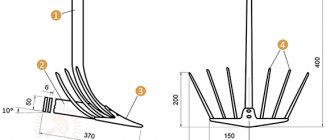
- The seeder is made from a steel pipe with a cross-section of 100 mm. The minimum wall thickness should be 3 mm.
- A furrow cutter is welded to the bottom of this pipe. The thickness of the steel is at least 6 mm.
Homemade potato planter for a homemade mini tractor. Part 1.
TOP 3 factory models of potato planters
Among the factory models of potato planters for walk-behind tractors, the following are the most popular:
Important! The name of these models stands for single-row potato planter (PT), the number “1” after the hyphen. The additional letters “M” and “A” indicate modifications (improvements) of previously released models.
- Type – single-row, trailed;
- Weight –25 kg;
- Track – 700 mm;
- Hopper capacity – 40 l;
- Productivity – 0.15-0.2 g/hour;
- The required power of the walk-behind tractor is from 6 hp;
- Price – 12000-14500 rub.
Potato planting unit KS-1A
- Type – single-row, trailed;
- Weight –33 kg;
- Track – 600 mm;
- Hopper capacity – 34 l;
- Productivity – 0.25 g/hour;
- The required power of the walk-behind tractor is from 6 hp;
- Price – 15,000-16,000 rubles.
KSM-1A – productive and convenient potato planter
- Type – single-row, trailed;
- Weight – 44 kg;
- Track – 600 mm;
- Hopper capacity – 41 l;
- Productivity –0.25 g/hour;
- The required power of the walk-behind tractor is from 6 hp;
- Price – 15500-16000 rub.
All these models work well with walk-behind tractors, both domestic (MTZ, Neva, Salyut) and foreign-made (Viking, CAIMAN, Daewoo).
Important! You can buy one of the models listed above in almost any large and medium-sized Russian city. But the most favorable prices are in such large cities as Moscow, St. Petersburg, Yekaterinburg, Novosibirsk. This is explained by high competition among a large number of sellers: firms, private entrepreneurs, which causes a wide variety of prices, seasonal discounts, and the possibility of purchasing equipment in installments or on credit.
Thus, a homemade inexpensive potato planter for a walk-behind tractor is a very convenient, easy-to-use unit, but at the same time it greatly facilitates the work of a summer resident or small farmer. Made from materials available to everyone, such a homemade product, compared to store-bought counterparts, will have a cost several times lower, while not being inferior to them in quality and reliability.