Buying a walk-behind tractor as a necessary means of production has become a necessity for many, but for normal operation of the unit, you must buy a trailer as part of the kit. However, the proposed models do not always take into account the necessary features, and this is one of the reasons that many owners of such assistants prefer to independently design a trailer for a walk-behind tractor with their own hands.
To build a trailer for a walk-behind tractor yourself, you can do the following:
- trailer frame;
- body;
- axle and chassis;
- hitch.
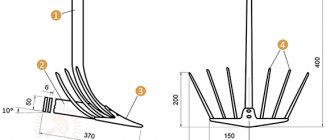
Drawing of a trailer for a walk-behind tractor
To make the work easier, you need to purchase or use ready-made elements:
- passenger car wheel hubs;
- wheels assembled with tires;
- tow hitch for a vehicle.
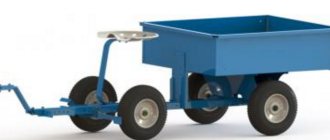
Types and purpose of models of main structures of walk-behind trailers
The main types and models of trailers for self-made walk-behind tractors are classified according to the type of homemade body part design:
- one-piece structures;
- transformable structures with folding sides;
- tipper body types.
The one-piece design of the trailer includes a rigid, non-removable side body. Due to the rigidity of the design, the trailer allows you to transport cargo both in bulk and in packaged form. The body has a large rigid frame platform connected by a welded joint to the side guards. A folding tailgate is provided for loading and unloading.
Transformer structures are trailers for universal use; they have the functions of both a rigid body trailer and a platform for transporting large cargo. The frame base is a rigid base, and folding or removable sides during transformation form an additional area of the flat platform.
The tipper type of walk-behind trailers allows for tipping and unloading of bulk cargo without additional effort.
Practical recommendations
If the power of the equipment does not exceed 5 hp. s., the optimal dimensions of the trailer in length and width will be 1.5 and 1 m. When the parameters of the body are calculated, pieces of the corrugated pipe are cut to the required length and a frame is welded from them. The design is quite rigid, so there is no need to install reinforcing elements in the corners. In order for the seam to be smooth and of high quality along its entire length, you should work on a flat surface, preferably using electric arc welding.
Body assembly and painting
The sides of the trailer are framed with a 25-30 mm profile. Sheathing is assembled from sheet metal, which is then attached to the corrugated pipe with threaded connections. The metal for the body must be free of rust. If there is corrosion, it is removed mechanically, and then the surface is coated with a priming rust converter. The body is fitted to the frame. If all dimensions match, perform a test assembly. Then they disassemble, set the body aside, and cover the frame with oil paint. It is necessary that there are no unpainted elements left anywhere.
The body flooring is also coated with paint, after which it is installed in its place. Fix the joints with fasteners, then paint the protruding parts of the bolts so that corrosion does not appear in these places. If the dried paint has come off in some places during installation, these areas are touched up. A drawbar is made from the thickest pipe.
Steering gear
Since the design provides for a tilting trolley, special axles are made from the bottom in the middle. To prevent the folding mechanism from jamming when lifting, it is necessary to maintain alignment. Reinforcement bushings are attached using a plate 5-6 mm thick. The same parts are welded to the coupling device (drawbar), which serves as the base frame.
Assembling a hinge joint with your own hands requires increased precision. The basis is a stainless steel circle with a diameter of 5 cm. The studs are also machined from steel, only hardened. Since the intensity of movement of the hinge will be low, you can do without bearings, the main thing is to regularly lubricate the mechanism.
When everything is ready, perform a test loading and check if there are any problems during movement, during turns, when starting, stopping, etc. If the equipment with a trailer works normally in all modes, the structure is ready for operation. If the power of the walk-behind tractor allows, the cart can be loaded with 300 to 700 kg.
A homemade trailer costs several times less than a factory one, and it will serve for decades. The main thing is to use high-quality materials, observe dimensions and carefully assemble.
Assembling a homemade trailer for a walk-behind tractor
When starting to implement a project, a DIYer needs:
- create a working draft or drawing (drawing);
- prepare material for the frame and other main components;
- prepare the workplace;
- mark the main structural elements of the trailer;
- lay out and adjust alignment angles;
- collect part templates;
- carry out the adjustment of the purchased entire units to the structural elements.
Required tools and materials
To carry out the work, you need to prepare all the necessary tools:
- welding machine;
- grinder with a set of cutting and abrasive discs;
- measuring instrument - tape measure, metal ruler, protractor, square, marker and chalk, metal scriber;
- hammer, chisel, pliers;
- bench vice, set of clamps, welding clamps;
- drill, set of metal drills;
- riveter
The required materials will be:
- steel square or rectangular pipe 60×60 or 60×30 mm;
- steel square pipe 30×30 or 25×25 mm;
- corner 25×25 mm;
- channel;
- springs of the Moskvich passenger car;
- steel sheet 2 mm thick;
- galvanized sheet 1 or 0.8 mm thick;
- fasteners, bolts, nuts, rivets.
For a rigid body model, instead of a spring-loaded wheel set on springs, you will need a regular beam.
For trailer wheels, ready-made car wheels from a Tavria, Moskvich or Zhiguli passenger car are suitable.
The wheels need to be selected immediately with the hubs, this will facilitate further assembly of the homemade product.
Frame
The trailer frame is an all-welded structure in the form of a frame lattice made of a square pipe. Traverses made from a 25×25 mm square form the cross members of the frame, and the spars are made from a 60×60 or 60×30 mm pipe. After marking, all structural elements are cut and laid out on a flat surface, the joints are welded with small seams, and each joint of the elements is checked with a square. After assembling the structure, final welding of all parts is carried out along the perimeter of all planes. The frame is painted after treating the surface with a metal primer.
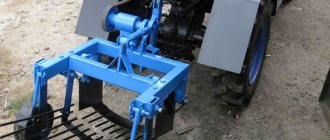
Chassis
In making a homemade trailer for a walk-behind tractor, the chassis is the most difficult element.
The basis of the chassis is a beam with hubs at the ends. The channels are joined to each other in such a way that they form a square. The joints are welded with a continuous seam. Wheel hubs are installed at the ends of the axle and welded.
The accuracy of the axle assembly is checked by checking the parallelism of the planes of the wheel rims. The connection between the frame and the beam is carried out using springs, while the ends of the springs are installed in welded brackets on the frame, and the beam is pressed against the central part of the springs using an earring.
The chassis installed on the frame is additionally checked for resistance to overturning. As in a car, the axle spring group must have rubber bushings in the frame mounting bracket.
Body, frame trim
The platform is marked relative to the grid in such a way that allowances are left for attaching the side posts. The front and side boards are firmly installed, and the rear board is made removable on door hinges.
The sides of the trailer have a frame structure made of 25x25 mm corners. The corners are butt welded, the seams on the inside are cleaned to the level of the metal plane.
Removable sides are assembled in the following sequence:
- side frame;
- The galvanized iron sheet is adjusted to the size of the frame;
- The side panels are cut out and secured with rivets through the corner.
The bottom of the body, made of a 2-mm iron sheet, is installed on the frame and welded with a small seam around the perimeter every 3-5 cm.
The installation of the boards begins with the installation of the front board, then the side boards are installed and connected with a welding joint.
The tailgate is secured last - first the hinges are marked and welded, and then the latches.
Other design details
After assembling the frame and body, a folding seat is installed - a wooden bench placed on top of the front side with support on the sides.
As a trailer brake system, it is recommended to use elements of the brake system of a car whose hub and wheels are used in the design. To ensure reliable operation of the brake system, it is recommended to provide an additional lever lock.
You may also be interested in homemade carts for walk-behind tractors.
Read about attachments for the Neva unit in this article.
Reviews
Victor, Podolsk:
“I like the Oka walk-behind tractor, because I’ve been working with it for 6 years. There are no complaints about the operation, except that the engine is noisy, but the speed is normal, about 8 km per hour. I drove to the nearest market in mine, transporting bags of cement. The journey to the market took about 45 minutes, and the same time back. In the trailer I had room for several bags of cement, plus food for the dacha. The trailer was not a factory one, either Belarusian or domestic; to be honest, the manufacturer was not interested. Everything went well with the fastenings, I quickly connected it and started working. Even on inclines on the road, the technology does not let you down!”
Valery, Moscow region:
“I don’t consider homemade trailers at all. When the question arose about buying a trailer cart, I bought a product made by Gagarin. Regular TPM-350. Lasts as long as the walk-behind tractor itself. I didn't notice any downsides. Pros: comfortable seat, wide enough, there is a glove compartment and even a footrest. Now they seem to be releasing it without a glove compartment, and it’s a waste of time, because on the road you may need tools and all sorts of little things, but there’s nowhere to put it, just in your pockets. The weight pulls normally, up to 500 kg with my weight being almost a hundred - it just fits. On sand, a walk-behind tractor with a cart will slip 100%, but on asphalt, even uphill, it goes well and quickly.”
Attaching the trailer to the walk-behind tractor
The trailer drawbar, like the frame, is made of 60×60 or 60×30 mm pipes. This is a double beam design with a connection in the coupling device. The coupling device is installed at the point where the drawbar beams meet. The rear ends of the pipes are welded with overlap and reinforcement to the trailer side members.
The coupling of the trailer with the hitch of the walk-behind tractor should ensure ease of rotation of the propulsion unit when moving and at the same time reliable connection with the trailer.
In a simple version, an earring made of a metal rod or reinforcement with a diameter of at least 20 mm can be used as a hitch to a standard trailer hitch. As an option, a standard car trailer hitch and tow bar are used.
For reliable articulation and ease of control of the walk-behind tractor, a pipe with a diameter of 40 mm and a length of 100 mm is welded at the junction of the drawbar beams. The axle of the towing device is installed inside the pipe on two bearings. On the trailer side, the pipe is plugged with a washer to fix the towbar axle; the diameter of the washer hole corresponds to the diameter of the towbar axle.
The axle of the trailer hitch, on one side, has a thread for fixing with a nut and a stud, and on the other, a welded hitch for connection to the walk-behind tractor.
The hitch at the end of the axle facing the walk-behind tractor is made of a square pipe 60x60 mm, 80 mm long. A through hole in the pipe, drilled through two opposite sides, must correspond to the diameter of the locking pin of the walk-behind tractor hitch and fit securely inside the towbar. Inside, the square pipe is reinforced with additional metal plates. The edges of the pipe are rounded so as not to create additional difficulties when turning.
On the trailer side, the towbar axle is secured with a nut and a locking pin.
As a result, when connecting the trailer hitch into the hitch eye of the walk-behind tractor and fixing the hitch with a finger, the walk-behind tractor and the trailer must be securely connected, ensuring stability and ease of control when moving.
Cost calculation
It is necessary to carry out calculations based on the list of prepared materials.
From a number of materials, all elements that are already present should be removed. Then you need to calculate the price for the remaining materials. It is necessary to proceed from medium and high prices. Then you should calculate the price of the tools. If you have a welding machine, you will only have to purchase gas or electrodes. However, it is not possible to predict everything. For example, if you decide to attach a seat to the device, but it is too old, you will have to look for another one. However, if you have cheap elements, the design can be created quite functional.
Where to begin
The design of a walk-behind tractor consists of several interconnected parts: engine, chassis, transmission and control. Part of the transmission is the clutch, which transmits torque from the engine shaft to the gearbox. It also provides decoupling between the motor and the gearbox when changing gears.
Thus, the speed slows down smoothly. Once you apply the brakes, it's easy to stop with the engine running.
The braking system increases the safety of using motorcycles when moving, allowing you to stop, if necessary, literally in one movement.
What does the brake look like from the outside?
The correct option would be to install similar parts from an old motorcycle. Or use a car parking brake to stop even on slopes and stand for a long time.
However, the second method is much more complicated. The braking itself is carried out by moving the lever, which tightens the cable. To go further, you should return the lever to its original position.
Example of brake action
Proper design
It’s easy to make brakes for a trailer for a walk-behind tractor with your own hands, taking parts from a car or motorcycle.
Parking ones are better; they allow you to stop a loaded cart. Tape ones are ineffective.
For clarity, it is worth drawing a detailed drawing of the entire structure, bottom view.
For example, you can use a drawing like this
When creating a drawing, it is advisable to designate all parts with numbers, indicating the actual dimensions of each.
Purchased walk-behind tractors have a drawing in the instructions, but if the mechanism is homemade, it’s easy to draw it yourself. At the same time, outline the location and structural features of the brake system.
It must be in direct contact with the wheels, blocking them when activated, and work silently and accurately.
The importance of details
The diagram must indicate:
- axle dimensions;
- pedal/lever size;
- return spring (installation location);
- shock absorbers (installation location) or rubber seals;
- brackets holding the brake cylinders together.
This will help to visualize the scope of work and serve as instructions.
Measuring every detail, correct calculations will help create a single mechanism in which all parts fit together without problems. You can't act by eye.
Main parts of the cart
The typical design of a trolley for a motor cultivator consists of a certain set of elements, but it is easy to modify it to suit your needs. For example, the owner of a walk-behind tractor may decide that additional components are needed. The main details will be:
- Suspension. It can be axial or portal type. Installation with a shock absorber is allowed, but with them the load capacity will be reduced, and the entire structure will be more complex. Elastic elements are not required if the owner plans to drive at low speeds, and the tires have a fairly high profile.
- Frame. It is welded from a section of profiled pipe.
- Body. Options: with folding or fixed sides. Materials: steel sheet, wood or plywood. Metal is joined by welding, wood is joined by a metal corner. The steel cart looks solid and is more reliable. Disadvantage: heavy weight.
- Drawbar. This component connects the walk-behind tractor and the towbar. The length should be selected so that it is convenient to turn.
- Seat. It is fixed to the trolley or coupling device.
- Steering wheel. The most important thing when designing this mechanism is to ensure that there is no risk of deformation on uneven terrain, and there are no increased torsional loads. The purpose of the steering mechanism is to provide horizontal articulation with two degrees of freedom.
The cart rests on two or four wheels. Accordingly, it turns out to be biaxial or quadriaxial. What to choose, the owner of the walk-behind tractor decides for himself. The version with four wheels is more stable, but it is more difficult to manufacture. In addition, a two-axle cart weighs more than a two-wheeled cart. It is recommended to focus on the power of the walk-behind tractor.