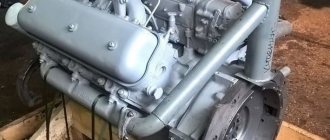
Despite the fact that the ZMZ-402 has been out of production for a long time, it enjoys great love among Russian car enthusiasts. Not too voracious, it has amazing maintainability even compared to any VAZ engines, and its torque and power are quite enough not only for the Volga, but also for the rather heavy Gazelle. In this article we will talk about the order in which the valves of this engine are adjusted and reveal some secrets that will allow you to improve its performance.
Frequency of the procedure
Despite its amazing maintainability, the ZMZ-402 was not very successful in its technical characteristics. The lower location of the camshaft, the presence of long pushrods, and the not very high quality of the parts, all this increases the vibration load on the gas distribution mechanism, and therefore reduces the time interval between adjustments. If the motor is used carefully, without operating under maximum load and without sudden starts, then adjustments must be made every 15 thousand kilometers. If the driver likes quick starts, driving at low speeds and high gears, and is also forced to carry heavy loads or drive through the mountains, then the mileage is reduced to 10 thousand kilometers. If you use gasoline that does not match the cylinder head (cylinder head), then regardless of the ignition settings, the valves must be adjusted after 5–6 thousand kilometers . This will reduce the likelihood of valve burnout and loss of compression.
This is interesting: Do-it-yourself adjustment of ZIL 130 valves
Description of adjustment work for the engine
The ZMZ engine is popular among domestic car enthusiasts due to its economical fuel consumption and ease of maintenance. But the engine’s amazing maintainability did not rid its design of some technical flaws.
The assembly of low-quality parts and the complex arrangement of spare parts inside the engine place a large load on the working mechanism, which increases the degree of its wear.
The ZMZ-402 engine requires a special approach, which involves adjusting valve clearances, which is carried out on average every 15,000 km. The lack of a gas distribution function in the engine forces vehicle owners to make adjustments for the following purposes:
Adjusting the valves of the ZMZ-402 engine
- avoiding valve burnout;
- increase in pressure in the engine cylinder;
- uniform filling of the cylinder with fuel;
- trouble-free removal of exhaust gases.
The frequency of adjustment work depends entirely on the type of vehicle load and correct use of fuel. If the engine is used carefully and is not driven to maximum speeds, then the valves should be adjusted every 15,000 km. If the vehicle is used to transport large cargo, adjustments are carried out every 10,000 km.
If a car owner uses gasoline that does not correspond to the designated brand as fuel, then the risk of valve burnout and loss of pressure in the cylinders increases significantly. Stable adjustment of thermal clearances every 5000-6000 km will save the engine from premature wear, and individual parts of the engine will be protected from overheating and failure.
Adjusting valves GAZ 402
The ZMZ-402 engine has been produced since 1985; it first appeared on the transitional GAZ 24M models. It is also widely used
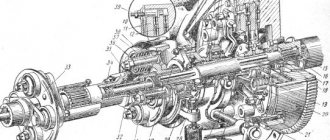
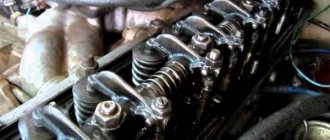
on Gazelles. The eight-valve engine has a lower camshaft and an overhead valve arrangement; its gas distribution mechanism contains the following parts:
- camshaft, it rotates in five supports of the cylinder block;
- camshaft, transmits movement from the crankshaft to the camshaft;
- 8 pushers, driven by camshaft cams;
- 8 aluminum rods;
- the rocker axis, on which the rocker arms themselves are located (8 pcs.) with adjusting screws;
- exhaust and intake valves located in the cylinder head.
When the camshaft rotates, the valves in the cylinder head rise and fall. Just like all other modern engines, the ZMZ-402 operates on a four-stroke circuit:
- first, an intake occurs into the internal combustion engine, the air-fuel mixture fills the cylinder;
- then the mixture is compressed in the cylinder, and it is ignited by a spark from the spark plug;
- working progress occurs;
- The last step in the process is the release of exhaust gases.
When compression occurs, both valves are closed and sealed - the valves are adjusted in this position. In order for the combustion chamber to be sealed at the moment of compression, there must be a thermal gap between the valve stem and the rocker arm - if there is none, when the metal expands on a hot engine, the valve will not fit tightly to the seat (seat), the engine may lose power, and in some cases In some cases, it will not start at all.
The valves on the ZMZ-402 can be adjusted in two ways. In the first option, the adjustment is made as follows (let's take the GAZ 24 car as an example):
- stop the engine, turn off the ignition, put the car in neutral;
- open the hood, remove the air filter housing;
- remove the valve cover, it is held on by six bolts;
- crank the crankshaft, align the first cylinder with the marks. The mark is located on the front crankshaft pulley;
- It should be noted that the marks on the pulley may coincide at TDC (top dead center) of the 1st and 4th cylinders, and if the valves of the 1st cylinder are clamped while the valves of the fourth are free, then the marks coincide with the 4th cylinder , and not with the 1st. This can be easily checked - remove the distributor cover and look where the slider points;
- adjust both valves on the first cylinder (gap 0.3 mm), turn the engine half a turn clockwise (the marks should be at the bottom)
- adjust both valves on the second cylinder;
- turn it another half turn (the marks are again at the top and coincide), adjust the valves of cylinder 4;
- We make another half revolution of the crankshaft (the marks are again below) and make adjustments on the third cylinder.
Close the valve cover, start the engine and check how the engine works. Valve clearances on all GAZ vehicles are adjusted using special feeler gauges; they are usually collected in one set.
There is such a thing as valve overlap, and if the valves of the first cylinder (at TDC) are free, both valves of the 4th cylinder will be clamped, but on the second and third, one valve each will remain free. Therefore, the adjustment can be done in two crankshaft rotations:
- set the TDC of the first cylinder, adjust the valves 1-2-4-6, counting them from the front of the engine;
- make a revolution of the crankshaft and adjust all the other valves (3-5-7-8).
In the books, it is recommended to carry out the adjustment on the cold side, on the outer valves (1) and set the gap to 0.35 mm, on the rest - 0.3 mm. But the cold adjustment cannot be done - aluminum rods expand as the engine heats up, and the gaps in the valves on a hot internal combustion engine decrease. Practice has shown that the most optimal option is adjustment on a well-warmed-up engine with gaps of 0.3 mm on all valves. By the way, the valve clearances on the GAZ 21 Volga are adjusted in the same way.
The size of the gaps in the valve drive:
| Cylinder number | Valve | size , mm |
| 1 | Inlet Outlet | 0,40 – 0,45 0,35 – 0,40 |
| 2 | Inlet Outlet | 0,40 – 0,45 0,40 – 0,45 |
| 3 | Inlet Outlet | 0,40 – 0,45 0,40 – 0,45 |
| 4 | Inlet Outlet | 0,40 – 0,45 0,35 – 0,40 |
Tightening torque of the cylinder head and other connections of the ZMZ 402 (ZMZ 4021) engine
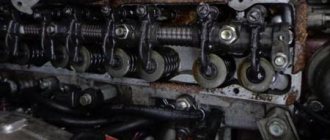
Adjusting the gaps in the ZMZ-402 valve drive
Adjustment of the gaps between the rocker arms and valves is carried out on a cold engine, with the cylinder head mounting nuts and the valve rocker arm axis mounting nuts tightened to the required torque.
Remove the valve rocker cover, to do this:
Disconnect the crankcase gas exhaust pipe. Disconnect the ignition distributor vacuum regulator hose
Using a 10mm socket, unscrew the six valve cover bolts.
Removing the valve cover
Removing the sealing gasket
We install the piston of the 1st cylinder in the T.M.T. compression stroke.
The third mark on the pulley should align with the boss on the timing sprocket cover
The distributor slider should be in the 1st cylinder position
In this case, the intake and exhaust valves will be closed and the valve rocker arms can swing freely.
Check the gap between the rocker arm and the valve with a feeler gauge. With normal clearance, the feeler gauge should move between the rocker arm and the valve end with little effort.
The gap size is indicated in the table.
The size of the gaps in the valve drive
| Number cylinder | Valve | Magnitude gap, mm |
| 1 | Inlet | 0,40 – 0,45 |
| High school graduation | 0,35 – 0,40 | |
| 2 | Inlet | 0,40 – 0,45 |
| High school graduation | 0,40 – 0,45 | |
| 3 | Inlet | 0,40 – 0,45 |
| High school graduation | 0,40 – 0,45 | |
| 4 | Inlet | 0,40 – 0,45 |
| High school graduation | 0,35 – 0,40 |
If the gap value differs from that indicated in the table:
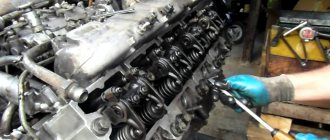
Unscrew the lock nut with a 14 wrench, while holding the adjusting screw from turning with a 11 wrench.
Then, turning the adjusting screw with a wrench (or a screwdriver inserted into the slot), adjust the gap, periodically checking it with a feeler gauge.
After this, hold the adjusting screw and tighten the lock nut.
Check the gap again with a feeler gauge. In the same way, adjust the clearance on the other valve of the 1st cylinder.
Rotate the crankshaft half a turn (180°) and adjust the clearances in the valve drive of the 2nd cylinder.
Rotate the crankshaft another half turn (180°) and adjust the clearances in the valve drive of the 4th cylinder.
Rotate the crankshaft another half turn (180°) and adjust the clearances in the valve drive of the 3rd cylinder.
Advice
When we turn the crankshaft, it is good to see the correct position by looking at the distributor slider. At the end of the distributor, you can mark the position of the runner with a marker or quick-drying paint.
aubito.ru
Preparation process
Tools and consumables necessary for the procedure are included in the following list:
- universal probes for measurements;
- set of socket and socket wrenches;
- set of wrenches;
- valve cover gasket;
- spark plug key;
- powerful flat and Phillips screwdrivers;
- hammer;
- clean rag.
Before you begin work on adjusting the valve clearances of the ZMZ-402 valves, you need to familiarize yourself with some of the nuances of the operation. It is important to remember that valve adjustment can only be done when the engine is cold. The state of a cold engine implies equality of the internal temperature of the motor and the external temperature.
The preparation stage includes the following activities:
Checking the engine clearance with a feeler gauge
- unscrewing the license plate in order to install the starter (unit of the starting system of the mechanism);
- removing spark plugs;
- removing the distributor cover (ignition distributor);
- Isolating the negative charge of a car battery.
The type of fuel also affects the dimensions of thermal gaps. The cylinder head, which is designed for No. 92 gasoline, but is used with No. 80 fuel, needs to increase the clearances to 0.4 mm. The use of gas and gasoline No. 76 for the cylinder head is not recommended, since such a case can cause burnout of the valves.
General procedure
Adjusting the valves of the ZMZ-402 engine involves the step-by-step implementation of technically competent actions. First you need to disconnect all the hoses attached to the ignition distributor cap. If the accelerator cable is attached to the valve cover, it should also be insulated. Next, the cover is removed by unscrewing the nuts. Some carburetor models require an air filter, which also needs to be disconnected.
Fuel gaps between valves and rocker arms of the ZMZ-402 engine
The next step is to remove the spark plugs and set the first cylinder to the top dead center position, which is adjusted by turning the crankshaft. The valves are adjusted in the following order: numbers 1, 2, 4, 6 are turned clockwise until the marks match, the same actions are performed with valves numbers 3, 5, 7, 8.
Using universal tools, the size of the thermal gaps is checked and the valves are tightened with nuts. The next stage of work includes reassembling the components - spark plugs, a cover with an updated gasket, an air filter and hoses are installed in their original place. The final stage of adjustment is testing the operation of the mechanism.
To check the fastening of thermal gaps, it is worth turning on the engine and observing its performance indicators. If the operation of the ZMZ-402 engine is not accompanied by strong noise and vibration, then the thermal valve clearances have been adjusted correctly.
Adjusting the thermal clearance of engine valves ZMZ-402
Video on the topic: Adjusting the valves of the ZMZ-402 engine
Publications on the topic
Adjusting the valves of the YaMZ 238 engine
Features of adjusting valves GAZ-53
Design features of the ZMZ-402 automobile engine
GAZ 2002, 92 l. With. - with your own hands
Novoaltaysk
GAZ 3110 Volga, 2004
50 000 ₽
Khabarovsk
GAZ 31029 Volga, 1994
30 000 ₽
Ulan-Ude
GAZ 3102 Volga, 2000
90 000 ₽
Chelyabinsk
GAZ 31029 Volga, 1996
60 000 ₽
See more cars on Drome
Participate in the discussion can only registered users.
Login Register
Required Tools
To correctly adjust the valves of a Gazelle with a 402 engine, you need to prepare the following tools:
- set of screwdrivers;
- probes of different sizes or a universal probe;
- ratchet with extension and 10 mm socket;
- a set of keys, sizes from 8 to 14 mm;
- spark plug key;
- hammer;
- rags.
This is interesting: Adjusting headlights with your own hands - how to set them up
Tips and nuances
The procedure is similar for V8 engines of the Zavolzhsky plant (GAZ 13, ZMZ 41, ZMZ 511, ZMZ 513, ZMZ 523, etc.). The valves on the engines of the Ulyanovsk plant (UMZ 414, UMZ 417) are adjusted in the same way. You can use a hub wrench to turn the motor using the ratchet. You can also rotate the engine by the fan blades, but this may cause them to break. To make it easier to turn the crankshaft, remove the spark plugs. It is possible that when tightening the valve cover, you turned the threads in the head, and this happens often. Most likely, some of the threads were already pulled out before you, by the previous owner of the car. In this case, drill a hole and cut a thread in it for a repair pin (available commercially). You can also wrap a regular M6 pin with epoxy glue into the old thread, but cutting a new one is preferable. To set TDC, remove the ignition distributor cover (distributor) and, turning the shaft, achieve the position of the slider in which its contact faces the first cylinder. Both valves of the first cylinder must be closed.
UAZ valve clearances
One of the main types of work is periodic adjustment of valves on UAZ 469, UAZ 417, UAZ 421, and also, if possible, cleaning them from carbon deposits.
The UAZ 469 valves on UMZ 421 and 402 are quite reliable in operation, since they are made of chromium steel, and when working on the exhaust valves, heat-resistant steel was used. To adjust the valves on the UAZ 469, like the UAZ 3303, including those with the 402 engine, it is necessary to check the gap between the valves and pushers at certain intervals. If the gaps are larger than normal, then it is more difficult to start the engine, and its operation is accompanied by knocking in the valves and a drop in power.
In the case of reduced valve clearances in the UAZ 469, problems occur in the carburetor, “coughing” and popping noises in the muffler, and the engine cannot develop maximum power. There is a problem with the carburetor (you can hear it). The gaps should be set in accordance with the standards on a cold engine during TO-2.
The procedure for adjusting the valves of the ZMZ-402 engine
Below is the detailed procedure:
- remove the terminals from the battery;
- put the gear in neutral;
- disconnect all attachments that extend from the valve cover, including the UOZ hose;
- remove the throttle cables attached to the carburetor;
- remove the air filter;
- unscrew the bolts and remove the upper part of the mechanism;
- remove the spark plugs;
- set the piston of cylinder 1 to TDC, aligning the crankshaft mark with the tide on the front cover of the engine - it is recommended to rotate the crankshaft only with the starter;
- remove the cover of the electrical distributor, check the slider - this element of the distributor should look strictly at cylinder 1;
- start adjusting the valves.
It is advisable to adjust the valves only when the engine is cold! On the other hand, the ZMZ-402 motor is equipped with an aluminum head. The rods tend to expand as the internal combustion engine heats up, and the gaps decrease. For this reason, experienced craftsmen recommend adjusting the 402 system on a warm engine, setting gaps of 0.3 mm on all elements. The exception is Gazelle cars.
As for the marks: they may coincide at TDC with the first or fourth cylinder. How can I check this besides the direction of the slider? If valves 1, 2, 4 and 6 are clamped, and the rest are free, the mark coincides with the 4th cylinder. And vice versa, if 8, 7, 5 and 3 are clamped, the mark coincides with the 1st cylinder.
Adjustment of engine valves 402 in two stages is carried out according to the following scheme:
- first the first intake and exhaust valves;
- then the second intake and exhaust;
- third inlet;
- rotate the crankshaft 360 degrees, align the marks and install the slider on the 4th cylinder;
- adjustment of the remaining valves.
Briefly, the order of adjusting the valves looks like this: first 1, 2, 4 and 6 - the rest are clamped, then - from the cockpit 8, 7, 5 and 3.
Adjustment of ZMZ 402 valves according to instructions:
- move the rocker arm along the shaft forward and backward;
- lightly and carefully hit the shaft with a hammer exactly above the valve - under no circumstances hit the pusher;
- Use a 11 wrench to unscrew the nut of the adjusting screw, holding the latter with a powerful flat-blade screwdriver or a 14 socket wrench;
- Use a feeler gauge to measure the gap - it should pass under the valve with little effort, and if necessary, adjust to the required values;
- tighten the nut back - check the gap again;
- repeat the operation with all valves.
On some cars, the valves are adjusted using washers. Instead of the original one, a ring of smaller or larger thickness is installed. An alternative option is to replace the pushers with options with the required parameters. There are known engines on which adjustment is not provided at all - on internal combustion engines with hydraulic compensators. ZMZ-402 valves are adjusted with a special adjusting screw.
Then you need to reinstall the spark plugs, distributor cap and attachments. Then carry out a test run of the engine to check the oil supply to all pushers. If lubricant does not flow to any element, you should loosen the rocker arm axis fastening nut in the area of the fourth cylinder. You will also need to clean the entire oil system of the car.
Finally, stop the engine and put all the dismantled components back in place. Tighten the valve cover bolts to the required torque. After installing all the necessary hoses and tubes, start the engine again. Let it warm up to 80-90 degrees, then listen to the operation of the valves - they should not ring or click.
How often does it need to be tuned?
When operating a vehicle under high load - transporting heavy loads, driving in the mountains and at low speeds - the adjustment period is reduced to 8-10 thousand km. And if gasoline that does not match the cylinder head is poured into the tank, the valves need to be adjusted every 5-6 thousand kilometers. Otherwise they will burn out and the engine will lose compression.
To avoid stripping the threads while adjusting the valves, the nut must be rotated very smoothly with a wrench at the beginning of unscrewing and at the last turn of tightening. The tips of the valve mechanism rods of the ZMZ-402 engine are made of duralumin, and not steel, as on the ZIL-130, for example. Therefore, it is extremely difficult to adjust the valves by ear. Rattling and knocking noises can be made by:
- worn camshaft cams;
- unevenly operated rocker arms;
- worn out axis;
- loose springs.
Valves with a defective camshaft cannot be adjusted properly. Therefore, it would be more advisable to replace the camshaft. The same applies to worn-out spring retainers, since the rocker arms in this case will rest not against the valves, but against the spring cups.
Preparatory stage
Our task is to ensure that the valve not only closes completely, but also opens to the required amount. Gaps are too big
, will lead to under-opening of the valve, which reduces the traction performance of the motor and adds noise during operation. However, it is not as dangerous as overtightened valves. If we leave insufficient thermal clearance, when the engine warms up, the valves stop closing completely, which leads to a decrease in compression, burning of the valves and breakthrough of gases under the valve head cover. So here it is advisable not to do it “by eye” and arm yourself with a table of clearances for your specific motor. (GAZ 21, GAZ 24D, ZMZ 402, as well as UMZ carburetor engines). We politely listen to experienced advisers from neighboring garages, nod, marvel at their ingenuity, but do everything as expected. More often than not, engineers are not fools and they don’t write instructions “out of the blue.”
Table: useful technical data for 402
| Cylinder operating order | 1-2-4-3 |
| Direction of rotation of the distributor rotor | counterclock-wise |
| Ignition timing, degrees | |
| centrifugal regulator | 15-18 |
| vacuum regulator | 8-10 |
| Spark plug | A14VR |
| Spark plug gap, mm | 0,8-0,95 |
| Slider resistance, kOhm | 5-8 |
| Spark plug tip resistance, kOhm | 4-7 |
| Resistance of the central contact of the cover, kOhm | 8-13 |
| Stator winding resistance, kOhm | 0,4-0,45 |
Installing TDC 402 engine
Setting the TDC 402 engine can be done in several ways:
- The easiest way. Remove the distributor cover. The contact of the slider when the piston of the first cylinder is at TDC is approximately under the contact of the high-voltage wire going to the first cylinder. We combine more accurately the first mark of the pulley and the ebb on the front cover. In this position, adjustment of the valves of the first cylinder and beyond begins.
- You can verify that the piston is on the compression stroke without removing the cover. Just turn on the ignition. Install a spark plug into the cap of the first cylinder. Place the candle against the mass. Crank the engine until a spark appears at the spark plug contacts. The spark must jump before the piston reaches TDC. As soon as the spark has slipped through, bring the mark to alignment with the low tide on the front roof.
- The most reliable way to determine TDC in the compression stroke is as follows. It is necessary to remove the spark plug of the first cylinder. Insert a paper gag into the candle hole. compact it. When cranking the crankshaft, the plug will shoot out. After this, all that remains is to combine the marks.
In this position, the valves of the first cylinder of the Gazelle engine 402 are adjusted.
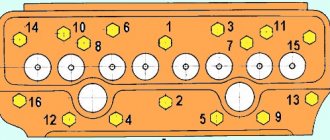
Cylinder arrangement on engine 402
The first cylinder is counted from the cooling radiator
For further adjustment, you need to know the operating order of the engine cylinders.
Operating order of the 402 engine
That is, after adjusting the valves of the first cylinder, the crankshaft rotates 180 degrees. Half a turn. The valves of the second cylinder are adjusted. The valves of the fourth cylinder are adjusted by another 180 degrees. And finally turning the crankshaft half a turn, the valves of the third cylinder are adjusted.
Each time the crankshaft is turned, it is necessary to correctly align the piston of the next cylinder to TDC. The easiest way is to turn the crankshaft half a turn after adjusting the first cylinder and make sure that the piston of the second cylinder is at TDC. To do this, just insert a thin metal probe with a diameter of 3 mm into the spark plug hole. Or a screwdriver.
So that it rests against the piston. As the piston rises, the dipstick will move out. When it reaches its maximum distance it will be TDC. It's easier with the fourth cylinder. TDC of the cylinder piston can be set according to the mark. He will again approach the low tide on the front cover. The third cylinder after turning from the fourth can again be determined using a dipstick.
Preparatory work
How to adjust engine valves? To begin with: all work on the engine unit must be carried out after the machine has cooled. After the trip, leave the car in the garage for several hours, this will be quite enough.
Before getting to the valves themselves, the assembly must be partially disassembled and some parts removed. Here is the sequence of work:
- Disconnect the battery terminals.
- Next, you will need to remove the top cover of the air filter, unscrew the fasteners of the part, disconnect the crankcase pipe and the ignition distributor hose.
- We remove the filter itself.
- Carefully disconnect the throttle linkage from the carburetor, then do the same with the air damper.
- In front of us is the valve compartment cover; all that remains is to remove it by twisting a few fasteners.
Preliminary work:
- cool the engine by turning it off and leaving the car to cool for several hours;
- disconnect the terminals from the battery;
- remove the air filter (remove the top filter cover, unscrew the fastening nuts, remove the crankcase ventilation pipe and the vacuum distributor hose);
- take out the air filter housing;
- disconnect the air and throttle valves from the carburetor;
- Using a screwdriver, unscrew the valve cover fastening and remove it;
Step-by-step instruction
Once you have reached the valves and the 402 engine has completely cooled down, you can begin the adjustment process itself. Here's what will come in handy when working:
- spanners;
- probes.
The work sequence is as follows:
- The first thing to do is get the crankshaft in the correct position for the job. We take a 36mm wrench, hook the ratchet and start rotating it clockwise. We're not in a hurry. As soon as the last mark on the pulley is opposite the mark on the cover, stop the rotation.
- We begin checking the valves of the first cylinder. First make sure they are all closed.
- Adjustment begins with the exhaust valves. We take out the probes and start checking. Normal readings are 0.4 mm, but 0.05 mm less is acceptable. Loosen the locknut before tightening the screw. If the value is greater, tighten the screw, insert the probe and double-check. Twist until a satisfactory result.
- After adjustment, tighten the locknut. After manipulation, the large probe should not pass into the gap between the parts.
- Next is the inlet element. We check the gap again, but this time the limit is 0.4 mm + 0.05 mm. If necessary, loosen the locknut, tighten the screw, tighten the locknut. Let's check.
- Next, the cylinders are adjusted in the following sequence: 2, 4, and the last 3.
- When moving from one cylinder to the next, you need to turn the crankshaft half a turn (180°).
- Adjusting the valves will take a few hours the first time, but the next time everything will go much faster.
- After adjustment, clean the cover and valves.
- We put the gasket on and screw on the compartment lid.
- We put the air filter back and install everything that was previously dismantled, only in the reverse order.
After cleaning and adjusting the valve on the Gazelle 402, the car’s engine should run much quieter. In addition, the vehicle’s normal speed performance will be restored. Fuel consumption will also be reduced. For the next 100 thousand km, you can forget about re-adjustment. After 3-4 adjustments, do not forget to inspect the integrity of the assembly parts; some of them may need to be replaced during operation.
Recommended gap size ZMZ-402
The caliber of the thermal gap, in accordance with the engine passport data, should be 0.4 mm. This indicator differs between the intake and exhaust valves, since the latter elements heat up more. Measurements should be taken with probes equipped with a pitch of 0.05 mm or less.
Parameters may also differ due to different operating conditions and driving styles:
In addition, by reducing the thermal gap, it is possible to increase engine thrust and reduce fuel consumption. But this will only work in quiet driving modes, without load.
The easiest way to adjust valves on a gazelle engine
Correct valve adjustment is one of the most important processes responsible for the operation of the gas distribution mechanism. A clear sign that the valves need to be adjusted is a characteristic ringing sound and poor engine starting when hungry. Adjusting the valves on a Gazelle with a 402 engine is not difficult and can be done by any car owner, the main thing is to know the procedure for adjusting the valves on a Gazelle and the gap that needs to be set depending on what fuel the engine runs on (gas or gasoline).
After watching this video, you can clearly see the easiest way to adjust the valves on the 402 Gazelle Business engine.
And so, to start adjusting the Gazelle valves, you need to remove the valve cover. Then use the key to “36” to set the crankshaft according to the mark (rotate clockwise) to install it at TDC. Then, using the keys “11” and “14”, we check the gaps with a feeler gauge and set them to the required value. Before you start checking and setting valve clearances on the Gazelle engine, you need to know three main points:
- The engine operating order is 1-2-4-3 ;
- Adjustment is made only on a cold engine ;
- The clearances on the exhaust valves of cylinders 1 and 4 should be slightly smaller than on the others (about 0.05 mm).
When the engine is running on gas, the valve clearances are set 0.05 mm larger (exhaust - 0.4 mm, and intake - 0.3 mm) than when running on gasoline, because then the valves will be pinched.
The feeler gauge under the seat should go in with little effort.
The easiest way is to set the clearances (intake and exhaust) first on the first cylinder, and then set the clearances through one valve. Then, turning the shaft 360 degrees, continuing to set the gaps from the 4th cylinder.
If anyone needs to see the whole process clearly, then watch a video on adjusting valves on a Gazelle.
GAZ 31 Reliable › Logbook › Adjusting valves in two steps ZMZ 402
Adjusting the valves in two steps: 1. Set the piston of the first cylinder to TDC on the compression stroke. You set the gaps: -exhaust valve of the first cylinder 0.35-0.40 mm. - exhaust valve of the second cylinder 0.40-0.45 mm. -intake valves of the first and third cylinders 0.40-0.45 mm. 2. Rotate the crankshaft 360 degrees. Set the gaps: - the exhaust valve of the fourth cylinder to 0.35-0.40 mm. -exhaust valve of the third cylinder 0.40-0.45 mm. -intake valves of the second and fourth cylinders 0.40-0.45 m
Engine Features
The Gazelle 402 is equipped with a 4-cylinder Cummins engine. The total engine volume is 2.7 liters, and its approximate service life is 500 thousand km.
If you use high-quality oil, this period increases slightly, but adjustments must be carried out even when using high-quality technical fluid. The engine has 16 valves - 4 per cylinder, 2 of which are intake, and 2 are exhaust.
Adjustment order table:
On a carburetor engine, to more accurately determine the position of the camshaft, it is possible to use a distributor, the slider of which is directed to the socket of the high-voltage wire of the corresponding cylinder. If the distributor cover is removed, then four screws on the housing that coincide with the sockets of the high-voltage wires can serve as a guide.
You can also use the distributor with the cover removed: connect a control light to the low-voltage circuit and turn the crankshaft with the ignition on. The moment the light turns on indicates the exact position of the camshaft at which the corresponding pair of valves is adjusted.
Why make adjustments?
Why adjust engine valves at all? This procedure is necessary to maintain the unit in working order. More specifically, there are negative effects that worsen the operating condition of the engine, namely:
- An increase in the gap leads to deterioration in valve performance, as a result of which the air-fuel mixture is of poor quality, which deteriorates engine performance.
- As the gap increases, the chance of parts breaking during the operating cycle increases.
- Wear of parts also increases by about 2-3 times.
In general, you may notice a slight deterioration in performance, which will subsequently lead to complete failure of the unit. If you don’t want extra costs, spend an extra hour on adjustments.
Position mark of the first cylinder
The first label is of interest. It must be combined with the ebb on the front engine cover. But this is not enough. During a full engine operating cycle, the piston approaches TDC twice. The first time in the compression stroke of interest to us. And the second time the piston reaches TDC during the exhaust gas emission stroke. In the first and second cases, if the piston is aligned strictly to the mark, the camshaft will not exert pressure on the valves. During the compression stroke, the cams will be turned away from the rocker pushers. During the exhaust stroke at TDC, the exhaust valve will close but the intake valve will not open yet. Therefore, it is necessary to accurately install the piston of the first cylinder precisely in the compression stroke.
How to determine when it's time to make adjustments
There are several signs that the mechanism needs servicing:
- a metallic knock is heard from the engine;
- drop in engine power;
- Unstable motor operation.
Even if nothing like this happens, after a run of 100 thousand km it is strongly recommended to inspect and service the unit. When adjusting the valve on the gazelle 402 model, do not forget to check the integrity of other structural elements.
The process of adjusting valves on the ZMZ 402 engine
- set of probes;
- a new gasket for installation under the cover;
- nuts and bolts (in case the fastenings break);
- bearings for replacement.
How to set the gap correctly?
Adjusting the VAZ-2106 valves with your own hands requires strict adherence to the sequence of actions and careful preliminary preparation.
Tools
First of all, make sure you have the necessary tools:
- socket wrenches;
- screwdrivers equipped with a flat blade;
- adjustment probe or micrometer;
- crankshaft turning key.
The adjustment sequence and instructions can also be found on the probe cover. Since the tool in question has standard parameters, and its thickness is 0.15 mm, its width does not cover the entire gap, and its use for fine tuning is not advisable. Moreover, the accuracy of adjustment with this tool decreases even more, since over time the gap width is deformed due to wear of cylinder head seats, valves and other parts.
Preparation
First of all, make sure that the battery is disconnected, otherwise you risk shorting out the wiring.
- There should be supports under the rear wheels, activate the neutral speed mode.
- Open the hood, wait until the engine cools down, otherwise there is no hope for accurate adjustment, and the risk of getting burned increases.
- Buy a rubber gasket under the cover; it will not deform when exposed to high temperatures. If you choose the old part, oily smudges will appear on the lid.
- If necessary, remove the gas pedal cable along with the carburetor cover.
- Get rid of the cover bolts, use a 10mm wrench for these purposes, make sure that the washers under the bolts are not lost.
Timing chain tension
After preparation, you must also make sure that the timing chain tension is at the optimal level and adjust it if necessary. Stretching the chain contributes to increased wear, the appearance of tapping sounds during engine operation, and disruption of the timing belt functionality.
There are two ways to check.
- Remove the engine from the protective casing, insert a screwdriver into the chain and try to bend it in two places where there is a little free space. With optimal performance, you won’t succeed and the chain won’t bend.
- Listen to the engine running when active. If noises are clearly audible, but a short activation of the gas eliminates them, the tension has weakened.
To adjust the tension, use a special tensioner.