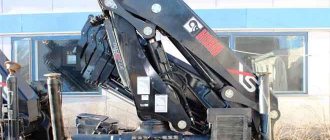
Hello, dear friends! Today we will talk about a rather unusual, but for many, useful and necessary solution. This is a do-it-yourself manipulator that can be installed on a regular trailer.
Some people install similar structures on GAZ 53 directly on the body, or on ZIL and Gazelle. Others use simple passenger trailers, improving their designs and expanding their operational capabilities.
It's up to you to decide what kind of manipulator you will use. It can be hydraulic or manual with a mechanical drive, which actually depends on your efforts. This is a question about what specific winch you will buy to achieve your goal.
When and to whom it may be useful
Before we talk about how a homemade crane is made and installed on a passenger car trailer, it is worth touching on the need for such a design. I agree that it may not be useful to everyone and not always.
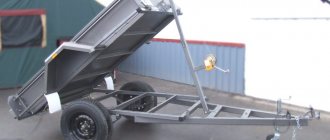
The presence of a crane on a passenger trailer expands its functionality and increases its performance characteristics. If you regularly transport some heavy objects and do not have a dump mechanism on the trailer, you can use a crane. Possessing certain carrying capacity parameters, it will make it possible to lift various types of cargo on board and lower it from it. Relevant for builders, repairmen, summer residents and just business owners.
In fact, it is an alternative for a manual winch on a trailer. But only the crane has a wider scope of application. This issue is worth considering with specific examples.
The capabilities of a trailer with a crane largely depend on the lifting capacity of the trailer itself and the crane you create yourself. Some models are capable of lifting two tons, but if the trailer platform is not designed for such a load, problems may arise during operation and transportation.
As for the immediate scope of application, several examples can be highlighted.
If you install a crane on your trailer, you can use it:
- for forest;
- for lifting barrels;
- loading construction materials;
- working with large items;
- transferring cargo from place to place within a small radius;
- lifting loads to heights;
- transportation of boards and logs;
- boat loading;
- transportation of motor vehicles;
- agricultural work;
- for construction purposes, etc.
There are actually a lot of options. They are only limited by the tasks you face and the performance characteristics of the created trailer with a crane.
Installation procedure for crane-manipulator installation
Installation of the CMU on a truck chassis takes place in several stages. A careful approach to each of them is important, since any negligence can have serious consequences. Until your own installation is installed and ready for use, you will need an auxiliary tool. This can be a crane or other lifting mechanism (crane, hoist, etc.).
Body dismantling
At this stage, difficulties usually do not arise. The body mounting ladders most often have to be cut off, because due to corrosion they stick to the seat. Therefore, it is better to immediately prepare new elements. In addition, you will need technological supports, which are 4 racks approximately 80 cm high - the body is subsequently installed on them so that its wings do not wrinkle.
Installation of the pump and power take-off (PTO)
The type of pump and the country of origin, as well as the brand of the CMU, do not matter when selecting a pump. The main thing is that the pumping equipment meets the requirements of the hydraulic system of the crane installation in terms of operating pressure and performance and can be installed on the PTO of a specific vehicle model. It is also important to take into account that the directions of rotation of the pump and the output shaft of the take-off box must coincide.
The procedure for installing the pumping device and PTO:
- drain the oil from the gearbox. After installation is completed, the lubricant is poured back;
- remove the plug under the PTO from the transmission;
- install the power take-off. Seals should be installed between it and the gearbox, as well as between the PTO and the pump;
- install the pump. It is better to pre-attach the suction hose and pressure fitting to the pump.
Depending on the method of switching on the PTO, the order of its installation is slightly different. If the activation is pneumoelectric, then the electromagnetic valve (SEM) is connected to the pneumatic system of the vehicle, and then connected to the control button installed in the vehicle cabin. If the PTO is engaged mechanically, then the gearbox control cable is inserted into the cabin through a hole drilled in the floor.
Frame preparation
When installing a unit with folding arms (usually CMU from Europe), which are placed vertically in the transport position and retracted, no special preparation of the vehicle frame is required. In other cases, it is necessary to relocate the fuel tanks, battery (if necessary), air tanks and tool boxes.
Installation try-on
The CMU is installed on a truck without fixing it with fasteners. When the installation is in this position, you should:
- mark places on the vehicle frame that require reinforcement;
- determine the technological distances that must remain between the installation and the body, the base of the manipulator and the cabin;
- calculate the height of the subframe so that the CMU can rotate freely around its axis.
In order for the dimensions of the equipment to comply with traffic regulations after completion of installation, the top point of the structure should not exceed the height specified by the rules.
Making a subframe
The subframe is made in one of two options: a general one, suitable for the base of the CMU and the body part, or directly for the manipulator. You can strengthen the frame using a bent profile. Regardless of the type, the tasks of the subframe remain the same: it must evenly distribute the load on the frame and prevent deformation of the latter when performing lifting operations.
There are no ideal subframe design options that guarantee the safety of the vehicle frame - each has pros and cons. It is important to observe the speed limit and operating rules of the unit, not to overload the vehicle,, if possible, choose good quality roads for driving, tighten the boom mounting pins in a timely manner, and regularly check the condition of the frame.
Strengthening and lengthening the frame
It is advisable to strengthen the frame under the mounting studs of the unit, at the fixation points of its base, to prevent it from breaking during operation.
If the body moves rearward, the length of the frame must be increased to accommodate its overhang. When installing a subframe along the entire length of the body part, the frame dimensions do not need to be changed.
Shortening the body and moving the rear wings
Sometimes the length of the body part has to be reduced by about 0.5 m due to too much rear overhang or for another reason. To do this, the sides are removed, cut to the required length, and the clamps and locks are transferred. The underbody is also shortened.
If the wings are attached to the body part, then when the latter is displaced, the shields must be moved to the required distance.
Installing the base, attaching the boom
The base of the CMU is connected to the vehicle frame through a subframe. For fixation, it is better to use reinforced studs with fine threads and a maximum cross-section. It is desirable that the fasteners be made of carbon steel. On each side of the stud, two nuts are installed, as an option - one, but elongated. Re-threading of the studs is performed after approximately 10–14 hours.
The pump and the handling unit are connected by a pipeline. The suction-pressure hose for supplying oil from the hydraulic tank to the pump cavity must be resistant to oil and gasoline. It is better to use an original high-pressure pressure hose that fits the fitting on the hydraulic distributor of the installation.
Installation of CMU and body
The crane is installed using an auxiliary lifting mechanism. At this stage, you need the help of a second person. The hydraulic cylinder of the unit must be extended when hanging it. There is no need to move the spool, otherwise the lubricant will leak out.
To install the body, an additional lifting device is not required - this can be done using a pre-mounted installation.
Before putting the CMU into operation, maintenance is performed. Oil of the required viscosity is poured into the mechanism. The pressure in the hydraulic system and the functioning of the components are checked. Trial work is being carried out.
Assembling the structure with your own hands
So that after the first use the arrow does not become deformed and there is no need to disassemble the entire structure, the issue of self-production must be approached as responsibly as possible.
In fact, the work involves performing 2 stages.
- Preparing the trailer. First you have to prepare the trailer itself. After all, installing a crane directly on the platform, especially when the floor is made of plywood, will not work. The crane will take up valuable space and will not provide the required efficiency. Therefore, it is better to make a knot outside the sides or cargo platform. Having prepared the site for the crane, the next stage will begin;
- Faucet manufacturing and installation. You can assemble a crane from scrap materials, but it is better to use high-quality components with the necessary parameters of strength and resistance to wear during operation. I'll tell you more about this a little later.
Now we will go through each stage separately.
Let me say right away that this is just an example that you can use as a basis or repeat it with absolute accuracy. Each trailer is different and has different capabilities, as well as the challenges faced by such a design.
Trailer preparation
Nobody forbids you to use ready-made drawings from the Internet. Just make sure first that they are correct, executed correctly and correspond to the actual characteristics of the resulting crane. Plus, do not forget that in some cases it is more correct and easier to install a winch for a trailer, rather than installing a homemade manipulator.
Perhaps someone will need an additional cradle or a larger boom. Everything is individual, but as an example one design is worth describing. You can always reinforce your acquired knowledge with the help of photo and video instructions presented on the Internet.
Before making the crane itself, let's prepare the trailer. The essence of the preparatory activities is as follows:
Preparatory stage
Only certified companies that have the right to perform such work can install CMU on a truck. Car owners who decide to install the installation on a KamAZ or other vehicle themselves will have to obtain certificates from the licensing authority for the workplace, technologies and equipment used.
In order to obtain permission to install a CMU, you should:
- fill out and register an application for truck conversion with the traffic police;
- obtain a preliminary technical examination conclusion on the possibility of installing additional equipment.
Any modifications to the vehicle design can only be made by the owner of the vehicle. To install the crane installation, you must have the original cargo customs declaration and the purchase and sale agreement drawn up in the name of the car owner.
Rules for choosing a DVR in the form of a mirror
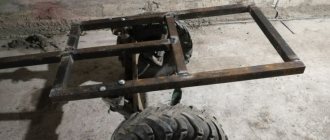
- prepare materials for the manufacture of the structure;
- make retractable stands from profile pipes and metal plates;
- thus the trailer will be more stable;
- based on a profile pipe, make a rectangular frame for mounting the crane itself;
- attach it to the crossbar of the subframe;
- fix the retractable leg inside one of the stand pipes;
- using sheet metal, cut out a platform of the required size;
- weld a piece of pipe to a sheet of metal;
- Using stiffening ribs, additionally connect the pipe to the platform for the tap.
As for materials, it is better to take a profile pipe with a cross-section of about 50x50 mm. Sheet metal should not be less than 5 mm thick. A piece of pipe for the base under the tap is taken around 90 mm in diameter. The length is arbitrary, but not less than 300 mm.
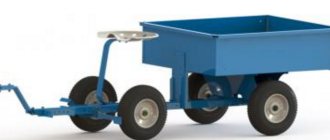
Lifting device
Now you have at your disposal a trailer on which there is a special stand and base for the future crane. Where exactly and on which side to make the platform, decide for yourself. There are different options here.
As for the lifting device, the work here involves performing the following operations: