Installing cylinder heads, valve rocker arms and adjusting valve clearances
The cylinder head mounting studs are screwed into the right and left rows of the cylinder block, having previously lubricated the threaded holes for the studs in the block with diesel oil.
The studs are screwed in over the entire length of the thread with a torque of 80-100 Nm (8-10 kgcm); they should protrude above the plane of the block by 122 mm, which is checked with a bushing (Fig. 1).
Before installing the cylinder head, it is necessary to wipe the mating surface.
We install the cylinder head gasket on the studs so that it fits onto the pins, and the gasket surround onto the cylinder liner collars.
The cylinder head assembly must fit freely onto the studs and dowel pins without impact.
Then we screw the cylinder head nuts onto the studs and tighten them.
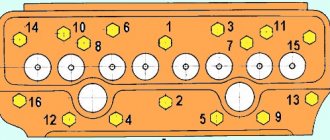
The nuts must be tightened in ascending order of numbers (see Fig. 2).
After the first tightening with a torque wrench, it is necessary to re-check the required torque of 220-250 Nm (22-25 kgcm) on each nut, following the indicated sequence.
The pusher rods are installed in the windows of the cylinder block and at the same time the tip of the rod is aligned with the heel of the pusher.
First, wipe the rod and lubricate the tip with diesel oil.
The right and left valve rocker arms with the axle assembly are installed so that the axle locating pins fit into the holes in the cylinder head, and the sphere of the adjusting screw is aligned with the tip of the rod.
The adjusting screw must be screwed into the rocker until it stops.
Then screw the rocker arm axis mounting bolts into the cylinder heads and tighten them to a torque of 120-150 Nm (12-15 kgcm).
Valve clearances are adjusted simultaneously on two cylinders and a dial is used (Fig. 4).
The dial is installed on the crankshaft pulley, and pin 3 is inserted into the threaded hole on the timing gear cover.
Thermal clearances of the YaMZ-326 engine are adjusted in the following sequence:
- rotate the crankshaft clockwise with a wrench using the pulley bolt, observe the movement of the intake valve of the first cylinder and set the moment when it is completely closed.
After this, the shaft is turned in the same direction until the marks on the crankshaft pulley align with the mark 1-4 YAM3-236 on the dial;
- adjust the gaps between the toes of the rocker arms and the ends of the valves of the first and fourth cylinders.
After tightening the locknut of the adjusting screw, the 0.25 mm thick feeler gauge should fit freely into the 0.30 mm thick gaps - with force.
After turning the crankshaft, it is allowed to change the gap within 0.20 - 0.35 mm;
— combining on the compression stroke the order of operation of the cylinders (1 – 4 – 2 – 5 – 3 – 6) with the mark on the pulley with marks 1 – 4, 2 – 5, 3 – 6 YaMZ – 236 on the dial, adjust the clearances for the remaining cylinders.
When adjusting the thermal clearances of the YaMZ-238 engine, the same techniques and methods are used as for the YaMZ-236 engine:
— on the compression stroke, combine figure 3 on the pulley with mark 1 – 5 YaMZ – 238 on the limb;
— adjust the valve clearances of the first and fifth cylinders;
combining on the compression stroke in the order of operation of the cylinders (1-5-4-2-6-3-7-8) the mark on the pulley with marks 4-2, 6-3 and 7-8 YaMZ-238 on the dial, adjust the valves of the rest cylinders
The control valve pushrods must rotate freely by hand.
The gap is adjusted using an adjusting screw; After adjustment, you need to securely fasten the screw with a nut and check the gap.
Installation of injectors, fuel lines and connecting pipe.
A set of injectors of the same spray group is installed on the engine.
The spray group is applied to the surface of the injector body.
Before installing the nozzles, wipe the inner surface of the glasses, and put one sealing copper washer on the sprayer.
The injectors are installed so that the fitting seal fits into the recess of the cylinder head.
The injector mounting brackets are installed on the cylinder head studs, washers are put on and nuts are screwed in, which are tightened with a torque of 50-60 Nm (5-6 kgf m).
Drainage tubes are installed on the left and right cylinder heads, having previously removed the transport plugs from the injectors.
Drainage tubes are attached to the nozzles with connecting nuts and bolts, having previously placed washers under the tips of the tubes and under the heads of the bolts.
To ensure a reliable seal in all cases, it is necessary to orient the washers with the tops of the cones away from the tips of the tubes outward.
Fuel return lines are installed in the camber between the cylinders and bolted to the right and left cylinder heads.
To ensure a more rigid fastening, a clamp is installed on each fuel line and secured to the flange stud of the left intake pipe.
High-pressure fuel lines are attached to the fittings of the high-pressure fuel pump and injectors in a certain sequence corresponding to the operating order of the high-pressure fuel pump sections.
The YaMZ-236 engine pump has an operating order that corresponds to the operating order of the engine cylinders (1 – 4 – 2 – 5-3-6).
The order of operation of the pump sections of the YaMZ-238 engine differs from the order of operation of the cylinders of this engine.
If the operating order of the engine cylinders is 1-5-4-2-6-3-7-8, then the pump sections operate in the sequence 1-3-6-2-4-5-7-8.
Connection diagrams of pump sections with cylinders of YaMZ-236 and YaMZ-238 engines are shown in Fig. 5.
The connecting pipe of the intake pipelines is installed so that the flange under the compressor air duct is directed towards the front of the cylinder block.
The pipe is attached to the flanges of the inlet pipelines, having previously placed gaskets with assembled mesh and rubber gaskets on the flanges and secured with bolts and washers.
The oil dipstick is installed in the guide tube, after wiping it.
Then install the cylinder head covers, which are secured with screws on one or two threads, and remove the engine from the stand.
Install plugs on the technological holes and secure with bolts.
Cardboard spacers must be installed under the plugs.
Running-in and testing of engines after repair is carried out on STE-160-1500 stands with electric brakes.
At these stands you can test YaMZ-236 and YaMZ-238 engines of all modifications.
The characteristics of electric brakes for test benches are given in the table.
| Characteristics of electric brakes | ||
| Index | Electric brake | |
| AKB-104-4 | AK-102-4 | |
| power, kWt | 160 | 160 |
| Synchronous rotation speed, min-1 | 1500 | 1500 |
| Torque, Nm (kgcm) | 1070 (107) | 1100 (110) |
| Limit speed of engine crankshaft when operating in generator mode with rated torque, min-1 | 3000 | 2500 |
The engine running-in and testing stand must have the equipment necessary to measure engine power, crankshaft speed, hourly fuel consumption, temperature of water leaving the engine (from the right and left water pipes), oil temperature in the engine sump, oil pressure in the line , fuel injection advance angle in degrees of crankshaft rotation angle.
Fuel consumption must be measured on scales with a measurement limit of up to 15 kg, time is counted using a stopwatch with a division value of 0.1 s; measurement of rotation speed - with a manual tachometer or tachoscope with a division value of no more than 10 minutes.
The capacity of the supply tank should be 10 - 12 l, the level of the bottom of the measuring tank should be at least 500 mm from the axis of the inlet of the fuel pump, the internal diameter of the inlet and outlet fuel lines should be at least 8 mm.
Fuel lines should not touch the measuring tank and should be immersed in fuel to a depth of no more than ⅓ of the height of the tank from its bottom.
A reflector is installed at the submerged end of the fuel line that takes fuel away from the engine, preventing the direct direction of the fuel stream to the bottom of the tank and helping to equalize the temperature of the fuel in the tank.
The engine installed on the stand must be fully equipped (with the exception of the fan impeller, generator, compressor).
Engine running-in and testing is carried out using L grade diesel fuel.
During the running-in period, diesel oil is poured into the engine sump, fuel injection pump housing and regulator housing up to the upper marks of the oil level indicators.
The air filters are filled with diesel oil in the amount of 1.6 liters for the YaMZ-236 engine and 1.4 liters for the YaMZ-238 engine.
The oil temperature is maintained using technological oil radiators (at the beginning of the run-in not lower than 50˚ C).
Running-in and testing of the engine is carried out in special modes and includes cold and hot running-in, control acceptance.
Basic recommendations
First of all, it should be noted that such a procedure can be carried out after repairing the power unit or in order to check the tightening torque of the bolts during engine operation.
If the cylinder head has been dismantled, you should carefully inspect the bolts, as well as the holes in the cylinder block for their installation. Screws must not have elongation or deformation of the threaded part. The holes in the block for the bolts are cleaned of any remaining engine oil, liquid, or other foreign particles. If this is not done, the cylinder block may be damaged, and the cylinder head will not be able to be tightened with the required force. This is interesting: Causes of valve knocking on a cold engine and how to eliminate them
Work should begin only after reading the vehicle manufacturers' recommendations for operation and repair. There the driver will find all the necessary information to complete the job, including the forces and sequence of tightening the bolts.
Another feature of using such bolts is their installation at a certain angle. To do this, you will need a special key with an indicator that will show the degree of inclination.
User Igor Ivanov shows in the video the installation and tightening of the cylinder head.
Bolt tightening torque (force)
The tightening torque for the bolts is different for each car (due to design features). Each vehicle has its own table of fastener tightening torques. In the next section, we will consider the cylinder head fastening forces using the example of a VAZ head.
Table: tightening torques for connections depending on thread diameter
| Nominal thread diameter | Turnkey size of head, bolt (nut), mm | Thread pitch, mm | Strength classes according to GOST 1759–70 | ||||
| Bolt | |||||||
| 5.8 | 6.8 | 8.8 | 10.9 | 12.9 | |||
| screw | |||||||
| 6 | 10 | 1 | 0,5 | 0,8 | 1,0 | 1,25 | 1,6 |
| 8 | 12 — 14 | 1,25 | 1,6 | 1,8 | 2,5 | 3,6 | 4,0 |
| 10 | 14 — 17 | 1,25 | 3,2 | 3,6 | 5,6 | 7,0 | 9,0 |
| 12 | 17 — 19 | 1,25 | 5,6 | 6,2 | 10,0 | 12,5 | 16,0 |
| 14 | 19 — 22 | 1.5 | 8,0 | 10,0 | 16,0 | 20,0 | 25,0 |
| 16 | 22 — 24 | 1,5 | 11,0 | 14,0 | 22,0 | 32,0 | 36,0 |
| 18 | 24 — 27 | 1,5 | 16,0 | 20,0 | 32,0 | 44,0 | 50,0 |
| 20 | 27 — 30 | 1,5 | 22,0 | 28,0 | 50,0 | 62,0 | 70,0 |
| 22 | 30 — 32 | 1,5 | 28,0 | 36,0 | 62,0 | 80,0 | 90,0 |
| 24 | 32 — 36 | 1,5 | 36,0 | 44,0 | 80,0 | 100,0 | — |
Correct tightening order
There is a certain order for tightening the bolts; it is the same on almost all cars - from the center of the head to its edges, cross to cross. So, for example, the two central bolts of the right and left rows are tightened first, then the two bolts located to the left of the central ones, then the two to the right of the central ones, then the two bolts located on the left in both rows, and the bolts located on the right in both rows complete the order.
It is important to remember that fastening is always performed in three to four approaches:
- The first approach is a force of 3-4 kgf.
- The second approach is a force of 7 kgf.
- The third approach is a force of 9 kgf.
- The last approach is a force of 11.5 - 12 kgf.
Some nuances
The tightening torque is one of the main factors for the normal fit of the block head. But this criterion is influenced not only by the applied force, but also by the fasteners themselves:
- General condition of the bolts – new or used;
- Presence of lubricant on the threaded part;
- Thread condition.
The type of power plant (petrol, diesel), as well as the number of valves, does not affect the cylinder head tightening technology. But this does not mean that the force and tightening procedure are identical for all motors, and before seating the head, you should definitely study the conditions for performing the operation and all its features.
Errors when installing the head
If you do not use a torque wrench when installing the cylinder head, you may make a mistake with the force, which will lead to uneven torque. In such cases, there will be excessive or insufficient force, which will result in either deformation of the head surface or allow the breakthrough of gases, oil or coolant. In both cases, this is fraught with serious consequences for the engine.
If you follow the rules for tightening the fastening bolts, as well as the required torque, you can always count on reliable and durable operation of the installed parts. The gas distribution mechanism in the engine plays a major role, so you should not neglect the rules for installing the component elements.
Reasons for adjusting valves
When should valves be adjusted? A knock in the gas distribution mechanism immediately comes to mind. It is clear that with such symptoms, first of all, the thermal gaps are checked and adjusted.
It is also worth making adjustments if the first thousand kilometers have been passed after the repair or if the cylinder head has been pulled.
It is necessary to monitor the mileage of the car and the condition of the entire gas distribution mechanism. If necessary, adjust valve clearances after 10-20 thousand km and always remember that increased thermal clearances lead to increased fuel consumption.
The importance of correct tightening of cylinder head fasteners
Tightening torque for the cylinder head of a VAZ-2112 16 valves: diagram, force.
Cars produced before 2011 require regular tightening of the cylinder head bolts. Car models produced after 2010 have engines of a different design, which is why they do not require this type of work. Despite this, the problem of bolt tightening is especially relevant for owners of VAZ 2106 and VAZ 2107, who must undergo an annual technical inspection.
The accumulation of moisture in the areas where the bolts touch over time leads to the need to tighten the fasteners in the cylinder block. In this case, the main reason for this is engine oil leaks: its gradual leakage from the internal combustion engine body leads to problems in the operation of the cylinders and their gradual failure.
Lubricating fluid can leak for various reasons, including:
- Deformation of the metal of the cylinder head, which is a consequence of a short circuit in the car's electrical network or engine overheating;
Damage to the cylinder head - consequences of engine overheating - Depressurization of the cylinder head gasket.
During its operation, it gradually wears out and wears out, which is why you have to constantly tighten the bolts. After passing every hundred thousand kilometers, a new tightening torque is determined - either with your own hands or in a car service center. In addition, the bolts are tightened after installing a new cylinder head. Damage to the cylinder head gasket and its failure
In this case, simply changing the gasket will not be enough: if the gain is set incorrectly, the new one will wear out at the same speed as before.
Consequences of improperly tightening cylinder head fastenings
Tightening torque for cylinder head on VAZ 2107
The process of tightening the cylinder head fastenings requires strict adherence to all features and rules. Quite often, beginners and non-experts make mistakes that result in defects in the cylinder head or cylinder block:
- Tightening the bolts;
- Getting lubricant into threaded wells;
- Fasteners are tightened in the wrong order;
- Using a wrench with an unsuitable attachment;
- Attempting to screw in bolts of the wrong length.
Without adding a lubricant, it is almost impossible to screw a bolt into a threaded well that is not cleaned of carbon deposits, dirt and rust. Even if the tightening is completed, its torque will not be increased to the required value. Experts who work with car engines apply lubricant only to the bolts, while beginners, due to inexperience and lack of knowledge, pour oil directly into the well. The result is a complete failure of the well, its deformation, which is why it is necessary to replace the entire cylinder block or carry out a major overhaul.
Location of cylinder head bolt wells
Tightening the cylinder head bolts “by eye”, without using a torque wrench, does not lead to anything good: the fasteners are either overtightened or undertightened. In the first case, the bolts break, which is why the cylinder block has to be sent in for repair. In most cases, cylinder head bolt heads are made with an external or internal hexagon, much less often - with a square. If the edges of the wrench attachment are worn, during tightening it may turn along with the edges of the bolt head. As a result, they will be erased, and the hardware itself will be impossible to screw in or unscrew.
Consequences of improper tightening of threaded connections - broken and failed bolts
Excessive stress in the cylinder head housing is usually detected when the bolt tightening order is not followed. The cylinder head is made of aluminum, which practically does not tolerate high loads, quickly deforms and becomes covered with cracks. Products of fuel combustion flow out through them, which provokes a loss of power and throttle response of the engine, increasing its appetite and reducing its working life. The appearance of cracks threatens the mixing of coolant and oil, which reduces the lubricating properties of the latter and leads to rapid wear of all engine parts and components that are in constant friction.
Cylinder head cracking due to high voltage
Checking the tightness of fuel pipes
How to tune a VAZ 2110 with your own hands
Before closing the valve cover. The engine should be started. To check for fuel leaks. It is necessary to look at all connections of the return fuel pipe. It is also necessary to look at all joints of the return fuel pipe. It is also necessary to check the connections between the nozzle and the extension cord. If the high pressure pipes are not tightened correctly. The extension in the nozzle body rotates. As a result, the body bursts. The crack is very small and difficult to see. But fuel will leak through it. You can notice this.
When the engine is running, the head cavity quickly fills with oil. If there is not enough time to carefully inspect the engine, it is better to turn off the engine. Wait until the oil drains. And start the engine again. The procedure is not very pleasant. But after assembly it may raise the oil level. This is because fuel gets into it. And it gets there from just these places. Therefore, it is better to make sure once again.
If everything is fine, you can close the lid. There is no need to apply much force when tightening the cap. Because you can squeeze out the gasket. Before installation, be sure to make sure that the gaskets fit in the grooves correctly. To avoid unnecessary problems with oil leakage. The installation of the YaMZ cylinder head is now complete. All that remains is to start the engine and check for possible leaks. Coolant. Oil from under the cover gasket. The procedure for tightening the YaMZ 236 cylinder head and the force with which it is pulled affect the further operation of the engine
That's why it's important to do everything right
How is the tightening torque of VAZ 2109 bolts adjusted?
Tightening torque for main and connecting rod bearings
If it is necessary to tighten the cylinder head of a Nine engine, it is important to observe not only the strength and degree of tightening of the bolts, but also other conditions. Below we will look at how to correctly stretch the cylinder head on a VAZ 2109
What will you need?
The procedure for tightening fasteners after removal and repair, as well as when installing the cylinder head, is carried out exclusively with a torque wrench.
In addition to the key, you will also need a caliper or a regular ruler.
User Marat Ibatullin made a video in which he clearly showed how the task of tightening the screws is performed.
Scheme of work
The order of tightening the bolts on cars with an injector or carburetor engine is determined by the manufacturer and is indicated in the service book for the car. According to the diagram, the pulling procedure begins with the central two cylinder head bolts.
The cylinder head bolts must be tightened as follows:
- First, you need to twist the screws with a force in Newtons of 2.0 kg/cm.
- Then the bolts are tightened to a torque of 7.5-8.5 kg/cm.
- After this, all screws must be tightened 90 degrees.
- At the end, each bolt is rotated 90 degrees again.
How to tighten the head screws of a VAZ 2109 block with your own hands:
- The torque wrench holder is placed in the zero position. This indicates that the instrument data corresponds to the moment of the initial position.
- Evaluate the indicators on the key before starting the tightening procedure.
- The tool holder can now be rotated. Monitor the readings as you complete the task.
- If it happens that the torque does not change during tightening, then the head mount may be stretched. This is quite normal, as it should be. First, use a wrench to tighten the screws to 2 kg/cm. Follow the tension sequence shown in the diagram.
- At the next stage, the covering is performed again in the same sequence. Only now the bolts need to be pulled to approximately 8 kg/cm.
- At the end of the procedure, the screws must be tightened once 90 degrees in a circle, and then again 90 degrees.
Channel RUS13 in its video showed how to install the cylinder head on a VAZ 2109 engine and tighten the bolts.
Tightening rules
What nuances should be taken into account when carrying out this procedure:
Observe the appropriate tightening torque for the VAZ 2109 cylinder head. The use of wrenches and other tools is not allowed, since the degree of tension can only be determined using a dynamometer. To perform tensioning, only working screws are allowed. The bolts must meet the requirements of the power unit installed on the machine. Before completing the task, make sure that the holders are in good working order. If the cylinder head has been replaced or repaired, then the old bolts cannot be used for tension; new ones must be purchased. On sixteen-valve power units, it is allowed to re-use screws to fix the block head, but only if the length of the parts is no more than 9.5 cm. It is necessary to measure the length of the screw only with a washer. If the bolts are larger than 9.5 cm, they must be replaced. If the vehicle is equipped with an aluminum head, then the cylinder head is fixed with TTU type screws
They cannot be tightened because they are screwed into a thread with a certain degree. When purchasing a cylinder head gasket, you need to pay attention to the manufacturer's specifications. They often prescribe a certain tightening ratio required for specific gaskets.
Please note that the indicated moment of force should not diverge much from the one applied during the work process. In power units equipped with aluminum cylinder heads, the tightening procedure is carried out on a cold engine. As for cast iron engines, in such internal combustion engines it is necessary to perform the tightening while it is hot.
How to correctly install the crankshaft on YaMZ 236?
Safe, proper operation of the engine largely depends on the condition of one of its main components - the crankshaft. Taking into account operating conditions and large continuous loads, the unit is made of steel. To make it more wear-resistant, it is produced by hot stamping, and the journals are hardened with high-frequency currents. A distinctive feature of the YaMZ 236 crankshaft is that it consists of four main and three connecting rod journals. The latter have additional cavities, with the help of which centrifugal oil purification occurs. By means of counterweights installed on the cheeks of the unit, it is balanced.
Step-by-step instructions for replacing the cylinder head gasket
The design features of the Niva Chevrolet make it possible to remove the cylinder head without good access from below. However, the presence of an inspection hole or lift greatly facilitates access to some nuts and the coolant drain valve. There is no need to remove the engine, but it is advisable to clear the space under the hood of interfering hoses and wires.
For repairs you will need the following tools:
- set of keys and socket heads;
- powerful wrench, ratchets, extensions;
- hammer;
- flat screwdriver;
- head or special wrench 38 for cranking the crankshaft;
- torque wrench;
- brake pipe wrench (suitable for oil line).
Conventionally, all work on replacing the cylinder head gasket on a Niva can be divided into 2 stages: removing all attachments and all electrical sensors from the cylinder head, removing the timing mechanism and attaching the head to the cylinder block.
Procedure for removing the cylinder head of a Chevy Niva
The work algorithm is as follows:
- Drain the antifreeze from the radiator and engine block. To do this, unscrew the plug on the block with a 13 key. In this case, there is no need to drain the oil from the crankcase. Remove the terminal from the battery. We move the gearbox to neutral position.
- While the coolant is draining, we begin to disassemble the engine from the hood side. We unscrew the throttle valve, remove the throttle cable, remove the wires from the spark plugs, disconnect the electrical connectors of the injectors, TPS, IAC, oil pressure and coolant temperature sensor.
- Now you can disconnect all the cooling system hoses going to the thermostat, heater core and throttle body heating. Remove the brake booster hose from the intake manifold.
- We take the engine wiring harness and all removed hoses to the side and secure them if necessary.
- We unscrew the protective screen of the exhaust manifold, loosen the 4 nuts securing the exhaust pipe to the exhaust manifold. For the convenience of further actions, the exhaust pipe can be removed from the lower mounts and completely lowered under the car.
- On a Chevy Niva with power steering, the pump mounting bracket will interfere with us. It is not necessary to remove it completely - just unscrew the fastening bolts and carefully hang it on the wire.
- Now you can start opening the engine. Remove the valve cover. Using a special wrench, unscrew the oil line to the hydraulic compensators and chain tensioner.
- Set the piston of the first cylinder to TDC until the marks align by turning the crankshaft. Loosen the chain tensioner and unscrew the top sprocket. We immediately fix it in this position with wire to prevent the circuit from jumping and phase failure.
- Unscrew the 10 nuts securing the camshaft housing with bearings. You need to unscrew evenly around the entire perimeter (according to the tightening order in the instructions). Remove the assembly from the engine.
- Access to 10 cylinder head mounting bolts is now open. You need to tear them off with a wrench, starting from the middle and moving to the outer bolts. The bolts are removed from their places and checked for thread condition and possible elongation (no more than 117 mm).
- Gently tapping and prying from below with a screwdriver, pull the cylinder head out of its place. After which you can remove it from the engine along with the collectors. The mass of this unit allows you to perform the operation yourself.
After removing the old gasket, possible damage and wear of the surfaces are assessed. If no repairs are required, the valves do not have carbon deposits, and all dimensions are within tolerance, then you can immediately begin replacing the cylinder head gasket and assembling the engine.
Tightening threaded connections without using a dynamo wrench
Car owners often wonder how to tighten the cylinder head bolts without resorting to using a torque wrench. This can be done, and this method is very effective in practice. To implement it you will need:
- Double-sided spanner or open-end spanner. As an option, you can resort to bending screwdrivers, which have a hole or cavity on one side;
- Steelyard (spring scales) with a limit of 20 kilograms.
After collecting the necessary tools, it is necessary to calculate the tightening torque - the force that is applied to the meter lever. If the nut is required to be tightened with a torque of 2 kgf*m, then the force will be equal to 8 kg. After all the calculations have been carried out, a key is installed on the fastener, to the other end of which the scales are attached. The steelyard ring is pulled until the required torque value is displayed on the scale.
The method of tightening threaded connections without a torque wrench is very simple and saves in situations where such a device is not at hand or its purchase is too expensive.
Tightening cylinder head bolts without using a torque wrench video:
In what cases is it needed?
Some motorists have no idea why follow the sequence and adjustment of the tightening torque of the cylinder head bolts. The motorist must understand that the use of inappropriate technology will result in problems with the operation of the engine.
This is very important and means that it should be given attention. Especially if you are used to repairing your “iron horse” yourself, and not turning to a service station for help
The numbers indicate the motor elements that need to be tightened.
Before we get to the issue of the order of tension of the cylinder head elements, we note that each engine has its own tightening torque. Accordingly, the coefficient is different for each car.
Some motorists believe that if they have repaired an engine or tightened its screws, then they have enough experience. But it should be borne in mind that this procedure must be carried out only in accordance with certain engine parameters. This information can be found in the owner's manual for your car.
Or if there is an oil leak. This reason is common. In addition, the need to tighten bolts arises when a motorist repairs an engine or replaces an internal combustion engine gasket. Also, adjustment is needed when the structure of the BC is damaged.
Oil leakage is one of the reasons for the need to tighten engine components
Note that the tension moment is influenced by several factors. If you do this yourself, you need to know what affects:
quality and lubrication of the holes, as well as the screws themselves. If the holes are dry or practically not lubricated, then this needs to be done
For lubrication, it is advisable to use non-viscous motor fluids. Pay attention to the condition of the thread and the element that goes into it. If the motor components are deformed and the threads are clogged, then it is better not to proceed with tensioning
Sooner or later this will lead to a decrease in the compressive force coefficient of the gasket, and as a result this can turn out very badly. Up to engine overhaul. Are you using a new bolt or an old one? If it is new, then its resistance and tightening torque indicator will be incorrect. Experienced professionals recommend that when using new screws, the tightening process should be carried out after two or three tightening cycles. To do it correctly, the element needs to apply a little force and tighten the element 50% after the tightening torque.
Summarize
Before carrying out work on adjusting the timing belt, fuel should not enter the engine. The pump is shut off using a special lever. Next, you should make sure that the rocker arm axes are firmly fixed. After this, we carry out the configuration according to the existing rules:
- The crankshaft rotates behind the flywheel. The adjustment is made at the moment of compression for each cylinder.
- The feeler gauge should be the appropriate size and fit between the parts without effort.
- To obtain the required clearance, turn the screw.
- Having reached the optimal clearance, tighten the nut.
- We repeat the operation to control the gaps using the same method.
- To finally make sure that the mechanism is adjusted accurately, you need to crank the crankshaft and check the clearances on several cylinders.
- We open the fuel pump to supply fuel to the cylinders.
- We start the engine and listen to its operation. The absence of extraneous noise indicates that the settings are correct.
- Reinstall the cylinder head cover.
Torque wrench and its types
To ensure the required tightening force, torque wrenches are used. These devices are designed for maximum loads, so you don’t have to worry about the possibility of the key failing.
The main characteristic of torque wrenches is their ability to transmit the most precise moment of force to hardware. There are different types of devices:
- switch;
- ultimate;
- digital.
The first option can be called the simplest device. The arrow key works by bending the lever on which a special torque measurement scale is installed. The advantage of such a device is its low price and the ability to tighten in both directions, since the scale is designed for double-sided measurement.
The second option - the limit key - is characterized by the presence of a spring mechanism. The design is designed in such a way that the optimal torque can be set on the wrench and effectively transmitted to the hardware. There is also a ratchet mechanism. At the required value, the ratchet is blocked and the force is limited to the torque achieved.
The third option is more expensive than all the others, however, it demonstrates excellent measuring characteristics. The electronic component allows you to achieve minimal error during the tightening process.
There are several more advantages:
- display of torque on a small display;
- light designation;
- measuring torque on pre-assembled hardware;
- no adjustment needed;
- convenient operation due to the ratchet;
- memory for storing moment data.
Basic recommendations
First of all, it should be noted that such a procedure can be carried out after repairing the power unit or in order to check the tightening torque of the bolts during engine operation. If the cylinder head has been dismantled, you should carefully inspect the bolts, as well as the holes in the cylinder block for their installation. Screws must not have elongation or deformation of the threaded part. The holes in the block for the bolts are cleaned of any remaining engine oil, liquid, or other foreign particles. If this is not done, the cylinder block may be damaged, and the cylinder head will not be able to be tightened with the required force.
Work should begin only after reading the vehicle manufacturers' recommendations for operation and repair. There the driver will find all the necessary information to complete the job, including the forces and sequence of tightening the bolts.
Another feature of using such bolts is their installation at a certain angle. To do this, you will need a special key with an indicator that will show the degree of inclination.
User Igor Ivanov shows in the video the installation and tightening of the cylinder head.
Bolt tightening torque (force)
The tightening torque for the bolts is different for each car (due to design features). Each vehicle has its own table of fastener tightening torques. In the next section, we will consider the cylinder head fastening forces using the example of a VAZ head.
Table: tightening torques for connections depending on thread diameter
| Nominal thread diameter | Turnkey size of head, bolt (nut), mm | Thread pitch, mm | Strength classes according to GOST 1759–70 | ||||
| Bolt | |||||||
| 5.8 | 6.8 | 8.8 | 10.9 | 12.9 | |||
| screw | |||||||
| 6 | 10 | 1 | 0,5 | 0,8 | 1,0 | 1,25 | 1,6 |
| 8 | 12 — 14 | 1,25 | 1,6 | 1,8 | 2,5 | 3,6 | 4,0 |
| 10 | 14 — 17 | 1,25 | 3,2 | 3,6 | 5,6 | 7,0 | 9,0 |
| 12 | 17 — 19 | 1,25 | 5,6 | 6,2 | 10,0 | 12,5 | 16,0 |
| 14 | 19 — 22 | 1.5 | 8,0 | 10,0 | 16,0 | 20,0 | 25,0 |
| 16 | 22 — 24 | 1,5 | 11,0 | 14,0 | 22,0 | 32,0 | 36,0 |
| 18 | 24 — 27 | 1,5 | 16,0 | 20,0 | 32,0 | 44,0 | 50,0 |
| 20 | 27 — 30 | 1,5 | 22,0 | 28,0 | 50,0 | 62,0 | 70,0 |
| 22 | 30 — 32 | 1,5 | 28,0 | 36,0 | 62,0 | 80,0 | 90,0 |
| 24 | 32 — 36 | 1,5 | 36,0 | 44,0 | 80,0 | 100,0 | — |
Correct tightening order
There is a certain order for tightening the bolts; it is the same on almost all cars - from the center of the head to its edges, cross to cross. So, for example, the two central bolts of the right and left rows are tightened first, then the two bolts located to the left of the central ones, then the two to the right of the central ones, then the two bolts located on the left in both rows, and the bolts located on the right in both rows complete the order.
- The first approach is a force of 3-4 kgf.
- The second approach is a force of 7 kgf.
- The third approach is a force of 9 kgf.
- The last approach is a force of 11.5 - 12 kgf.
Some nuances
The tightening torque is one of the main factors for the normal fit of the block head. But this criterion is influenced not only by the applied force, but also by the fasteners themselves:
- General condition of the bolts – new or used;
- Presence of lubricant on the threaded part;
- Thread condition.
The type of power plant (petrol, diesel), as well as the number of valves, does not affect the cylinder head tightening technology. But this does not mean that the force and tightening procedure are identical for all motors, and before seating the head, you should definitely study the conditions for performing the operation and all its features.
Errors when installing the head
If you do not use a torque wrench when installing the cylinder head, you may make a mistake with the force, which will lead to uneven torque. In such cases, there will be excessive or insufficient force, which will result in either deformation of the head surface or allow the breakthrough of gases, oil or coolant. In both cases, this is fraught with serious consequences for the engine.
If you follow the rules for tightening the fastening bolts, as well as the required torque, you can always count on reliable and durable operation of the installed parts. The gas distribution mechanism in the engine plays a major role, so you should not neglect the rules for installing the component elements.
Checking the actual values of “thermal compensators”
The turbodiesel manufacturer stipulates that for the YaMZ 238, valve adjustment is necessary only if the measured value exceeds the established limits: 0.25-0.30 mm. Accurate measurement of the clearances of both valves of one cylinder can be carried out only during the compression stroke:
focus on the first cylinder; turn the crankshaft clockwise (looking at the fan, from the front of the car) until the intake valve closes (completion of the suction stroke) - its end in contact with the toe of the rocker arm should rise to the highest maximum point; Rotate the crankshaft another 1/3 turn (120 degrees), maintaining the same direction of rotation.
The cylinder number is identified as follows:
- focus your gaze on the engine fan (at the front of the car);
- the left near cylinder is the first;
- the right near cylinder is the fifth;
- further numbering is carried out sequentially (the leftmost is the fourth, the rightmost is the eighth).
There are two ways to rotate the crankshaft:
- from the front: for fastening the pulley with a suitable spanner;
- from behind: with a special crank - behind the flywheel.
The size of the gap is determined by the thickness of the feeler gauge placed between the end of the valve and the rocker arm boss. The valves are not subject to correction if the 0.25 feeler gauge passes freely, and the 0.30 feeler gauge passes with noticeable interference.
When inspecting and adjusting valves on the YaMZ 238 engine, it is recommended to press the transmitting levers (rocker arms):
- on the right cylinder head (cylinders 1-4) the levers of the exhaust elements are towards the end of the axle; inlet parts - to the thrust washer;
- on the left cylinder head (cylinders 5-8) - vice versa.
Tightening torque of cylinder head bolts
Depends on the version of your car, on old domestic cars there are only two of them, on more modern versions there are already 4. If you decide to tighten the cylinder head bolts yourself, prepare a fairly warm room, or if you are going to do repairs in the warm season, choose a day with weather conditions when the temperature reaches more than 20 degrees Celsius. If you are carrying out repairs in the cold season, prepare a heated room in which it will be convenient to work.
When carrying out repair work, do not forget to clean all bolts and connections from dirt and excess oil, especially if the gasket has leaked in the structure. After each tightening operation, it is advisable to wait 20 minutes until the metal returns to its original shape in order to avoid overheating and deformation of the metal case.
It is advisable to look up the tightening torque on the cylinder head of your car in the original manual of your car or find out from an experienced mechanic competent in these matters. Be sure to check the model and year of your car so you don't make a mistake.
Follow the correct order of tightening the cylinder head bolts, otherwise the work will have to be redone and your efforts will be in vain.
Tightening torque of the cylinder head VAZ 2114 8 valves: correct operation with a torque wrench
A tool such as a torque wrench, which allows you to tighten bolts with equal force, requires great care in operation and certain skills.
Torque wrench
An approximate sequence for tightening bolts with this wrench is as follows:
- set the holder to the “zero” position;
- begin smooth rotation of the instrument, while simultaneously monitoring its readings;
- if the tool rotates (especially at the initial stage of tightening) without changing the torque on the indicator, this may indicate a slight internal stretch of the fasteners. This phenomenon is absolutely normal and the rotation of the tool should be continued;
- When the tightening torque corresponding to the required one is reached, the movement of the tool should be stopped.
Bolt tightening
Instead of using a torque wrench, you should not use any other tool (including a mechanized one, with the ability to regulate the tightening force). After all, only with a wrench can you achieve absolutely precise and smooth tightening of the bolts, thanks to which the gasket will be evenly pressed over the entire surface of the block. This will help maximize its service life, avoid burnouts, oil leaks and coolant leakage.
Removing the cylinder head
Remove the exhaust pipe assembly with the spark arrestor and the pre-filter. Disconnect the wires from the connecting panels attached to the fan casing, free them from the fixing brackets and remove them from the cylinder head cover. Move the disconnected wires to the cab. Loosen the steering coupling bushing and move the bushing towards the rear steering shaft. Remove the front steering shaft. Remove the water temperature sensor wire, fuel pipes, fine fuel filter, air cleaner with bracket, air supply pipe, exhaust manifold, adapter pipe, drain pipe with pipe, intake manifold, thermostat housing, cylinder head cap and cover, rocker arm mechanism and pushrods. Disconnect the cylinder head pipe and oil pipe. Disconnect and remove the injectors. Remove the cylinder head with gasket.
The need to replace the cylinder head assembly is determined after its removal. Replacement is carried out if there are cracks (primarily near the holes in the water jacket and between the valve seats); when the lower plane is warped by more than 0.2 mm (see Fig. 1), measured with a metal ruler and a feeler gauge; when the valves are buried more than 3 mm, measured with a depth gauge (see Fig. 2) or a feeler gauge (see Fig. 3) relative to the plane of the head. The permissible value of valve recessing is 1.8 mm. If the valves sink more than 3.5 mm, it is necessary to replace the cylinder head assembly.
Rice. 1. Check the plane of contact of the surface of the cylinder head for warping. 1 – test ruler; 2 – dipstick.
Rice. 2. Measuring the sinking of valves using a depth gauge.
Rice. 3. Measurement of valve recess relative to the plane of the head using a feeler gauge.
Assembly precautions
The head is extended. Now you can install everything in its place. As when removing push rods. The same goes for installation. You need to be very careful. Be sure to feel the barbell for its seat. It represents a cup. And it's very easy to miss. The bar itself if you insert it without holding it. It won't get into the cup. And it will fall into the engine crankcase. After that, the rods fell into place. The rocker arm brackets are screwed together with the rocker arms. The injectors are secured with brackets.
Fuel pipes for return drain. It must be screwed on carefully. It is advisable to install new sealing washers. With new washers, the tubes will not rotate when the fitting is tightened. Even a slight twist on the injector threatens to cause the tube to burst. When tightening the tube fitting into the head itself, you must make sure that the fitting is tightened. And when tightening the tube nut. It needs to be held. To avoid damaging the thread. This connection very often brings a problem. Leaking fuel. Which will fall into the pallet. After which the oil level in the engine increases. After installing all the manifolds, it is necessary to adjust the valves.
Tightening torque of the cylinder head on a VAZ 2109, replacing the gasket with your own hands, the necessary tools
At the end of the operational period or if the integrity of the cylinder head gasket is damaged, the element must be replaced.
The main sign of a malfunction or gasket wear is the formation of coolant and oil leaks at the junction of the engine block and the cylinder head.
Cylinder head seals
Replacement
To change the gasket, you will need to dismantle the assembly, get rid of the worn cylinder head gasket and reassemble the structure in the reverse order, following the recommendations regarding the tightening torques of the cylinder head bolts. We will tell you about all this in more detail.
Disconnect the wiring from the coolant temperature sensor and emergency oil pressure sensor. Remove the thermostat, just remember to drain the coolant first. Remove the air filter housing. There is no need to remove the carburetor, because it will not interfere with replacing the gasket. Disconnect the exhaust pipe from the exhaust manifold. Remove the camshaft drive gear after first setting the piston of the first cylinder to the TDC position. Now you can remove the protective casing of the camshaft drive belt, loosen the gear fixing bolts, securing the gear from turning. Remove the camshaft drive belt. Then you can completely unscrew the mounting bolts and remove the gear. Press the latch to disconnect the wiring block from the ignition distributor. Similarly, turn off the central high voltage. Loosen the clamps to remove the fuel supply hose from the fuel pump. Disconnect the throttle and air damper drive rods from the carburetor. Disconnect the power supply from the solenoid valve. Remove the vacuum booster hose from the intake pipe fitting. Disconnect the tube from the vacuum ignition corrector. Loosen the tension on the clamps to remove the interior heating hoses from the pipes. Remove the cylinder head. Using a socket with an extension, the mounting bolts are unscrewed. Rock the head a little jerkily, then remove the element. Remove the old gasket, clean it of any remaining rubber seal and other contaminants. Wipe dry thoroughly, after which you can reassemble. Before assembly, check whether the length of the cylinder head bolts is within the normal range. Ideally, their length is 135.5 millimeters. If the bolts have lengthened during use, then all bolts will have to be replaced.
Replacement procedure
Puff
Reassembling the unit if you strictly follow the instructions for dismantling work will not pose any particular problems.
An incredibly important aspect of replacing the cylinder head gasket and all other activities associated with removing the head is the correct adjustment and tightening of the bolts.
Tightening the bolts is done strictly with a torque wrench, which will allow you to control the tension torque.
Here are some guidelines for using this specialized wrench and checking the current tension condition:
- Place the holder in the zero position. This will indicate that now the key data is equal to the moment of the original position;
- Look at the torque tool readings as you begin to tighten the bolts;
- Rotate the holder, monitor the indicators;
- If the torque does not change, the fastener may be stretchable, which is normal. This is exactly what should happen;
- If the torque increases rapidly, bolt movement should be achieved. That is, the stretch of the holder is small, it needs to be stabilized.
Golden rules of tightening
To properly reassemble the cylinder head, you need to adhere to the golden rules:
- Strictly follow the tightening torque data corresponding to the VAZ 2109;
- Make adjustments only using a torque wrench. Other tools do not allow you to get the desired result;
- To install the cylinder head, use only serviceable bolts that meet the requirements of your engine installed on the VAZ 2109;
- Before work, make sure that the holders are in good condition.
Checking the bolts
Hot engine run-in
Before starting the engine, it is necessary to adjust the fuel injection advance angle.
To do this, check the relative position of the marks on the fuel injection advance clutch and the drive half coupling of the fuel pump drive shaft (the marks should be on one side);
— remove the high pressure pipe of the first section of the injection pump;
— a momentoscope is installed on the fitting of the first section of the pump.
After making sure that the regulator bracket is in the fuel supply on position, pump fuel into the engine power supply system with a manual booster pump for 2-3 minutes and rotate the engine crankshaft clockwise (as viewed from the fan) until fuel appears in the glass tube.