The Gorky Automobile Plant has been installing ZMZ-406 engines on Volga and Gazelle cars since 1996. These engines replaced the ZMZ-402, differing from them in greater power and better dynamics with a smaller displacement (2.3 liters versus 2.5 for the 402), moreover, the new engines turned out to be more economical. In the first years of production, GAZ cars were installed carburetor engines, then they were gradually replaced by injection engines.
Engine ZMZ 406 for GAZ cars
On Volga and Gazelle cars the following were used:
- 4061.10 - carburetor on 76 gasoline (compression ratio - 8);
- 4062.10 - injection on 92 gasoline (compression ratio - 9.3);
- 4063.10 - carburetor with 92 gasoline (compression ratio - 9.3).
Some GAZ vehicles also used other engines from the Zavolzhsky Motor Plant, for example, ZMZ-405. Since 2006, only injection engines, more modern and with better characteristics, have been installed on Gazelle and Volga cars. The disadvantages inherent in carburetor options are a thing of the past.
Main differences and technical characteristics
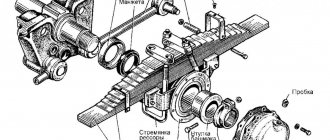
ZMZ-406 is an in-line four-cylinder engine. Its main part is a cylinder block made of gray cast iron.
Disassembled ZMZ 406 motor
It is heavier than aluminum, but has increased rigidity and does not require replacement liners. The engine design has changed significantly compared to the previous model (ZMZ-402). An important feature is that the cylinder head contains two camshafts, one of which is intended for the intake valves, the other for the exhaust valves. They are driven by a two-stage chain, with hydraulic tensioners operating in automatic mode.
Each cylinder has four valves to improve the intake of the working mixture and the exhaust of exhaust gases. The valves are actuated by hydraulic pushers and do not require clearance adjustment. The spark plugs are located in the center of the combustion chambers, which increases the compression ratio.
Basic technical data of ZMZ-4062.10:
Comparison of technical characteristics of various modifications of the ZMZ-406 engine
- Weight, kg - 192;
- Volume, liters - 2.28;
- Compression ratio - 9.3 (8*);
- Power, l. With. - 145; 100*; 110**;
- Torque, Nm - 200.9; 181.5*; 191.3**;
- Gasoline brand - AI-92, A-76*;
- Oil volume, liters - 6;
- Coolant volume, liters - 10.5.
Driver mistakes
Because of the eternal desire to improve their unit, many try too hard and end up simply killing the engine. What mistakes should you not make when working with the 406 series power apparatus? It is better not to optimize an engine, the price of which varies within 100 thousand rubles.
You should not listen to the advice of inexperienced drivers who suggest reducing the flywheel weight. This will only lead to unnecessary problems and not increase power. Air swirlers are superfluous. There is no need to listen to specialists who offer to install them. If you use them, the power will be proportionally reduced. The vehicle speed does not increase when the intake air heats up. Engine reliability will decrease if droplets of water are added to the intake tract. Designers, on the contrary, try to separate the liquid from the fuel as much as possible, because when it gets into it, it contributes to the onset of corrosion. Some recommend installing an electric tensioner to change the technical characteristics of the engine. However, it not only costs a lot of money, but also completely kills the power unit. And these are not all (but the most common) mistakes made by drivers.
Comparison of injection and carburetor engines
The main difference between these modifications is the method of preparation and admission of the combustible mixture into the combustion chamber.
Carburetor for the ZMZ 406 engine.
On the carburetor 4061 and 4063, the traditional method is used; on the injection 4062, a new (for that time) version of gasoline injection through nozzles, controlled by an electronic microprocessor, is used. When using injectors, the accuracy of fuel dosage increases, injection and ignition occurs at the optimal moment. Engine performance increases, power and torque increase, which is clearly seen when comparing the characteristics of injection and carburetor engines (see above).
Ready-to-install injection motor ZMZ 406
In addition to the best characteristics, injection motors are more economical and cause less damage to the environment.
This occurs due to more complete combustion of fuel under the control of an electronic unit that does not require regular maintenance. Carburetor engines have their advantages. This is the simplicity of the design, the ability to adjust and repair without the involvement of specialists. True, this can turn out to be a disadvantage: if the carburetor is incorrectly configured, various negative phenomena occur, for example, unstable idle speed. If you are not confident in your abilities, it is better to contact a workshop.
Wiring diagram for Gazelle 406: reconfiguring the car for gas using Volga parts
The driver is the most dangerous component of the car
What to do if the price of fuel, and with it your expenses for it, no longer fit into the freight transportation budget? Of course, many will advise switching to gas if you don’t have a carburetor under the hood, and they will be partly right. After all, the Gazelle with the 406 engine, which is well known to many, will require, in addition to the LPG itself, a lot of modifications, which is not cheap. But there is a way out and it will be discussed in this publication.
Switch to gas? It is possible, although difficult
What is needed for remodeling
If you modernize it, it will be completely, including the injector, and for this you should take a closer look at the Digitronic gas-cylinder equipment. This HBO is praised by many, and it can be installed on Gazelle.
Many people know about the economical consumption of a car with LPG.
But there is one significant nuance - to equip a car with Digitronic, you need an injection engine, “tuned” to Euro-2 toxicity standards.
And then, modifications for the injector will not end there, because the following components and parts will be needed:
- Injector wiring on the Gazelle - 406 engine does not have it, not to mention the control unit;
- Intake system, including the manifold itself with the injector ramp, throttle position sensor, throttle pipe, idle air control and additional air regulator, connecting pipes and pipes;
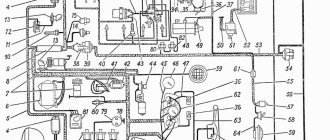
In the photo - a diagram of the electrical equipment of the gasoline version of the ZMZ 406
Note! Wiring for Gazelle 406 is also available at disassembly sites. But its performance and reliability cannot be guaranteed.
- Injection camshafts. This point is controversial, since it is quite possible to leave carburetors on the car. The main difference between them is the lifting height, which affects the power;
- Electric fuel pump together with a fine fuel filter;
- Mass air flow sensor with connecting pipes;
- Air filter housing with bracket;
- Electric fan (but not required).
Original solution
What if you don’t go shopping and waste time and money, but buy a donor car for disassembly? For example, Volga 3102 produced in 1999-2004. We don’t need fairly well-maintained cars in garage storage because of the high price; it’s better to focus on the remodeling budget, choosing the available options.
You can still buy a donor car from the original owners at a reasonable price
Important! Since we are interested in the electrical part, it is quite acceptable to purchase a car with defects. And although we won’t take everything when modernizing the Gazelle 406, the electrical wiring from the Volga must be ideal. Pay maximum attention to inspecting it.
Real case
A short search turned out to be successful - we had a good 2002 car at our disposal. The asking price is 12,500 rubles. And since we don’t need the entire Volga 3102, but only its injection wiring - the Gazelle 406 runs on gasoline , after all, the donor car was dismantled and sold off.
For reference: Volgov engines are used by many domestic automakers. See our article - UAZ 462 electrical wiring.
In a short period of time we managed to implement:
- Headlights for 580 rubles;
- Front and rear bumpers for 700 rubles;
- We received about 3,600 from the delivery of ferrous metal to the machine itself.
At the same time, we kept all the spare parts and components required for the conversion:
- the motor itself;
- gearbox;
- I liked the seats
- electric windows for front doors;
- windshield wipers and heater motor;
- all sorts of little things, such as screws, clamps, pipes and hoses.
And, of course, the Volgov wiring diagram - Gazelle for the 406 motor, it will fit with minor modifications to the connection connectors.
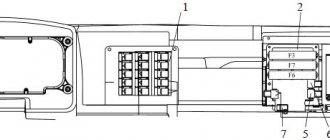
When laying Volgov wiring, you can be guided by this diagram
Features of the injection engine power system
It is one of the main ones on the engine and does not require adjustment, but you still need to monitor its condition. The injectors and pressure regulator work normally only on pure gasoline. Refuel at proven gas stations, sometimes (preferably in the fall) drain the sediment and water from the tank. If leaks appear on the fuel lines at the connectors, they must be sealed (tighten the fittings without excessive force or replace the seals).
Cracked hoses should be replaced to avoid rupture. But keep in mind that the fuel in the lines behind the fuel pump is under high pressure (about three atmospheres); when disconnecting the system elements, it must be reset.
To do this, turn off the fuel pump (the easiest way is to remove the corresponding fuse), start the engine and wait: it will run out of fuel in the system and stall.
Run the starter (do not press the gas pedal) for a few seconds. Disconnect the negative battery terminal to avoid accidental sparks. Now you can disconnect the necessary elements. After completing the work, do not forget to replace the fuel pump fuse and terminal. Turn on the ignition and wait a few seconds, the pump will pump fuel into the system. Start the engine and check for leaks.
Determining a malfunction in the engine management system
This system receives information from various sensors installed on the engine; the normal operation of the power and ignition units depends on it. There is an opinion that a malfunction in this system can only be determined in a technical center using special instruments. This is not entirely true; you can find the problem yourself. The occurrence of a problem is indicated by the “Check Engine” indicator on the instrument panel, which lights up continuously. Each malfunction has its own code, which the system records in memory; the task is to obtain it and determine the cause using a special table.
To find out the code, locate the diagnostic connector located on the right side of the engine compartment. Remove the cover from it and connect contacts 10 and 12 with a copper wire. Now the control unit is in information output mode. Sit in the driver's seat and turn on the ignition, you will see the warning light flash. Your task is to count them. The fault code consists of two or three digits. The number of indicator flashes is equal to a number, then a pause and the next number.
For example, fault code 26 will be displayed like this:
- 2 short flashes, each lasting 0.5 seconds;
- A pause of 1.5 seconds, which means the transition to the next digit;
- 6 short flashes;
- A long pause of about 4 seconds, indicating the end of the code.
The control unit begins transmitting information with code 12, repeated three times. This indicates the serviceability of the diagnostic system. Then the fault code, it is also repeated three times; then move on to the next problem, if there is one. After listing all the codes in memory, the unit will repeat all the information until you remove the jumper from the connector. So you can take your time and check again.
After determining the fault code, look at the table (you can print it out and carry it with you in the glove compartment). You will immediately see what exactly is not working. If the memory is empty, only code 12 is transmitted.
Diagram of the ZMZ 406 motor design
It should be noted that the failure of one of the sensors will not lead to the engine stopping (with the exception of the crankshaft angular position sensor, the failure of which is very unlikely). If a malfunction occurs, the computer switches to the emergency program, the engine runs worse, but you can get to the workshop.
Wiring diagram gas 31105 406 engine injector
Car diagram - Volga 31105
In this section you will find electrical circuit diagrams of equipment for GAZ (Volga) - 31105 from 2004.
and younger. GAZ-31105 belongs to the middle class and has rear-wheel drive. The car is intended for use on roads with improved surfaces in various climatic conditions at ambient temperatures from –45 to +40 °C. The car body is all-metal, supporting structure. The vehicle is equipped with a longitudinally four-cylinder gasoline engine ZMZ-40621 with a fuel injection system (a ZMZ-402 carburetor engine can be installed upon request) and a five-speed gearbox. The front suspension is independent spring, the rear suspension is on longitudinal springs. The braking system is dual-circuit with disc brakes on the front wheels and drum brakes on the rear. All cars are equipped with radial tubeless tires. An anti-theft device is installed on the steering column, built into the ignition switch (lock). Depending on the configuration, cars can be equipped with: power steering, electrically heated front seats, a windshield washer with electrically heated jets, electrically driven and electrically heated exterior rear view mirrors, and fog lights. Electrical diagram of equipment for Volga-31105 with ZMZ-402 engine
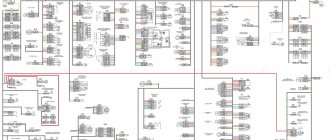
Electrical diagram for GAZ-31105 with engines ZMZ-4062, ZMZ-40621
Scheme of an integrated microprocessor control system for engines ZMZ-4062, ZMZ-40621
Symbols for GAZ 31105 diagrams
A9 – Submersible pump module (ZMZ-40621) 81 – Oil pressure indicator sensor 82 – Emergency oil pressure drop indicator sensor 87 – Coolant temperature indicator sensor 88 – Coolant overheat indicator sensor B12 – Fuel level indicator sensor B20 – Electric fan switching sensor B46 – Speedometer sensor B64 – Air temperature sensor in the intake manifold (ZMZ-4062) 867 – Sensor for emergency drop in brake fluid level 868 – Ignition distributor sensor (ZMZ-402) B70 – Engine control system coolant temperature sensor (ZMZ-4062) 874 – Rotation speed and synchronization sensor (ZMZ-4062) 875 – Air flow sensor (ZMZ-4062) 876 – Air throttle position sensor (ZMZ-4062) B83 – Anti-icer 891 – Phase sensor (ZMZ-4062) 892 – Knock sensor ( ZMZ-4062) 893 – Carburetor air damper closing indicator sensor (ZMZ-402) B95 – Pressure sensor D4 – EPHH control unit (ZMZ-402) D7 – ABS unit D23 – Engine control unit (ZMZ-4062) D29 – Lock control unit doors E1 – Left headlight E2 – Right headlight EZ – Left fog headlight E4 – Right fog headlight E7 – Front left turn signal E8 – Front right turn signal E9 – Left turn signal repeater EY – Right turn signal repeater E16 – Courtesy light E27 – Rear left lamp E28 – Rear right lamp EZO, E72 – License plate lamps E31 – Rear fog lamp E35 – Engine compartment lamp E59 – Cigarette lighter E61 – Trunk lamp E64 – Taxi lamp E66 – Medical sign lamp (GAZ-310231) E67 – Finder headlight (GAZ-310231) E68, E69 – Interior lamps (GAZ-310231) E70 – Tailgate lamp (GAZ-310221) E71 – Glove compartment lamp E80 – Additional brake signal E81, E82 – Rear lights in the trunk lid F1 - F4 – Spark plugs F30 – 10A fuse for air conditioner F36 – 25A fuse in the headlight wiper circuit F41 – Left fuse block F42 – Right fuse block F43 – Fuse block in the engine compartment G1 – Generator G2 – Battery 1Н.Н2 – Sound signal Н7 – Alarm emergency drop in oil pressure H8 – Coolant overheating indicator H16 – Right turn indicator H17 – Left turn indicator H19 – Minimum fuel reserve indicator in the tank H20 – High beam indicator H30 – Parking brake indicator H54 – Low battery indicator H56 – Emergency indicator drop in brake fluid level H62, H63 – Front side light lamps H64, H65 – Headlight lamps H66 – H69 – Instrument lighting lamps H70, H71 – Rear fog lamps H72, H73 – Reversing light lamps H74, H75 – Brake signal lamps H76 , Н77 – Rear marker lamps Н78, Н79 – Rear direction indicator lamps Н80 – Side light indicator Н81 – Backup indicator Н91 – Engine control system indicator (ZMZ-4062) Н92 – Carburetor air damper closing indicator (ZMZ-402) Н97 – Heated seat indicator H98, H99 – Low beam lamps H100, H101 – High beam lamp H102, H103 – Front turn signal lamp K1 – KZ starter relay – Windshield wiper relay K6 – Air conditioning mode relay K7 – Sound signal relay K9 – Electric fuel pump relay (ZMZ- 4062) K12 – Turn signal switch K13 – Parking brake warning switch K18 – High beam relay K19 – Low beam relay K20 – Fog light relay K30 – Headlight cleaner relay (GAZ-3102) K36 – Electric fan relay K40 – Headlight relay K42 – Rear heating relay glass K46 – Engine control system relay (ZMZ-4062) K52 – Instrument cluster indicator test relay K54 – Seat heating relay K56 – Air conditioning relay K57 – Compressor clutch relay K71 – Rear fog lights relay K72 – EPHH system relay (ZMZ-402) M1 – Starter M2 – Heater fan electric motor M3 – Cooling system electric fan (ZMZ-4062) M4 – Windshield wiper motor M5 – Windshield washer electric pump M6 – Electric fuel pump (ZMZ-4062) M15 – Headlight wiper motor (GAZ-3102) M19 – Antenna motor M20 – Rear motor heater (GAZ-310231) M24 – Right rear view mirror M25 – Left rear view mirror M26, M29 – Electric window lifter motor MZZ – Electric air conditioner fan M38, M39 – Electric drive for headlight range control M40 – Electric air conditioner condenser fan M50-M53 – Door lock motor P1 – Speedometer P2 – Instrument cluster RZ – Tachometer P5 – Voltage gauge P6 – Coolant temperature gauge P7 – Oil pressure gauge P8 – Fuel level gauge R1-R4 – Interference suppression resistors (ZMZ-402) R12 – Additional resistor for heater fan electric motor R13 – Additional resistor rear heater fan electric motor (GAZ-310231) R14 – Rear window heating element R17, R18 – Seat heating elements R25, R26 – Windshield washer electric heating jets R28 – Air conditioning resistor S1 – Ignition switch S5 – Hazard warning switch S6 – Heater fan switch S9 – Switch turn indicators S12 – Windshield wiper switch S15 – Heated rear view mirror switch S18 – Rear fog light switch S19 – Fog light switch S29 – Reverse light switch S30 – Brake light switch S36 – Horn switch S39 – Central light switch S50 – Control switch mirrors S52 – Parking brake indicator switch S54 – Instrument cluster indicator check switch S61 – Heated rear window switch S63 – Antenna switch S70, S71 – Door lamp switches S72 – EPHH system switch (ZMZ-402) S73 – Rear heater fan switch (GAZ- 310231) S75 – Searchlight switch (GAZ-310231) S76 – Interior lamp switch (GAZ-310231) S77 – Glove box lamp switch S81-S84 – Power window switch S91, S92 – Seat heating switches S109 – Windshield washer jet heating switch S1 16 – Headlight electric corrector switch S117 – Air conditioner electric fan switch S118 – Air conditioning switch S131 – Carburetor air damper closed indicator switch (ZMZ-402) T1, T4 – Ignition coils U2 – Radio tape recorder VI – Voltage regulator (ZMZ-402) V2 – Transistor switch (ZMZ -402) XI – Plug socket (GAZ-310231) X51 – Diagnostic connector (ZMZ-4062) X52 – Connector Y3 – Electromagnetic valve EPХХ (ZMZ-402) Y19-Y22 – Injectors (ZMZ-4062) Y23 – Idle air control ( ZMZ-4062) Y27 – Air conditioning compressor clutch
Cooling system features
The centrifugal pump (pump) on the ZMZ-406 is driven by a poly-V belt. The thermostat operates in two modes: on a cold engine (up to 70-80 °C), the coolant moves in a small circle, bypassing the radiator; with further heating, the main valve begins to open, and the radiator starts working. When 94 °C is reached, the main valve opens completely and all liquid passes through the radiator.
The system fan is turned on by the TM-108 92-87 sensor.
Diagram of the ZMZ 406 engine cooling system.
In this designation, 92 is the temperature for turning on the fan, 87 is for turning off.
Unfortunately, the factory installs the sensor on the left side of the radiator, and the coolant from the cylinder block goes to the right side and manages to cool while passing through the radiator tubes. That is, the sensor does not reflect the actual temperature of the liquid leaving the unit, the fan turns on too late, and the motor overheats. If this happens on your machine, replace the sensor with a TM-108 87-82 or even a TM-108 82-67. The fan will turn on earlier, there will be no overheating. It should be remembered that the interior heating radiator is permanently connected to the cooling system.
Engine cooling radiator ZMZ 406
To shorten the warm-up time after starting the engine, do not open the heater damper or turn on its fan.
Owner reviews
There are many reviews about 406 engines on the Internet. Opinions are very different, some cannot get enough of such a reliable and powerful engine; they have already driven 80–90 thousand kilometers on it without any problems. But there are other opinions that describe frequent breakdowns, oil leaks and other malfunctions.
In one of the reviews, the owner writes that he often has to tow other cars in his Volga, including heavier Gazelles. The engine pulls great and has plenty of power.
But he also notes the frequent failure of control system sensors; he considers the reason to be the low quality of manufacturing of domestic devices and advises switching to imported ones. Many owners write about shots in the muffler and problems with starting the engine. The expression “it starts, then it doesn’t” is often encountered, but there are reviews that note good starting in frosts of −30 °C and below. Perhaps some people came across a successful engine, but others did not. Proper operation and maintenance of the engine certainly matters.
History of the creation of ZMZ-406
This engine model was developed on the basis of the Saab 900 sports unit. The project was completed on paper in 1990. And just three years later the first prototypes of this engine appeared. Production of a small series was launched in 1996, but it began to roll off the main assembly line in 1997. Production ended in 2003.
At first, the 406 engine (carburetor) was installed on small boats that were used by government agencies. A little later, employees of the Gorky plant became interested in it, and over time it was acquired by Volga and Gazelle. After some time, it began to be included in the basic Sable kit. Manufacturers ZMZ and GAZ allowed the installation of “non-native” engines on many car models at their own request, so the 406 unit can also be seen on some Volgas, the configuration of which did not include this unit.