When should it be adjusted?
First, you need to decide why you might need to adjust and repair the Stihl ms 180 carburetor. So, this needs to be done in the following cases:
- If the chainsaw does not hold idle speed;
- repairs may be required if the saw does not start;
- there is a loss of power;
- increased fuel consumption;
- the chainsaw does not develop maximum speed;
- stalls when revving up.
This list can be continued for a long time, but we have identified the main reasons. Before you start making adjustments, you need to know what main parts the carburetor on the Shtil MC 180 chainsaw consists of, and who makes it.
Calm ms 180, overview of sore spots, adjustment.
Stihl chainsaws are considered the standard of quality. They are capable of working for years without proper maintenance, but they often begin to act up.
Good afternoon, dear subscribers and guests of the channel.
Not long ago, a Shtil ms 180 chainsaw came to me for repair. In fact, it is a rare guest in my workshop; much more often they carry “Chinese” ones, which are made of “G” and therefore do not work for long.
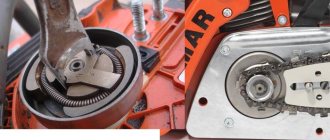
The 180 had problems with bearings and seals on the sprocket side. Everything is clear, this is not a disease, but the “crooked” hands of the owner, who does not know how to properly tension the chain and certainly does not loosen it after work, although this must be done. Especially in winter.
The chain heats up during operation, the metal expands and it becomes a little longer. Naturally, it needs to be tightened to its normal state, but after work it is necessary to loosen it, otherwise the following happens: the chain cools down and becomes shorter, and an increased load occurs on the chain links, drive sprocket and bearings.
At the end of the article, I will give recommendations on how to properly operate and maintain the Shtil MS 180 chainsaw, which will help to significantly extend the service life of the tool, but for now let’s continue.
How to adjust it yourself, the nuances of setting
The carburetor of the Shtil 180 chainsaw, indiscriminately, can only be adjusted by the number of revolutions at idle. It is impossible to increase or decrease the fuel supply in various modes using special screws. The manufacturer limits access to adjustments and does not install these screws. How to adjust the carburetor to the correct idle speed is described in great detail in the manufacturer's instructions.
If certain malfunctions occur, and if you have experience, you can increase or decrease the fuel supply by increasing the gap when opening the needle valve.
To increase the flow, the rocker arm of the needle valve in the distribution chamber must be bent up, and to decrease, down. This regulates the stroke of the needle and, accordingly, the throughput of the valve.
You should not carry out the adjustment yourself, because this must be done very precisely and if there is an error, it is almost impossible to return the original position of the rocker arm.
Who can repair carburetors?
Everything said below applies to any models of chainsaws, including gas trimmers, scythes and other equipment. Adjusted, of course, for design features.
There is an opinion that it is better not to climb inside a chainsaw yourself. For those who are used to working with a hammer and sledgehammer, this may be true. Otherwise, any more or less neat person whose hands do not shake can fix any problem with his work. In general, this is a job available to anyone.
Of course, it happens that the problem cannot be solved on its own. And you need to contact the service center. But firstly, 90% of malfunctions are usually solved by simply flushing the jets or, in the worst case, replacing the membranes or adjusting the needle, and secondly, in the worst case, even if you are desperate, the carburetor removed from the saw can be easily replaced. The new original one is, of course, a little expensive. The price for an analogue made in China is 700-800 rubles, you can buy it in a well-known store or from Russian dealers. In general, there is nothing to lose - let's get into the carburetor!
Malfunctions and repairs
After we have examined the design of the carburetor, it is not difficult to determine the reason why fuel enters the combustion chamber in a larger volume. This happens due to wear of the gasket between the compensator cover and the carburetor body. How might this make an impact, you ask?
The answer is simple: as the gasket contracts, it releases the diaphragm on top of it a fraction of a millimeter down. This, in turn, will put more pressure on the needle valve rocker arm, it will open more than it should and fuel will flow in excess (it will begin to overflow).
Another reason is stretching of the diaphragm itself, this occurs as a result of natural wear and tear. It is impossible to prevent this process, but you can solve the problem by periodically changing all gaskets, carburetor diaphragms, and fuel pumps. There is a repair kit for this.
When cleaning a chainsaw with compressed air, never blow into the fuel pipe, as this can stretch the diaphragm.
Sticking injector valve - a common breakdown and how to avoid it?
A common cause of carburetor failure on a Stihl chainsaw is a stuck valve in the nozzle. The reason for sticking is a violation of the storage of the chainsaw, or rather the Shtil 180 manufacturer’s instructions for proper preparation for storage.
As follows from the instructions, before long-term storage, it is necessary to drain the fuel from the tank, then start the saw and burn off the gasoline from the carburetor. Failure to comply with this elementary rule entails the following consequences. The forsknui valve, being in direct contact with the fuel, sticks to the body, because the gasoline gradually evaporates and only sticky oil remains. You cannot replace the injector, since they are not in the repair kit; you can only try to knock it out and wash it, which is not always possible to do without damaging the injector.
Who can repair carburetors?
Everything said below applies to any models of chainsaws, including gas trimmers, scythes and other equipment. Adjusted, of course, for design features.
There is an opinion that it is better not to climb inside a chainsaw yourself. For those who are used to working with a hammer and sledgehammer, this may be true. Otherwise, any more or less neat person whose hands do not shake can fix any problem with his work. In general, this is a job available to anyone.
Of course, it happens that the problem cannot be solved on its own. And you need to contact the service center. But firstly, 90% of malfunctions are usually solved by simply flushing the jets or, in the worst case, replacing the membranes or adjusting the needle, and secondly, in the worst case, even if you are desperate, the carburetor removed from the saw can be easily replaced. The new original one is, of course, a little expensive. The price for an analogue made in China is 700-800 rubles, you can buy it in a well-known store or from Russian dealers. In general, there is nothing to lose - let's get into the carburetor!
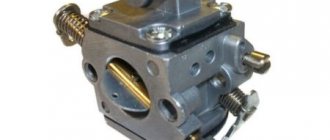
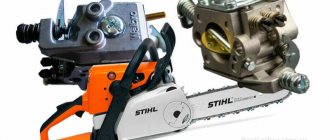
Design and principle of operation
So, the carburetor was developed and manufactured by a subsidiary of Stihl, called Zama. Original carburetors have the company logo on their body, guaranteeing product quality.
Appearance of the Zama carburetor
Fuel pump
A fuel pump is installed directly in the carburetor body, which operates under the influence of an air pulse from the chainsaw crankcase, transmitted through special channels. The pump has a diaphragm installed, which is responsible for pumping fuel under the influence of an impulse. A gasket is installed between the diaphragm and the housing, which is responsible for the tightness of the fuel pump.
Distribution chamber
In the distribution chamber, as in the fuel pump, there is also a membrane that opens and regulates the fuel supply by pressing a special rocker arm, which lifts its needle valve.
The chamber cover is the compensator body, which is attached to the carburetor using four screws; a gasket is installed between the body and the cover, which increases the height of the chamber and is responsible for sealing.
Nozzle
The fuel supply nozzle is mounted in the carburetor body in such a way that it is a connecting link between the distribution chamber and the cavity in which the throttle valve is installed. At the same time as the fuel, air is supplied to the injector and an air mixture is formed. The injector has a check valve that blocks the flow of air in the reverse order, that is, from the throttle chamber to the distribution chamber.
Throttle valve
The throttle valve is installed in the carburetor body and is responsible for increasing the flow of the fuel mixture directly into the engine cylinder. At the moment you press the gas, the throttle valve opens slightly, thereby increasing the throughput of the channel and fuel from the carburetor cavity rushes into the cylinder in a larger volume.
Combustion of a larger volume of fuel increases the amount of energy generated, which affects the power and speed of processes. The damper is installed on a shaft passing through the entire carburetor body. At the shaft exit from the housing, there is a fastening for the throttle cable, and next to it there is a cone-shaped adjusting screw responsible for adjusting the idle speed. By tightening the screw, you can slightly adjust the position of the shaft and the damper installed on it, thereby increasing or decreasing the idle speed, slightly opening or vice versa closing the damper.
Air damper
The carburetor air damper is installed on the opposite side of the throttle valve and is responsible for starting a cold engine; it is controlled by the engine control lever. For a cold start, the air damper is completely closed; for normal operation, it is opened.
In the photo, there is a hole in the center, and there is a washer in the middle - this is the air damper
Chainsaw PARTNER 352.
A carburetor such as we will consider is installed on many saws of similar brands such as Poulan, Mc Culloch, Max Cut.
We unscrew all three screws (as shown on the indicators) and remove the top cover of this saw from the body.
We remove the air filter from our housing (shown in the figure) - a filtering foam rubber element (green foam rubber in the figure).
Unscrew two nuts at once and remove the air filter housing itself.
In order to remove this air filter housing, it is simply not enough to simply remove it from two bolts. He won't take off. The protrusion indicated on the arrow will interfere with it. You need to apply very little upward force to the filter housing, until the protrusion is slightly higher than the very top edge of the chainsaw housing, and remove it.
We work on the right side of the carburetor. Remove the fuel hose (as on the top arrow) and then the choke drive rod.
Finally, we remove the carburetor and remove the tip of this cable from the throttle valve drive lever.
On our left side we also pull the gasoline hose together from the carburetor fitting.
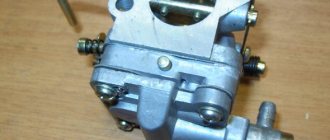
The carburetor is now removed and ready for further disassembly.
In the example we are considering - a chainsaw, confusingly, that is, there is no gasoline in the gas tank. Therefore, when we removed the gas hose on the right side of this carburetor, fuel did not come out of the hose at all. Your tank may also be full, and therefore not much time may pass after working with the saw. During operation, the fuel in the tank is under slight pressure, so after removing the hose from it, fuel will begin to flow out. Prepare in advance a clothespin or clamp or an ordinary nut for a 13 cm drawing.
We completely unscrew the idle speed screw and the screw securing the carburetor cover on top.
Then remove the top cover. An area of the carburetor will open, which is called the fuel pump, where the blue transparent gasket is the fuel membrane.
On the left side of the carburetor, remove two screws (according to the instructions, the screws are marked L and H), first removing the spring clip from them. When assembling the carburetor, these screws cannot be mixed up; screw H has an annular groove; if it is not there, then mark the screw with any one.
Remove the four screws from below and remove the very bottom carburetor cover.
Remove the needle valve assembly. For this purpose, remove the screw indicated by the arrow in the figure. Under the two-arm lever, don’t lose it, there is a small spring.
Dismantled parts are disassembled.
Next you need to remove the air damper and everything related to it. Unscrew the screw (shown by the arrow in the figure) and remove the damper.
We dismantle the air damper axis itself. To do this, we apply the necessary force directed along the axis. The arrow in the figure shows the hole, which must be closed when removing the axle, since the spring-loaded ball is located in it. Here is the throttle valve. Unscrew the screw and you can remove it.
We remove the screw shown by the arrow and behind it the drive lever for this throttle valve.
Next, we dismantle this spring washer stopper (indicated by an arrow in the figure).
Here I want to draw your attention to three similar screws. 2 and 3 are screws securing the dampers (interchangeable)
1 is the screw securing the drive lever of this throttle valve, it is very similar to the previous two, but it is longer than them. You can’t confuse them when you assemble the carburetor!
The last operation for disassembling the carburetor is to remove the entire throttle valve axis. The photo below shows the position of such a throttle valve axis on a fully assembled carburetor.
We rotate this axis 180 degrees clockwise (to be honest, the axis itself will rotate this way under the action of the spring). It will take the same position as in the photo below. Only for sure with THIS!!! position of the axis, we begin to carefully remove it from the carburetor body.
The photo below shows the moment of dismantling this throttle valve axis. The left thumb covers the hole in the carburetor body. If you don’t do this, then you will have the opportunity to look for one very small part on the floor.
Top
How to remove and reinstall?
In cases where it is necessary to clean the Shtil 180 carburetor or disassemble it, you will first need to remove the assembly from the chainsaw. This must be done in compliance with a certain algorithm of actions:
- Place the protective cover for the chainsaw on the bar.
- Remove the top cover of the chainsaw.
- Unscrew the two nuts securing the air filter and carburetor.
- Remove the air filter housing.
- Disconnect the wire from the engine control lever.
- Carefully remove the lever from its seat in the housing, while simultaneously disconnecting the air damper rod from it.
- Pull the carburetor towards you and disconnect the fuel supply, as well as the throttle linkage.
To facilitate dismantling, you can additionally unscrew the rear handle and disconnect the throttle linkage first from it, and then only from the carburetor. This may be necessary, because without some experience, disconnecting the rod from the carburetor is quite problematic and it is easier to first disassemble the handle.
To install the part in place, follow the reverse order of the algorithm.
When removing and installing the chainsaw engine control lever, you should be extremely careful, because the seat on the saw body is the weak link of the saw, and very often inexperienced users break it.
Reliability of Chinese carburetors purchased on Aliexpress
The 21st century has allowed people to shop over long distances. It’s very convenient - you order a product on one of the sites and after a few weeks you have it in your hands. One such service is Aliexpress. There you can buy a variety of products, including a carburetor for your saw from China. But what is the quality of this product? Surprisingly, no worse than domestic ones. In most respects, they are close to their Russian counterparts, so such a purchase will not disappoint owners of chainsaws. Relatively cheap and high quality - you will definitely like it!
Conclusion
In conclusion, I would like to say that the original Stihl carburetors, which are produced by its subsidiary, are almost the most durable and reliable. If you want your tool to work properly for a long time, you should take care of it. Do not forget to clean the air filter and lubricate the chain with proven oil during the process. When storing the saw for a long time, be sure to remove all gasoline and chain oil from the tank.
Good luck with your woodworking and less damage to your iron friend!
How to disassemble for cleaning and replacing the repair kit?
In order to clean, change gaskets or needle valve, the carburetor must be disassembled. To do this, you need to unscrew 4 screws on the compensator cover and one on the fuel pump.
Once you open the housing, you should be extremely careful, because if debris gets inside the carburetor, it will make it impossible to operate. The thickness of the channels in it is comparable to the thickness of a thread or even a human hair.
A video on repairing a Shtil 180 carburetor can be viewed below. In it, the master talks in detail about the problems and clearly demonstrates the entire repair process.
Chainsaw Partner 350S Cleaning the Walbro carburetor
Chainsaw Partner
350S Cleaning
Walbro carburetor Service website - VKontakte group.
A detailed video with the cleaning process will help you do the job correctly.
After all the products have been dried, it is necessary to assemble the carburetor. Usually the detergent evaporates completely within a day. It is better to wait a day after cleaning, since residual detergents on the parts can get into the fuel compartment and release toxic gases during combustion.
Another important nuance associated with disassembling a chainsaw is that it is necessary to extremely accurately install and adjust the needle valve petal, otherwise the chainsaw
may not start. You can use a blade to check that the petal is installed correctly. Having installed it on top, we see how freely the petal rotates. If no problems arise, then everything is in order and you can continue assembly. If movement problems still arise, then the petal must either be pressed down or the edge on it must be bent.