What is a walk-behind tractor on its network? This is the same tractor, but miniature. And one more important difference: it is single-axle, the role of the rear axle is performed by a person who controls the walk-behind tractor using the handles on the steering wheel. In Soviet times, such equipment was not in demand, since to plow your garden you could use collective farm equipment for a small fee or for free. For those who don’t know, there were no problems with fuel in those days. When collective farms disappeared into eternity, such equipment turned out to be in demand, since it greatly facilitated the carrying out of basic types of agricultural work in relatively small areas. Light weight, high maneuverability, the ability to use almost the same set of attachments as on tractors - these are the main advantages of walk-behind tractors and their varieties - motor-cultivators, in which the function of wheels is performed by a cutter, cultivator or other attachments of a similar type. Add to this the significant difference in price compared to tractors, even small ones, and you will understand why such equipment is very popular among private owners.
Like any other self-propelled vehicle, the walk-behind tractor has a gearbox that allows you to regulate the speed of cultivating land. Many models are also equipped with a reverse, making maneuvering easier. But quite a few walk-behind tractors without reverse gear are also produced. If it is necessary to make a turn in a limited area, such units have to be turned manually. If the weight of the walk-behind tractor is small, 30-40 kg, this is not a problem. But our home-grown farmers prefer heavier machines - they can handle soils of any composition, including heavy ones. However, maneuvering a walk-behind tractor weighing under a hundredweight is not a task for physically weak people. Therefore, many owners of such equipment, after one or two years of operation, decide to independently modify their walk-behind tractor.
If you think that this is a task that requires special technical skills, you will be only partially right. Yes, technical knowledge is required and we will provide it to you. Everything else depends on whether your hands are straight or not. But since you work on the land, we can assume that everything is fine with you. So let's start studying the issue.
How to make a gearbox for a walk-behind tractor with your own hands
There are differences in several important characteristics between worm and chain gearboxes for a walk-behind tractor: gear ratio, efficiency, number of shafts and gears, angular speeds and power.
Main elements of an angular gearbox
The components of the angular gearbox are: generator housing, flange bearing, rotor shaft, steel washer, steel flange, bevel drive gear, angular gear housing, steel key, pinion shaft bearings (2 pcs), driven gear shaft, steel bearing housing gear shaft, pulley mount, V-belt pulley, flange mount.
Motoblocks with gear reducer
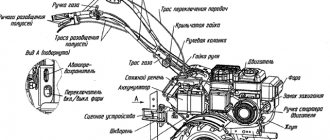
To understand what a gear reducer is, let’s look at the structure of the transmission. It transmits torque from the engine to the wheels, and changes the speed and direction of movement of the walk-behind tractor. The transmission consists of a gearbox, differential, gearbox and clutch. Transmission units can be gear, chain, belt, or a combination of one or the other. The gear transmission consists of bevel and spur gears (gear reducer). It is used on some models of cars and heavy walk-behind tractors. The figure shows the gear transmission of the Ugra NMB-1 walk-behind tractor, which uses a gear reducer.
How to assemble a gearbox with high quality
Schemes for switching the direction of movement of an agricultural machine are as follows:
- The drive sprocket, located on the main shaft, transmits the torque to the bevel gear, which is the drive gear.
- 2 bevel driven gears are mounted on a splined shank. One of them, which is engaged by a reversible bushing with a spline on the main shaft, begins to rotate. In this way, transmission occurs either to the differential or to the wheels of the car.
- The rod of the reversing device is equipped with a fork. It flips the direction-changing sleeve to the right in one direction, or to the left in the other direction, or to neutral. This is how commands are implemented that change the direction of movement.
- A homemade reversible gearbox is controlled using a rod lever.
A do-it-yourself reduction unit will be considered high quality if the following factors were taken into account during its manufacture:
- rated power;
- permissible limit temperature under extreme conditions;
- rotational speed;
- permissible loads on axles and parts;
- the size of the gearbox angle;
- torque value;
- type of lubricant for rubbing parts;
- frequency of work.
If the gearbox for a mini tractor is used incorrectly, it may fail. The following reasons may lead to this:
- excessive load causes a large release of heat, this leads to overheating of the shaft and transmission parts, teeth may break, shocks will be heard in the chassis, and uncontrollability will appear when the speed decreases;
- incorrect choice of gear ratio;
- neglect of routine repairs, which includes a preliminary inspection of the engine and main components.
Read also: How to make a conical hole in metal
Thus, since the walk-behind tractor has a certain speed range, it is therefore important that when switching them, the functionality of all components is maintained.
A self-made gearbox ensures an increase in power with a sharp drop in speed to a minimum value.
The lowering unit must necessarily complement the design of the machine, since it is used to cultivate the ground, remove snow, leaves, grass, and various materials.
One of the most important elements of a walk-behind tractor is the drive. If you need to purchase a gearbox for a walk-behind tractor, then know that the service life of the entire unit will depend on its reliability. The gearbox for a walk-behind tractor (made with your own hands) is designed to convert and transmit the torque that it receives from mechanical gears and makes agricultural machinery work.
How to brighten the reverse lights on a VAZ
Reversing lights of Auto VAZ have standard 25W lamps. Sometimes this is not enough to see obstacles when driving in reverse at night. The problem can be solved with a little tuning, which will make the rear dimensions of the Auto VAZ brighter.
It is also worth considering that LEDs do not heat up like halogen lamps.
Halogen lamps G-4 in reverse VAZ
The second option suggests using 20 and 35 W halogens in the headlights for a G-4 base.
We break the bulb of a regular light bulb and remove the remains with tweezers. We insert the halogen bulb holder inside and solder the wiring.
To secure the halogen lamp socket in the iron base, we need to fill it with silicone sealant.
And in order for the sealant to fill all the cavities between the cartridge and the iron base evenly, you must use a syringe without a needle.
It should be taken into account that a halogen lamp heats up more than a simple lamp (up to 350-450 degrees), soldering the leads of such a lamp with ordinary solder is prohibited; a ceramic socket must be used. Since the contact area of the lamp with the socket is small, the socket itself does not get very hot. The sealant can maintain its shape when heated to 340 degrees.
Comparison of lamp light: standard 21-W, halogen 20-W and halogen 35-W.
The brightness of a simple 21-W lamp from a 20-W halogen lamp does not differ by eye.
And the 35-W halogen is already clearly brighter by eye, this is clearly visible in the picture.
The cost of questions is 2.00.
LEDs in the reversing lights will significantly add brightness to the light when parking.
H3 halogen bulbs in the reversing light
I installed an H3 lamp on the second side of the rear headlights. You needed: a spring of the required length, a wire with a male terminal and half a paperclip.
For the lamp wire, make a cut in the socket using a file (Fig. 1).
The lamp has flat holes. There we insert the male socket with the wire.
We fix the lamp in the socket using a spring, and use a paper clip to make hooks for hooking
We bring the wires out through the cut and solder them to the board (for the wire from the lamp we use an additional connection). Now the brightness of the reversing light is slightly better.
We connect halogens as reversing lights
Because 55W lamps have a 10A fuse installed, and in this case, through fuse F19 (in addition to other equipment), we connect 2 60W lamps. To remove the load from fuse F19, you can also install a relay from the reverse light switch.
Contact 2 from the switch is connected to contact 85 of the relay, and contact 86 goes to ground. We connect the wire that was disconnected from contact 2 of the switch to contact 87 of the relay. We supply 12V power to pin 30 of the relay: you can take it from the battery, but it’s better to connect to Ш2-16 (plus is supplied after turning on the ignition in the car). The relay is placed on the mounting module.
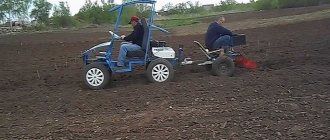
Making your own adapter for a walk-behind tractor with your own hands: drawings and step-by-step instructions
Now let's talk about how to make a front adapter for a walk-behind tractor with steering control. We will tell you what materials you will need, and also describe step-by-step instructions for creating and assembling the unit.
What you need to create an adapter
To create an adapter with a steering wheel for a walk-behind tractor, you will need the following materials:
- A pair of wheels with an axle. Wheel radius varies between 15-18 inches. Even wheels from an old Volga car may be suitable.
- Bearings for steering column and wheels.
- Metal for the frame (angle, pipe or channel).
- Fasteners (nuts, bolts, washers).
- Lubricant (solidol or lithol).
- Consumables (discs for grinders, electrodes, drills).
- Welding machine.
- Drill.
- Bulgarian.
- Set of wrenches.
Important! The wheels should have a radius that is not too small or large. This may cause the machine to tip over.
Algorithm of actions for creating an adapter for a walk-behind tractor
Let's move on to making an adapter for the walk-behind tractor. First, you need drawings according to which all parts will be manufactured and fastened.
You can make the drawing yourself if you have the appropriate skills. If you are afraid of making a mistake in the calculations, look for drawings on the Internet or on specialized sites. For example, using this scheme you can make the simplest adapter for a walk-behind tractor.
Important! Before starting to work on the drawings, be sure to check the correspondence of numbers and sizes.
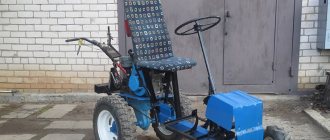
Let's move on to assembling the mini-tractor with our own hands.
Stage 1.
It all starts with making the frame. It can be made from cut pieces of metal of the required length. The metal can be cut with a grinder and the elements can be fastened with bolts or electric welding.
Stage 2.
After the frame we make the chassis. If the engine of your walk-behind tractor is located at the front, then the track width must be determined by the base wheels. The rear ones are attached to the frame using an axle. It can be made from a piece of pipe of the required width. At the ends of this pipe we press bushings with bearings. Wheels are installed on them.
If the engine of your walk-behind tractor is located at the rear, then the track width must be larger, otherwise the mini-tractor will not be able to balance properly during operation. In this situation, it is better to remove the base wheels of the walk-behind tractor and install it on a wider axle.
Stage 3.
In order to make a steering wheel for a walk-behind tractor, it is not necessary to remove additional handles from a motorcycle or car.
It is enough to use the handles from a walk-behind tractor. This way, you can control the mini-tractor with a steering wheel that looks like a motorcycle.
However, you will not be able to do the rear normally. Therefore, it would be better to install a steering column on a mini-tractor.
Stage 4.
When using an all-metal frame, the steering will be integrated onto the front axle of the walk-behind tractor.
You can make an articulated frame, then the steering column will turn completely onto the front half-frame. To do this, you will need to weld a gear to the front half frame. Another gear is installed on the steering column.
Stage 5.
The seat, which can first be removed from the car, should be welded to the frame of the slide. It must be adjustable, especially when controlling the front adapter, which is attached to the walk-behind tractor.
Stage 6.
If you plan to use a mini-tractor to work with cultivators and plows, then you need to additionally weld the bracket. To operate attachments, an additional hydraulic system must be installed. The pump can be easily removed from agricultural machinery.
To work with semi-trailers, you will need to weld a towbar from a passenger car to the rear of the frame.
Stage 7.
You can make a hitch for a walk-behind tractor with your own hands; we will even provide you with the necessary drawings to make the work easier.
In order to make a U-shaped hitch, you will need a metal channel of the correct size and thickness. Attach the hitch under the steering column of the walk-behind tractor.
By following our drawings you will be able to drill holes in specific locations. The pin and bracket will be attached through them.
Important! All parts must be made of high-strength and high-quality steel.
The front adapter for the Neva walk-behind tractor is completed. After assembly, you need to lubricate the mini-tractor and test it. After this, the preparation of the adapter can be considered complete, and you can safely work on the walk-behind tractor.
Tools and materials
Regardless of the extent to which the walk-behind tractor is planned to be modernized, the following devices will be required for this work:
- welding machine;
- grinder with blades for cutting and grinding iron;
- electric drill;
- screwdriver;
- roulette;
- oil level;
- soldering iron;
- Screwdriver Set;
- core;
- hammer.
As a rule, all this is in the workshop of every owner of a summer house, country house or small farm.
To make an all-wheel drive tractor from a walk-behind tractor, you need to find or buy the following materials:
- steel angle 50 mm;
- sheet steel 3-4 mm thick;
- wires for lighting devices;
- wheels from a passenger car (2 or 4);
- solid hexagonal steel profile;
- iron wire 1 mm;
- seat with steel frame;
- headlight and side lights from a moped or motorcycle;
- generator or portable battery.
Most of this property can be found at a landfill or scrap metal collection point. Iron is given a presentable appearance by treating it with acid, a grinder and an anti-corrosion compound.
Terms of use
The basis is to buy the right engine and see how it is installed on the walk-behind tractor. And also follow the instructions correctly and take care of the engine while it is running. The first thing you need to do before purchasing the product is to get advice from a specialist about the features of using the unit.
It is important to carefully read the installation and operating instructions so as not to make mistakes during operation. It is necessary to systematically carry out preventive maintenance - change the oil, clean components
When it is clear that the engine is not functioning stably, contact a service center for help. The guarantee document will be useful. There are many reasons for breakdowns, so if you don’t have repair skills, it’s best not to fix it yourself, so as not to worsen the situation. A professional will definitely find the reason, determine whether the oil seal on the crankshaft needs to be replaced, whether to use a different fuel, or whether the internal wire needs to be replaced.
Purpose
An adapter for a walk-behind tractor was created for the convenience of gardening. If you attach a hinge to it, you can expand the scope of application of the device:
- remove hay;
- level the soil surface;
- transport goods;
- harrow the ground;
- clear the area of snow.
An adapter is a device that is designed for movement on a motor cultivator. With it, you can control the unit while sitting in a chair, and at the same time cultivate the soil. The trailer for the Neva motor-cultivator is equipped with a steering control. It makes it easier to use the walk-behind tractor.
This trailer speeds up work in the field. Using this design, you can increase the speed of the cultivator from 5 to 10 km/h. Let's look at the adapter device. The adapter for the motor cultivator consists of:
- frames;
- operator seats;
- two wheels;
- axles;
- coupling mechanism.
After attaching the adapter, the cultivator looks and is used like a mini-tractor. To create an adapter for a cultivator with front steering, you need a frame. The operator's seat is installed on it. The frame is fixed to the chassis.
The seat is fixed to the frame. This will make it easier for the operator to control the cultivator. The wheel system will help move the unit around the site. There are 2 types of wheels: metal (used in the field) and rubber (used for driving on the road).
The hitch for a walk-behind tractor is made of steel or cast iron by welding. She attaches the cart to the cultivator. The U-shaped fastening system is considered the best. With this design the device will be stable.
- The highest travel speed on a walk-behind tractor with a trailer is 12 km/h.
- Maximum load capacity - 100 kg.
- The track diameter is 67 cm.
- Dimensions are 130x70x71 cm.
- The weight of the device is 22 kg.
- The warranty period is 5 years.
Homemade adapter
It is important to pay attention to the fact that it is also compatible with other agricultural equipment from this manufacturer. For example, the adapter can be used as a rotary adapter for a Neva motor-cultivator mower
However, a homemade adapter helps save money. Moreover, it is much more pleasant to use and can be repaired at home at any time of the day.
There are several types of adapters to the Neva
Homemade adapters for Neva walk-behind tractors come in two types:
- Heavy, which, in turn, are divided into long and short.
- Lightweight (installed on cutters).
There are also front and rear devices, depending on the drive.
More detailed information regarding the drives is provided below.
Dependence of the mini tractor operation on the gearbox
The walk-behind tractor is designed to facilitate the work of landowners. In order for it to work properly and flawlessly, plowing the ground, removing leaves and dry grass, and planting, it is necessary to have a sufficient supply of power and speed. To find out how to reverse on a walk-behind tractor, you need to familiarize yourself with its structure and the tasks assigned to it.
The lowering reversible unit is called a creeper. They are equipped with all modern installations that run on gasoline or diesel and are air-cooled. This addition allows the agricultural machine to operate safely under increased load, such as digging up potatoes, cultivating heavy soil, and plowing. With the help of this reduction unit, it becomes possible to increase power and eliminate wheel pair slipping.
You need to choose power depending on the size of the area:
- 5 hp — from 6 to 10 acres;
- 6 hp - no more than 30 acres;
- 7 hp - up to 50 acres;
For larger plots, a power exceeding 7 hp is selected. The installation diagram includes a gearbox for a mini tractor; it is mounted on the drive shaft, where there is a gearbox on one side and a clutch assembly on the other. It is represented by gears that mesh using a gear train. The reversible gearbox provides a set of required speeds. If you decide to make it yourself, then it must be reliable and withstand loads in difficult areas.
Read also: Soldering duralumin at home
You can simply borrow this unit from another device - a motorcycle or mini tractor. It is important to take into account gear ratios. The reverse gearbox on the walk-behind tractor has a ratio of 1:4.62. Compliance with these values guarantees normal operation of the unit: improved running and traction performance and unloading of the drive gearbox.
Possible breakdowns and repairs of the gearbox of the Neva MB-2 walk-behind tractor and analogues
- The unit jams—the circuit is broken. Having untwisted the unit, you need to install a new chain.
- No connection. The problem is caused by damage to the welded contact between the gear and the block shaft. The unit will need to be disassembled and the shaft replaced.
- The transfer is not recorded. There may be several reasons:
- the performance of the fork brush has deteriorated - after unwinding the unit, the element should be replaced;
- the spring or clamps of the unit have failed - replace it, make adjustments;
- The settings in the switching device have changed - after loosening the board screws, you need to make the first gear and then tighten the screws.
The described breakdowns and their causes are the most typical and “popular”. It should be noted that if you cannot eliminate the defects with your own hands, then it is better to contact a specialist.
Proper quality of service – long service life
Note that repairing the walk-behind tractor gearbox will not take a very long time if you fill it with oil on time, monitor its level, avoid shock loads and operate it carefully. Thus, proper operation is the key to a long service life not only of the gearbox, but also of other elements of the walk-behind tractor.
Diesel engine maintenance - key points
In order to ensure uninterrupted operation of Neva diesel walk-behind tractors, the manufacturer recommends performing the following types of engine maintenance work:
- checking the oil level, adding or replacing oil;
- adjusting clutch cables;
- checking gears;
- checking clutch friction units;
- checking and tightening bolts and nuts;
Before installing the Neva diesel walk-behind tractor “in idle mode”, it is mandatory to perform the following steps:
- run out of fuel before the engine stops running;
- leave the engine until it cools completely, and then drain the remaining fuel from the tank.
Maintenance of the diesel engine filter must be carried out after 8-50 hours of operation (depending on the degree of load and duration of continuous operation).
After 100 hours of operation, you need to change the oil, clean the oil filter and oil distribution box, and carry out lubrication work.
After 500 hours of operation, the same actions are carried out as during maintenance after the first 50-100 hours of operation; in addition, carbon deposits and dirt are removed from the cylinder cover, oil filters and oil distribution box. The water tank should also be descaled.
Repair instructions for the gearbox on a walk-behind tractor
You shouldn’t start repairing the gearbox on a walk-behind tractor yourself if the operation of the unit and its design are a complete secret to a new user.
Since the gearbox is a rather complex unit, you should not proceed to repairing it yourself immediately after detecting breakdowns.
It will be better if professionals handle the repair of the gearbox.
If an oil leak is detected from the gearbox, it means that the bearing seals were installed incorrectly or were worn out. They may not be properly tightened on the lids. Damaged gaskets may appear underneath them.
If the air valve (breather) is clogged, it is necessary to clean it and bring the oil level to normal. Oil leaks can be eliminated by replacing or correctly installing oil seals or gaskets.
Tightening the cover bolts will also help solve the problem.
Types of violations in the checkpoint and ways to correct them
If the automatic transmission mechanism has stopped functioning normally, the following types of problems may occur:
- Violation of the kinematic connection inside the gearbox.
- Spontaneous gear shifting or lack of locking.
- Oil leak on the shift shaft.
- Dysfunction of the axle decoupling mechanism.
- No gear shift.
- Gearbox jamming.
If the kinematic connection inside the gearbox is broken or the sprocket in the block breaks, it is necessary to disassemble the gearbox to replace the problematic sprocket.
The cause of an oil leak on the shift shaft may be excess oil in the gearbox, so you need to check the oil level. If the welding connection of the gear breaks, disassemble the gearbox and replace the block shaft.
After draining the excess oil, you should check the degree of wear of the working edge of the cuff on the shift shaft, disassemble the gearbox and replace the part.
The reason for the lack of gear locking or their spontaneous shutdown is a violation of the adjustment of the gear shift mechanism. When making repairs, you should loosen the screws securing the switching mechanism board.
After this, engage first gear and tighten the screws securing the board.
For example, having made a mini tractor with your own hands, it is imperative to ensure that the drive is adjusted correctly by changing the tension of the axle axle separation control cable.
To correct the breakdown of any element of the axle decoupling drive inside the gearbox, you should disassemble the gearbox and replace the broken parts.
If a broken spring or worn shift mechanism board retainers are found, the damaged parts should be replaced by adjusting the gear shift.
If it is missing, the shift crayon may be destroyed or the threaded piece of the shift knob may be cut off. After disassembling the gearbox, it will be necessary to replace the defective parts.
If there is no gear shift, you should disassemble the gearbox and replace the worn gear shift fork. If the cause of the gearbox jamming is a broken chain, then it should be disassembled and the chain replaced.
Troubleshooting Tips
If the operation of the gearbox is accompanied by increased noise in the gearbox, then the reason for this may be a lack of oil in the gearbox device or a discrepancy between the quality of the lubricant and the required parameters. It is necessary to choose oils of the appropriate brand; they must have a certain purity. If there are any problems, you will need to change the oil or add it to the gearbox.
The occurrence of noise in the transmission units of a walk-behind tractor can be caused by loose fasteners, so it is necessary to inspect the fasteners, tightening them properly.
The cause of frequent noise is wear of the gears and bearings. This may lead to more serious damage to the walk-behind tractor's gearbox. It is not difficult to avoid their occurrence if you carry out timely inspection and repair of the walk-behind tractor. It consists of the usual replacement of worn components and parts.
If the transmission units of a walk-behind tractor heat up, the following are the main causes of this malfunction:
- Lack of transmission oil in the crankcases.
- Worn bearings.
- Oil condition does not meet the required parameters.
There can be two reasons for correcting deficiencies:
- bearings replaced;
- adding or replacing oil.
In order for a gearbox or homemade gearbox to last longer, it is necessary to periodically check the oil level in them, fearing a sudden change in load.
Signs of disturbances associated with difficulties in switching speeds, spontaneous shutdown, disruption of the process of turning on the unit, arise for the following reasons:
- Worn parts.
- Abrasion of shaft splines.
- Incorrect clutch adjustment.
Rolling (wear) of the ends of the engaged gears causes two problems, leading to self-shutdown or incomplete inclusion of speeds.
Increasing speed with your own hands
How to make your walk-behind tractor faster? It should be noted that we are talking about transport speed. The Neva MB-2 walk-behind tractor, with certain modifications, can reach speeds of more than 20 km/h, however, if it does not have a differential, then control becomes significantly more complicated.
You can increase the speed in several ways, for example, install wheels of larger diameter or change the gear pair of the wheel reducer, replacing the standard gears with 61 and 12 teeth with 55 and 18 teeth, respectively. This method is quite complicated to implement, but it allows you to increase the initial speed by almost 2 times.
Some owners want the walk-behind tractor to travel at a speed of 40 km/h. It is possible to make such a modification, but it must be taken into account that it will place a large load on the gearbox, and it will be difficult to drive such a vehicle.
What techniques did you use to change the speed on a walk-behind tractor?
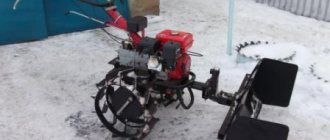
Do-it-yourself reverse gear for a mole cultivator
This is what the Magneto ignition circuit for the “Mole” motor cultivator might look like
- There may be no ignition if the flywheel plates jam the magneto cores.
- An incorrectly set gap between the electrodes will not allow a spark to escape.
A motor cultivator differs from a walk-behind tractor in the depth of processing and the presence of a second speed (forward). Well, the depth of processing has always suited me, but with speed, I decided to experiment. We take two wheels, from the “classics!”, and start getting smart.
Does not start
So, what to do if the “Mole” does not start, what could be the reasons for this? The ignition fails or there is no ignition at all in the following cases:
Engine
The main reasons that the “Mole” engine does not start are:
- lack of fuel (or its low quality);
- ignition problems discussed above;
- the appearance of decompression and, as a result, piston wear and deformation of the exhaust valve.
In the first case, it is enough to simply fill in the required amount of fuel (a mixture of gasoline with M-8V autolom oil) and all problems will be resolved. In the case of a compression failure, you will have to completely disassemble the engine and replace damaged parts, and this could be a piston or an o-ring.
Deformation of the exhaust valve becomes another cause of compression failure, which leads first to a loss of power of the “Mole” motor-cultivator, and then to starting problems.
READ How to Start a Motoblock Oka
To restore engine functionality, it is necessary to completely disassemble it. Having assessed the condition of the piston, replace it if necessary. We change the piston rings and exhaust valve. We examine the engine head, in particular the gas distribution mechanism, and if there is carbon deposits, we clean it. If structural elements are damaged, we replace them with serviceable ones.
Adjusting and tuning the Neva MB-2 carburetor
The functionality and durability of the walk-behind tractor engine depends on the stable operation of the carburetor. This is why its adjustment and tuning are so important. In addition, if the carburetor is incorrectly configured, a gasoline walk-behind tractor may experience increased fuel consumption
Adjusting the carburetor of the Neva
MB-2 is produced as follows:
- The full throttle and idle screw are turned to the limit.
- Both screws are unscrewed 1-1.5 turns.
- Next comes starting and warming up the engine.
- The throttle control lever is placed in a position in which the engine will operate at minimum speed.
- Set the minimum idle speed until the unit operates stable.
- The idle speed is set to maximum.
- The minimum idle speed is adjusted.
- Steps 6 and 7 are performed until the engine runs smoothly (more smoothly by ear) at idle speed.
For long-term and uninterrupted operation of the walk-behind tractor, it is necessary to regularly perform engine diagnostics, monitor the frequency of oil changes, and also comply with operating conditions and time intervals for scheduled maintenance.
Basic rules for setting the ignition
Checking and setting the ignition on the Neva MB-2 walk-behind tractor is carried out according to the following principle:
- the spark plug is turned out, the electrodes are wiped dry, then the carbon deposits are removed;
- the gap between the electrodes is measured and set;
- the spark plug body is fixed on the cylinder head;
- the crankshaft is scrolled up to 4 times (a starter cord is used for scrolling);
- If the ignition is working properly, a white-blue spark should be struck. Its absence or yellow color indicates a malfunction.
Next, you should check the condition of the flywheel and stator and the size of the gap between them (the norm is from 0.10 to 0.15 mm).
The gap is increased, if necessary, using a feeler gauge. As an auxiliary tool in the absence of a probe, you can use an A4 sheet folded in four or a razor blade. If the gap between the flywheel and the stator is normal, the ignition will work properly.
Motoblock device
In terms of its design, the 4x4 adapter, which is designed for the Neva walk-behind tractor, is a rather simple device. It includes several fundamental parts:
- frame structure on which other components can be installed;
- driver's seat;
- wheelbase, including wheel axle;
- the mechanism for connecting the walk-behind tractor, including.
Motoblocks come in different brands and designs. Russian users know, for example: Cayman, Foreman, Viking, Crosser, Texas, Patriot and others. After coupling the walk-behind tractor and the adapter, the resulting device can be compared in functionality to a mini-tractor, however, such a comparison is somewhat arbitrary, since the power will remain the same, because there is still only one engine, and it comes from the walk-behind tractor.
Moreover, you can attach auxiliary attachments to the adapter, which will further expand the potential range of work. Some types of adapters are equipped with special sections where you can place some loads. There are also models that are equipped with a lifting lever, which greatly simplifies the work with the additional device.
Peculiarities
Walk-behind tractor
can be practiced individually, and also attach various auxiliary tools to it, such as a harrow, cultivator, mower. Such devices make it possible to seriously increase the possible range of tasks that a walk-behind tractor can handle. But besides this, it is possible to use a motorcycle as a vehicle if you create a specialized adapter for it in advance.
READ Super Circular DIY
This device allows you to sit quite comfortably on the seat with which the adapter is equipped and do exactly the same work, only with a much greater level of comfort.
In essence, the structure of the adapter is relatively primitive. It looks like a cart on which various elements are attached:
- a hitch for fixing a walk-behind tractor and an adapter for attachments;
- driver's seat;
- wheels;
- frame for fastening primary components;
- steering wheel.
If you reconstruct a walk-behind tractor
under a mini-tractor, you can further expand its functionality. Of course, identification with a mini-tractor is to some extent symbolic, since the power of the unit will remain the same, as will the resources of the unit used, or rather, its motor. You can build an awning from the scorching sun. With such equipment, you will not be afraid of tedious agricultural work under the hot sun. You can improve the vehicle's maneuverability in rainy or snowy weather by installing a tracked attachment.
The lion's share of adapters has a system that involves attaching a trailer in which you can move loads. Additionally, it can be equipped with a lifting handle. There are 2 couplings: the Neva unit itself is fixed to one, and any attachments are attached to the second. In addition, the design has a steering wheel, which optimizes its maneuverability.
The center mount of the unit is made of durable materials, since it must withstand considerable overloads, because you will also be driving the unit and additionally transporting quite large loads. The unit can be used in almost all conditions, including the most difficult ones.
Standard
These modifications include the basic frame structure on which the required components are based, the driver's seat, the wheelbase, the axles, the coupling device (coupling) of the unit with the adapter. Roughly speaking, the designated structure can without hesitation be called an ordinary cart with a comfortable seat adjacent to the walk-behind tractor.
In addition, the possibility of additional aggregation with all kinds of mounted equipment cannot be ruled out, which will increase the practicality of the mechanism. Nowadays, you can purchase an adapter or create it yourself with special sections for placing compact additional items.
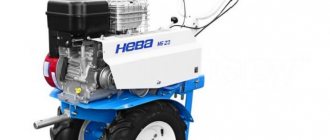
Mintractor from the Neva walk-behind tractor
Equipment under the Neva
equipped with a number of engines developing 5.5-10 hp.
The engines are equipped with gearboxes with two or four gears (plus reverse
). The wheels are driven by a combination gearbox (gears and chain). For a homemade tractor from a Neva walk-behind tractor, it is preferable to use models with a powerful engine.
In the design diagram of Neva
There is a standard hitch, which is designed for mounting a plow, harrow and other agricultural equipment. The coupling device is transferred to a homemade tractor without changes. The construction of tractors based on the Neva is carried out according to drawings that were published in periodicals.
Among the DIY designs, there is a design based on a borrowed front suspension and steering rack from the Oka compact car. To manufacture the rear axle, a unit from Niva is used.
Chinese
Chinese walk-behind tractors are copies of Russian products. Engines of our own design and production are used as power plants, which are somewhat different from Russian units. The advantage of the models is the price, which is reduced by simplifying the design and saving on materials. Because of this, there were complaints about the quality of the products, but the latest models are largely free of this drawback. Improvements in manufacturing and assembly quality have caused the growing popularity of Chinese products.
The functions, engine parameters and weight characteristics of Chinese equipment differ little from their Russian counterparts. Common brands include products under the brands Zubr, Centaur, Aurora.
Kit contents
| 1. | Pulley (roller) | 1 PC. |
| 2. | Reverse bracket | 1 PC. |
| 3. | Return spring | 1 PC. |
| 4. | Clutch cable with spring | 1 PC. |
| 5. | Control knob | 1 PC. |
| 6. | Washer M-8 | 2 pcs. |
| 7. | Pulley Taper Bushing | 2 pcs. |
| 8. | Grover washer M-8 | 1 PC. |
| 9. | Nut M-8 | 1 PC. |
| 10. | Belt Z(0)-1400 | 1 PC. |
Attention! This reverse kit is not an official product of the manufacturer of Neva walk-behind tractors, but is formed solely on the basis of applications, requests and recommendations from the owners of these walk-behind tractors themselves and was created to help them purchase all spare parts in one place.
There are no specific rules, technical conditions or GOSTs for the use of this kit. Each owner has the right to independently make decisions on installation, adjustment, and design changes at his own discretion, at his own request and under his own responsibility.
The reverse gearbox is included in the main part of the walk-behind tractor - the drive. The durability of the walk-behind tractor depends on its reliability. The task of such a gearbox is to preserve and maintain the performance of the machine in difficult conditions.
Universal device
To create a universal adapter you will need:
- corners;
- pipes;
- sheet iron;
- 2 wheels;
- seat;
- welding unit.
The described mechanism is practiced for the implementation of basic agricultural work and cargo transportation. The manufactured device can be equipped with a lifter, harrow, or plow. The universal adapter includes the frame, hitch, wheels and seat.
To achieve structural stability and prevent overloads, a graphical display of the working units and blocks of the device mechanism is initially developed
When creating the design, the fork and bushing require special attention. This device ensures unhindered rotation of the trolley
The frame is welded from corners and iron pipes. The body can be constructed from iron sheet. Along with this, the height of the sides should be higher than 30 centimeters.
The coupling device is presented in the form of a rod (15 centimeters in size) installed in the hole of the trailer coupling device. The disadvantage of such a system is rapid breakdown. In order to reduce wear, it is advisable to increase the coupling. The next step is installing the seat. An 80 cm indentation is made on the frame from the front end. Afterwards the seat is fixed with bolts. The next step is testing the functionality of the manufactured device.
Preparing to make your own adapter
Despite the simplicity of the design, making an adapter for a walk-behind tractor is not so easy
First of all, you need to pay attention to the drawing, diagrams and dimensions, because they can help you accurately create a homemade product the first time!
When assembling a homemade adapter, the following tools and materials will be useful:
- Steel sheet with a thickness of 0.5 cm;
- Several 1-inch square pipes;
- File;
- Welding;
- Hitch;
- Electric drill;
- Electric hacksaw;
- Square;
- Mounting kit.
If you plan to make an adapter with steering controls, all the parts described above will be useful, but you need to add the following to them:
- Ready seat;
- Steering;
The most key design elements are:
- Hitch. These are two parts of welded square pipes and a part of a water pipe. It is installed on the frame and secured with bolts.
- Wheel fixation unit. 2 pieces of pipe 10 centimeters long are welded at right angles. You need to insert a horizontal section into the mounting pipe, then fix it firmly and securely with a bolt. The axle and bearings with wheels are mounted on a vertical workpiece.
When all the necessary tools have been collected and the necessary parts have been made, you can begin assembling the adapter yourself.
Manufacturing of a reversible gearbox
If you want to build a unit at your own discretion, then you cannot do without a borrowed housing. It is impossible to do it yourself outside of factory conditions. The material used is cast iron or aluminum alloy. The body is produced using special equipment. To make a reversible gearbox at home, you need to start with the housing. If it was not possible to select from other mechanisms, then it can be built from a gas pipe with thick walls with an outer diameter of 2.73 cm. Internal components: axles, gears. They must withstand the loads to which the homemade reverse
gearbox Regarding seals, bearings, fuses, it is recommended to select them based on the design.
Homemade reverse
the unit can actually be assembled from the elements that make up the main gear on a used GAZ-69 car. Hubs, bushings for reverse, sprockets, rod, fork are machined from metal. 45 steel is suitable for this. Finished parts must be hardened. You should be very careful in the manufacture of cams on the hubs, as well as reversible bushings, since they will be subject to increased dynamic loads. The drive and driven gears must be isolated from each other by a gasket, the thickness of which can be adjusted to the degree of their pressing.
Sources:
https://specmahina.ru/motoblok/minitraktor.html https://motoblok-kultivator.com/reduktor-dlja-motobloka-svoimi-rukami/ https://morflot.su/revers-na-motoblok-neva-svoimi -rukami/
How to work with a walk-behind tractor correctly
After fuel has been poured into the tank, the engine has been warmed up and started, and all fastening connections have been checked, you should begin cultivating the soil. First you need to set the second gear. It is considered the most convenient for getting started.
You need to drive a walk-behind tractor in the middle of the bed you have planned. Before reaching the end of the area where the soil is located, you need to turn the device, pointing it in the opposite direction. It is recommended to turn left.
When moving the walk-behind tractor along each subsequent bed, emphasis should be placed on the left cultivator. Thus, processing will be performed at the same depth. It must be taken into account that sometimes the ground is too soft and the device sinks in it. Then you need to rearrange the cultivator with the back, blunt side forward.