If you have a craving for experimentation and would not refuse the opportunity to turn your bicycle into a homemade moped that can accelerate to 50 km per hour and above, this instruction is for you.
Homemade moped
Using simple spare parts, you can build a bicycle with a chainsaw motor with your own hands. Let's get started!
- Carefully inspect and test your bike. The proposed modernization will significantly increase the load on all its parts. Therefore, every part must be inspected and well lubricated. Also check all fasteners and re-tighten the bolts. In addition to constructive necessity, all these actions are the key to your safety.
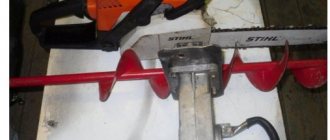
- You can make a bicycle with a chainsaw engine or a trimmer engine (also called a gas trimmer). If you are wondering how to adapt a motor from a lawn mower to a bicycle, then there is nothing complicated here. A gas mower is suitable for this design in the same way as a chainsaw. If you choose a chainsaw, make sure that its power is at least 2 kW. And if you have a trimmer, then 1 kW of power will be enough, since the lawnmower engine has a lower speed. The point is that you need to get enough traction to get moving. But at the same time, a more powerful engine means more weight. You need the motor weight to not exceed 6 kg, otherwise the bike will sway noticeably on the road.
Engine of a lawn mower on a bicycle
- Check the engine for functionality. A bicycle with a chainsaw engine will, of course, roar loudly - we believe you are ready for this. Most likely, your neighbors and random passers-by will not be ready. Therefore, we recommend that you conduct your tests away from human habitation - in a forest, in a park, on a country road.
Pay special attention to checking the condition of the gas tank. Gasoline must not splash out, as this creates a fire hazard. The engine will be behind you, so you should pay special attention to this point.
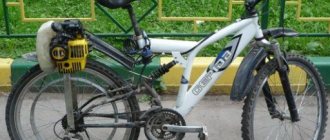
- Now let's find out how to install a chainsaw engine on a bicycle. It is necessary to make room behind the cyclist, above the rear wheel. To do this you will have to remove the wing. The easiest way to use this scheme is to install a drive shaft, and use a tire instead of the driven shaft. This type of drive is the simplest and most effective; the design does not require the use of a large number of parts. The friction shaft will transmit rotation from the engine; for this, the shaft diameter should be approximately 25 mm.
Engine above the rear wheel of a bicycle
- To install the engine on your bicycle, weld a metal stand to the frame located under the seat. You need to install the engine as low as possible, then your vehicle will be more stable in motion. You can secure the motor to the stand in any way - bolts, clamps or welding.
- The throttle cable and wires that will allow you to forcibly turn off the engine must be carefully secured to the frame. This is a matter of comfortable riding and cyclist safety.
- Ready! You can try out your new bike with a chainsaw motor. Monitor the tire pressure, it should be at least 3 atm.
Bicycle with chainsaw engine
How to make a moped from a chainsaw?
The youth dream of most of our fellow citizens was and remains a moped. It develops a higher speed and has a structure that is more advanced than the motorbike described above. Buying a ready-made moped is not a cheap pleasure. We will tell you how to make it from scrap materials.
For this you will need:
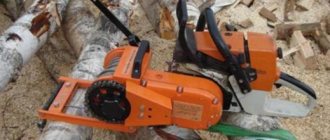
- a motor from a working, powerful saw (in our version, this is the “Friendship” model);
- 2 wheels from an old bicycle;
- pipe with a diameter of 2 cm (metal);
- cable;
- bicycle sprockets; as well as forks;
- old spare parts from a motorcycle - a ready-made fuel tank, a headlight, and, if desired, a seat, although this can also be made with your own hands;
- steering part;
- gas lever.
- we cook the frame to which we connect the wheels from the bicycle, forks, as well as a gas tank and a lantern;
- we adapt the motor - the composition of the installation will depend on the configuration of the frame;
- screw on the gas tank and battery;
- we check that the newly installed elements do not dangle;
- We make a chain drive - it will allow the wheels to receive the torque of the motor and move. You can use a belt instead of a chain pulley. But we must not forget that its wear will be noticeably higher;
- we set up the ignition system - we connect the battery and brake lever to it;
- adjust the exhaust pipe.
The assembly process is complete: you can start testing the moped.
Chainsaw ignition for a motorcycle
Chainsaw spare parts are also used to modernize outdated or in need of repair vehicles, such as a motorcycle. To improve this vehicle, a saw ignition system is often used.
- flywheel;
- flywheel spacer with key;
- fan;
- coil with high voltage wire;
- aluminum plate for attaching the coil;
- bolts, nuts.
Chainsaw ignition is suitable for Ant and IZH Planet motorcycles. Unlike a magneto, this ignition is reliable and durable, and is not afraid of shaking and water.
How to make an electric bike
If you don’t want to bother with a gasoline engine, there is another option - install an electric motor. It can be purchased or installed from another device. The first option for creating electric mopeds is preferable, since the engines already provide the necessary power.
Options for installing an electric drive on a bicycle are a wheel motor and a separate engine on a chain or belt drive.
The wheel motor differs from the usual one by the presence of a drive mechanism in the central part. It is connected to the control unit using wires. A significant advantage is the ability to make the bike front-wheel drive without making changes to the classic transmission. And if you wish, you can even install two motor wheels. Installation is quite simple, provided that the bike itself allows it. However, it’s a stretch to classify a bike with such wheels as a moped.
An electric moped, that is, an analogue of the one discussed above, is a completely different matter. Of course, an exhaust pipe will not be needed here - this is a plus both in terms of reliability and overall weight.
Assembling an engine from scratch at home will be problematic, so let’s look at how to install a ready-made shaft motor.
Progress:
- Install a new sprocket and belt pulley onto the carriage axle.
- A shaft with a drive pulley is attached to the seat tube.
- The pulleys are connected by a belt.
- The shaft is connected to a power source through wires.
- Route the wires from the battery to the switch on the steering wheel.
The location of the battery is on the lower front tube of the frame or trunk. Electric motor operation diagram:
- When the electric motor is turned on, the rotating roller engages the rear tire tire, pushing it.
- The pulleys and front sprocket transmit torque to the transmission.
- Changing gear causes a change in torque output. At the same time, the rotation speed of the roller remains constant.
DIY electric bicycle:
Additionally, you can connect a second shaft to the front wheel by connecting it to the driven pulley of the main drive.
The engine allows you to reach the optimal speed faster and maintain it longer. A bicycle-based moped is a budget option to become the owner of a faster and more powerful vehicle. Transforming a bicycle into a moped in most cases does not make irreversible changes to the design, so it is possible to return everything to its place.
Pros and cons of homemade design
If an average person wants to independently assemble a two-wheeled vehicle using a chainsaw, then he is guaranteed the following advantages:
- Possibility of saving money, since the costs of accessories and a chainsaw are not comparable to the costs of a ready-made branded moped or motorcycle.
- By making a moped yourself, you can identify all possible weak points and correct them, making a reliable vehicle.
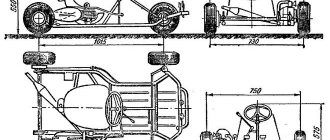
- you can create a frame of any geometry and shape, including a go-kart or tandem.
In addition, it becomes possible to practically profitably use a broken chainsaw (with the exception of engine failure) and an old bicycle that has fallen out of use.
There are almost no disadvantages. The following nuance cannot be called a drawback in the classical understanding of the meaning of this term, but nevertheless, making a moped yourself will require skills in working with metalwork tools, an angle grinder, welding and other devices. Otherwise, it will not be possible to make a high-quality and comfortable moped.
As is clear from the article, it is quite possible to assemble a moped from an old bicycle and a chainsaw yourself, quickly and efficiently. The article presents all the data that will help you make a comfortable and safe two-wheeled vehicle for yourself.
Connecting individual parts to the frame
To create a motorbike, you can use any bicycle: old, rusty, folding. A motorbike requires only a strong frame as a base. If one is not available, you can make it yourself. To do this you will need several pieces of metal pipe.
The motor is attached to the frame at the junction of the lower and seat tube. This is the most optimal, but not the only option. Sometimes you can see a motor mounted on the trunk. The main thing is that the fastening is reliable. During operation, vibration will be felt, due to which the motor may fall if it is poorly secured. It is recommended to use metal clamps for fastening. A set for a motorbike may include special perforated mounts. But their use is not at all necessary.
In addition to the engine, it is necessary to attach the battery and fuel container to the frame.
What details are needed?
In order to assemble the motorbike structure you will need the following materials:
- chainsaw motor
- bicycle wheels 2 pcs.
- tank, headlight, seat from a motorcycle or other suitable unit
- spray paint cans 4 pcs. and masking tape
- metal pipe 16-20 mm.
- cable
- chain
- cycling stars
- front and rear bicycle forks
- axis
- hose
- plastic bottle
- IV
- steering wheel
- throttle handle
It should be noted that on the modern market there are ready-made kits that include all the necessary parts for making homemade products. But the question here is price. If you want to save money and use unnecessary parts lying around in the barn, you will have to try on your own.
Option 1: how to quickly assemble a moped with a gasoline engine
Before you start creating a new moped from a bicycle, you need:
- bike;
- gasoline engine and gas tank;
- battery;
- pulleys or gears;
- transmission belt or chain;
- drive cable;
- fastening clamps.
The working unit of the engine, gas tank and battery are securely fastened to the frame using fastening clamps. Convenient location:
- on the top pipe there is a battery;
- the junction of the lower front and seat tubes is the engine;
- Next to the engine is a gasoline tank.
At the next stage, you need to make pulleys - special transmission units through which the engine force will be transmitted to the rear wheel. The source material for the pulleys can be small wheels with external barriers, the size of a CD. Mandatory conditions are the strength of the material and reliable fastening.
Best articles: Bicycle dimensions (overall dimensions)
Do-it-yourself installation of pulleys on a bicycle:
- The front gear wheel is attached to the motor shaft.
- A second pulley is attached to the hub of the rear wheel of the bicycle.
- A belt is placed on the pulleys. The tension force is approximately the same as that of a chain. The belt must hold firmly to the wheels; this determines how accurately the engine will transmit force to the wheel.
If a chain drive is used instead of a belt drive, then gears are installed on the motor and wheel instead of pulleys.
So, the transmission is ready, now let's move on to connecting the engine:
- The working motor housing is connected to the battery.
- Assemble the “ignition” mechanism: a regular brake lever is attached to the steering wheel, then it is connected to the engine body through a cable.
- Set the tension so that the engine starts freely through the handle.
Assembly principle
The first thing that attention is paid to is the design of the frame, which is made of pipe and on which the power unit will subsequently be placed. Then the tank, headlight and wheels are installed
If you are using old parts, you must first clean them of rust. This is especially true for seams. After the initial stage is completed, the frame is covered with several layers of paint. Be sure to dry each layer thoroughly to avoid corrosion. As a recommendation, it is best to use spray paint to avoid smudges. You can paint not only the frame, but also the wheels, after sealing the rims with masking tape.
Moped from chainsaw Druzhba-4
After all the parts are dry, you can begin installing the chainsaw engine. Make sure that the motor is well installed and secured. Without a cooling system, such a bicycle motor will overheat after 30 minutes of operation, so it is advisable to make a water cooling system. The homemade device looks like this. 2 flexible tubes are connected to the plastic bottle. One is attached in the upper part for air intake, the other in the lower part and through it, using a drip system, water flows to the engine cylinder head. The result is simple homemade drip irrigation and effective cooling.
As an additional comfort for the driver, you can install fenders, since clods of dirt and water can get on the engine. The resulting unit is capable of speeds of up to 60 km/h.
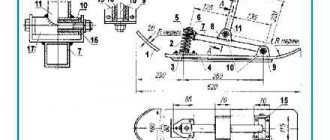
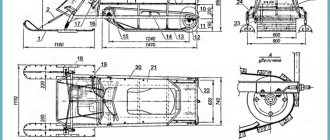
Below is an approximate drawing that can be used to convert a bicycle into a moped.
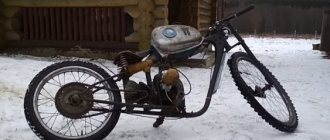
Option 2: assembling a moped with a gas engine
This is an advanced method, and the result is more reminiscent of a real moped. To make it, we need:
- gasoline engine;
- moped parts: wheels, shock absorbers, exhaust pipe, brakes;
- proven bike frame;
- tools.
Since here we are going to get a real moped, the frame must have increased strength and weight. Also, mopeds have a slightly different frame design, which may require some modifications.
Wheels from a moped are put on the frame. It will be necessary to change the fork design, since the width of the wheels will be wider than the distance between the dropouts. If possible, install shock absorbers on the fork.
Carefully overhaul the moped power unit and replace all faulty parts. The propulsion system will require a separate space; for this, a welded metal platform at the bottom of the frame would be a good option. The engine and fuel tank are secured to the site using metal fasteners. It is better to place the battery closer to the steering wheel. An exhaust pipe is connected to the bottom of the engine. The pipe must be firmly secured to the frame so that it does not dangle while driving.
Transmission. Next, you will need to make the engine torque transmission system:
- Remove the pedals and chainring from the bicycle frame.
- Install sprockets on the rear wheel of the moped and the engine shaft. A star on a wheel with a larger diameter.
- Place the rear wheel on the frame.
- Connect the stars using a chain.
Motor connection. The clutch and throttle valve are connected to the ignition lever via drive cables. The tension is selected so that the engine can immediately start and start spinning the wheel.
Brakes. If only one brake (for example, the front brake) may be sufficient for a bicycle, then it is better to play it safe and install them on both wheels. The rear one can be used as the main one, and the front one as an auxiliary one, to adjust the speed.
In general, a homemade moped based on a bicycle will look like this:
Since a vehicle equipped with an engine moves faster than a regular bicycle (this is why the modification is intended), for safety reasons it is necessary to install lighting devices on it. Personal protective equipment – helmet, knee pads and special shoes.
Tips and tricks
On the forums you can find a lot of useful tips on how and what to do correctly when assembling a moped from a chainsaw and a bike. Following simple wishes and parting words from practice will help amateurs avoid annoying mistakes when constructing a moped from a chainsaw.
- Since upgrading your bike will significantly increase the load on all its components, you should first make sure that the bike is in excellent condition.
- After transformations, the engine from a chainsaw will turn into a homemade bicycle motor, so the initial parameters of the engine must be strictly maintained: weight - up to 6 kg, volume up to 50 cubic meters. cm.
- To avoid fire hazards, carefully check the condition of the fuel tank.
- The transmission of force from the bicycle motor to the wheel depends on the correct installation and tension of the belt.
Homemade bicycle with motor – Velobaggio
If you are eager to make a bicycle with a motor with your own hands, then get ready for the fact that you will have to work a little. In this article we will tell you how to install a wheel motor on a bicycle and how to make a bicycle with a chainsaw motor your own.
- Do-it-yourself bicycle with a motor: installing a motor wheel
- DIY bicycle with a chainsaw motor
The easiest and most affordable way to make a bicycle with a motor with your own hands is to install a motor wheel. Connecting a wheel motor is not as simple a task as a person who has never encountered it might think. The most difficult part of this process is connecting the electrical connections.
By purchasing a wheel motor, you also become the owner of a controller, Pas system, throttle handle, charger and brake handle, which are included in the kit.
Since the wheel motor is driven by alternating current, the need for a controller is due to the need to convert direct current from the battery into alternating current.
On special brake handles there is a microswitch designed to cut off the power current from the motor during braking.
To install the wheel motor yourself, you will need to perform the following steps:
- First of all, you need to put the bike with the wheels up and dismantle the old rear wheel. In place of the old wheel, you will need to install a new wheel with an electric motor. The wheel motor is installed so that the bundle of power wires is on the left, in the direction of movement of the bicycle. If this requirement is not taken into account, the wheel motor will simply spin in a different direction.
- After attaching the wheel motor, you will need to attach the batteries to the bicycle frame and connect the controller. When connecting the controller, a very important point is its additional insulation. You can, for example, protect the device with a plastic bag.
- Next, the remaining equipment is connected. Do not forget that all electronics must be connected to the battery through a 20A fuse; it will prevent the system from burning out if a short circuit occurs. You will find a detailed installation and connection diagram in the delivery package for the wheel motor.
DIY bicycle with a chainsaw motor
Over time, many cycling enthusiasts get tired of simply pedaling, and their engineering talent and imagination push them to take such a step as installing an engine on a bicycle. A chainsaw is perfect as a “donor” for the motor. But how to assemble a bicycle with a chainsaw motor with your own hands? Let's try to figure this out.
Let's take a chainsaw engine with a power of 1.5 hp. Many will doubt that a motor of such power will move a bicycle with a 100-kilogram cyclist, but believe me, there is no need to worry: the bicycle will easily accelerate and pick up a speed of 30–35 km/h.
For the sake of fairness, it must be said that acceleration cannot be called fast, but this does not interfere with driving. What's good is that with such an engine you will hardly smell gasoline, which makes it possible to store it at home.
Naturally, while driving there is a crackling sound, like a regular chainsaw, which means that you will be moving with quite a loud sound.
The bushing to which the belt is tensioned from the engine is secured with special washers and screws. There are bushings of different diameters for different wheels: from the smallest to simply huge, for 28-inch wheels.
The inside of these bushings has a rubberized surface. Based on what was said earlier, it is not difficult to guess that the drive belt needs to be selected taking into account the diameter of the bushing and the diameter of the wheel. An important point is that the sleeve must be fixed evenly, eliminating any distortions.
Best articles: Choosing a reliable tent
"Gas" lever. It is controlled using a cable that regulates the angle at which the damper in the engine carburetor will deflect. This lever is similar to the brake lever on a bicycle, which means that you will accelerate without turning the handle, as in a moped, but by pressing the lever, as in a chainsaw.
Let's summarize the result you should get: a great bike at a low price. Very nimble and a lot of fun. Although, this option also has its drawbacks: due to the noise, every dog in the holiday village considers you a personal enemy, trying to catch up with you and bite you!
https://2kolesa.com.ua/kak-sdelat-velosiped-s-motorom-svoimi-rukami/
Step-by-step instruction
First you should use axle pegs from a BMX bike. Axle pegs are things that stick out from the side of a bike's axle to stand on or do tricks on.
When disassembling the engine clutch, remove the nut that holds the clutch to the engine crankshaft. This is the only part that cannot be done without a welder. You may be able to go to a muffler shop or school metal shop and have them weld the nut as centered and straight to the peg as possible. If the nut is not welded securely and centered, you will experience severe vibration which will cause rapid wear on the engine crankshaft bearings. accuracy is key in this part. After completing this step, screw the peg to the motor shaft.
You will be interested in How long an electric scooter can withstand: recommendations from experts
Making a bracket for mounting the engine. Take a box steel stick and weld or screw a metal plate to the end. Now drill 2 holes in the plate to move the bolts that held the chainsaw rod to the saw. Drill holes to mount the bike frame and vertical bolt. Once all the holes are drilled, you can start screwing on the chainsaw motor and attach it to the bike frame.
Reusing an old bicycle brake cable and brake lever is a great idea. You should look at how far the brake cable goes when you squeeze the handle. You can almost guarantee that it will go much further than the throttle cable on the engine. This creates a problem because if you pull too hard on the saw's throttle cable, you could break the cable or worse. The workaround for this is to leave some slack in the cable. Make sure the carburetor is at wide open throttle when the bike's brake handle is fully depressed.
Once the motor is bolted to the bike, I need to find a way to apply some force to the motor so that it rides on the top of the tire. If you don't have some kind of pressure pushing the motor onto the tire, the bike won't move fast and the drivetrain will slip a lot. It's better to use some kind of spring to do the job. You want light tension, but not too much. Too much voltage will put unnecessary stress on the motor bearings and cause them to wear out faster. Enough tension to allow you to speed up.
The chainsaw engine was running fine before installing it on the bike, so it should run fine once started. A couple of pumps on the fuel primer and throttle set to 1/3 give it enough thrust to get the bubbles out of the fuel lines and get it going. The engine will not start until you reach a speed of 6 to 10 mph. This is because the engine requires a certain speed to start producing electricity to ignite the spark plug.
The bike turns out to be very fast.
What are they needed for
To begin with, why install an engine at all?
- The first is, of course, speed. With a good engine, a bicycle can reach speeds of 40-50 km/h without the participation of the cyclist. This is interesting both when walking on a weekend, and on the road from and to work, when you need to get there quickly, inexpensively, and also, preferably, without sweating. Some even go to work with the help of a bicycle engine, and return home pedaling to their heart's content.
- The second is saving energy. Not everyone uses a bicycle as an extreme endurance trainer. You just want to ride for fun, but sometimes this is not so easy to do when the landscape consists of drops, gullies and hills with long climbs. To compensate for the environment unfriendly to poor sportsmanship, the engine is very pleasant to use.
- The third - quite conditional - is the passion of modern riders for progress and uniqueness. The times of homemade mopeds in every yard, described at the beginning of the article, are long gone, and having a motorized bike, and even assembled with your own hands, is very, very cool.
Friction transmission
This type of electric drive, although found on sale, is not particularly popular.
Its principle is simple. The engine is installed directly at the drive wheel, torque is transmitted directly from the stator shaft to the tire. It would seem that everything is simple and obvious. But what may be applicable for children's electric cars and bicycles is of little use in the actual use of transport. Judge for yourself:
- There are no transmission links, that is, the possibility of increasing the angular speed of the wheel through the use of gearboxes is excluded;
- Extremely low efficiency;
- Even a slight drop in pressure in the wheel chamber will dramatically reduce the efficiency of such a drive.
- Constant friction between the engine clutch and the tire tread dramatically reduces its durability.
- In conditions of wet weather, dirty roads, frost, the friction coefficient will decrease significantly, the clutch will slip, which will reduce the already low energy output of the drive.
The only advantage of this system is its ease of installation, which does not require any major modifications to the bicycle.
No, if you are planning a modification with real improvements in the performance of the bicycle, it is better to immediately abandon such a scheme.
How to make a motorbike from a trimmer with your own hands?
Making a motorbike with your own hands from a lawn mower is not as difficult as it might seem at first glance. First, determine what power the engine on the trimmer is. It must be at least 2 horsepower. Otherwise, the future unit will not be able to travel a long distance, or even not move at all.
The next stage is the design of the drive. To do this, you will need to make a drive pulley (attached to the motor), a driven pulley and a special frame for the motor. It is recommended to select a belt that transmits torque at the end of the assembly, based on the dimensions of the entire structure.
You can install the engine from a trimmer on a bicycle by making a special small frame from scrap metal scraps. The second point is attaching this structure to the bicycle. It must be reliable and at the same time easy to maintain. This suspension must be securely attached, resistant to vibration and, preferably, quickly and easily detached.
There are two mounting options:
- bolting;
- fastening by welding.
Each method has its pros and cons. Take into account all the features of your equipment and its operating conditions, and build on these data when choosing a mounting option.
Additionally, do not forget to attach parts such as a small fuel tank, exhaust pipe. It would also be a good idea to install an additional brake, since a bike with a trimmer engine will be much faster and more powerful than a regular one.
We also invite you to watch the video, which shows the process of constructing a motorbike from a trimmer:
What does it take to make a moped from a chainsaw and a bike?
For the most part, converting a bicycle into a moped with your own hands by attaching a chainsaw motor to it does not require any special skills of a mechanic or engineer. If you are new to this business, then numerous drawings of a moped made from a chainsaw, as well as educational video reviews, will help you. Also, not every man has everything he needs in his garage to make a motorbike from a chainsaw with his own hands. Therefore, before assembly, it is recommended to study the list of necessary parts, fasteners and spare parts and buy the missing elements.
Moped
In specialty stores you can find entire kits that include a ready-to-install engine, fasteners and other parts that are necessary to transform a bicycle into a moped. This kit will greatly facilitate the process of assembling a motorcycle, since there is no need to select an engine, suitable power, fasteners, battery, transmission belt, cable, etc.
Assembly instructions and drawings of a homemade moped
Firstly, we will first look at the simplest and most affordable option for how to make a moped from a chainsaw from the photo above. When assembling, the question often arises of how to install a chainsaw motor on a bicycle.
Best articles: What types of bicycle navigators are there?
It is important that it is securely attached and does not move while riding. For this type of homemade motorcycle, you need to secure the following parts with clamps in certain places:
- the battery is installed on the top tube;
- the chainsaw bicycle motor itself is mounted at the intersection of the lower front and seat tubes;
- fuel tank - near the engine.
The next step in the conversion is to create and install the pulleys on the bike. They are needed so that engine operation provokes rotation of the rear wheel. Typically, pulleys use external barrier wheels, which are about the size of CDs.
DIY moped
When selecting wheels, take into account the strength and reliability of both the material itself and the fasteners. To install the pulleys, the front wheel is attached to the motor shaft, and the second pulley is attached to the rear wheel hub.
Next you need to put the belt on the pulleys. Sometimes men use a chain instead of a belt. In this case, the pulleys are replaced with a chain, and the principle of its installation is no different.
If we talk about a more complex option, then as a result you will get a homemade vehicle that is most similar to a real motorcycle. The main differences from the previous design are a more reliable and durable frame, wider wheels that can be removed from an old moped, the presence of shock absorption and the installation of an engine from a chainsaw.
The most convenient place for the engine will be a separate platform welded at the bottom of the frame. You can also place a fuel tank there. An exhaust pipe is also attached to the engine. As for the battery, owners of homemade mopeds recommend placing it closer to the steering wheel. The next step will also be the transmission and connecting the engine. You can watch all the nuances of how to properly make a motorcycle from a chainsaw with your own hands in the video.
Benefits of Using a Chainsaw to Build a Bike
- Easy to use (great for women);
- Gives additional acceleration and power;
- Does not require additional registrations or permits;
- All necessary spare parts can be found in the store;
- Low-cost maintenance;
- The most profitable option compared to a moped;
- Silence when installing a muffler.
- Cherkasy
“Different from racing in Europe”: in Cherkassy, participants in motorcyclist competitions faced a very difficult route
“I really like it because it’s fast. Everyone rode bicycles, but my bicycle was very slow,” says motorcycle owner Vyacheslav Nezamai.
The history of the creation of the bike began when Slavik and his younger brother asked their father to give them a motorcycle.
“One day on the Internet they saw a boy riding a regular gasoline motorcycle and they really wanted this motorcycle. Looking at the price of the motorcycle, I was very surprised that my car costs the same, and my eldest son suggested making it at home,” says motorcycle designer Vitaly Nezamay.
My father, a cook by training and a security guard by profession, at first did not know where to start, because there were no instructions anywhere on how to assemble a motorcycle with his own hands. But I couldn’t refuse the children, so I had to fantasize.
“The basis of our children’s bike was an ordinary Druzhba chainsaw, like the one I recently purchased from scrap metal, as we see, from 1982,” Vitaly shows.
The engine and tank were from a chainsaw, the steering wheel and brake were from bicycles, old shock absorbers from a Lanos, some spare parts from a Ural truck—my father bought all this as scrap metal.
Peculiarities
Motorbikes can be purchased at the store. But they are quite expensive, and the appearance is far from desirable. And this design weighs about 20 kg. This weight will make the journey much more difficult if the engine fails and you have to pedal. Such disadvantages can be avoided if you make a motorbike with your own hands.
This type of transport was widely popular among teenagers during the Soviet Union. But modern capabilities and tools make it possible to significantly change an ordinary bicycle and create an original means of transportation. Experienced DIYers, when asked how to make a motorbike with their own hands, will answer that it is very simple. Almost anyone can cope with such an activity.
Classic chain or belt drive
This principle is most often used by DIYers because of its visual clarity and the wide selection of necessary components from ordinary bicycles. Electric motors from household appliances (for example, a washing machine) or automotive electrical equipment are often used as a motor.
What can be said about the disadvantages of such a drive?
- It should be immediately noted that modifying a bicycle in this way will require the owner to have sufficiently deep knowledge of mechanics and high technological skills.
- Another drawback is the noise of a system with this type of transmission, but in road conditions this is unlikely to cause significant inconvenience to anyone.
- The modification involves some changes in the frame design, which may reduce its strength characteristics. In any case, it is not recommended to carry out such work on bicycles with carbon or aluminum frames - only on steel ones.
But the disadvantages are brightened up by a number of advantages:
- This type of transmission is the most economical and efficient of all existing ones.
- It is possible to use stepped gear shifting, which is familiar to most cyclists. This will significantly increase battery resources by choosing the optimal mode depending on traffic or road terrain.
- As a rule, this type of transmission allows the use of components already installed on the bicycle, which does not lead to a significant increase in overall weight. In addition, the efficiency of the system makes it possible to use engines and batteries of lighter weight.
- The highest speed indicators are also shown by bicycles with this type of gear.
It is clear that there is a wide field for creative design ideas here. However, manufacturers have not forgotten about cyclists - there are ready-made kits for electric bicycles on sale. The most popular sets are Taiwanese.
Similar “constructors” are produced in different designs - using a standard bicycle chain, or with force transmission through an additional chain with one or two additional sprockets.
The systems are equipped with electric motors with power from 360 to 1500 W, with a supply voltage of 24 or 36 volts. Electronic controllers are used to control the operation of the drive, and in motors up to 500 watts they are usually built-in. The kit includes all the necessary fasteners, visual inspection and manual control of the drive.
Installing an electric drive will be a completely feasible task for any owner with “properly growing hands.”
The overall weight of the bike is quite acceptable - 3-4 kilograms, but the speeds it can reach are very impressive - 40 kilometers per hour or more.
HOW TO PUT A MOTOR ON A BIKE: ENGINE INSTALLATION PROCEDURE
Many people wonder how to install a motor on a bicycle? The answer is simple: to do this, you just need to buy a motor specially designed for installation on a bicycle. The most common are motors that are mounted directly to the bicycle frame. You can install the engine yourself. How? Read on!
Engine installation procedure
- First, you should install the sprocket. To do this, attach a pair of rubber spacers to the rear wheel of your bike: the first one between the spokes, the second behind the spokes. The star should be put on top of the bushing on the outside of the wheel, and the installation of the crescent is carried out on the inside. Next, all this is secured with bolts. On an already mounted star, you need to check the gap: its value should not be higher than 1.5 mm on each side. To correct the gap, you need to tighten the star in those places where it is necessary, simultaneously rotating the wheel.
- The important point is that the sprocket should be installed with the bulges and depressions of the teeth towards the spokes. This is necessary to prevent the chain from weakening and to ensure the required distance between the rear wheel and the bicycle frame.
- The motor should be installed according to the drawing that will be included in the kit. The throttle is mounted on the right handle. To do this, you first need to drill a hole, the diameter of which is 5 mm, 125 mm from the edge of the handle. The throttle must be installed with care. The installation of the motor switch must be carried out simultaneously with the throttle and its terminals must be connected to the corresponding wires in the engine. The clutch lever needs to be attached to the left handle.
- The gas tank is mounted on the top tube of the bicycle frame. Next, the fuel filter must be installed in the tank. The ignition coil is also attached to the frame, not far from the engine. The electrical leads of the coil should be routed to the motor and switch in accordance with the color marking. There is another output intended to connect energy consumers. Most often, a bicycle headlight is connected to it.
- The next step is the installation of the drive chain. It must be put on the motor sprocket and on the sprocket in the rear wheel. Now you need to install the chain tensioner and adjust it depending on the chain tension. Remember, the chain should not be overtightened. When work with the chain is completed, you will need to install protection on top.
- Before installing the carburetor, it must be assembled. To do this, you need to remove the lid from it and lay out all the parts. The needle should be located in the center of the caliper, and a flat washer with a slot should be placed on top, so that the slots in the washer and the carburetor caliper coincide. The cable is secured by installing it in a clamping chuck and threading it through the cover and spring.
- Before you start driving, you need to adjust the distance of the electrodes in the spark plug (from 0.4 to 0.5 mm) and the free play value in the clutch handle (from 2 to 3 mm). Next, you should prepare the oil and gasoline mixture in a separate container, and then pour it into the tank. The proportion of oil to gasoline should be 1:25 at first, and 1:20 after 500 km. Under no circumstances should you mix different types of fuel in the gas tank or use pure gasoline. The gas tank cap must be tightly closed.
Deciding on power
The key factors will be:
- the power of the engine, which is located around the wheel hub (the speed and traction qualities of an electric bicycle depend on it);
- battery capacity. The time of autonomous skating and the weight of additional equipment, which usually does not exceed 10 kilograms, depend on it.
Of course, you can include additional data in the evaluation list, for example, the number of battery recharges (resource), time spent on full charging and many other indicators.
Much depends on the weight of the cyclist. A teenager weighing 50 kg and an overweight man weighing 125 kg apparently need different sets.