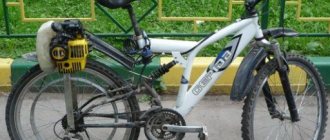
A DIY chainsaw motorcycle is a solution for those men who don’t want to spend money on a car and its subsequent maintenance and who don’t like pedaling a bicycle. In this case, an excellent way out of the situation would be a moped from a chainsaw and a bicycle, which you can assemble with your own hands in the garage, having purchased some of the necessary, missing parts and spare parts. The remodeling process itself is not particularly difficult.
Before starting assembly or if you have questions, you can always refer to the drawings and numerous video reviews available on the Internet.
The principle of a homemade moped from a chainsaw
As the basis for a future moped, you can choose an old bicycle that you want to breathe new life into. You will also need a chainsaw to install the motor on the bike. Thus, you will get a motorbike that you can upgrade: repaint it, install wider wheels, change the handlebars and do other procedures that will make your homemade bike more like a motorcycle.
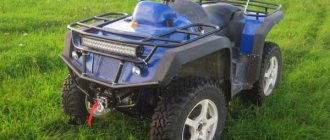
Moped from a chainsaw Ural
What will be needed for production?
At the initial stage it is necessary to select devices:
- Chainsaw with a power of up to 3 kW, which corresponds to 5 hp.
- Bolts and nuts from 14 to 19.
- Special mounting brackets.
- Bike.
- Motorcycle chain.
- Reservoir for fuel tank.
The chainsaw engine power of 2 to 3 kW allows the moped to reach speeds of up to 40 km/h, which is quite enough for a light two-wheeled vehicle.
And a mechanic's tool:
- Wrenches from 14 to 19.
- Drill.
- Bulgarian.
- Welding machine.
- Vise.
If it is not possible to use a ready-made bicycle, then its components are needed: sprockets for the chain, metal profile tubes for assembling the frame of the future moped. In addition, you will need to purchase a motorcycle brake system, side lights, and a flashlight.
Obviously, working with such a tool on the listed devices is accessible to ordinary people who are not afraid of working with a mechanic’s tool and an angle grinder, and also have basic skills in working with electric welding.
What does it take to make a moped from a chainsaw and a bike?
For the most part, converting a bicycle into a moped with your own hands by attaching a chainsaw motor to it does not require any special skills of a mechanic or engineer. If you are new to this business, then numerous drawings of a moped made from a chainsaw, as well as educational video reviews, will help you. Also, not every man has everything he needs in his garage to make a motorbike from a chainsaw with his own hands. Therefore, before assembly, it is recommended to study the list of necessary parts, fasteners and spare parts and buy the missing elements.
Moped
In specialty stores you can find entire kits that include a ready-to-install engine, fasteners and other parts that are necessary to transform a bicycle into a moped. This kit will greatly facilitate the process of assembling a motorcycle, since there is no need to select an engine, suitable power, fasteners, battery, transmission belt, cable, etc.
Speaking of tools, you will really need all the popular types of auto mechanic kit components: screwdrivers, pliers, wrenches, wire cutters, etc.
Assembly instructions and drawings of a homemade moped
Firstly, we will first look at the simplest and most affordable option for how to make a moped from a chainsaw from the photo above. During assembly, the question often arises of how to install a chainsaw motor on a bicycle. It is important that it is securely attached and does not move while riding. For this type of homemade motorcycle, you need to secure the following parts with clamps in certain places:
- the battery is installed on the top tube;
- the chainsaw bicycle motor itself is mounted at the intersection of the lower front and seat tubes;
- fuel tank - near the engine.
The next step in the conversion is to create and install the pulleys on the bike. They are needed so that engine operation provokes rotation of the rear wheel. Typically, pulleys use external barrier wheels, which are about the size of CDs.
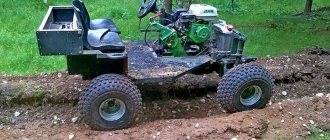
DIY moped
When selecting wheels, take into account the strength and reliability of both the material itself and the fasteners. To install the pulleys, the front wheel is attached to the motor shaft, and the second pulley is attached to the rear wheel hub. Next you need to put the belt on the pulleys. Sometimes men use a chain instead of a belt. In this case, the pulleys are replaced with a chain, and the principle of its installation is no different.
All that's left to do is connect the engine. First, the motor is connected to the battery, and then the ignition is assembled. To do this, you need to install the brake lever on the steering wheel and connect it with a cable to the engine.
If we talk about a more complex option, then as a result you will get a homemade vehicle that is most similar to a real motorcycle. The main differences from the previous design are a more reliable and durable frame, wider wheels that can be removed from an old moped, the presence of shock absorption and the installation of an engine from a chainsaw.
The most convenient place for the engine will be a separate platform welded at the bottom of the frame. You can also place a fuel tank there. An exhaust pipe is also attached to the engine. As for the battery, owners of homemade mopeds recommend placing it closer to the steering wheel. The next step will also be the transmission and connecting the engine. You can watch all the nuances of how to properly make a motorcycle from a chainsaw with your own hands in the video.
Our hands are not for boredom
The Druzhba chainsaw is optimally used as an engine and drive for the following devices:
- generator;
- water pump;
- sawmills;
- circulars;
- Bulgarians.
The simplest belt drive from a chainsaw to a car generator will provide electric light to a country house or cottage. Using the same method, you can connect it to a centrifugal pump to pump water out of the basement.
By adding a worm gear to the chainsaw, you can easily construct a simple winch.
Using a chainsaw, you can easily construct something like a band sawmill , where instead of a band, a carriage with a saw attached to it will move. This design will allow you to dissolve the tree trunk onto the timber yourself. Theoretically, it is possible to saw boards, but due to the wide cut there will be large losses.
Tips and tricks
Many users insist on paying attention to how the belt is held on the wheels. The degree of its fastening affects the transmission of force from the engine, and, consequently, the driving process. The chain is a more reliable and durable part, but do not forget that when using a chain on a homemade moped, gears are used instead of pulleys.
The engine that you removed from the chainsaw should be in full working order. Otherwise, spend a little more time assembling the moped yourself and rebuilding the engine. Try to fix failed parts or completely replace them with new ones.
Transmission.
I found a wheel from a scooter and then the idea came to me to put a star there, I had a hub from an alpha moped collecting dust in my garage, I slightly adjusted the hub from a moped, it fit like a cast one, drilled the holes, tightened the hub, the star does not hit and holds well. I set the driven sprocket to 41 teeth.
I took the drive sprocket with 9 teeth and the gear ratio was 4.5.
Do-it-yourself scooter with a motor from a trimmer?
A homemade motor scooter with an engine from a trimmer is an excellent home transport for entertainment, traveling short distances outside the roadway (on sidewalks and park paths, for example).
Based on the characteristics of this type of transport, it will have the following technical characteristics:
- will be able to develop low speed (no more than 40 km/h);
- the small diameter of the wheels will cause little stability, which can lead to the scooter skidding;
- such equipment is not intended for heavy loads and transportation of heavy loads;
- Children should not be trusted with such a “toy” without adult supervision.
The assembly process itself is relatively simple. First, find an old scooter (if you don’t have one, you can weld a similar frame yourself). If you take an already assembled unnecessary scooter, it is appropriate to strengthen its frame with a 15 mm square metal profile.
Next you need to choose the appropriate wheels. They should be small in diameter, but wide enough and stable. Wheels from a garden cart or a go-kart car are ideal.
A chain drive will transmit power from the engine to the rear wheel. To do this, you need to make a gearbox. This is the most difficult stage of construction. The bicycle gear must be secured to the coupling of the lawn mower motor. First, the dimensions of the coupling should be adjusted to the gear (cut off the teeth from it, make it thinner by turning it on a lathe). The best way to fasten the coupling and sprocket is by shrink fit or welding. Next, you need to connect the second bicycle sprocket with the adapter hub, which in turn must be seated on the shaft, and the shaft on bearings.
The second sprocket and brake pad are secured using another hub on a fixed shaft. Brake and gas levers and cables can be reinstalled from a moped or purchased at a car store.
Application of cultivators
Since cultivating even a small plot of land requires a lot of effort, summer residents are thinking about making a motorized hoe. These workers come to the idea of making a homemade walk-behind tractor with their own hands because factory-made walk-behind cultivators are expensive.
Homemade walk-behind tractors are used to carry out the following procedures:
- plowing;
- hilling,
- mowing,
- application of fertilizers.
Also, a do-it-yourself motorized plow will help with snow removal and weeding, and if you add a trailer, you can use it to transport cargo weighing up to 200 kg. A light walk-behind tractor usually includes only a cutter and a weeder. On a medium-weight product you can find a milling cutter, a plow, a mower and a hiller. Heavy products are reliable, have high maneuverability and non-removable wheels. With this design of the walk-behind tractor, it is possible to use the following equipment:
- cutter;
- plow;
- harrow;
- rake;
- mower;
- semitrailer;
- snow blower.
A bicycle with a motor: the history of the modern electric bicycle.
Motorized Bicycle - A bicycle with an outboard engine used to propel the vehicle or assist in riding it. Sometimes classified as a motor vehicle or hybrid vehicle class, a motorized bicycle is usually powered by an electric motor or, less commonly, small internal combustion engines. If it is driven by an electric motor, it is sometimes referred to as a light electric vehicle. In the past, internal combustion engines were more common in motorized bicycles than they are now, although electric motors were also used. With lighter batteries and better charging, the electric motor has recently become more popular.
History of the motorized bicycle
1818 invention of the two-wheeled balance bike
1834 first working electric motors
1860 invention of lead batteries
1885 the main features of the modern bicycle were formed
1890 A patent was issued for the design of an electric drive mounted on a bicycle.
1903 The first Harey Davidson motorcycle was a bicycle with a motor.
1991 introduction of the first lithium-ion batteries
1992 modern electric bicycles (electric mopeds)
Many motorized bicycles are based on standard bicycle structures and technologies, although there are extensive modifications to motorized bicycle technology.
In countries where the cycling culture is strong (especially in Asia), motorized bicycles are especially popular. In 1996, there were 370,000 motorized bicycles and 470,000 other vehicles in Shanghai.
Using the pedals
Motorized bicycles differ from motorcycles in that they are able to move using only pedals, if required. Mopeds also have pedals, but they are used as a last resort or due to legal requirements and are often not used at all.
The actual use of pedals varies widely depending on the type of vehicle. You can only drive with the engine running if the driver does not want to pedal. The pedals can serve as additional power, for example, when driving uphill.
bikelectro.ru
Connecting individual parts to the frame
To create a motorbike, you can use any bicycle: old, rusty, folding. A motorbike requires only a strong frame as a base. If one is not available, you can make it yourself. To do this you will need several pieces of metal pipe.
The motor is attached to the frame at the junction of the lower and seat tube. This is the most optimal, but not the only option. Sometimes you can see a motor mounted on the trunk. The main thing is that the fastening is reliable. During operation, vibration will be felt, due to which the motor may fall if it is poorly secured. It is recommended to use metal clamps for fastening. A set for a motorbike may include special perforated mounts. But their use is not at all necessary.
In addition to the engine, it is necessary to attach the battery and fuel container to the frame.
Assembly principle
The first thing that attention is paid to is the design of the frame, which is made of pipe and on which the power unit will subsequently be placed. Then the tank, headlight and wheels are installed. If you are using old parts, you must first clean them of rust. This is especially true for seams. After the initial stage is completed, the frame is covered with several layers of paint. Be sure to dry each layer thoroughly to avoid corrosion. As a recommendation, it is best to use spray paint to avoid smudges. You can paint not only the frame, but also the wheels, after sealing the rims with masking tape.
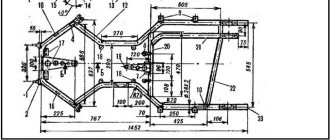
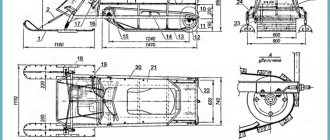
Chain reducer
A two-stage chain gearbox is designed to reduce the rotation speed and increase the torque transmitted from the output shaft of the power unit to the wheels or rippers.
Chain gear drawing
1 — body (channel No. 20); 2 — cover (StZ, sheet s5); 3 — gasket (oil-resistant rubber) 4 — second stage drive sprocket (z = 11, t = 19.05); 5—key; 6 — bearing 206 (2 pcs.); 7— compensation sleeve; 8 - shaft; 9 — nut M22x1.5 with a spring washer; 10 - oil seal; 11 — spacer bushing with keyway; 12—eccentric bearing housing (StZ, 2 pcs.); 13 — M8 screw with spring washer (30 pcs.); 14 — driven sprocket of the second stage (z = 25, t = 19.05); 15— bearing 3008 (2 pcs.); 16 — bearing housing; 17 — sealing sleeve; 18 — left axle shaft; 19—oil drain plug (M10 screw); 20 — bottom of the body (StZ, sheet s4); 21 — oil filler plug (screw Ml0); 22,23 — oil seals (2 pieces each); 24 — right axle shaft; 25 — M6 fixing screws (8 pcs.); 26 — M8 bolt; 27 - chain t = 19.05; 28 — driven sprocket of the first stage (z = 57, t = 12.7); 29 — spacer sleeve
The 1st stage of the gearbox consists of two sprockets (17 and 57 teeth with a pitch of 12.75 mm). The drive sprocket (17 teeth) is mounted on the output shaft of the power unit, the driven sprocket is mounted on the outer flange of the 2nd stage input shaft. The 2nd stage of the gearbox is reinforced (drive sprocket with 11 teeth, driven sprocket with 25 teeth, tooth pitch 19.05 mm). Since this stage is close to the cultivated soil during operation of the walk-behind tractor, to protect it from dust it is placed in a closed crankcase, welded directly to the crossbars and to the side members through steel spacers.
A strut is welded between the crankcase and the cross member for reliability. The crankcase is welded from two channels No. 2 with flanges reduced in length to 35 mm. In the lower part, the shape of the channel walls is a semicircle; instead of the shelves, which are cut off, a bottom is welded from a 4-mm steel sheet, curved in the shape of a semi-cylinder along the channel walls. The top of the crankcase is closed by a cover with an oil-resistant rubber gasket.
Both walls have two coaxial holes for bearing housings (d = 100 mm). Each of these holes is bordered by six other threaded holes (M8) intended for attaching the housings to the crankcase. The lower bearings (that is, axle bearings) have regular housings, while the upper ones (shaft bearings) have eccentric housings. By turning them around the axis (at least 15°), the chain tension of the 2nd stage of the gearbox is adjusted in steps.
The shaft of this gear stage is mounted in two ball bearings 206. The drive sprocket is fixed by two spacer bushings between the inner walls of the crankcase, exactly in the middle, and is connected to the shaft with a parallel key. The large driven sprocket sits on the centering boss of the right axle shaft and is secured with six M8 bolts between the opposing flanges of the axle shafts. Its lower teeth, together with the chain links located on them, are constantly immersed in oil. During operation of the walk-behind tractor, the oil is transferred by a chain to the upper part of the crankcase, thus lubricating the rubbing parts of the 2nd stage. Oil seals in the bearing housings protect against oil leakage to the outside. The rigid flange connection of the axle shafts forms a single shaft, placed in two 308 ball bearings.
What details are needed?
In order to assemble the motorbike structure you will need the following materials:
- chainsaw motor
- bicycle wheels 2 pcs.
- tank, headlight, seat from a motorcycle or other suitable unit
- spray paint cans 4 pcs. and masking tape
- metal pipe 16-20 mm.
- cable
- chain
- cycling stars
- front and rear bicycle forks
- axis
- hose
- plastic bottle
- IV
- steering wheel
- throttle handle
It should be noted that on the modern market there are ready-made kits that include all the necessary parts for making homemade products. But the question here is price. If you want to save money and use unnecessary parts lying around in the barn, you will have to try on your own.
Friction transmission
This type of electric drive, although found on sale, is not particularly popular.
Its principle is simple. The engine is installed directly at the drive wheel, torque is transmitted directly from the stator shaft to the tire. It would seem that everything is simple and obvious. But what may be applicable for children's electric cars and bicycles is of little use in the actual use of transport. Judge for yourself:
- There are no transmission links, that is, the possibility of increasing the angular speed of the wheel through the use of gearboxes is excluded;
- Extremely low efficiency;
- Even a slight drop in pressure in the wheel chamber will dramatically reduce the efficiency of such a drive.
- Constant friction between the engine clutch and the tire tread dramatically reduces its durability.
- In conditions of wet weather, dirty roads, frost, the friction coefficient will decrease significantly, the clutch will slip, which will reduce the already low energy output of the drive.
The only advantage of this system is its ease of installation, which does not require any major modifications to the bicycle.
No, if you are planning a modification with real improvements in the performance of the bicycle, it is better to immediately abandon such a scheme.
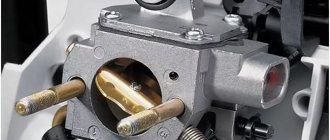
Engine
The key component of a homemade snowmobile is the engine. Unlike other parts, such as a bus or chain, this unit must function without the slightest glitch. Otherwise, the car will remain motionless or stall at the wrong moment.
Therefore, the issue of choosing and installing an engine must be treated with full responsibility. If you want to choose an engine from an imported chainsaw, it is recommended to choose the “Calm” model.
The next, no less important, unit of the system is the gearbox. It also plays a key role in the trouble-free operation of the snowmobile.
Asterisks
The right tip has a special groove for mounting chain sprockets. We are talking about a caterpillar shaft sprocket, which is secured with a nut. To implement this action, an appropriate thread is made on the tip.
The shaft tip has similar dimensions, and its fastening is carried out in exactly the same way as the shaft sprockets.
The sprocket with the largest number of teeth is installed in the first stage of the transmission. The Ural power plant has up to 38 teeth.
Steering
To produce a functional and comfortable self-propelled vehicle that can be easily controlled by an inexperienced driver, you can use any available steering wheel, including a bicycle one. In this situation, you will need to provide manual control of the speed, which requires some effort. You can avoid wasting time by using a steering wheel from a moped or scooter, which is already equipped with a power control unit. In this case, the design will become as comfortable and reliable as possible.
UAZ farmer salon
TTM CENTER is the official dealer of UAZ. You can purchase new UAZ cars at the most favorable dealer prices. We manufacture and install all types of superstructures on UAZ vehicles. UAZ has been known to domestic buyers since 1941. This car has proven itself to be an excellent workhorse, ideally suited for the roads of our country, due to its reliable engine, axle and, of course, cross-country ability.
Despite the fact that domestic cars do not always please their owners with reliability and build quality, there are still brands that can boast of excellent technical characteristics and durability. UAZ is one of the most popular domestically produced cars. Since Soviet times, UAZs have been considered the most cross-country and reliable vehicles, which are ideally suited for use in the Russian climate and roads.
Since the release of these cars, many generations have changed, and the line of models has expanded significantly. Now, in addition to the familiar Loaf and Hunter, such well-known models as the Patriot are being produced - a completely new body, equipment and functions. And those models that have been produced for several decades are constantly being modernized and becoming better.
One of the most important advantages of all UAZ cars is their low cost. Even Chinese classmates can hardly compare with the domestic auto industry in this indicator. In addition, as all UAZ owners know, this car is very cheap to maintain - repairs are easy, and spare parts are common and available. Moreover, spare parts are sold both in stores (new) and at salvage yards (used). Therefore, the owners of this car have a wide choice in terms of expected maintenance costs.
All UAZ vehicles are distinguished by high cross-country ability - these are powerful SUVs that can conquer any obstacles and are not afraid of harsh climatic conditions. However, these cars have proven themselves well on city streets - they are maneuverable and dynamic. Many owners may complain that the car is not very comfortable, and the interior of the UAZ has not changed since the release of this car. However, it should be borne in mind that due to the absence of all the “extra”, this car becomes one of the most spacious in its class, while at the same time ensuring ease of operation and excellent maintainability.
For those who value comfort first and foremost, you can consider purchasing the UAZ Patriot, as well as cars built on its platform. There is a completely new level of convenience here, as well as a lot of functions and capabilities. UAZ vehicles have proven their reliability and durability through their widespread use in the military industry, as well as exports abroad.
How to make an electric bike
If you don’t want to bother with a gasoline engine, there is another option - install an electric motor. It can be purchased or installed from another device. The first option for creating electric mopeds is preferable, since the engines already provide the necessary power.
Options for installing an electric drive on a bicycle are a wheel motor and a separate engine on a chain or belt drive.
The wheel motor differs from the usual one by the presence of a drive mechanism in the central part. It is connected to the control unit using wires. A significant advantage is the ability to make the bike front-wheel drive without making changes to the classic transmission. And if you wish, you can even install two motor wheels. Installation is quite simple, provided that the bike itself allows it. However, it’s a stretch to classify a bike with such wheels as a moped.
An electric moped, that is, an analogue of the one discussed above, is a completely different matter. Of course, an exhaust pipe will not be needed here - this is a plus both in terms of reliability and overall weight.
Assembling an engine from scratch at home will be problematic, so let’s look at how to install a ready-made shaft motor.
Progress:
- Install a new sprocket and belt pulley onto the carriage axle.
- A shaft with a drive pulley is attached to the seat tube.
- The pulleys are connected by a belt.
- The shaft is connected to a power source through wires.
- Route the wires from the battery to the switch on the steering wheel.
The location of the battery is on the lower front tube of the frame or trunk. Electric motor operation diagram:
- When the electric motor is turned on, the rotating roller engages the rear tire tire, pushing it.
- The pulleys and front sprocket transmit torque to the transmission.
- Changing gear causes a change in torque output. At the same time, the rotation speed of the roller remains constant.
DIY electric bicycle:
Additionally, you can connect a second shaft to the front wheel by connecting it to the driven pulley of the main drive.
The engine allows you to reach the optimal speed faster and maintain it longer. A bicycle-based moped is a budget option to become the owner of a faster and more powerful vehicle. Transforming a bicycle into a moped in most cases does not make irreversible changes to the design, so it is possible to return everything to its place.
Preparation
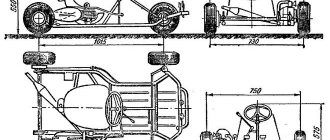
To make a go-kart you will need various materials. Karting is a means of transport that covers a long distance in a short time. Karting can participate in competitions, it can be driven on uneven roads, in rural areas, where large equipment cannot pass. The preparatory stage begins with creating a diagram of the future structure.
A drawing of the karting should be drawn up taking into account the dimensions, which should correspond to the height of the person. For teenagers, the device can be made to individual specifications. After choosing the sizes, you need to assemble the main base. To make a karting structure, you will need the following materials and tools:
- chainsaw;
- square pipes 10 m long;
- round steel pipes;
- durable steel plate;
- gearbox from an old car;
- bottom plugging equipment;
- driver's seat from a kart or passenger car.
Benefits of the product
The essence of the benefit of a homemade design is tangible savings in money. A good factory snowmobile will cost a considerable amount of money. In addition, the situation often occurs that having bought a snowmobile, ridden it for a short time, then it sits idle and is used extremely rarely. Lack of free time, banal dependence on the availability of sufficient snow.
A homemade snowmobile can be assembled from existing scrap metal and unnecessary spare parts, spending a little money. The engine of the Druzhba chainsaw is economical and is not picky about the oil and fuel used. In the future, if the snowmobile is no longer needed, it will not be such a shame to give it away, sell it, or even just throw it away.
Having free time and an interest in engineering work, a homemade snowmobile can be reconstructed, modified, or made changes. It's like a children's construction set, only for adults.