What will be required during assembly?
First of all, the operator needs to carefully study the drawings. Focusing on them, he will be able to quickly understand the assembly order and the dimensions of each part used.
After studying the drawings, a manufacturing scheme should be drawn up.
- creating front skis and choosing a method for attaching them;
- organization of transfer methods to the wheel;
- welding of the support frame;
- installation of attachments necessary for operating the snow scooter.
To assemble a snowmobile yourself, you will need to prepare pre-polished metal corners, ties and spacers, sheets of plywood and steel, bolted joints and clamps.
Rotor equipment
In a rotary snow blower, the snow is thrown out by a rotor, which creates increased centrifugal force. Passing through the pipe, the snow is thrown at a distance of 6-7 meters. A rotary snow blower works like a powerful vacuum cleaner. However, it is not intended for breaking ice. This is even dangerous, since small and large ice particles falling on the rotor blades will certainly damage them. Making a rotary snow blower yourself is much easier than making an auger. However, difficulties exist in both options. The combined snow blower is also worthy of attention. The reason for the appearance of this version of snow blowers was the advantages and disadvantages of the first two types of devices.
List of sources
- tehnika4sad.ru
- tytdacha.ru
- remoo.ru
- landscapenik.com
- stroy-podskazka.ru
- o-motoblokah.ru
- sadovij-pomoshnik.ru
- stroyka.ahuman.ru
- funer.ru
- SpecMahina.ru
- 6sotok-dom.com
Pros and cons of making your own
The main advantage of making a snowmobile yourself is the opportunity to create a reliable unit, which in terms of its characteristics will be practically not inferior to factory analogues produced by well-known brands.
Other important advantages of self-assembly include:
- the ability to plan and assemble a snowmobile of the dimensions that are suitable for the driver and specific operating conditions;
- the use of almost any available means - individual parts or entire mechanisms. The main thing is that the components used are in full working order;
- fuel economy – a self-made snowmobile consumes an order of magnitude less fuel than branded analogues. This is noticeable even in cases where powerful power units from professional chainsaws are used to design it;
- ease of operation and maintenance - a snow scooter with a chainsaw motor has a simple design, which makes it easier to maintain and repair independently.
There is only one drawback to making a snowmobile yourself - the need to learn how to use a grinder, drill and welding machine if the designer does not have the skills to operate this equipment. In addition, it will be useful to master a lathe - using it will allow you to turn out high-quality parts for assembling the unit.
Other creation options
There are other ways to build a snowmobile using skis or a crawler rear. These makeshift snowmobiles and snowbikes use bicycle wheels.
Snowmobile from scooter
One of the simplest homemade options you can create yourself from any scooter or moped. The only differences here are the frames, the sizes of the tracks, and other parts. Such a snowmobile is unlikely to be powerful and will have difficulty moving through snow-covered snowdrifts. Therefore, they use wheels of a smaller diameter and increase the frame. This homemade moped moves well on light snow or crust. In the spring, you can replace the ski or track back with wheels and get a scooter or moped again.
Chainsaw snowmobile
Using a motor from a trimmer, many craftsmen can independently make various devices: cultivators, motorbikes, snowblowers and, of course, snow scooters (or snowmobiles).
The product is not particularly powerful, but reliable, lightweight and easy to use.
Snowmobile from a motorized dog
It is even easier to get a snowmobile from a motorized towing vehicle or a motorized dog; there is practically no need to reassemble it - just add skis with steering and make minor changes.
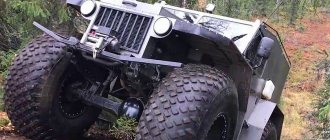
Snowmobile from ATV
The ATV undergoes even less alteration for better maneuverability in winter snowy terrain. Essentially, everything is limited to tuning, which consists of installing tracks, although this process is expensive and time-consuming.
Snowmobile on tubes
About homemade products using cameras or pneumatics has already been noted above. The homemade device consists of a control support ski and a leading support pneumatic.
The advantages include the high cross-country ability of the vehicle, and the disadvantages include low maneuverability.
Transformable snowmobile
A folding snowmobile is called a mini snowmobile or transformer. Its main difference is convenience and ease of use. It easily fits when folded in the trunk or even on the seat of a car.
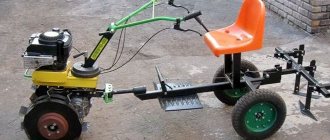
Snowmobile from a cultivator
And another savvy option for inventive use - a snowmobile made from a cultivator. Usually, every farm has a cultivator and sits idle in the winter. Using the engine according to the assembly diagram, we make an apparatus for winter movement. The power is small, but in reality it is practical and effective.
Which engine is suitable for making homemade products?
Before getting ready for work and starting assembly, it is important to choose the power unit for the chainsaw.
It must meet several criteria:
- power and traction characteristics are the most important parameters. The speed of movement and load capacity of the homemade product depend on the power and torque of the chainsaw motor. For example, an internal combustion engine with a capacity of no more than 2 liters. With. can only carry one adult and his small luggage. As the power of the engines used increases, the capabilities of snowmobiles will increase. It must be remembered that the higher the power of the power unit, the more fuel it will need for stable operation. The best option is to use motors with a rated power of 3 to 6 liters. With.;
- build quality - if the designer wants his homemade chainsaw to serve him for more than 1-2 seasons, then he needs to choose motors from manufacturers. This is why enthusiasts most often assemble snowmobiles from STIHL or Husqvarna chainsaws;
- protection from dust and moisture - there should be a minimum of unnecessary holes in the motor housing. Otherwise, snow and dust will get into the engine compartment, which can cause a short circuit in the ignition system. It is best to have only 2-3 holes in the motor housing, intended exclusively for air cooling.
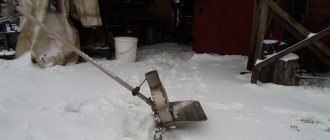
Children's snow blower with trimmer motor
Another important requirement is that the chainsaw engine must be in full working order. Before assembling the snowmobile, the manufacturer will need to clean the air and fuel filters, as well as adjust the carburetor and set the required clearance in the standard ignition system of the chainsaw.
General rules of constructions
Homemade products for driving on snow are varied in appearance, size, layout, power, and even the principle of movement. But in each variety there are components that provide the properties necessary for snowmobiles, namely:
- Don't fall into the snow.
- Move along the surface with minimal friction and in the desired direction.
Obviously, the probability of sinking into the snow and the friction force depend on the weight of the unit, the contact area, and the shape of the surface of contact with the snow. Of course, the condition of the snow has its influence, but this must be taken into account.
To fulfill its main purpose, the following components are always present in the design of a snowmobile:
- supports in the form of runners, wheels or tracks to support the weight of the structure with passengers on the snow surface,
- engine with gearbox, transmission device and fuel tank,
- propellers pushing the structure along the snow surface,
- steering device that changes the vector of interaction with snow to turn,
- frame on which all components are mounted.
Making homemade products is simplified by the availability of parts from specialized equipment. Often spare parts are taken from Buran snowmobiles or any tools and vehicles with motors: scooters, motorcycles, walk-behind tractors. The scope for creativity when creating each node is huge. There are many varied and proven solutions for every detail.
READ Gasoline Diluted with Oil for Trimmer Proportions
DIY snowmobile from a chainsaw
During the actual assembly of the snow scooter, you must strictly adhere to the chosen algorithm of actions.
The order of work is as follows:
- First the operator must make the front ski. It should be thin and, at the same time, as durable as possible. If the ski is too thick, the snowmobile will not be able to glide quickly across the snow. If you use too thin and vulnerable materials to make it, it will quickly break at the first impact on a hard obstacle. It is best to use a 3-mm steel plate reinforced with stiffening ribs as the base of the ski, which must be straightened in advance. After this, you need to weld 2 metal corners to each other. You will need to weld a spout to the front of the plate, and attach the previously connected corners in its middle part. To fix the corners, they need to be welded to the ski with a thick continuous seam;
- At the rear of a chainsaw snowmobile there may be a wheel or a caterpillar mechanism made from a conveyor belt. The option with a wheel is preferable, since in this case the finished snow scooter will be light and will be able to move at a fairly high speed. To complete the homemade product, a wheel from an old garden cart is suitable. It is necessary to weld the corners to it, and also install the driving and driven sprockets from the IZH motorcycle with 9 and 43 teeth, respectively. In this case, the gear ratio of the mechanism will be 4.7 - this is enough to transport 3 adults;
- The third stage of assembly is the manufacture of the support frame. Almost anything that can be lying in the garage is suitable for its construction. Most often, profile pipes, angles, spacers and ties are used to assemble the frame. The main thing when making a frame is to maintain a balance between its low weight and maximum strength. It is best to weld the support frame exclusively according to the drawings. Otherwise, the risk of backlash and roll when operating a finished snowmobile with a chainsaw will increase;
- The last stage of manufacturing is the installation of attachments. A homemade snowmobile will need to be equipped with a soft seat, as well as install a handle with a gas handle and a brake lever in its front part.
On caterpillar tracks
Track supports are used more often than others, simultaneously performing the function of propulsion. The reason is high efficiency and reliability. This design allows you to reach high speeds while maintaining stability and maneuverability. There are several options for how to make tracks for a snowmobile with your own hands:
- from a conveyor belt,
- from truck tires,
- from driving V-belts.
Plastic or PVC tubes no larger than an inch in diameter, sawn along the axis, must be bolted across the conveyor belt.
Even a child can handle such a lightweight device.
Old truck tires with winter tread can also be used as tracks if you cut off the sidewalls. They don’t need crossbars, but you will have to sweep the edges with fishing line in centimeter increments, otherwise the tire will quickly become frayed.
Drive belts, just like the conveyor belt, must be equipped with lugs. Several parallel belts, 2 or more, are connected to each other by transverse strong lugs, attaching them to the belts with rivets or with screws. The distance between adjacent hooks should be equal to the pitch of the drive sprocket.
Tracks made from conveyor belts or belts are often reinforced with a chain, which increases the reliability and durability of the propulsion unit.
These snowmobiles combine lightness with a reliable drive.
One of the varieties of tracked snowmobiles is a motorized dog, which was named after its resemblance to a sled dog. At the expense of maneuverability, the design was lightened, and the traction force also increased. But this is the most effective towing mechanism in the snow.
To change direction, you need to make significant efforts to shift the center of gravity of the motorized dog.
The basic dimensions for assembling a two-seater snowmobile, indicated in the drawing, will help make the ride comfortable. Other sizes will depend on the availability of spare parts and assembly diagram.
When driving, discomfort from headwinds is alleviated by installing motorcycle glass and mudguards for the feet. But it is impossible to completely protect yourself from the cold wind on such transport. For comfort, you need a completely enclosed cabin, which means the weight will increase and a more powerful engine will be required.
A snowmobile with a car engine is designed for long trips over long distances. With heat-insulating body material, the ride is comparable to the comfort of a passenger car.
And the easiest way to achieve comfort is to simply place a rear-wheel drive vehicle on wide supports such as skis, tracks or pneumatic wheel tubes, and also drive the standard wheels to the snowmobile propulsors and attach the front ski to the steering bipod.
During manufacturing, it would be useful to provide a replaceable scheme for replacing wheels with skis and back, if you use spare parts for the conversion.
Materials for production:
The entire manufacturing process is shown in the photo.
First of all, we disassemble the ripper attachment.
The lug mount must be secured to the wheel rims.
To prevent the wheels from slipping in the snow, we put on chains.
trimmer rod and drive cable.
READ Trimmer Fuel Consumption In Hours
We make the mount for the gearbox from a chair leg. We attach it to the frame using this fastening.
Skis can be reinforced with an aluminum angle.
The gas handle is made from a bicycle brake handle.
This is how a snow scooter with a trimmer motor turned out, great fun for children.
The design is collapsible and easily fits into the trunk of a car.
In winter, movement becomes difficult, so you need a universal vehicle for driving through snowdrifts. Using available tools, you can begin constructing a snowmobile. With the right approach, a homemade snow scooter will become an indispensable assistant in winter.
You can begin assembling the structure after developing the drawings. The reliability of the future vehicle depends on their accuracy.
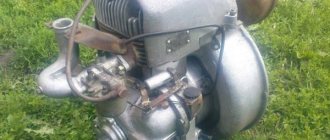
You can make a snowmobile using one of the chainsaws as a basis:
- Friendship. Acts as a power plant. The result is a simple device without unnecessary parts. Such a vehicle will have a fairly large mass with little power, and there will be no safety covers. The saw engine has a power of 1 kW and runs on gasoline. Tool weight 12 kilograms;
- Ural. A more reliable option with more power and less weight. The tool is environmentally friendly and works even at sub-zero temperatures. Two-stroke saw engine with a power of 3.6 kW. Tool weight 11.7 kilograms;
- STIHL. The advantage of this saw is its environmental friendliness and low noise level.
Having decided on a chainsaw, you can start designing a snowmobile.
The design consists of the following parts:
- Steering wheel;
- Fuel tank;
- Power plant of petrol tools;
- Steering ski stand bushings (two pipes with a diameter of 30 cm);
- Control ski;
- Crawler gear;
- Track bed;
- Support base;
- Track roller;
- Back brace-limiter;
- Track tensioner;
- Track tension gear;
- Bearing;
- trunk;
- Driver's seat;
- 1st part of chain drive;
- 2nd part of chain drive;
- Driver's seat backrest holder;
- 1st gear driven sprocket;
- 2nd gear drive sprocket;
- Sprockets for the 2nd stage of chain transmission;
- Sprockets for the 1st stage of chain transmission;
- Steering knuckle lever;
- Traction steering rack;
- Bipod with steering shaft;
- Front axle beams;
- Track mounting shaft;
- Track tension axles.
Why do you need a drawing?
How to make a homemade earth drill (pit drill, earth drill)
Assembling a snowmobile begins with a plan, that is, with a drawing. It is recommended to do it yourself, taking into account the non-standard and unique nature of the planned man-made mobile vehicle. Here it is necessary to remember that this working diagram is needed for internal use, therefore the level of drawing art does not matter, but the main thing is how clearly the plan will be embodied in the diagram
When drawing up a drawing, it is important to take into account the weight of the structure: the lighter the snowmobile, the higher its maneuverability will be.
Frame
According to an individual drawing, the frame is welded in the form required for this version of a homemade snowmobile. Wooden bars or metal pipes are used as the starting material. The easiest way is to make a wooden frame. Its main advantages are that it is easy to repair in the field (there is a lot of wood around), and it holds the car well on ice. The metal frame is welded from pipes of a certain square section, the size of which depends on the load. Its advantage is that it is a stronger and more durable structure than a wooden one. As always, there is a ready-made option - take a frame from a moped.
Track assembly
After making the frame, they begin to create tracks, consisting of tracks and rigid hooks installed along their entire length. Caterpillars can be made from conveyor belts or car tires. You can use ready-made industrial tracks. An advantage of purchasing ready-made tracks may be their special regional purpose, where climate, terrain and travel conditions are taken into account.
Wheels are installed inside the homemade tracks. With their help, the tracks on which the lugs (or simply hooks) are located rotate.
A common option for their manufacture is plastic pipes. They are cut into pieces
The lugs are attached to the tracks with bolts, and it is important to maintain the same distance between the lugs so that they do not disturb the movement of the caterpillar
The wider the tracks, the more difficult it is to control the vehicle, but the higher the maneuverability becomes. The thickness of the tracks must correspond to the engine power.
Chassis
After the frame and tracks are ready, they begin to assemble the structure with the chassis.
- Using front suspensions, the steering and skis are attached to the frame.
- The steering wheel is often taken from a motorcycle or scooter, but in case of non-standard solutions, it is assembled independently, based on personal preferences and convenience.
- Skis are often used ready-made. Typically, a ski consists of the following parts: base, shock absorber, link leg, fork, its rod and bipod. But there are options for making your own: from plywood, plastic, metal.
- The rear suspension connects the engine to the tracks.
- A motorcycle chain can be used as a drive.
- The fuel tank is chosen based on safety, economy and practicality. The capacity of the container (made of plastic or metal) is determined by considerations of the necessary distances to be overcome.
- The seat is made to order according to individual preferences, since the control of the snowmobile will depend on convenience and comfort. The best choice is a seat made from quality materials.
How to make a snowmobile from a chainsaw?
The manufacturing diagram and drawings will allow you to correctly connect the power plant, transmission, track or track. There is no need to make the latter yourself - they will fit from Buran. And for children's transport, an ordinary ski track is quite enough.
Sequence of work:
- Frame. A sheet of steel of two millimeters in the middle of the structure is connected by spot welding. It will house the gearbox and chain drive shaft;
- Also, a small module is mounted in the middle under the operator’s seat;
- The front of the support base and the cross beams of the front axle are fastened with a beam. As a connecting element, you can take a water pipe with a diameter of 1.5 centimeters. At the end of the pipe, weld bushings under the steering, mount a stand in the middle;
- Rack. Steel corners 33 centimeters will do. They are connected by steel crossbars - gussets two millimeters thick, ensuring the reliability and durability of the structure. A stand is needed to secure the motor;
- Caterpillar. Using a ready-made element from Buran, you need to cut the workpiece by 0.5 meters. The finished caterpillar is secured with a transport tape. For the manufacture of gears, 1.5 centimeter sheets of cardboard are suitable;
- Drive shaft. A pipe 1.4 centimeters thick is suitable. The upper flange secures the gears. Trunnion tips are welded at the back of the drive shaft;
- Motor. A snow scooter with a chainsaw motor, so the installation itself must be in good working order. Even old gas powered tools require proper maintenance and use. The gearbox must operate without interruption. The power of such a snowmobile is not enough to transport goods and more than one person;
- Stars. The right tip will be longer than the left. The extension is necessary to produce a keyway that secures the chain sprocket. The track shaft sprocket is secured with a nut with the required thread pre-made on it;
- Steering. A handlebar from a scooter or bicycle will do. The main thing is the correct installation - the central axis must adjust the traction force to be able to control the skis and, accordingly, move easily;
- Brake and lights. There is no particular need for a braking system, since the vehicle does not gain high speed. For movement at night, you can install a simple lighting system.
A homemade design is not registered, so the vehicle should be used away from public roads.
Homemade products from a washing machine engine:
How to connect a motor from an old washing machine through or without a capacitor 2. Homemade emery from a washing machine engine 3. Homemade generator from a washing machine engine 4. Connecting and adjusting the speed of a commutator motor from an automatic washing machine 5. Potter's wheel from a washing machine 6 . Lathe from an automatic washing machine 7. Wood splitter with an engine from a washing machine 8. Homemade concrete mixer
We make a snowmobile with our own hands - it couldn’t be easier!
I made this snowmobile literally in a couple of weekends in the garage at the dacha. Although its design at first glance looks very simple, nevertheless, in terms of cross-country ability in deep loose or wet snow, it is not inferior to most industrially produced snowmobiles.
Several years ago, I built a snowmobile for my nine-year-old daughter with a homemade track made from conveyor belts and plastic water pipes as lugs. At first I had doubts about the reliability of such a track and how the plastic parts would behave in the cold. But during two years of winter operation, no breakdowns or severe wear of the pipes occurred. This inspired me to create a light snowmobile for myself with the same homemade track.
Knowing full well that the smaller the weight of the snowmobile and the larger the supporting area of the caterpillar, the better its maneuverability in loose and deep snow, I tried to make the design as light as possible. The principle of operation of the snowmobile is very simple. Four wheels are installed inside the caterpillar, which roll along the conveyor when moving tape on which the lugs are attached. And the caterpillar drive from the motor is carried out by a chain through the driven shaft using special drive sprockets. I took them from the Buran snowmobile.”
With an engine from a conventional walk-behind tractor with an automatic clutch with a power of only 6 hp. you won't accelerate quickly. I planned to ride the snowmobile not on compacted paths, but on loose snow, so I abandoned the soft track suspension and skis to reduce the weight of the snowmobile and simplify the entire design.
First I made the caterpillar. A plastic water pipe with a diameter of 40 mm was cut into blanks for lugs 470 mm long. Then I sawed each workpiece lengthwise into two equal parts using a circular saw. Using the device shown in Fig. 2, I used a wood circular saw to cut plastic pipes for lugs lengthwise.
I attached the lugs to the conveyor belt with two 6 mm diameter furniture bolts with a large semicircular head. When making a caterpillar, it is very important to maintain the same distance between the lugs, otherwise they will run into the teeth of the drive sprockets and the caterpillar will begin to slip and slide off the rollers.
To drill holes in the conveyor belt for mounting bolts with a diameter of 6 mm, I made a jig. The holes in the tape were drilled using a wood drill with a special sharpening.
Using such a jig, you can drill 6 holes in the conveyor belt at once to attach three caterpillar lugs.
I asked a turner to make the drive shaft of the caterpillar and supports for the bearings. I made the snowmobile frame myself from 25x25 mm square pipes.
READ How to Correctly Install a Starter on a Trimmer Video
Since the axes of the ski and steering hinges are on the same cutting line and in the same plane, you can use a continuous steering rod without ball ends.
Ski turning bushings are easy to make. I welded 3/4″ female plumbing couplers to the front cross member of the frame. I screwed pipes with external threads into them, to which I welded the bipod of the ski steering rack.
I recommend using skis from the Argomak children's snow scooter. They are lighter and more flexible, but they need to be equipped with corners for attaching to the snowmobile's rotating stand and a metal undercut at the bottom - for better control of the snowmobile when moving on crusty or compacted snow.
The chain tension is adjusted by moving the motor.
Driving a snowmobile is very easy. When you increase engine speed with the throttle handle located on the steering wheel, the automatic centrifugal clutch is activated and the snowmobile begins to move. Since the estimated speed of a snowmobile is low (only about 10-15 km/h) and depends on the density of the snow, the snowmobile is not equipped with brakes. It is enough to reduce the engine speed and the snowmobile stops.
I will share a few tips that may be useful when repeating this design.
I cut the pipe for the tracks lengthwise with a hand-held circular saw on wood, first on one side, then on the other. This makes it smoother than cutting both walls at once. It is more convenient to process small workpieces. If you immediately cut a long pipe lengthwise, then the plastic will melt and the saw blade will jam.
Tracks can be made to any width. And each designer has the right to choose what is more convenient for him: to make a wide but short track or a narrow and long one. Just remember that with a large caterpillar the snowmobile will be difficult to control and the engine will be more loaded, and with a small one it may fail in loose deep snow.
Some of my photos show that there are Plas installed inside the tracks.” These are guide stops for the slide, which should prevent the caterpillar from sliding off the rollers. But during the operation of the snowmobile, the caterpillar did not slide off the rollers even without slipping, so “barrels” can not be installed, which will reduce the weight of the snowmobile.
At the end of winter, I completely disassembled the snowmobile to determine its weight. The weight of its individual components turned out to be as follows: caterpillar - 9 kg; drive shaft assembly - 7 kg; two pairs of wheels with axles - 9 kg; engine and steering wheel - 25 kg; pair of skis - 5 kg; frame - 15 kg; double seat with racks - 6 kg. In total, everything together weighs 76 kg. The weight of some parts can be further reduced. Nevertheless, the weight indicator for a snowmobile with a track of this size is quite satisfactory.
The geometric dimensions of my snowmobile are as follows: snowmobile frame length - 2 m; the distance between the axes of the support wheels (rollers) is 107 cm; The width of the caterpillar is 47 cm. The pitch of the caterpillar lugs depends on the thickness of the conveyor belt and it must be selected experimentally (I got 93 mm). I do not provide exact dimensions and drawings of the snowmobile parts, since everyone who plans to repeat the design will be guided by those parts and components that can be purchased or manufactured independently.
Sergey KHOMYAKOV, Moscow ()
Types of cultivator attachments for trimmers
Cultivator attachments are good for cultivating small plots of land. Often there are several cutting parts at once. The cutting width of the cutters can be adjusted in the range of 130–250 mm. To prevent debris from getting in, they have a protective shield. Usage options:
- weeding of small areas;
- digging up the garden and flower beds;
- loosening the soil near trees;
- hilling carrots, potatoes, etc.
Cultivator attachments
The torque from the unit's engine is transmitted to the cultivator attachment via a shaft in a special rod - it must be purchased separately. This unit differs in the number of splines on the end of the rod. There can be 7 or 9 of them. For example, the Oleo-Mac cultivator attachment will not fit the Husqvarna trimmer.
Spline connection of cutters or disks to the shaft is convenient. It allows free movement of the cutting parts, which is ideal for cultivation. The soil can be loosened with a wide grip - up to 200–250 mm per pass. When choosing a nozzle, you need to take into account mechanical limitations on drive power. If the device is designed for a power of up to 1.5 thousand W, then the cultivator is suitable only for the purpose of cultivating loosened soil or hilling beds and potato bushes.
Varieties of design
Trimmer attachments differ in the type of cutting mechanism. The efficiency and quality of work to be performed using a gasoline unit depends on it. The cultivator attachment for the trimmer comes in two types:
- Serrated. This type includes a straight row consisting of several curved and pointed knives. They turn up the earth and open it up. The toothed nozzle can be heavy – its weight reaches 5 kg.
- Disk. These cultivating devices are equipped with several discs that have fixed knives. The ends of the blades are curved in a certain direction. A protective flap is installed on top of them, thanks to which the soil does not fly out during the working process.
Weeding attachments can be attached to the trimmer in several ways. There are three in total:
- near the engine instead of a rod;
- at the bottom of the rod instead of a gearbox;
- by disconnecting the rod in the middle.
Cultivator attachment for lawn mowers
Advantages and disadvantages
Cultivator attachments for trimmers have several important advantages. More details about them:
- Great for cleaning and weeding. The tool is often used by adherents of organic farming, who tend to believe that frequently loosening and hilling the soil is harmful.
- The cultivator attachment easily and quickly copes with weeds that have not yet grown too much. In addition, cultivation will loosen the soil and saturate it with oxygen, which will have a positive effect on the development of plants.
- They are easy to maintain and cost an order of magnitude cheaper compared to suspended equipment on a walk-behind tractor.
- Fast rotating cutters can provide high efficiency.
- Suitable for loosening the soil not only over a large area, but also in greenhouses, flower beds, and flower beds.
- The disc cultivator is equipped with a safety guard.
Using a trimmer with a cultivator attachment
Any attachment for a gasoline trimmer has its drawbacks. Be sure to take them into account. These are the moments:
- Any cultivator attachment for a trimmer will significantly increase the weight of the assembled unit - by about 5-6 kg. Long-term work will not be possible for everyone.
- The cutter attachment will not allow you to press the blades close to the soil. Excessive pressure will cause the rod to break or at least bend.
- It is recommended to use a cultivator for brush cutters on clay soil, because... it is not able to penetrate deep - it will only scratch the surface of the earth.
- The drive of gasoline trimmers is located behind the operator, and the rod is often long. During cultivation, vibrations constantly appear. Their size is determined both by the changing load on the cutters or disks and by the long rod.
- Vibrations are transmitted through the shoulder strap to the user's hands. Holding a capacious unit suspended and operating the unit’s power button is not always convenient. Long-term cultivation of soil using attachments is unsafe for health.
How to make a bicycle with a gas mower engine?
an important role when constructing a moped from a trimmer . In addition, the manufacturer needs to prepare the workplace in advance and lay out all the elements used on it. This will save time during the subsequent production of homemade products.
To assemble a motorbike from a trimmer, you need to proceed in this order:
- First of all, it is necessary to equip the driving rear wheel of the bicycle with a sprocket. To do this, you will need to install 2 elastic rubber pads on the rear wheel: the first of them should be located between the wheel spokes, and the second - directly behind them. The star itself must be tightly installed on the bushing, which is located on the outside of the wheel. In this case, the crescent-shaped part must be secured from the inside;
- Next, you need to install the power unit from the disassembled trimmer . It is best to choose the rear part of the frame for mounting the motor, behind the standard seat - usually the “trunk” of the bicycle is located in this place. It needs to be removed and a strong steel plate welded in its place. It is necessary to install a piece of rubber between it and the engine, which will partially dampen engine vibrations. The operator must use a clamp to secure the motor to the plate. It will prevent the driver from getting burned while operating a homemade moped;
- After this, the power unit from the trimmer and the sprocket will need to be connected by a drive belt or chain. To be able to regularly adjust the chain position, the operator must install a tension roller;
- Then the bicycle with the engine from the trimmer must be equipped with a gas lever mounted on the homemade handlebar. The accelerator must be connected to the engine using a cable;
- Next you need to install the gasoline tank. To install it, you will need to use a small metal or plastic platform located above the engine - this will ensure that fuel naturally enters the cylinder of the power unit;
- In the end, the operator will only have to install the carburetor from the trimmer on the bicycle engine.
Before direct use, homemade bicycles with a trimmer must be carefully checked and tested. To do this, you need to carefully examine the structure of the unit and make sure that all the components necessary for its operation are installed on the frame. Then you will need to check the moped in action. After driving a few kilometers at low speed and making sure that the bike is in good condition, you can move on to more active use on the road.
Peculiarities
A children's gasoline snowmobile is an almost exact copy of a similar adult unit. The only difference is that it is somewhat reduced in size and has reduced power, but this has a beneficial effect on the cost. In essence, a snowmobile is the same sled, only mechanical, and even with the ability to conveniently turn using front runners attached to a bicycle-type handlebar.
Gasoline vehicles, of course, are technically more complex than their electric counterparts, but this does not stop most parents. The reasons for this are obvious: low power of electric snowmobiles, low autonomous range, a simple desire to accustom a child to servicing a fuel-powered machine.
The electric model is simpler, controlled almost by buttons, but modern manufacturers are doing everything to make operating a gasoline snowmobile also easy for a child. Great emphasis is placed on the stability and safety of the machine - every snow bike is designed to be stable and not tip over. Like an ATV, a snowmobile for children has remote control functions, which include forced maximum speed limitation and complete engine shutdown using a remote control.
Source
Rules for operating a homemade moped
To extend the life of a moped with a trimmer motor, its owner needs to adhere to a number of important rules.
- timely replacement of consumable parts - if you do not change the air filter and other elements of the moped for a long time, then its important mechanisms will begin to work under increased load. This will lead to a more complex breakdown of the homemade product:
- use high-quality gasoline and motor oil for refueling - if you fill the fuel tank of a moped with low-quality gasoline, then quite quickly the bicycle owner will be faced with the need to replace the engine CPG;
- lubricate the gearbox used in a timely manner - this will prevent the mechanism from operating under high loads;
- mix gasoline and oil strictly in the proportion specified by the trimmer manufacturer - if you add more oil than specified in the instructions, this will lead to flooding of the engine spark plug;
- regularly check the condition of the fasteners - bolts that are not fully tightened threaten not only with the engine falling, but also with injury to the owner;
- paint scratches and chips immediately after they appear on the frame - this will prevent further corrosion of the moped’s frame;
- Do not allow the trimmer - if you use the moped frequently, you need to take breaks. At the same time, if the bicycle is used in hot weather, then its motor should be allowed to cool down every 15 minutes of riding. If it is cool and windy outside, then the number of breaks can be reduced to 1 time for every 25–30 minutes of driving;
- promptly change the tires on moped wheels using a trimmer - in winter, you need to install tires with spikes on homemade wheels. This will prevent wheel slipping and increase safety when using the bicycle.
READ Al-Ko Trimmer Gear Lubricant
Also, the owner of a bicycle with a trimmer motor will need to monitor the weight of the cargo transported on the homemade product. If the luggage is too heavy, it can lead to overheating and serious damage to the engine, as well as other mechanisms of the device.
Cultivator attachment
The cultivator attachment on a petrol trimmer is used to loosen the soil in small areas, such as a flower bed, greenhouse or around bushes and trees. The tool can be:
- Toothed, it has cutters located on both sides of the drive shaft.
- Disc, when cutting discs are used instead of a cutter.
The difference in these two units is only in their design and names; the essence of the work they perform is the same - loosen the ground.
Important! Toothed models are lighter in weight, therefore, it is best to process light soils with them, unlike disc ones. This attachment is powered by a motor using a special rod (sold separately)
The rod has slots, there can be from 7 to 9 of them. That is, you need to know exactly which attachment to buy, since it may not fit from one model to another
This attachment is powered by a motor using a special rod (sold separately). There are slots on the rod, there can be from 7 to 9 of them. That is, you need to know exactly which attachment to buy, since it may not fit from one model to another.
When the cutters and discs are fixed with splines, the cutting elements will move freely, and you can loosen the soil to a width of 20-25 centimeters.
Note! Long beds are more convenient to process than short ones. In the first case, you need to make fewer turns
When choosing an attachment, you need to take into account the power of the trimmer. If the power of the device is no more than 1500 W, then you can only process already loosened soil. For example, you can only hill potatoes.
The disadvantages of the design include the fact that it will not be possible to deeply loosen the soil. Only the top layer can be processed, and only if it has been plowed recently. On hard soil, such a cultivator attachment will simply “jump”; it will not loosen the soil. And you won’t be able to press it more tightly to the ground either; the rod will spring and bend, which will lead to the trimmer breaking.
Attachments for trimmer cultivator
But still, sometimes it makes sense to purchase such an attachment. Considering its sometimes quite high price, many craftsmen decide to make a cultivator for a lawn mower themselves.
snow blower
A snow blower is a machine that scoops up snow and throws it to the sides. It works on screw and rotary principles.
Screw mechanisms carry out a 1-stage intake of snow mass. The device is located in the front part of the unit, covered with a lid on the sides and top. In the process of rotating around its own axis, the auger captures, grinds snow and ice, crushes them into small fractions, transfers them inside the equipment to the throwing shovel, then to the outlet pipe. For freshly fallen snow, mechanisms with a smooth edge are suitable, for stale snow - with a serrated edge.
In a rotary type unit, the snow cover is cleared by a rotor. The nozzle is attached to the drive shaft and works like a vacuum cleaner. The blades protrude forward, making it much easier to grip snow. In a homemade snow blower from a trimmer , they are made of high-quality metal or durable plastic. The rotor creates increased centrifugal force. Snow is thrown away, passing through the pipe, at a distance of up to 12 m.
Both electric and fuel motors are suitable for snow blowers.
If the range of action of the mechanism is within the house, install an electric motor from a trimmer , while taking into account the waterproofing of the unit. When carrying out work in summer cottages, it is better to install a low-power gasoline engine.
At the preparatory stage for a do-it-yourself snow blower from a trimmer, drawings of parts and assemblies are developed according to a well-thought-out plan, technology and based on the availability of material and equipment. For assembly, use the diagram of a lawn mower.
Necessary equipment for making a homemade machine:
- Petrol trimmer with straight rod and gearbox.
- Steel sheet 1.5 mm thick or metal barrel.
- Milling cutter with teeth.
- Set of tools:
- drill;
- drill;
- spanners.
- Bulgarian.
- Welding machine.
- 4 rectangles 25x10 cm are cut out of a sheet of steel.
- One of the corners of the long side of the part is turned into a blade shape.
The deflector is made from metal strips 30x15 cm, bent, sides 10 cm high are welded. For the blade, take a blank 30x40 cm, bend the edges to a height of 2 cm.
In order to make a snow blower with your own hands from a trimmer , perform the following algorithm of actions:
- the bottom of the barrel is 15 cm, cut in a circle;
- at the bottom of the structure, a hole is drilled for the gearbox protrusion and 3 additional ones are drilled for attaching the shield;
- on the side they make a square with a side of 10 cm for unloading the snow mass;
- 1/3 of the front part of the structure is covered with a metal sheet so that the square hole is located in the center of the damper;
- the finished rotor blades are welded in a cross pattern to the gas trimmer disk;
- a deflector is installed to the unit body at the point of snow emission and welded;
- a spatula is attached from below;
- install the gearbox, securing it with bolts;
- insert the rotor.
During work they use a welding machine. Welding on thin metal is a complex technological process that only a professional can handle. Therefore, it is better to use the services of an experienced welder when manufacturing some parts.
Self-installation of the engine
Once the drive has been assembled and installed, the operator can begin installing the motor. For safety reasons, the internal combustion engine from a lawn mower must be mounted on a moped using an additional suspension made of metal. The fastening element itself should resemble a frame welded from steel channels and angles.
The shape and dimensions of the frame must correspond to the dimensions of the motor used. Fasteners can be attached to a bicycle frame in different ways. If in the future the motor will not be removed from the moped, then the engine mount can be welded to the device. If in the future the motor will be removed for subsequent installation back on the trimmer, then a pair of bolted connections will be suitable for attaching it to the moped.
When installing an internal combustion engine from a trimmer to a moped, you must take into account in advance the need for further engine maintenance. To make it easier for the operator to repair the internal combustion engine, the operator needs to have free access to the most frequently replaced engine parts: the air filter, cylinder and seals.
Snow blower for walk-behind tractor
This type of snowplow is designed with a walk-behind tractor engine. Such a unit requires almost no physical effort and is capable of clearing large areas of snow cover. It is possible to use an old gasoline engine with a power of 6.5 l/s.
It is necessary to build the snow blower in such a way that removing the engine for maintenance is not difficult. It is also recommended to install a manual start, because installing a battery or generator increases the weight of the snow blower.
A winter walk-behind tractor is perfect for clearing snow. This snow blower will be easiest to assemble using a special snow blower attachment. However, in order to save money, it is recommended to assemble such a nozzle yourself from available materials. There are three main options for such devices.
Rotating hard brushes. This option is perfect for clearing shallow snow cover, as well as for cleaning areas where there is a risk of damage to decorative tiles or other coverings. Such brushes are capable of covering up to 1 meter of cleaning area. They are mounted on a rotating auger under a special canopy. Another advantage is the ability to adjust the direction of movement of the brushes.
Hanging shovel with knives attached to it. This technique will cope perfectly with accumulated snow. This simple device is attached to the traction device using a universal hitch. The lower part of such a shovel must be covered with rubber. This is done in order to avoid damage to the coating under the snow and the shovel itself. This snow blower will work like a bulldozer - loosen a layer of snow and then move it to a dump. The width of the snow cover reaches 1 meter.
The most effective attachment for a walk-behind tractor is a rotary or friction type snow thrower. The main element of this design is an auger with a shovel wheel attached to it.
When rotating, the device grabs snow and moves it upward using a wheel. In this case, the snow is thrown over a very long distance, and the thickness of the captured cover can reach 25 cm at a time. That is why this attachment is the most effective snow removal design for walk-behind tractors.
Motorcycle from a trimmer - what to pay attention to before assembly?
Before you start assembling a motorbike with your own hands from a lawn mower, you will need to choose an engine that will become the basis of your homemade product. It is the power of the internal combustion engine that directly affects the traction characteristics and endurance of the device.
In practice, homemade products equipped with engines from trimmers with a power of 3 hp or more performed best. With. and higher. Each scooter with a motor is capable of carrying 1 adult with hand luggage, while having an additional reserve of torque.
It is strictly not recommended to assemble a homemade product based on electric motors from trimmers. This is due to the low power reserve of such motors, as well as their instability in bad weather conditions. If there is no other choice, and the manufacturer only has an electric motor at hand, then when installing the engine, special attention must be paid to protecting it from external factors: moisture, dust, debris. During further operation of the scooter with an electric motor, the trimmer will need to take frequent breaks to cool the engine. Otherwise, the engine will quickly fail.
Having dealt with the motor, you need to move on to the bicycle frame. It will need to be equipped with an additional platform on which the engine and fuel tank will be mounted. In this case, the latter should be located above the engine from the trimmer so that fuel flows to the power unit naturally.
It is very important that homemade bicycles with a trimmer are equipped with a comfortable handlebar, on the handles of which you can place all the switches necessary for work. This will simplify the operation of the homemade product when moving at high speed.
How to make a moped with a motor from a brush cutter?
Assembling a homemade trimmer begins with studying detailed drawings. The diagrams must indicate the dimensions of the parts used, as well as the sequence and methods of their installation into the overall structure of the moped.
Do-it-yourself children's snow scooter with a motor from a trimmer
Next you will need to prepare the equipment and parts.
- drive motor;
- gearbox;
- brake system;
- welding machine;
- Bulgarian;
- set of bolted connections;
- set of wrenches and screwdrivers.
The further procedure for assembling a homemade moped from a trimmer should be divided into several stages. Each of them must be treated with special responsibility, since not only the quality of the device depends on it, but also the safety of the operator during its operation.
Installation of the brake system.
A homemade bicycle with a lawnmower engine must be equipped with a braking system. To make it, you will need to use a pair of brake discs, installed one on the drive and driven wheels. To control the brakes, the discs must be connected using metal cables to levers mounted on the handles of the standard handle.
In addition to installing the brakes, the operator will also need to replace the standard tires on the moped's wheels. Not only the cross-country ability of a self-propelled bicycle depends on this, but also the safety of the owner when riding off-road.
Sources:
https://morflot.su/kak-sdelat-snegohod-iz-trimmera-svoimi-rukami/ https://zemlyconsalt.ru/navesnoe-oborudovanie/moped-iz-trimmera-svoimi-rukami.html
Components
Particular attention should be paid to the component parts.
The engine is the most important part of the mechanism and is selected with special attention. Its condition must not only be working, but it itself must be installed after maintenance. The gearbox must also be in good condition.
Sprockets are elements for transmitting translational motion from the engine. You need to create a tip on the right that is longer than on the left.
The steering is suitable for a scooter, moped or bicycle. The most important thing is to connect the engine to the steering part correctly.
The brake system is not provided for in the presented diagrams, but it can be made. However, first think about whether it’s worth racking your brains over this, because motor sleighs do not develop high speeds.
Do-it-yourself children's snow scooter with a motor from a trimmer
Drive shaft
Caterpillar drive shaft (tension shaft is the same, only position 4, replaced by position 1): 1 – left (along the way) tip (steel, cylinder 22); 2 – shaft (steel pipe 0.28x20; 3 – flange for fastening the gear to the shaft (steel sheet s4, 2 pcs.); 4 – right (along the way) shaft tip (steel, cylinder 29); 5 – track drive gear (2 pcs.); 6 – frame spar, 2 pcs.); 7 – bearing housing cover (steel, 2 pcs.); 8 – bearing 80204 (2 pcs.); 9 – bearing housing (steel, 2 pcs.); 10 – drive shaft sprocket; 11 – fastening the sprocket to the shaft (M12 nut with wide and spring washers); 12 – key (steel 20); 13 – seal (felt, 2 pcs.); 14 – fastening the bearing housing to the spar (M6 bolt, with 4 sets of screwdriver); 15 – fastening the bearing housing to the spar (M6 bolt with spring washer, 4 sets).
A pipe with a radius of 1.4 cm is used as a drive shaft. A flange with prepared holes for the teeth of the drive wheels is attached to it. At the end of the drive you need to weld trunnion tips.
Sources:
https://specmahina.ru/gazonokosilka/samodelki-iz-trimmera.html https://ventanaspb.ru/info/snegokat-iz-trimmera-svoimi-rukami/ https://zemlyconsalt.ru/pily/snegokat-s -motorom-ot-benzopily-svoimi-rukami.html