When it comes to mechanical water drilling, you need unique tools, which you often have to make yourself.
Augers are used for mechanical drilling of water wells.
A high-quality auger can be made with your own hands quite quickly and inexpensively, but to do this you will need to get good at it and have all the necessary equipment in your arsenal.
Preparatory stage
Before you begin assembling the auger structure, you need to prepare a working tool . This list includes:
In addition, you will need a welding machine and safety glasses to reduce the risk of sparks getting into your eyes while working.
As for the pipe material, it is better to select steel elements that have increased corrosion resistance. If you take a cheap option, then after some time rust will appear on the surface.
If everything is prepared, then you can start working. To make a screw with your own hands, you must perform the following steps:
If a screw is required to work with bulk material, then the turns must be arranged continuously. Otherwise, the desired effect will not be achieved. If everything is done correctly, you will get an effective tool that will have the following positive qualities:
But all these characteristics can be obtained only if you strictly follow the installation instructions. Even a beginner can install some homemade devices.
Some tips
Some recommendations will help you make a high-quality drilling device. When working, you should consider the following:
- It is necessary to correctly calculate the diameter of the screw. The fact is that during operation the hole will differ slightly from the size of the cutting part. For example, a 200 ml element will provide a well of 240-250 ml.
- You can replace the grinder discs with regular sheet steel, the thickness of which will be about 2 mm. But it will have to be further bent and sharpened to give it the ideal shape.
- When working with the disk, you must follow safety precautions. It should be carefully and securely secured in a special vice, and cut only with safety glasses.
- To calculate the auger feather, you can use the special program “Compass-3 D”. She will do everything necessary, just enter the initial data and wait for the finished drawing. All this will significantly save time.
To extend the service life of a homemade auger, you need to clean it after each job. Remove soil from metal parts, adjust blades and sharpen them if necessary. In addition, for storage, choose rooms with low humidity.
Easy way
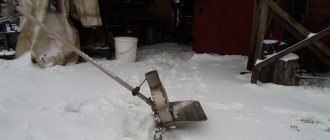
There is a very simple way to quickly assemble a homemade auger with two blades. These elements will fit perfectly into the ground. The only negative is that it can only be used at shallow depths, no more than 10 m.
The screw is manufactured using the following technology:
In this case, the drilling structure will make longer strokes, which means that working with the tool will be easier and faster. At this point the auger is ready.
Products of Russian industry
Domestic mechanisms. They have a budget price, replaceable blades are interchangeable on many models, and the knives are easy to sharpen. However, there are some drawbacks:
- the coloring of the ice auger elements is not always at the proper level;
- knives are often made of low-quality materials that can quickly become dull;
- drilling holes in ice is much more difficult than with imported mechanisms;
- blade mounting screws require constant monitoring, as they tend to get loose and get lost;
- When unfolded there is some play.
Despite all their shortcomings and shortcomings, domestic products are very popular, and they are purchased not out of a sense of patriotism, but because they cope with the tasks assigned to them. Our article “How to work with an ice auger and not damage its elements” is devoted to how to handle them correctly.
Complex option
This method of manufacturing a screw will allow you to assemble a high-quality and accurate device that will serve for a long time. First, calculations and drawings are made, then measurements are made. It is also worth preparing tools and suitable material in advance, and only then start assembling a homemade drill.
Step-by-step instructions for installing a screw mixer are as follows:
Actually, this is where the work is finished. All that remains is to make a handle and an extension cord. The first one can be made of plastic, it will be more convenient, but the last part can be made from any suitable pipe.
Making a screw with your own hands
In a country house, in the absence of a centralized water supply, they equip an autonomous one - a well or a well, and to drill a well, in order to save the budget, they do not rent a drilling rig, but drill with a homemade auger, which makes the process cheaper, although it makes it a little more time-consuming. You can make an auger with your own hands in one day: it is enough to have some tools and materials for this, which will be discussed, as well as the manufacture of an auger with your own hands is described in detail.
Drawing for making a screw spiral
Comments (1)
Wonderful site! I was attracted by the detailed, expertly described making of homemade devices. I myself make various devices and devices and I understand that giving such a detailed description and illustrating it well is a lot of work. Do you have any ideas for making a homemade waterjet cutting machine? This topic has been bothering me for a long time. At one time I worked on such a machine and since then I have the most enthusiastic memories of it. It is very expensive to buy, but on the other hand, the principle of its design is quite simple. We have plenty of homemade CNC machines, but I haven’t heard about a machine made by ourselves. The main problem, as I understand it, is the manufacture of an ultra-high pressure pump (4000 atm). If you're interested, we can think about it together.
Screw manufacturing procedure
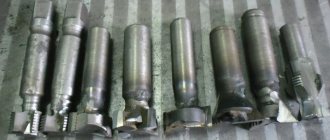
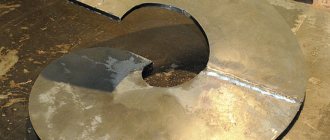
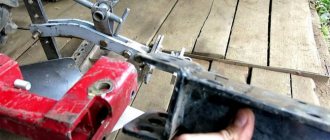
Before making a screw with your own hands, prepare the material. A 120-centimeter piece of pipe is taken as the body, the ends of which are cut evenly with a grinder. Next, you need to cut a square with sides 200 x 200 mm from sheet steel, drill Ø 40 mm in the center of the square and make a slot with a grinder from the center in any direction to the edge. This will be one turn of the conveyor spiral, of which several will need to be made. To make it round, the square is cut by welding or a grinder to the shape of a circle with Ø180 mm, the spiral is bent so that the pitch between the turns of the spiral is within 80-100 mm.
Schematic diagram of the auger interturn feather
You should end up with a circle, the beginning and end of which do not coincide in the plane. This part will serve as a template: you will need to attach it to a sheet of steel, outline the outline with a pencil and cut out the next circle. It is better to paint these blanks immediately to protect them from corrosion, and after assembling the structure, paint them again.
With a pitch between spirals of 100 mm, 12 spirals (feathers) must be cut for each auger segment. The rings are secured to the auger axis by welding, and to each other too. After welding, the seams are hammered and cleaned of scale with a rasp.
A profile pipe is needed to make the auger mounting system. The pipe is left open at the top to allow water to flow into it. To produce an auger, water is simply not poured under the grain. The profile pipe is inserted 2/3 into the round one and welded, and the gaps between the pipes are closed with pieces of sheet steel. In a square pipe, step 2 cm away from the top and drill a through hole Ø 10 mm.
Auger drawing
The manufacture of the receiver, which is located on the back side of the auger, involves welding four steel sections that follow the contours of the profile pipe. Departing 2 cm from the lower end, a through hole Ø 10 mm is also drilled, through which the entire structure is fixed using a bolted connection. It is better not to use a threaded connection so that when the screw rotates in reverse, the structure does not become disconnected.
Polymer sand tiles
VIDEO ON THE TOPIC: Business in waste processing and production of polymer sand products
Equipment for the production of flexible bitumen tiles is fully automated and therefore expensive. For a novice businessman, it is preferable to manufacture polymer sand tiles - the initial costs and production costs are much lower. Plastic waste is used as raw materials: bottles and packaging, household appliances and building materials that have become unusable.
Deep sorting and cleaning when preparing raw materials is not required; the only condition is that the ratio of hard and soft polymers should be 50-60/40-50. Moisture evaporates during the production process, food waste and paper burn.
To make tiles from plastic bottles and other similar waste, a lot of dry sand with a fraction of up to 3 mm without clay impurities is required. Production premises must have electricity, good ventilation, and water. Tables and conveyors.
Equipment for the production of polymer sand tiles:
VIDEO ON THE TOPIC: Line of equipment for the production of polymer sand tiles
- polymer crusher – from 90,000 rubles;
- chamber for drying sand – 175,000 rubles;
- thermal screw mixing heating and melting machine – 200,000 rubles;
- electronic balance;
- two-way molding unit – 140,000 rubles;
- racks.
Sand moisture content should not exceed 5%. The crushed polymer, sand and dye are mixed in the heating-melting machine. The mixture is weighed while still hot, placed in a mold and exposed to a press for 4-10 minutes, then placed on a rack until it cools.
In terms of performance characteristics, plastic tiles are practically not inferior to materials made from bitumen, but are cheaper.
Manufacturing of screws: technology and equipment
The operation of various mechanical devices is based on the use of a screw. A similar part is represented by a screw, which is characterized by a certain shape. An example is the installation of a screw in conveyors designed to move various bulk materials. This design has become very widespread and is represented by a combination of a wide variety of components.
General information about the device and areas of application
When considering a screw, it should be taken into account that it is a type of screw, which is characterized by an increased area of turns. The features of such a detail are the following:
Despite the rather complex shape, to reduce the cost of the product, it is made by hand. A home-made version will be able to withstand long-term operation, however, errors made during calculations and manufacturing of the part can cause the screw to be completely unsuitable for use.
Products of foreign colleagues
Imported ice axes can easily bite into any ice, are made of good materials, are of good build quality, and have less weight. Among the leaders of the domestic market are the Swedes and Finns. Swedish products have a different direction of rotation - clockwise, which you have to get used to.
What disadvantages are noted when operating in Russia:
Which is better: heated floors or radiators?
Warm floorBatteries
- significant cost of the product;
- sharpening blades is quite problematic, and sometimes impossible;
- walking on ice with sandy patches, the edges quickly become dull;
- the price of foreign knives is sometimes comparable to the cost of a domestic ice drill.
Swedish Mora are distributed throughout the world. The company produces 26 models, which differ in diameter, color, height of the screw part, dimensions, and folding system. The knives are hemispherical with complex arched blades.
Preparatory stage
Most often, the part is used as the main element of a screw conveyor. In addition, it is possible to use the part for drilling wells. The manufacture of screws should begin from the preparatory stage. Its features are as follows:
The correct shape of the finished product depends on the correctness of the preparatory stage. That is why it is necessary to create a blank from cardboard, after which it is applied to the main part and the main parameters are checked. The screw can be made from a variety of materials; if you choose durable steel, you can count on a long service life.
Usage
The advantages of using screws in production are the maximum simplicity of the devices and the controlled, uniform supply of bulk, small-piece or liquid cargo.
Construction is impossible without the help of an auger. Devices based on it will help mix concrete, move cement or sand from place to place. The first use of augers on construction sites began in the sixteenth century.
Screw conveyors or screw conveyors are widely used in the field of agriculture due to their closed design and compact size. Almost all combines currently produced in Russia are equipped with augers.
But in drilling, augers have not gained much popularity, because their use is only possible if the surface for drilling is soft, but not clay, since clay sticks to the auger, plus the depth when drilling augers is very limited. But if these parameters are met, then the auger screws do their job quite well.
Examples of the use of augers in the food industry: transportation of food products in workshops (meat, flour, sugar, cereals). Even pharmaceuticals are not possible without screws; with their help, it is possible to carry out hermetically sealed transportation of raw materials for medicinal products.
Making a screw
The applied screw manufacturing technology allows us to obtain a high-quality and precise part that will last for a long period. At the same time, a screw can be made from a variety of materials, which are characterized by certain properties. The production technology is represented by the following steps:
Both ends of the shaft are created in such a way that bearings can be installed. They must be designed to withstand a sufficiently large load. Do not forget that a drive is also required that will transmit rotation from the engine to the executive body. Augers can be of various lengths and geometric shapes, it all depends on the purpose of the device and the area of application.
Instructions for replacing belts
When a belt fails, you should use these instructions for replacing it:
- First, decide which belt you are going to replace.
- Remove the cover covering the belts. It is located in front of the engine, under it you will find nuts. Usually there are six such nuts.
- Unscrew the nuts. If the drive cable prevents you from doing this, loosen it
- So, you got to the belts, remove the damaged parts.
- After installing new belts, you need to spend some time tensioning them. Find the optimal distance at which they will be well tensioned.
- Screw the nuts back and return the cover to its original position.
- The auger gears are available in 20- and 24-tooth types.
For more information about replacing belts on a snow blower, watch the video:
Calculation of the feather of a screw conveyor or auger
The most important parameter is the size and geometric parameters of the auger feather. Special programs are used to determine properties. An example is KOMPAS-3D. This program also includes a package that allows you to automatically perform calculations when you enter the following information:
As a result of automatic calculations, you can obtain a detailed drawing on which the main parameters are indicated. In addition, the usual formulas can be used to determine the main parameters.
How to make a screw with your own hands at home
You can make an auger with your own hands at home if you have a small number of common tools. In this case, the screw made can last for a long period. The main recommendations for performing the work include the following points:
Today, plastic versions have become quite widespread. Their production is possible by designing the product in a special program, after which printing is carried out on a 3D printer. This option is characterized by increased accuracy, but can be used to transmit small forces.
Homemade drilling devices
We also manufacture an auger in cases where a drilling rig is needed. The work carried out is characterized by the following features:
All elements of the product in question are welded with a welding machine. In this case, attention should be paid to the quality of the seam, since even minor defects reduce the strength of the connection.
Materials used fixtures and tools
To carry out DIY work on making a drill auger, certain materials and tools are required. In this case, you can make not only turns for the auger with your own hands, but also many other elements. To work you need the following:
To make a spiral for augers, it is recommended to choose steel with increased corrosion resistance, since rust may appear on the surface with use over time. Some tools for making an auger are in a regular mechanic's kit.
Source
What are they made from?
Self-tapping screws in construction are used in assembling frames of house walls, rafter systems, floor and ceiling padding, and cladding of enclosing structures.
That is, the load on such fasteners during the operation of the house is significant. Therefore, the material for the production of such elements must be very durable and also quite flexible. You may be interested in: Vacuum lift: characteristics and operating principle
In modern enterprises, screws are made, of course, from steel. At the same time, the production of such elements usually uses chemically and thermally treated material of this type ST 10 KP or ST 08 KP. This steel has fairly high surface hardness and ductility. Its only drawback is its increased susceptibility to aging.
A wire is pre-made from steel ST 10 KP or ST 08 KP, the diameter of which corresponds to the diameter of the stem of future self-tapping screws. Next, such material is wound into coils and sent to factories specializing in the production of construction fasteners.