Homemade 4x4 ATV with an engine from an Oka car: photo and detailed description of the manufacture of the ATV.
In previous articles, we have already considered several options for manufacturing rear-wheel drive ATVs, now let’s take a look at the all-wheel drive design. 4x4 all-wheel drive significantly increases the capabilities of the ATV; in fact, it is already a full-fledged all-terrain vehicle for off-road use.
The author of this homemade technique is Sergey Pletnev. Let's take a closer look at the design of the homemade product.
Homemade ATVs full description photo video
28 873
Dear visitors to the site “Visiting Samodelkin”, from the material presented by the author you will learn how you can independently assemble a full-fledged ATV with a 4x4 wheel arrangement with your own hands. IN
Read more
34 742
This all-terrain vehicle was assembled purely for entertainment purposes, so the author focused on industrial ATVs and assembling his car. However, there are a number of design differences that
Read more
22 201
An excellent option for a pneumatic ATV with an engine capacity of 150 cm3. The axles of this all-terrain vehicle are made on a balancer suspension. When making this all-terrain vehicle, the author wanted to achieve excellent quality, not
Read more
78 217
We present to you a 4x4 ATV model with all-wheel drive, which is designed to conquer off-road spaces. This model was constructed by assembling various components, assemblies and parts
Read more
DIY 4x4 ATV (38 photo description)
A homemade ATV with 4x4 all-wheel drive assembled by Alexey Brazgin: below are detailed photos and a description of the assembly of the ATV.
.
To make the homemade product, the author used the engine and gearbox from the OKA car, the master also took springs from it for the suspension, satellites from NIVA 214, suspension elements from the nine, the frame was welded from professional pipe with sections of 20x25 and 20x25 mm.
Alexey welded the suspension arms from a round metal pipe with a diameter of 20 mm. The wheels are radius -15, ball rims are from the classics, Forward Safari tires are 540. Two seals are also welded for the front and rear of the car, the fuel tank is made of stainless steel with a capacity of approximately 18 liters.
- 1. engine and gearbox from an OKA car.
- 2. gearbox and ball joints VAZ classic.
- 3. VAZ 2109 suspension elements.
- 4. R-15 wheels.
- 5. tires “Forward Safari -540”.
- 6. wiring from the scooter.
- 7. professional pipe with sections 20x40, 20x25 mm.
- 8. round pipe radius 20 mm.
- 9. Epoxy resin and fiberglass for making the body.
- 10. bolts, nuts, washers, etc.
So, let's look at the entire process of assembling an ATV.
The heart of the iron horse is the engine from an old OKI.
The frame is welded from a square pipe with a section of 20x25 and 20x25 mm.
Gearbox from a VAZ classic with grenades from a nine.
The suspension arms are homemade, welded from a 20 mm round pipe, 24 silent blocks are installed.
Rear springs from OKI and VAZ classic shock absorbers.
Steering.
Transmission of torque from the gearbox to the gearboxes.
tires "Forward Safari 540"
Next came the work of making a fiberglass body impregnated with epoxy resin.
Primer and painting of frame and cladding.
Let's watch a video showing a homemade ATV in action:
Further assembly
Side steps are welded to the frame, a front axle is installed, a cardan from the gearbox is connected to the front axle, and front shock absorbers are installed. Front axle shafts are connected to the hubs and axle
The brake system is installed separately for the rear wheels
Steering and braking system for front wheels installed
Off-road tires purchased (in this case the most suitable option)
The stage of creating the ATV matrix has arrived. Polyurethane foam, cardboard, resin, fiberglass, reinforcement, etc. came in handy.
The technology of using materials when creating a matrix is a very complex process that requires deep and detailed study
Light reinforcement and cardboard form the frame of the wings, as well as the front and rear parts of the cladding. Foam was poured in excess into the places where convex shapes were supposed to be made.
The dried foam was processed with a file, jackhammer, knife and other tools
An oil cooler from a helicopter was installed and the first layer of fiberglass was applied
The front suspension is completely assembled. Original ball VAZ 2109 from below. On top is a steering tip from a UAZ
Treated surface. Side view
The hubs were adjusted to the NIVA wheels using special adapters
Side view of the hub
The matrix is almost ready. Additional frame parts have been prepared for use as a trunk and a bumper at the same time.
The seat is homemade. The steering wheel is borrowed from the Minsk motorcycle. Control elements were connected to it.
Tools and materials
We will assemble a 4x4 ATV for outdoor activities, which was developed by analogy with the best factory-produced models. Judging by numerous reviews, the scheme not only works, but is also of quite high quality - often a good homemade product for your own use is significantly superior to what advertised brands offer for a lot of money.
You won't need a lot of materials, but you need to be sure that you have everything you need. If you do not make sure of this in advance, you may not be able to find the last part, and because of this the ATV will not be assembled.
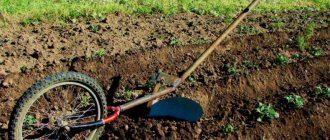
- Pipes. This material will act as the basis for the frame. Ordinary water pipes are suitable, but, naturally, we are talking about metal products. You will need two different diameters - 27 and 32 mm. There is no need to indicate the exact length - it all depends on your skills in working with metal, and a beginner will probably need much more than the minimum.
- Details from Oka. The “heart” of the new vehicle will be the engine from the Oka 11113 model. A gearbox is also needed from this car model. The instrument panel, taking into account the origin of all other main components of the unit, is also taken from Oka.
- Details from VAZ. Borrowings from the car are not limited to Oka alone - thanks to this, the amount of work will be significantly reduced. From the classic “nine” you need to take front and rear gearboxes, as well as grenades and hubs. Thanks to the distribution of this car in Russia, even today there will be no problems finding such parts.
- Wheels. You can take it from anything, but the recommended radius is 15. As a good example, they often take wheels from a Chevrolet Niva - respectively, two front and two rear.
- Front and rear wheel transmissions.
- 20 liter canister. In the design of a homemade all-terrain vehicle, it is used as a fuel tank.
- Fiberglass. This material is necessary for the manufacture of the frame - thanks to its presence, the finished all-terrain vehicle will not differ significantly from the factory product in its appearance.
- Muffler. Used optionally, not required.
The toolkit for making a homemade quad looks much broader, since it is designed to provide comprehensive processing of the materials described above. From what you will definitely need, we highlight the following:
- welding;
- grinder for cutting pipes;
- drill;
- hammer;
- roulette;
- wrenches of different sizes;
- calipers;
- knife.
Armed with everything you need, you can proceed directly to constructing a homemade vehicle.
Frame
Special attention should be paid to creating the body of an ATV. This is one of the most difficult stages. Fans of homemade vehicles usually make such a component from fiberglass or fiberglass. Fiberglass is used even more actively, especially for body kits.
The next step is to apply several layers of fiberglass. Each one in turn is coated with epoxy resin. To make the body of the all-terrain vehicle stronger, metal fasteners are inserted between the layers of fiberglass. The finished product needs to be thoroughly dried, and then sanded and painted.
Having familiarized yourself with the main stages of work, you can consider the process of creating an ATV based on various equipment in more detail and depth.
This is what good-quality drawings of vehicles made from Ural look like. The ground clearance of the device is 0.28 m. The distance between the centers of the wheel rims is 1.25 m. The total length (the distance between the extreme front and extreme rear points) is 1.85 m.
Craftsmen can also make a homemade device from Niva or Oka. The engine, cooling system, and transmission are taken from the “donor” car. The same goes for most parts. But the frame, alas, will need to be modified. Round pipes are taken and the base for the front and rear cargo boxes is welded from them.
Additionally, eyelets are installed where the levers and shock-absorbing devices will be attached. The brackets, as already mentioned, will have to be mounted directly while working with specific components. The power plant, gearbox and clutch basket are slightly shifted relative to the longitudinal axis of symmetry (to the left). Otherwise, the horizontal angles of the longitudinal shafts on the transmission will be very large.
Watch about copters: My first takeoff. First steps across the sky. — Parkflyer
The transmission is assembled from parts of domestic cars. A good option would be to create an ATV from “Ant”. The rear gearbox is taken from a scooter. The front axle can be taken from the “nine”. The frame is made of steel pipes. Sheet iron is used for upholstery. The front axle is shortened and connected to the rear axle.
Important: additional modifications will be required. Inter-wheel gearboxes are usually taken from classic VAZ cars. But instead of “stockings” and axle shafts, they use parts from front-wheel drive mechanisms. Typically, such a system uses wheels from a Niva car with a diameter of 15 inches.
An ATV with an engine capacity of 50 cubic meters can be made from a scooter (and from a moped too). The front suspension and control arms are made independently. Steering knuckles are taken from any children's ATV. Housing bearings are used to install the rear axle with a star. The engine with the CVT remains the same as that installed at the factory; The wheels should be taken from a walk-behind tractor.
But the most exotic solution, of course, is an ATV made from a chainsaw. Important: the original device must have a power of at least 6 liters. With. It is advisable to choose copies with a fully functional motor. If there are deformations, the problematic parts should be replaced. The supporting frame is made of steel pipes and a plate on which there should be no rust.
The transmission of forces occurs using a chain and a star. A metal tensioner is also needed. The remote gas tank is placed a couple of centimeters above the engine. The use of disc brakes is recommended. Parts can be taken from an unnecessary moped.
End of work
Completed work.
The panel was borrowed from the OKA car.
An ATV is an all-wheel drive vehicle and a motorcycle, an endurocross bike, in one package. The features of this type of transport are compactness, tires with deep treads for better off-road traction, 1-2 seats and no roof over your head. This type of transport first appeared in Japan in the 1970s and won the hearts of many off-road romantics. Such transport will be of interest to hunters, fishermen, and those who like to conquer impassable terrain. Many of us dream of such a toy for adults. We will tell you how you can make your dreams come true with your own hands.
Choosing an ATV engine
The most important part for your all-terrain vehicle will be the power unit. Motorcycle engines are most often used (they are economical and small in size). Let's say, an engine from Ural or Minsk, IZH Planet or IZH Jupiter will do. You can adapt an engine from a VAZ or Oka to your ATV. To avoid engine overheating in hot weather, you need to choose a model with an air cooling system.
The most popular option is to transfer automotive forced cooling.
Modernization of an existing frame or drawings from scratch
Before any undertaking, you need an action plan and a design drawing or a finished frame. If you are comfortable with mathematical calculations, then you can calculate everything yourself. If you can’t make a drawing, you can contact a specialist or look for a design diagram that suits you on the Internet.
The easiest way is to take a finished motorcycle frame as a basis and weld all the missing parts onto it. The order of your actions is as follows: disassemble the old motorcycle. We leave only the frame. We cut off the rear part of the frame with the pendulum fork mount. We extend the frame with pipes and weld the bridge (use jibs and gussets). First turn the car axle over so that the quad can go forward and not backward (because on the Ural gearbox the direction of rotation is reversed at the output).
Remember that in case of replacement, the axle gearbox must be easily removed.
We are looking for spare parts for a car: 2 front hubs, a rear axle (so that the discs match the fasteners with the hubs), a driveshaft, front suspension arms, tie rods, a ¾-inch round water pipe.
If there is no donor motorcycle, then the frame is best made from durable alloys: pipes, profiles, spot welded together. For the load-bearing parts of the frame, you can buy water pipes (VGP 25×3.2). You must have equipment that will allow you to bend the pipes in the right place.
For the body, we prepare a frame from a 70×40 pipe. The length should be no shorter than the spring, and the width should correspond to the size of the bridge. When using jibs, do not forget about the torsional rigidity of the structure.
We connect the cardan to the box using a “Ural” rubber coupling. Through the hinge crosspiece we connect the cardan to the bridge with a flange. If the donor was IL, then the drive is carried out by the original chain.
If your quad has springs on shock absorbers, then leave the rear suspension pendulum along with the silent blocks. Weld the bridge to the fork (don't forget to reinforce the seams with wide gussets to prevent vomiting later). Instead of a cardan, use an axle shaft from an Oka or VAZ. We leave the springs and shock absorbers as is, do not touch them. When the frame structure is ready, we proceed to attach the engine to the bottom of the frame using bolts. The engine can be located at the rear or at the front (it makes no difference). The muffler can also be homemade, two-section.
Now we carefully mount the transmission on the rear wheels so that there is no play. The drive comes with the engine from an outdated motorcycle. Wheels on the quad can be installed from Niva. If you need a trunk, you can weld it from thin-walled steel pipes. The bumper can be replaced by "kanguryatniks".
Control type
In order for your all-terrain vehicle to be safe to operate, you will have to take care of the type of control. Your ATV can have 2 types of controls:
a steering wheel (we take the base from the car - tie rods) and a steering wheel from a used motorcycle (lever and shaft).
The steering shaft can be made from a pipe with a diameter of 20 mm and a wall thickness of 2.8 mm. Place a travel stop at the lower end. Thus, at the bottom the shaft rests on a thrust bearing, and in the middle it rotates in a detachable nylon bracket-sleeve.
Suspension: front and rear
Your ATV can be equipped with either rear or front suspension. For the rear suspension, the following solution is suitable:
1.
To make the design lightweight and simple, you need a gear-shaft system. In this case there is no differential.
2.
The structure will be very heavy if you use a road bridge (it has to be shortened). In this case, there is a differential that will be needed when driving.
For the front suspension, you can use the suspension from the Ural or IZh as a basis. Installing the front suspension is more time-efficient - it is faster than all-wheel drive, where you will need the help of professional turners, electricians, and welders (some modification will be required).
To attach the pendulum arms, the motorcycle frame is lengthened at the front. It must be installed so that the turning wheels do not touch the engine cylinders. Therefore, on the Ural frame, the wheels are placed further forward. To increase geometric cross-country ability, the suspension arms should be as long as possible
(you need to make these yourself). To the steering column (made from a “Ural” cardan) at the bottom we weld two steering bipods side by side: on the right and left wheels. The hubs are attached using the original ball hubs.
When installing the front strut, remember to tilt the strut. This will prevent the steering wheel from being knocked out on bumps and will help return the steering wheel to its place when turning. If there is no tilt, you can fly by inertia; returning the steering wheel to the reverse position off-road will be very problematic.
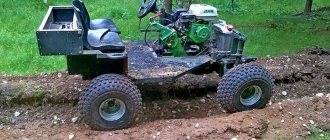
Four-wheel drive quad bike
For a four-wheel drive ATV you will need:
— drive from a mechanical transmission with a power take-off gearbox to the front wheels;
Wheel differentials;
Front-wheel steering (car-like);
Independent suspension (possibly multi-link) or dependent suspension.
If it is not possible to assemble everything yourself, they take the suspension from Oka or front-wheel drive VAZs.
We are preparing the frame from scratch for the Oka engine. In the front suspension we leave room for the front wheel drive gearbox. You can do it yourself: we cut off the “stockings” of the bridge and remove the suitable axle shafts from the VAZ from the differential. We turn the engine backwards. Now the axle shafts have become cardan shafts that drive the front and rear axles.
ATVs are becoming increasingly popular due to their lightness, maneuverability, high cross-country ability and at the same time compactness. Indeed, an ATV is something between an all-terrain vehicle and a motorcycle. Just like an all-terrain vehicle, it has high cross-country ability; it can be used for traveling over rough terrain, off-road, in the mountains or forest, but at the same time, unlike a motorcycle, an ATV is more stable.
Step by step instructions
To make an ATV from a walk-behind tractor, you do not need to significantly alter the equipment. The process itself includes the following steps:
- The wheelbase is expanding. Since the disks of the walk-behind tractor are located directly under the walk-behind tractor, they are moved apart. The inserts are turned on a machine, and if there is none, then they simply purchase suitable adapters that serve to expand this base.
- The frame is being installed. It must be strong and reliable. Usually a ready-made motorcycle frame is used, but with certain skills you can weld pipe cuttings together. A significant load will be placed on this part, since it is on it that the engine and all the main components are mounted. The frame is connected to the entire unit using two special pins and a swivel joint.
- Wheels are installed, the size of which varies, depending on the purpose of the motorized device. The first step is to select the disks. It is better to use automobile ones, under low-profile tires, so that the camera fits tightly to them. To maintain integrity and longer service life, it is recommended to place a durable but soft cloth between the disc and the camera.
Instead of tires, you can use tubes from heavy-duty vehicles, which will increase stability and traction area. Their use will also help increase the depreciation of equipment. But they are thin and do not have a margin of safety, so such wheels will be easily damaged by thorns, twigs and sharp objects.
This is how a walk-behind tractor can be easily and simply transformed into a unit that can quickly and maneuverably move across fields, hills, steep ravines and other places where there is no asphalt road surface.
A self-assembled ATV is no worse in functionality and characteristics than factory devices. The main thing is that you know its strengths and weaknesses, and the unit made with love will last a long time and without any problems. You just need to carry out maintenance on time and monitor the condition of all systems.
DIY ATV frame drawings
The false tank has a complex shape. It was not possible to bend it out of hardboard. Therefore, having wrapped the engine with plastic film, I began to fill the space intended for it with layers of polyurethane foam. After each layer, drying is mandatory, otherwise the thick volume of foam may not dry out inside.
Filled until the layers went beyond the contour. Finally, after the foam had completely dried, I began to draw out the desired shape with a knife. I smoothed the edges with coarse sandpaper. A part of the Oka dashboard was used under the instrument panel. I secured it to the blank also using polyurethane foam.
Since the foam is large-porous, the pores were filled with gypsum and then processed. When the shape of the blank began to correspond to the intended design and its surface became more or less smooth, I coated the blank with PF-115 paint. Since I was not going to make a matrix for gluing the body kit on the block, but immediately glued the body kit on it, followed by finishing the surface to an ideal state, putting plaster and painting the block could be neglected.
See about copters: Walkera V450D03 – buy a radio-controlled helicopter, price comparison of online stores: photos, characteristics, description | E-Katalog
So, the blockhead is ready and to glue a high-quality product, it was required: 10 kg of epoxy resin, 1 kg of plasticizer for it and 1 kg of hardener, 15 linear meters of thin fiberglass fabric, 5 m of glass mat, brushes, gloves. It is highly advisable to wear breathing protection.
And the more expensive they are, the more reliable they are. But, as you know, you can’t buy experience, so I gained it in the process of work. I used transparent tape as a separating layer between the block and the product. The whole idiot covered it with stripes carefully, without any omissions.
It took only 1.5 rolls of wide tape. I diluted the resin in 200 - 300 grams with a hardener and plasticizer. I used measuring cups and syringes, which is not very convenient. Before this, I cut strips of fiberglass in such sizes that large canvases would lie on flat surfaces, and on uneven surfaces, pieces of fabric could repeat them without making folds.
By the way, the fiberglass stretches moderately along the diagonal of the weaves, “flowing around” the desired shape. First, I thickly coated one section of the block with epoxy resin, placed the fiberglass on it and impregnated it with resin on top again. The adjacent piece of fabric was glued using the same technology with an overlap of 3 - 5 cm.
I had to work quickly - the resin sets quite quickly, and the higher its temperature, the faster. Yes, I also heated the resin a little near a powerful lighting lamp for better fluidity. After gluing the blockhead with fiberglass in one layer, I began to cover it with glass mat.
The fiberglass mat I got was quite thick, and it turned out to be good for gaining the thickness of the product. But it does not hug uneven surfaces, so I used it only on flat (or slightly sloping) surfaces and without overlap. Impregnation with resin was carried out in the same way as when working with fiberglass.
Just keep in mind that it takes a lot of resin to impregnate glass mat, so you need to dilute it more. After gluing the glass mat, uneven surfaces were glued in several layers with cloth. Each subsequent layer was applied after the previous one had set a little, so that the resin would not leak.
And since the process of gluing the body kit took more than one day, after a day of break it was necessary to “roughen” the surface with coarse sandpaper and degrease it - after all, the resin cures completely during this time. The final layers on top of the mat were again covered with fiberglass, and not even just one layer.
Since I needed the surface, as they say, the smoother the better, and I didn’t have enough experience, dips and holes still remained - I filled them with resin alone, and with pieces of fiberglass applied there. There wasn't enough resin. I already bought more at the hardware store, in boxes.
I liked working with it more because it was already packaged, and all I had to do was mix the ingredients. And it dried faster than the one purchased from the company. After the glued body kit had completely dried, I made cuts in it, dividing the product into three parts: rear fenders and rear, false tank with seat, front fenders and front end.
Carefully, slightly prying and pulling with his hands while picking, he separated the product in parts without much effort from the block. Now, having removed the parts, he began to process them separately, bringing them to the desired result. In general, ordinary preparatory and painting work using “all” technology: first, rough grinding with the removal of large bulges of resin and fiberglass; then painstakingly filling the recesses with putty and fiberglass; then grinding the outer surface and priming with a plasticizer.
Finally, metallic painting and varnishing with a plasticizer. The blockhead was also carefully cut off and placed in the far corner, just in case. The body kit was attached to specially made and welded “in place” mounts on the frame. Finally, I welded the front and rear luggage racks from thin-walled steel pipes with an outer diameter of 20 mm, and in addition to them, “kangaroo bars” that replaced the bumpers.
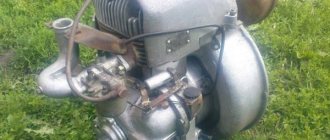
Scooter with a chainsaw motor
A chainsaw motor can also be installed on a homemade scooter. The engine needs to be prepared: the saw bar and chain must be removed. Other constituent parts remain untouched. The preserved motor housing makes it easier to attach it to the scooter platform.
Chainsaw crafts can be very different. They are assistants in the household and help maintain the budget. However, to create a safe device you need to have certain skills and knowledge. Therefore, it is important that homemade products are made by truly skilled craftsmen.
Dear visitors to the site “Visiting Samodelkin”, from the material presented by the author you will learn how you can independently make a three-wheeled mini-bike with an engine from a Ural chainsaw with a minimum of funds, so let’s go)
This three-wheeled mini-bike is the brainchild of one very good man and his name is Gainetdin Bulatov from the city of Pyt-Yakh, or simply Gennady. The author made the three-wheeler especially for his beloved grandchildren; Gennady has three of them)
The heart of the mini-bike is the engine from the Ural chainsaw; according to the author, it was lying abandoned in the garage because he uses modern saws. This engine is well suited for a mini-moped and has enough power to push a child around.
The frame is welded from a half-inch water pipe, the wheels are from a garden wheelbarrow, the axles are from the same, the small drive sprocket is from a D-6, the large driven sprocket is from a bicycle, the chain is also a bicycle chain. The throttle and brake cables are mounted on the bicycle handlebars. The rear axle is mounted through bearings at three points and is driven by transmitting torque from the engine through a chain drive from a small to a large sprocket.
The wings are also homemade and made of metal from an iron barrel. There is a small glove compartment under the seat where you can store and transport wrenches and a chainsaw starter.
So, let's look at what exactly the author needed to assemble a three-wheeled mini-bike?
1. engine from a Ural chainsaw 2. wheels from a garden wheelbarrow 3. bearings 3 pcs 4. sprocket from D-6 5. bicycle chain 6. half-inch pipe 7. cable 2 pcs 8. bicycle handlebar 9. rear axle for 2 wheels 10. paint 11. large bicycle sprocket 12. foam rubber 13. leatherette 14. plywood (for seat) 15. bolts, nuts, washers, engravers
1. welding machine 2. grinder (angle grinder) 3. drill 4. set of wrenches 5. screwdriver 6. tape measure 7. spray gun 8. marker 9. hammer 10. corner
Step-by-step process of assembling a mini-bike with an engine from a Ural chainsaw with your own hands.
As mentioned above, Gainetdin created this mini-bike for his grandchildren in order to instill in them a love of motorcycles from a young age. A three-wheeled moped is very convenient in terms of stability, just like a bicycle in principle, and the child quickly gets used to riding such a bike.
See about copters: How to make a quad bike with your own hands
To start the assembly, the author purchased 3 wheels from a garden wheelbarrow at a reasonable price.
The creator of the three-wheeled mini-bike is Gainetdin Bulatov from the city of Pyt-Yakh.
Assembly Features
The main advantage of an Oka ATV is its power. A two-cylinder liquid-cooled engine may be too small for an Oka as a car, but for an ATV it is enough.
First you need to prepare the frame for the ATV. It is usually welded. In order to do this you will need:
- Upper and lower spars (they are usually made of two round pipes with a diameter of 25 millimeters and a thickness of 3.2);
- Auxiliary spars (for example, for struts);
- Bent side members for the upper and lower planes.
- Mounts for levers and shock absorbers.
And a number of small parts for installing various components. But at this stage, the search for an answer to the question of how to make an ATV from oka is just beginning. The next thing to take care of is the transmission. It will be quite unique, since despite the fact that an all-wheel drive engine is used, there is no gearbox in this case.
Assembly
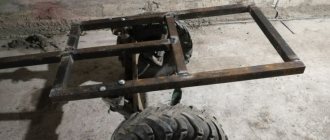
You should start making an all-terrain vehicle with your own hands by creating a frame. It is brewed from a water pipe with a diameter of 32 mm. The middle part of the frame is made a little wider in order to freely accommodate the main mechanisms of the future vehicle; in front and behind it is made a little narrower so that it fits freely between the wheels without increasing the width of the all-terrain vehicle.
There is nowhere to borrow a pendant, so you will also have to cook it yourself. To make it, they use the thinner pipe - 27 mm.
The finished part looks like an A-arm that attaches to a previously welded frame.
Next is work on the engine. If you have provided everything correctly, it can practically be laid on the middle part of the frame, and so that it does not significantly protrude beyond its sides on the sides. The gearbox is immediately connected to the engine.
The gear ratio of both gearboxes is 43 to 11. Both the front and rear, being taken from the VAZ, are already suitable for the CV joint (“grenade”) from the same. A caliper with disc brakes from the same car is installed on top of the hinge. An elevator is installed under the wheels, and the wheels themselves are installed on top of it.
The next step is installing the clutch. Its installation is the most controversial point in the entire assembly scheme of an ATV based on the Oka, because it is not always obvious where exactly to place the controls. In most ATVs, like motorcycles, the clutch involves steering - the control is located on the handle.
However, the concept discussed in this drawing involves a completely different approach - the clutch is placed under the left foot. For a person who has extensive experience in driving factory ATVs, such an innovation may seem wild and require lengthy retraining, but a beginner will quickly master the technology.
Numerous reviews on the Internet regarding this popular assembly scheme speak in favor of this engineering solution.
Mechanics note that the designated design solution allows you to change gears while driving without much effort, and the quad itself is able to move away in any gear without being too picky. With an Oka engine, an all-terrain vehicle of this design is capable of carrying even two passengers, while off-road you should only use first and second gears as lower ones, but for the highway, third and fourth gears are much more practical.
As the structure develops, all other parts listed in the list above are gradually welded and attached. When all the insides of the unit are ready and look approximately the same as in the photographs presented, you can gradually move on to external work - working on the frame so that it looks no worse than store-bought counterparts.
The last step before this is usually the installation of the seat, steering wheel and instrument panel. A small hole under the instrument panel with a built-in fan is used as a radiator. Please note that when driving through heavy mud, the radiator may periodically become clogged, which has a bad effect on the ability of the components to cool on their own.
When all the filling is assembled and put in order, we proceed to the actual installation of the body. First, we carefully sand the frame and level it so that it can be covered with external materials. Secondly, we cut the fiberglass into pieces so that they completely hide the “inner world” of the “iron horse”.
After this, the fragments of fiberglass, intended to become the body of our all-terrain vehicle, are generously impregnated with epoxy resin. We cover the frame with these fragments, press them tightly against each other and wait until the epoxy resin sets and forms a complete body of the new all-terrain vehicle.
Completing the build
The corresponding attachments, controls, and gas tank are installed on the frame. All elements are firmly fixed to the frame. The battery needs to be changed, buy the appropriate battery that is suitable for the ATV. Traveling in nature far from home is very important, since without high-quality power to the electrical system, the vehicle will not be able to move.
When all the components and mechanisms are installed, you need to trim the body with metal or plastic parts. The first option is preferable. They will be able to protect all components from damage, since the body of the ATV is often subject to impacts. The surface of the body is primed and painted. You can decorate it with stickers of standard or original designs. If necessary, you can print any image.
At the last stage, headlights, rear-view mirrors, trunk and other additional structural components are installed. After completion of the work, the functionality of the system is checked and modifications are made if necessary.
A homemade ATV is assembled not only from the Oka: read how you make your own ATV from the Ural, Ant, Dnepr, from a walk-behind tractor and a scooter.