Snowplows are presented in different modifications, with different technical and operational characteristics. However, it is not necessary to buy a snow blower from the manufacturer. It is possible to turn another garden tool into an effective snow blower. This could be a trimmer. This is a tool, powered by electricity or gasoline, needed to mow grass. Some brush cutters can be converted into a snow blower. If you are interested in this modification option, then be sure to read our article.
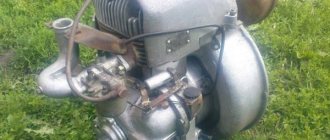
snow blower
A snow blower is a machine that scoops up snow and throws it to the sides.
It works on screw and rotary principles. Screw mechanisms carry out a 1-stage intake of snow mass. The device is located in the front part of the unit, covered with a lid on the sides and top. In the process of rotating around its own axis, the auger captures, grinds snow and ice, crushes them into small fractions, transfers them inside the equipment to the throwing shovel, then to the outlet pipe. For freshly fallen snow, mechanisms with a smooth edge are suitable, for stale snow - with a serrated edge.
In a rotary type unit, the snow cover is cleared by a rotor. The nozzle is attached to the drive shaft and works like a vacuum cleaner. The blades protrude forward, making it much easier to grip snow. In a homemade snow blower from a trimmer, they are made of high-quality metal or durable plastic. The rotor creates increased centrifugal force. Snow is thrown away, passing through the pipe, at a distance of up to 12 m.
Both electric and fuel motors are suitable for snow blowers.
If the operating range of the mechanism is within the house, install an electric motor from the trimmer, taking into account the waterproofing of the unit. When carrying out work in summer cottages, it is better to install a low-power gasoline engine.
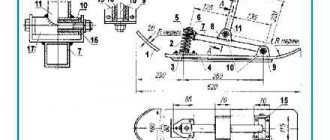
At the preparatory stage for a do-it-yourself snow blower from a trimmer, drawings of parts and assemblies are developed according to a well-thought-out plan, technology and based on the availability of material and equipment. For assembly, use the diagram of a lawn mower.
Necessary equipment for making a homemade machine:
- Petrol trimmer with straight rod and gearbox.
- Steel sheet 1.5 mm thick or metal barrel.
- Milling cutter with teeth.
- Set of tools:
- drill;
- drill;
- spanners.
- Bulgarian.
- Welding machine.
First they make the rotor:
- 4 rectangles 25x10 cm are cut out of a sheet of steel.
- One of the corners of the long side of the part is turned into a blade shape.
The deflector is made from metal strips 30x15 cm, bent, sides 10 cm high are welded. For the blade, take a blank 30x40 cm, bend the edges to a height of 2 cm.
In order to make a snow blower with your own hands from a trimmer, perform the following algorithm of actions:
- the bottom of the barrel is 15 cm, cut in a circle;
- at the bottom of the structure, a hole is drilled for the gearbox protrusion and 3 additional ones are drilled for attaching the shield;
- on the side they make a square with a side of 10 cm for unloading the snow mass;
- 1/3 of the front part of the structure is covered with a metal sheet so that the square hole is located in the center of the damper;
- the finished rotor blades are welded in a cross pattern to the gas trimmer disk;
- a deflector is installed to the unit body at the point of snow emission and welded;
- a spatula is attached from below;
- install the gearbox, securing it with bolts;
- insert the rotor.
During work they use a welding machine. Welding on thin metal is a complex technological process that only a professional can handle. Therefore, it is better to use the services of an experienced welder when manufacturing some parts.
Types of snow blowers for home
There are many variations of snow removal structures for a country house or dacha. Regardless of appearance and size, they are all divided into several types. By engine type:
- Electrical;
- Gasoline.
Snow blower for home
By design option:
- Screw machines (divided into single-stage and two-stage);
- Rotary machines.
Electrical
The choice of power plant for the winter assistant is influenced by:
- The amount of snow that typically falls in a region;
- The area of the territory to be cleaned;
- Availability of an old engine of the required type and components for it.
The electric snow blower is compact, but it cannot be overloaded with work. Its power is enough to tidy up a small yard or paths near the dacha and garden. In addition, the electrical homemade product will be tied to the living space due to the sockets.
Among the advantages of such a motor:
- Silence;
- Low maintenance;
- No gasoline costs;
- Environmentally friendly.
Important! Such units require special components. For example, a cable that is not afraid of sub-zero temperatures, waterproofing materials to protect the motor from snow and moisture
Gasoline
A gasoline engine is more expensive to maintain. It needs high-quality fuel and oil, and the engine will need to be constantly maintained. A DIY snow blower with an internal combustion engine makes loud noises during operation and emits large quantities of exhaust gases. Among its advantages:
- This design is powerful and can handle a large amount of work in a short time;
- Mobility. The snow blower will work even far from living quarters or a garage.
- No power cord getting in the way, etc.
Gasoline snow blowers
Screw
Regardless of the type of motor, the design of the unit can be either auger or rotary. The summer resident himself decides which one to choose.
Interesting! The auger snow blower device is based on a working element such as an auger (an axis on which screw blades or conveyors are located). This part resembles a corkscrew or a screw spare part for a regular meat grinder. The auger is located directly in the bucket, which scoops up the snow. The element performs two functions. The first is that the blades break the snow into small particles. The second is that they mix the snow mass into a pipe, from which it subsequently flies out to the side.
As soon as the engine starts working, the screw blades of the auger begin rotational movements. If you remember your school physics course, you can understand that knives convert rotational energy into linear energy. Thus, they push the ice or snow mass towards the pipe without much effort. Screw units are manufactured in two types:
- Single stage;
- Two-stage.
Single-stage cleaners are a simple design, the manufacture of which will not cause difficulties. The main thing here is to correctly execute the auger. It is this that is the main working element. It is located under the bucket, scoops up snow and pushes it towards the exit hole.
On a note! Two-stage blowers have two stages before sending the snow into the exit pipe. In addition to the auger located in the dump, there is another working element - the rotor. It is a rotating impeller. The snow, ground by the auger, falls into the spinning rotor blades. There it crumbles, gets accelerated and flies through the pipe away from the path that is being cleaned.
Rotary
It’s also easy to make a rotary snow blower with your own hands. Its design is based on a rotating rotor, onto which snow immediately falls. A shovel with rounded side edges is provided for feeding the snow mass. The rotor grinds the snow and throws it through the outlet in the form of a sleeve. Such a unit is sometimes made without an engine. In this case, the rotor with a shovel and a sleeve is installed on the MTZ walk-behind tractor. A mini tractor, LuAZ, etc. are also suitable as a driving force.
Rotary snow blowers for home
How to make a snow blower from a trimmer with your own hands
To work you will need the following tools:
- grinder and drill;
- metal sheets;
- steel barrel or pipe;
- welding machine;
- self-tapping screws, bolts.
The procedure for creating a homemade snow blower
- Start by creating the body. It is best to make it from a metal beer barrel, but if you don’t have one, you can use a large diameter pipe. Cut a piece 15 cm long, leave the bottom. The gearbox will be attached to it.
- You need to make a hole in the very center of the bottom of the pipe or barrel so that the trimmer's operating shaft can pass through there. Place markings in the form of three points for fastening the gearbox and drill holes for the bolts in their place.
- Make an exit (deflector). It is needed so that snow is thrown out of the snow blower. A hole with a diameter of 10 cm is cut out in the homemade body. Later you will need to weld the pipe. But before that, cut a semicircle-shaped blank from a metal sheet and weld one part of the front side of the case with it. Thus, the plug will not allow snow to scatter, but will direct it into the deflector. It should be located in the central front part of the plug.
- Make a rotor (impeller) with which snow will be collected. To do this, take a trimmer disk blade, and cut out four blades from metal, each of which has a size of 25x10 cm. These blanks are welded to the disk blade crosswise.
- Proceed to complete work on the deflector. Attach the pipe to the hole on the body, which can be made of steel. The size of the tool should be 10 cm. Attach an elbow of the same length so that the snow is thrown to the side. If the deflector is round in shape, the elbow can be taken from a plastic sewer pipe.
- Next, a shovel is made from a steel sheet measuring 30x40 cm. Sides are folded on its sides, the height of which is 2 cm. The structure should be welded to the bottom of the tool body.
- The collection of parts begins with a trimmer. The gearbox is bolted to the bottom of the homemade product, and then the wings are put on the shaft. The handle of the snow blower can be the trimmer handle itself, or you can make a more convenient design.
You need to put a snowplow from a trimmer on the frame yourself, for which a special rectangle is made. Skis or ordinary wooden runners are attached to it from below, which will allow you to push the unit through the snow.
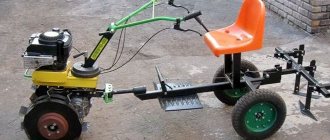
We make a motorbike
Home craftsmen managed to make a more practical vehicle out of an ordinary bicycle - they replaced it with an engine from a lawn mower. At the same time, options with both a gasoline engine and an electric motor are practically implemented.
Required tools, materials and parts
The electric motor for a bicycle is powered by a battery, which, depending on the power of the unit (it is taken 0.35-1.2 kW), lasts from 30 minutes to 2 hours.
To convert a bicycle, two- or four-stroke gasoline engines are used. The latter option consumes less fuel and is less noisy during operation. The recommended power is from 1.5 hp, and the optimal option is 2 hp. When using a motor with a lower parameter, the motorbike will barely move or will not be able to move at all.
The rotational movement from the gasoline engine to the bicycle wheel occurs through the use of a belt or chain drive. Because of this, you will additionally need to make the following details:
- a metal suspension in the form of a frame with sides to secure the motor to the bicycle frame;
- driven and driven pulleys or sprockets for attachment to the engine and wheel, respectively.
To implement the project, you will need to select a suitable gearbox. After installing the pulleys, select the belt of the desired size.
The dimensions of the frame for the engine depend on its dimensions. The suspension itself is secured to the frame of the motorbike:
- bolted connection;
- using welding.
The last option is the best in terms of strength if the welder is good. If the design of the bicycle frame allows, then the suspension is replaced with a clamp that secures the engine. This mounting option is more practical. The method of fixing the motor should be convenient, reliable and allow it to be quickly removed if necessary.
Doing all the work yourself with an old, functioning trimmer, a bicycle and a small set of tools will require time and patience from the performer.
Sequence of assembly of the structure
To independently assemble a bicycle with a gasoline engine, you will also need, in addition to the materials and parts considered, the following:
- controller;
- cable for adjusting motor operation;
- fuse;
- welded exhaust pipe;
- sleeve;
- washers;
- bolts;
- chain tensioner.
The motorbike is assembled according to the following algorithm:
- put a sprocket on the rear bicycle wheel;
- use a clamp to fix the engine (with a sprocket on the shaft) on the frame behind the seat or on the trunk, if the design features of the bicycle allow, otherwise you will need to choose another convenient place for this purpose;
- put the chain on the sprockets of the wheel and motor;
- attach the tensioner;
- adjust chain tension;
- fix the throttle;
- stretch a cable from it to the engine;
- secure the fuel tank;
- install the carburetor.
For the purpose of personal safety when operating a motorbike, the braking system is modernized, the wheel tires are replaced with non-slip products, and the integrity and stability in motion of the created structure is checked. After the entire structure is assembled, it is tested, having previously been inspected for defects.
Advantages of a homemade snow blower
For many people, it is important to understand the benefits they will get from making a functional snow blower out of a trimmer for their yard work. Still, there is an alternative solution - this is the purchase of a ready-made snow blower from src=»https://ogorodland.ru/images/wp-content/uploads/2021/10/Snegoochistitel-benzinovyy-br-t6556.jpg» class=»aligncenter» width ="900″ height="499″[/img]
There are several advantages here:
- Versatility. The modification is not aimed at a complete redesign, but at providing the trimmer with additional functionality. In winter, it will work as a snow blower, and when grass appears, it will switch to trimmer mode.
- Affordable price. Rework costs will be minimal. Large expenses are not envisaged. You can make some of the components yourself. Yes, you will have to buy something in addition. But the price is still several times less than buying a new snow blower.
- Efficiency. If you do everything correctly and use a lawn mower suitable for such purposes, the snow blower will pleasantly surprise you with its operational capabilities. But there is an important nuance.
Not all trimmers (mowers) are suitable for conversion into a snow blower.
Before proceeding with disassembly and assembly, make sure that the original unit meets certain requirements.
Results
These mechanisms have positive and negative qualities. We get a snow removal machine from existing tools, at minimal cost. The device becomes multifunctional. But there is also a minus. The equipment is not designed to work in winter, which means its parts will wear out faster.
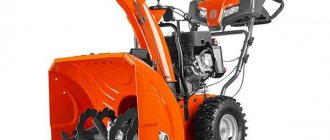
These devices are easy to remove only loose dry snow. And as you may have noticed, you will have to tinker before assembling the working unit, and some refuse the idea of assembling it with their own hands, but still plan to save money, and it is for these purposes that an article was written in which we will talk about the Husqvarna 227 snow blower, because unlike our This product costs much less than its counterparts.
For the same reasons to save money, the grass cutter from a washing machine is quite simple in design and easy to assemble with your own hands.
Choosing the right trimmer
To turn a trimmer into a snow blower, you will need the original equipment for subsequent conversion. It is a mistake to assume that any model of brush cutter is perfect for such modifications.
In fact, the trimmer must meet certain requirements in order to be able to turn it into a functional and efficient snow blower.
- Engine's type. Trimmers can be electric or gasoline. The priority choice will be gasoline lawn mowers. This is due to the fact that the electric motor does not have much power. It can only work under light load. If the permissible values are exceeded and the unit is not used for direct functions, the engine can quickly fail. The gasoline engine has more power, at which it copes with its duties perfectly.
- Barbell design. This is relevant if the snow blower is made from a manual brush cutter. The rod ensures the transmission of torque from the engine to the working moving tools. There are lawn mowers where the rod looks like a curved pipe. To transmit torque along an arc, a flexible cable is used. The engineering solution itself is interesting and effective. But only in relation to the operation of the trimmer for its intended purpose. If you need to convert the trimmer into a snow blower, then a curved rod will not work. The design simply cannot cope with the load when removing snow. So only those trimmers are used that provide direct transmission of torque from the motor to the working tools. Here it is not the cable that is responsible for the work, but the cardan shaft. And its characteristics are significantly superior to the cable.
- Wheels. Don’t give up the idea of turning a wheeled lawn mower into a full-fledged snow blower. But even here there are limitations. For conversion, a two-wheeled model is suitable, in which the rotating working elements are located in the front of the equipment. There's no way to turn a four-wheel lawn mower into a snow blower.
It is recommended to prepare drawings in advance according to which you will make a snow blower from a trimmer.
Moreover, different options are possible here. Someone takes a finished drawing and repeats everything strictly according to it, purchasing the necessary components. Others create a drawing from scratch. Or you can take a ready-made circuit, but slightly adapt it to the components that you have at your disposal. The easiest way is to take a ready-made diagram.
It is important that the drawing fully reflects the result you are striving for. Indicate each component, hole and welding location, take into account the thickness of the metal and the size of certain elements.
Which trimmer motor is suitable for assembling a snow blower?
The first and most important element for assembling a snow blower is the trimmer motor. His choice should be based on 3 factors:
- type - experienced designers do not recommend assembling snow blowers based on electric motors. These motors are vulnerable to moisture and snow, which, if seeped into the motor, can cause a short circuit. To prevent this, it is best to assemble a snowplow based on a gasoline engine from a trimmer;
- power - the higher, the more capabilities the snow blower will have. Based on a powerful power unit, you can assemble a self-propelled rotary auger snow blower with tracks - it will be able to crush wet compacted snow and clear snowdrifts where wheeled snow blowers are powerless. It is important to remember that the higher the power of the internal combustion engine, the more fuel it will need for stable operation;
- manufacturer - it is best to choose well-known manufacturers of garden equipment for assembling ICE snow blowers. Such companies include the brands Stihl, Sturm, GoodLuck, Forte, Champion and others. The main advantage of branded motors is the high quality of their factory assembly, reliability and durability.
It is important to remember that to assemble a snow blower from a trimmer device, you will need to remove not only the power unit, but also the ignition, clutch and the entire fuel system assembly. Therefore, before manufacturing the unit, you need to carefully check all these components and eliminate any malfunctions.
Cultivator
Using this attachment, you can easily cultivate small areas of land, loosening them and preparing them for further sowing. The drum design is designed in such a way that it allows you to plow the ground next to trees and all kinds of plantings without damaging them. The nozzle is suitable for digging up flower beds and hilling up root crops.
Selecting a screw or rotor and installing them
A snow blower with an auger effectively copes with heavy and wet snow and helps remove small ice. It throws the removed masses at a distance of up to three meters. The auger itself is something like a meat grinder screw. It is installed horizontally parallel to the bottom of the cylinder. The disadvantages of this design include the complexity of manufacturing and the inability to make the auger yourself. It will have to be purchased as a separate spare part for the snow blower.
Elements of an auger snow blower
A snow blower with a rotor removes snow by rotating the blades under the influence of centrifugal force caused by the trimmer. Snow dumping distance is up to six meters. But it cannot be used where ice has formed, as it can damage the mechanism. However, a rotary snow blower made from a trimmer is much simpler to manufacture and operate.
To make a snow blower from a trimmer with an auger, the casing of the machine should be made rectangular, and the deflector hole should be equipped in the rear part (the pipe will regulate the direction of mass ejection).
Diagram of a screw mechanism for a snow blower
A homemade machine will cost less than a purchased one, but you need to carefully calculate the parameters of the parts so that the device does not overheat and does not break down during operation.
How to make?
Making a snow blower from a gas trimmer with your own hands does not imply reworking the design of the mower, but only comes down to making an attachment. Let's look at an example of the simplest design of this removable element for a gasoline trimmer.
Before starting the work process, it is necessary to draw up the appropriate drawings. They must take into account the dimensions of all parts and how they are connected to each other.
The drum body is a metal cylinder whose diameter is greater than its height. The diameter and height of this “Box” determines the volume of snow that will be thrown to the side. The housing should not be too large as this may overload the trimmer motor.
The drum is made by cutting a circle of the required diameter from a sheet of metal and welding a side to it. This side can be made from the same sheet metal by cutting out a ribbon from it, the length of which is equal to the circumference of the circle. Welding is carried out in a spot way to avoid deformation of the workpieces due to the high heating temperature. After the parts are tacked by welding to one point, the side is bent along the edge of the circle, and the point fastening is repeated. The result should be some kind of round “Bowl” with a side.
Its optimal diameter is 30 cm, and the height of the side is from 5 to 8 cm.
A hole is drilled into it, which is intended for attaching the drum to the housing of the gearbox for transmitting rotation to the trimmer shaft. The diameter of the hole is several units larger than the diameter of the shaft - their contact is excluded. The drum is mounted permanently on the gearbox. To do this, elongated nuts are welded to the gear housing or mounting holes in the gear housing itself are used, if any. Holes are drilled in the bottom of the drum, located opposite the equipped fasteners on the gearbox. By aligning the holes with the mounting points on the gearbox, you can screw the drum to the working part of the trimmer.
In order for the drum body to hold firmly on the trimmer, a stop is welded to the back of the first one. This element is a jumper connecting the drum to the tube-housing of the scythe cardan. The jumper is attached to the tube using a clamp.
A disk is cut out of a sheet of metal, the diameter of which is 2 cm less than the diameter of the drum. A hole with a diameter equal to the diameter of the trimmer shaft + 0.5 mm is drilled in the center of the disk. 4 blades are welded to the disk edgewise. Their arrangement is criss-cross.
The blades should not touch each other in the center, leaving a hole in the disk free.
The disk with blades - the screw, rotating on the shaft, should not come into contact with the bottom of the drum body. To do this, first screw a nut onto the shaft, then put on a disk, which is secured with another nut. The height of the first nut must be sufficient so that, resting on it, the screw is not sufficiently distant from the bottom of the drum and the heads of the bolts that secure it to the gearbox.
A hole with a diameter equal to the diameter of the snow drain pipe is cut out in the upper part of the drum (from the trimmer motor side). This pipe is welded to the edges of the hole, and the weld seam is thoroughly welded. The snow chute must be directed away from the machine operator. The optimal angle of inclination of the pipe is selected, depending on the characteristics of the terrain where the snow will be removed. It should be sufficient for the snow stream to reach the required length.
The front part of the drum body is half covered with a metal plate. Its fasteners must provide for the possibility of installation/removal. This is necessary in order to be able to periodically clean the drum from frozen snow and to remove the attachment from the trimmer. To do this, “ears” with holes are welded to the drum body through which the face plate can be bolted. There should also be holes made in it located opposite the “ears” of the drum.
Drawings of a snow blower from a trimmer
On the Internet there are drawings of a snow blower made from a trimmer with your own hands, which are used in the manufacture of attachments. You don't have to copy everything. The drawing serves as a basic diagram. Dimensions are subject to change as available materials may not meet specifications.
Snow blower designs can be improved at will. Depending on the power of the trimmer, the grip is increased or decreased. The snow blower is moved on skis or wheels. The control handle is usually the trimmer bar, but you can use your own hands to adapt a separate, more convenient handle.
The most complex design is considered to be the screw mechanism. The knife is made in the form of screws. As the blades rotate, they scoop up snow toward the center of the snow blower body, and the rotating blade throws it out through the deflector.
It is easier for a novice craftsman to assemble a rotor structure according to the drawing with his own hands. If the trimmer has enough power, the snow blower can be upgraded to a two- or four-wheeled machine. A convenient U-shaped handle is installed for control. The trimmer controls are placed on it, and a larger fuel tank is installed for continuous operation.
Additional Information
All nut-and-bolt connections must be equipped with washers or lockers (if necessary). The shape of the propeller blades is rectangular, with rounded corners.
When using a snow blower with a brush cutter, it is important to take breaks and rest the tool.
To learn how to make a snow blower from a trimmer, watch the video below.
Design options for homemade snow blowers
The main task of a snow blower is to capture and throw away snow masses from the place where they accumulate, for example, from the sidewalk. Snow blowers made by folk craftsmen have different designs. But according to the type of snow capture, models differ into auger and rotary.
Auger unit
The main part of the snow removal unit is an auger, reminiscent of a screw from a meat grinder.
There are two types of screw units.
- Single stage. They are equipped with one screw in the form of spirally arranged knives. The spiral knives consist of two parts and converge in the center where the tossing vanes are located. When the mechanism moves with a bucket, a layer of snow is cut, which immediately falls under the rotating knives. The latter crush the snow and move it to the central part of the body. Since the blades are located in the center of the auger, they capture crushed snow and throw it into a nozzle installed at the rear of the bucket. The higher the rotation speed of the shaft with blades, the further the snow is thrown. Auger knives can be either with a smooth edge or with a serrated one. Smooth edged knives are used for clearing freshly fallen snow and are often made from conveyor belt. A toothed auger is used if it is necessary to remove icy and compacted snow.
- Two-stage. This is a modernization of an auger-type snow blower. Its design also includes a screw. But for better snow ejection, a rotor with 2 or more blades is installed at the rear of the bucket. A rotary auger snow blower works on the same principle as a single-stage unit, but thanks to the rotor blades, the snow is better crushed and thrown over a long distance (up to 15 meters). The following figure shows the structure of a two-stage type snow blower.
Rotary unit
A rotary snow blower has the simplest design and consists of a round “snail” body and guide blades. In the upper part of the body there is a sleeve through which snow is thrown out.
A rotor with blades is installed in the central part of the cochlea. This impeller is driven by a motor (gasoline or electric). The rotor, rotating at high speeds, captures snow, crushes it in the snail body and throws it out through the sleeve.
Snow throwers made by craftsmen for the home can be of two types.
- With stationary drive. The motor is installed in the unit, after which it becomes a full-fledged snow blower.
- As a supplement for other units (mini-tractor or walk-behind tractor). Therefore, a motor is not installed on these mechanisms. The transmission of rotational motion from the engine to the rotor occurs through a chain or belt drive.
Varieties
To effectively use the brush cutter, each owner can purchase the following attachment options.
- Drill. When using a gasoline trimmer, no electrical energy is required. Despite this, this type of equipment is characterized by high efficiency, strength and reliability in use. Scrolling on the drill is ensured by a gearbox.
- Running wheels on a lawn mower. This attachment can be used in conjunction with a blower or other devices. The running wheels are especially suitable for use with a sweeping brush or roller. In this case, the work process is accompanied by convenience and comfort.
- A lopper is a type of device for a brush cutter that is used for cutting twigs and branches that are located at a height of about 250 centimeters. The lopper works like a hacksaw.
- Garden shears are used for trimming hedges and also curly shrubs. The nozzle is based on a couple of modifications that have different hose lengths, which is convenient in different situations.
- Lawn aerator. The direct purpose of this nozzle is lawn aeration. With its help, you can saturate the top soil layer with air by piercing it. Also, this equipment breaks the surface crust of the lawn that has formed after rains, heavy watering or trampling. Using a lawn aerator in combination with a lawn mower, you can restore the breathability of the soil.
- Cultivator. This type of attachment, a soil cutter, is used when loosening the soil in flower beds, in greenhouses or in a small bed, as well as near trees and bushes. Users note that due to the low weight, only the top layer of soil is processed. If the soil is hard, then the cultivator on the lawn mower will scratch the top of the substrate without penetrating deeper.
- Height cutter. The direct purpose of the saw device is to cut down branches and bushes whose thickness does not reach 0.15 meters. Also, with the help of this device it is possible to thin out the crowns of trees that are below 450 centimeters. The pole saw has the form of a gearbox located in the housing together with an oil tank and a connection hole with the trimmer.
- Reducer attachment. It can be used as a motor for mobile vehicles. The gearbox is capable of reducing speed by 5 times.
- Water pump. Using a pump, you can supply water from rivers, lakes, containers, wells for subsequent watering of beds, washing a car, domestic water supply, pumping water into an outdoor shower, and so on.
- Brush and roller. This type of nozzle has the appearance of a rubber brush that rotates with high efficiency and sweeps up debris without causing damage to the surface. The brush and roller can be used to sweep the garden path, remove mowed grass, and remove moss. A high operating effect is achieved in conjunction with running wheels.
- For snow removal. A snow brush allows you to easily clear the snow cover in your yard and surrounding area. When functioning, the trimmer throws snow over a certain distance.
- For weeding. The petrol hoe can be used to weed potatoes, beets, carrots and other root crops from weeds.
- Blower. This type of device is used to blow away fallen leaves, clean paving slabs of debris, and also restore order to lawns.
- The edger is designed for neatly leveling the lawn, creating a beautiful border around your garden plot, path, and flower bed.
- Boat motor. Designed for use in dinghies, wooden and rubber boats, the transom of which has a height of no more than 0.36 meters. The speed of the boat in this case will be affected by the power of the gasoline trimmer. The nozzle looks like a separate leg; it is connected to the trimmer using a special adapter.
“Snow blower” from a trimmer and brush cutter - the principle of its operation
There are many options for making a snow blower from a brush cutter. Let's stick to the simplest method. Let's replace the cutting knife with a rotor. This snow blower will work like a regular shovel. You just don’t have to lift it, you just need to carry it along the ground. She will scoop up the snow and throw it aside.
Materials and tools
We have a task before us: a do-it-yourself snowblower using a trimmer. One condition: the scythe must have a straight rod and a gearbox at the end. It is advisable to include a multi-tooth disc in the kit for mowing thick grass. Next, we buy beer, “Baltika” in a large tin barrel.
Let's have a drink. We get the main material - metal. Tools that will be useful are a drill, an angle grinder, and a welding machine.
Non-drinkers can replace the bottom of the barrel with sheet metal, 1.5 mm. Using welding, make the necessary parts.
Step-by-step production of parts and assembly
Let's start creating spare parts. We cut the barrel in a circle, at a height of 150 mm from the bottom. We make a hole at the bottom into which the protruding part of the trimmer gearbox will fit. Drill 3 more small holes. They should be positioned so as to coincide with the holes for mounting the shield on the gearbox.
We make a square slot on the side, measuring 100 by 100 mm, to throw out snow.
We close the upper open part of the workpiece by a third with a piece of tin. After first making sure that the ejection slot is in the center of the closed part.
Let's make a rotor. We cut out 4 rectangular blanks, 250 by 100 mm. We give each blank the appearance of a blade by cutting off one of the corners on the long side. We weld them to the trimmer disc in a cross pattern. The rotor is ready.
Snow blower rotor
The deflector, which is responsible for the direction of snow emission, will also be made from the remains of the barrel. We cut out a strip of metal 150 mm wide and 300 mm long. Slightly bend the workpiece. We weld sidewalls to it, 100 mm high, which prevent snow from scattering at the exit.
The last thing to do is the spatula. We take a piece of metal measuring 300 by 400 mm. We bend the edges. We get sides with a height of 20 mm.
- We take the body and weld a deflector to it, in the place where the ejection slot is.
- Attach the spatula from below.
- We insert the trimmer gearbox into the hole and secure it with bolts.
- We install the rotor like a regular lawn mower blade.
If these instructions are not enough for you, then you can always read this article, which discusses in more detail the process of assembling a shovel for a snow blower with your own hands.
This device should be used at full throttle. Frequently pressing the throttle trigger will damage the engine or clutch. Some of the readers may have already thought about purchasing a high-quality and reliable device that can last for many years, and if you are one of these people, then follow the link and find out about the Patriot self-propelled gasoline snow blower.
More information in the following videos:
Snow mower
By installing a blade, it's easy to make a snow blower out of a lawn mower. But it must be self-propelled. In this case, the mechanism moves due to the motor drive, and the snowball is raked by a shovel attached in front. A convenient solution for those who do not want to disfigure their instrument. There will be no major changes to the mower design.
The worst mechanism for converting into a snow blower is a gasoline lawn mower. Its engine shaft is directed downwards, which significantly reduces the design options for the future device. It will not be possible to place such an engine on its side; the oil will leak and the engine will jam.
The shaft is equipped with a special part that breaks when the load is exceeded, protecting the engine. Another thing is the snow blower from the Mole cultivator, which you can assemble with your own hands only by reading the instructions on this site.
Necessary materials and tools to make a snowblower with your own hands
We will make a blade from a 20 by 20 mm metal profile and a sheet of smooth roofing iron. The tools you will need are: an angle grinder, a welding machine, a drill, a riveter and other hand tools.
Step-by-step manufacturing of parts and assembly of a homemade snow blower
Let's start cutting the profile. We make 2 pieces 100 cm long and 4 pieces 50 cm long. Parts of shorter length should be bent, giving the shape of the future dump. We weld the resulting parts. Long pieces are located vertically at the top and bottom. A pair of short parts are located at the edges, remaining at an equal distance from the middle.
We take a sheet of metal and cut out a blank with a width of 100 cm and a height of 50 cm.
Drill holes along the contour, at a distance of 1 cm from the edge. We attach the workpiece to the frame, drill the profile along the holes already obtained. Now let's rivet the parts together.
Fastening elements are made from profiles. We cut two blanks 20 cm long and another pair, 30 cm long. Different sizes are needed so that the raked snow goes to the side. We fasten them in the form of a corner using spot welding. At a distance of 3 cm from the seam, we drill each part.
Remove the blade before starting the mower.
Operation and maintenance tips for the unit
To ensure that your snow blower lasts as long as possible and you don’t waste time on repairs, you must strictly adhere to a number of rules. During operation you will need:
- Fully squeeze the gas;
- Avoid frequent pressing of the gas unnecessarily, as this will lead to damage to the engine and clutch;
- Try not to run into hard obstacles - this will lead to deformation of the shovel.
Before each use of the machine, you need to warm up its engine. Use only seasonal oil for work, drain it each time before the summer period, and fill in a new lubricant before the snowfall season.
The unit should only be stored in a dry place, avoiding contact with moisture. In the future, dampness will lead to corrosion and rotting of metal elements. After each use of the snow blower, it is necessary to remove any remaining snow from its blades and remove debris that has fallen between them.
It is easier to assemble a snow blower from a trimmer yourself if you purchase a special factory-made attachment. Craftsmen who do not accept store-bought components assemble the equipment themselves. A homemade snow blower is no worse in functionality than a factory attachment, but costs the owner completely free.
Spoiler
- https://PlazmoSvarka.ru/stanki-i-instrumenty/chto-mozhno-sdelat-iz-trimmera-svoimi-rukami.html
- https://GrandFart.ru/obsluzhivanie-i-remont/uborka-snega-gazonokosilkoj.html
- https://CarsFarm.ru/kombajny-i-motobloki/snegouborshchik-iz-gazonokosilki.html
- https://spec-mashines.ru/motorcultivator/izgotovlenie-snegouborschika-iz-trimmera.html
- https://kalibrtractor.ru/instrumenty/nasadka-na-trimmer-dlya-uborki-snega-snegouborschik-svoimi-rukami-i-gazonokosilka-dva-v-odnom.html
- https://SpecNavigator.ru/snegouborshhik/iz-trimmera-svoimi-rukami.html
- https://tryhimself.ru/ogorod/snegouborshhik-iz-trimmera-podgotovka-i-poshagovyj
- https://tehnika.expert/dlya-sada/prochaya-sadovaya-texnika/snegouborshhik-svoimi-rukami.html
- https://MachinSpec.com/kommunalnaya/snegouborshhik/bolgarka-trimmer-gazonokosilka-svoimi-rukami.html