With the onset of spring, summer residents and owners of garden plots have a lot of work, because before planting garden crops, soil cultivation is required. The most difficult work is considered to be digging and loosening the site . For this purpose, most summer residents use an ordinary shovel, but such work takes a lot of time and effort. Fortunately, there is a more effective device - a cultivator. With its help, you can complete a large amount of work in a short period of time. You can buy a device or make a manual cultivator with your own hands, saving a lot of money.
DIY hand cultivator
More about the device
The most popular are small designs whose weight does not exceed 20 kg. They are very productive and compact, and with the help of such products you can perform various tasks on the site: removing weeds, loosening the soil and even applying various fertilizers. A hand cultivator will also be useful when caring for some plants, as it is capable of loosening the soil near the beds, thinning and hilling them.
Small hand cultivators are popular
Note! Of course, you cannot compare a hand-held cultivator in terms of power with a walk-behind tractor, but for basic tasks in a garden plot it is quite enough. The advantages of hand tools include the absence of fuel or electricity costs, as well as the ability to use them in hard-to-reach places.
Such a cultivator cannot be compared in power to a walk-behind tractor.
The design of most types of cultivators includes special cutters, which, moving around the site, loosen the soil. Other attachments can also be used:
- paws for loosening the soil;
- a special sock that loosens and cuts the soil, thereby removing weeds;
- hiller for creating small grooves in the soil, which are needed for sowing various crops;
- needle disk , which is used when a large crust forms on the soil surface;
- feeding knives with special dispensers . They are necessary for applying fertilizers to the soil.
Diagram of a hiller with a knife-ripper
When used correctly, hand cultivators greatly facilitate excavation work. Of course, for this you need to use the appropriate nozzles and types of structures.
Cultivators come in different types
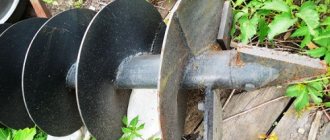
Rotary or star
Making such a device is not a difficult task. To make the structure, you need 5-7 stars, which will serve as knives, strung onto the axle. These knives can be either straight or curved to the sides. After cultivating the soil with such a tool, it is recommended to walk between the rows and a flat cutter. A combination of two models is also possible, when the stars are first used in the design, and then a flat cutter is used for the final stage. This can significantly save the worker’s strength and energy. Since the stars perform the function of wheels in the design, an additional axle is not needed.
Working with such a tool is quite difficult, so only a physically trained person can handle it. In such a garden structure, you can install wheels of the same diameter instead of stars. In this case, you will get a good weeding hiller.
Types of cultivators
The classification of devices is carried out depending on the mechanisms used. Cultivators are shared with the following equipment.
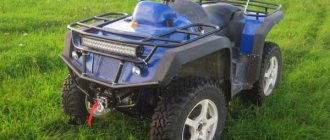
- Electrical. Mainly used for processing large areas. The device can only operate if there is a source of electricity. The design is lightweight and compact in size; moreover, such devices do not pollute the atmosphere with harmful substances.
Electric cultivator DAEWOO - Rechargeable . This type of equipment is used to work in small areas. The advantages of battery-powered cultivators include high mobility and small dimensions.
- Gasoline. Another type of equipment that is considered one of the most common among summer residents. It has high performance, good mobility, and is easy to use. But such devices must be properly maintained, not to mention polluting the atmosphere with harmful substances.
Hyundai petrol cultivator - Mechanical. It is no secret that hand cultivators are very easy to use, they do not take much time and effort, and are also low in cost. There are several types of designs of hand cultivators, starting with a simple “Tornado” cultivator, which is an ordinary fork with curved fingers on the bottom, and ending with a flat cutter.
Hand cultivator
The advantages of hand cultivators also include the fact that they are easy to make yourself. This does not require special skills, just follow the recommendations. To make a particular design, you need the correct drawing of the product, a little free time, patience and, of course, some tools and materials.
Hand cultivator "Gnome"
DIY flower pots
In our new article, we share the best flower pot ideas! The most original and beautiful options, step-by-step manufacturing instructions, useful tips - all this can be found in this article!
What do you need for work?
To make various devices for soil treatment at home, you need to prepare special materials for this. First of all, you need to take care of getting steel. The more different pipes, sheets or metal rods you have, the better. You can’t do without a set of tools, but they are present in any garage, so you don’t have to bother finding them.
When working with metal pipes, you cannot do without special tools.
A welding machine is one of the most important tools for working with metal products. With it, you can connect different parts made of metal in just a few seconds. Of course, in most cases you can do without a welding machine by connecting the parts using self-tapping screws. But the quality of such connections cannot be compared with the quality of welds.
Inverter welding machine
Assembly of hand cultivators
Once you have prepared everything you need for work, you can begin making a hand cultivator. This is a unique product that has a number of advantages, for example, compactness, availability of materials for its manufacture and the efficiency of the finished cultivator.
Manual soil cultivator
A homemade cultivator will make it possible not only to remove weeds throughout the entire area, but also to thoroughly loosen the soil. But, as noted earlier, hand cultivators are not intended for large areas , so if your garden or vegetable garden has a large area, then it makes sense to purchase a gasoline cultivator. Manual structures are best suited for country work. At home, you can make such types of hand cultivators as rotary, disk, flat cutter and others.
Cultivator-weeder: 1 — wheel assembly (from a garden cart), 2 — main frame, 3 — spring, 4 — chain lock, 5 — hook, 6 — U-shaped rotary handle assembly, 7 — Ml2 fixing screw with hexagon head (3 pcs.), 8 — rotating bracket, 9 — weeder frame (steel strip 20×7), 10 — mounted raker (steel chain from a rod with a diameter of 10), 11 — 15-star weeder-clump breaker (from agricultural machinery), 12 — M10 nut with lock nut and washer (2 pcs.), 13 — rotating cultivator arm (from agricultural machinery, modified), 14 — axle bolt with nut and washers (2 pcs.), 15 — M14 bolt with nut (2 pcs.) .).
Rotary cultivator
The main tasks of the rotary structure are to harrow the soil and further level it. The cultivator consists of special hemispherical disks in the amount of 2 or 4 pieces. Each pair of these disks is attached to an axis, due to which the base of the structure can move. This allows you to increase or decrease the angle of inclination of the disks during operation.
Diagram of a rotary disk cultivator
The base must be metal, since it is subject to a large load during operation. The base itself can be attached to the handle. If all the parts are made of metal, this will significantly increase the weight of the structure, which is why many summer residents make handles from wood. When working, grass will not cling to the discs of such a cultivator, which is very convenient, especially when cultivating areas covered with weeds.
DIY lightweight cultivator
Disc rotary cultivator
Cultivator "Tornado"
An excellent cultivator with the simplest design, consisting of only three parts - a submersible element, a handle and a handle . In many ways, the principle of operation of a cultivator is similar to the operation of a corkscrew. You need to press the structure into the ground and rotate it, and then the cultivator can be lifted. During the treatment of the site, weeds are removed along with the root system. The product can easily be made at home if you follow the step-by-step instructions below.
"Tornado" - manual cultivator
Table. Manufacturing of the Tornado cultivator.
| Steps, photo | Description of actions |
| Step one | Cut 4 blanks from a steel rod, the length of which should be approximately 30 cm. Bend each blank using a vice. |
| Step two | Sharpen each of the blanks on one side. This is required so that the structure fits well into the ground. All rods must be equally smooth and sharp. |
| Step three | Weld the blanks to the metal pipe. A regular or profile pipe may be suitable. Make sure that all parts are welded at the same angle. This will increase the efficiency of the design. |
| Step four | Treat the welding area with a grinding wheel or file to remove all irregularities. This will give the structure a more attractive appearance. |
| Step five | Weld a handle to the profile pipe. To do this, you can take the same diameter. If desired, wrap the handle with duct tape, especially in areas where you will be holding it with your hands. It is also advisable to treat welding seams. |
| Step six | Test the finished structure in action, and if any of the elements are not welded well enough, then during the test of the cultivator it will fall off. If the product passes the test, then paint it and safely use it for its intended purpose. |
On a note! If you need a larger structure, you can use larger pieces. The manufacturing technology will not change as a result, and the reliability of the cultivator will not suffer.
Disc cultivator
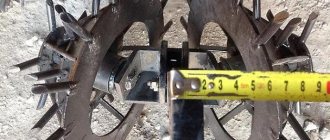
Another option for making a manual cultivator, the main part of which is steel discs. The standard design includes 5 discs, to which special teeth must be attached. Due to these teeth, loosening of the soil occurs. You can make such discs yourself or buy them in specialized stores. The surface of two disks must be smooth, and teeth must be attached to the rest. As an alternative, curved nails can be used instead of teeth .
Disc hiller: 1 — row of potatoes being processed, 2 — hiller disk assembly (from agricultural machinery, 2 pcs.), 3 — fist (from agricultural machinery, 2 pcs.), 4 — T-shaped bracket, 5 — stand, 6 — scraper steel (from agricultural machinery, 2 pcs.), 7 — bridge beam (steel pipe 32×2.5), 8 — locking bolt Ml0, 9 — beam-handle
The finished discs need to be put on the axle one at a time, and then the bearings are installed. The finished structure is attached to a handle made of wood. When cultivating the soil, the discs begin to rotate, and the teeth alternately stick into the ground. A disc cultivator is capable of cutting weeds and loosening the soil. It needs to be cleaned periodically to remove stuck plants.
Disc hiller
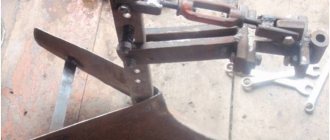
Flat cutter
Another type of cultivator that you can make yourself. A flat cutter is a fairly effective piece of equipment; it requires an old bicycle and one wheel to make. Next you need to follow the instructions given below.
Step 1. Prepare two small semicircles made of hot metal. They must be durable, since they carry the main load.
Two prepared semicircles
Step 2. Bend two meter lengths of 15mm pipe for the handles. Then cut off the excess from the bike frame.
Future handles and cropped bicycle frame
Step 3. Weld the handles to the bicycle frame, as well as a thrust rod that will take the load from the handles while cultivating the soil.
Handles are welded to the bicycle frame
Step 4. Connect the two plates together by welding, sharpen the resulting blade and weld it to the bicycle frame. It needs to be installed on the seat so that you can adjust the blade in height.
Blade welded to frame
Step 5. Paint the assembled structure, thereby protecting it from corrosion. If desired, you can wrap the handles of the flat cutter with electrical tape. At this stage, the process of manufacturing a manual cultivator can be considered complete.
It is recommended to wrap the handles with electrical tape
Video - Homemade flat cutter or saving drowning people
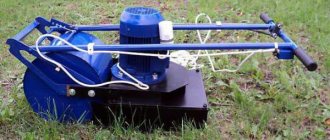
Chainsaw cultivator
In case you have an unnecessary chainsaw lying around in your garage, some of its parts can be used to make a good cultivator. But, unlike previous options, those people who have at least a little knowledge of technology will be able to make a product from an old chainsaw . In addition, there are additional costs, such as the purchase of fuel and lubricants. Since the chainsaw runs on gasoline, the cultivator you make from it will also run on it.
A cultivator can be made from a hand chainsaw
- First, make a metal frame for the future cultivator using metal corners. The frame should have a cubic shape.
- Attach the engine from the chainsaw to the finished frame, or rather to its upper part.
- Make handles for your design. It is advisable to use metal pipes for this. This design will be more convenient to use.
- Prepare two sprockets, one of which should be driving, and the second should be driven and installed on the intermediate shaft.
Do-it-yourself motor cultivator from a chainsaw
Note! A chainsaw cultivator has a number of advantages over other designs, for example, high power and productivity, minimum effort, etc. But such a cultivator also has disadvantages, the main one of which is the need for regular refueling. Therefore, you should always have gasoline ready on your farm.
A motor cultivator has several important advantages
How to make a flat cutter
Many people are looking for a cultivator for weeding. You can make such a weeding machine yourself. A profile pipe made of metal or steel is used as the basis for the frame. This base must be made of 2 parts. You need to weld at an angle of 30 degrees. A wheel fork made of a steel pipe or plate 3 millimeters thick is welded to the frame. The wheel itself can either be made independently or purchased. The steering wheel must be made of 2 steel pipes fixed to the frame.
The horizontal part of the frame is an adapter for the cutting attachment. Then you need to install a knife, which is made of steel tape 2-3 millimeters thick. Then the knives are sharpened. The sharpening angle can be changed or adjustable knives can be installed. If there is an old bicycle on the farm, then all the spare parts can be taken from it. Due to the large diameter of the bicycle wheel, the ride becomes very easy when working. The knife is made in the form of an inverted letter “P”, or T-shape. It should be noted that a T-shaped knife must be used very carefully between rows, as there is a possibility of spoiling the harvest.
A special subtype of the flat cutter is the design with forks. This device has several knives that are attached to a fork. It is made of steel rods, and they, in turn, are curved in a special way.
Additional recommendations
If, after reading the step-by-step instructions, you decide to make such a cultivator yourself, then you must not forget about safety measures. First of all, it is necessary to protect your eyes and hands, especially when working with a welding machine. If arc welding is used during work, then you need to protect yourself not only from the intense and very bright light emitted by the device, but also from scale, which, having appeared at the site of the weld, can break off from the metal and fly high.
Personal protective equipment when performing welding work
Ten rules of welding
When using gas welding, when heating metal, be sure to wear protective gloves and use special face protection . You work with high temperatures, so your skin needs to be protected from burns. The remarkable thing about hand cultivators is that they can be made even without special skills or experience.
Making a homemade cultivator is not as difficult as it might seem
Advantages and disadvantages
Like any tool, the miracle shovel has its drawbacks, which you should be aware of when purchasing it:
- The device is only suitable for straight areas - it will not work to dig up the soil figuratively. Narrow and curved areas will have to be processed manually.
- For the process to be effective, a person’s weight must be at least 80 kg, otherwise it will not be possible to dig up the ground to a given depth.
- The tool will not be able to dig holes.
- It is impossible to work in low greenhouses.
- If the mechanism breaks, repair will not be easy.
- The weight of the product is much higher than the weight of a conventional bayonet shovel, which can lead to severe fatigue at the end of the job.
Expert opinion
Kuznetsov Vasily Stepanovich
For some, these disadvantages may seem decisive, but do not forget about the undeniable advantages of choosing a cultivator: speed of tillage, minimal effort and ease of use.