The process of planting potatoes seems to be quite labor-intensive work, especially if the garden area is quite large. You can’t do this without outside help, because doing this alone is not only difficult, but also takes a long time.
What should those who do not have the opportunity to involve their friends or relatives in planting do? The answer is simple - you need to use those automated units that specialize in such purposes.
Recently, walk-behind tractors have become widespread, being real “helpers” for farmers in running their farms. Using this unit, you can not only plow land, but also plant potato tubers.
However, in this case, you cannot do without additional equipment. For this purpose, specialized stores offer a fairly wide range of potato planters designed for aggregation with a walk-behind tractor (such as the KSM 4 potato planter).
But not everyone has extra funds to purchase such equipment, so a reasonable question arises - how to make a potato planter for a walk-behind tractor with your own hands? Let's try to answer this question in this article.
Device
A potato planter for a walk-behind tractor can be easily made at home, using fairly traditional tools, as well as those components that almost every rural resident has on their farm (read about spare parts and parts for KSM 4 here).
The operating principle and purpose of a homemade potato planter for a walk-behind tractor is identical to factory analogues, such as a potato planter for a mini tractor, for a tractor, bomet, l 207, for MTZ.
Homemade potato planter
In general, this device has the following structural elements, which we will need to manufacture:
- frame structure on which the remaining elements of the unit will be located;
- container in which the planting potatoes will be located;
- a mechanism that will operate the system for planting tubers in holes;
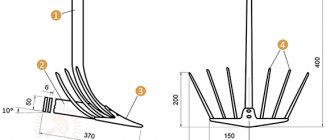
- rippers that dig holes;
- wheelbase;
- elements that bury holes after planting potato tubers in them.
In principle, this is the minimum that we need to make a fairly simple design of a potato planter at home.
The process of assembling such a device itself involves quite a lot of scope for action, because you can add an additional tank to the design, which will contain fertilizer, and also make not one, but two elements for planting tubers.
Of course, this will lead to the weight of the entire structure, slightly reducing its maneuverability and performance. Therefore, you need to think several times before adding additional elements to the potato planter.
For more information about a homemade potato planter for a walk-behind tractor, watch the video:
Homemade potato planter - a significant saving of your money
Attachments for various agricultural machinery can significantly expand the use of these units in rural areas. The presence of a walk-behind tractor or mini-tractor (for example, Russian-made) does not mean that you will be able to perform absolutely any tasks on earth.
For example, mowing lawns or planting potato tubers will not be possible for you without the use of additional equipment.
In many ways, the land is cultivated specifically for planting potatoes, because it is not for nothing that it is called “second bread.” Of course, many are accustomed to planting potatoes with a walk-behind tractor (for example, Don), manually, or using a potato planter for a mini tractor, but you can think about making a potato planter with your own hands.
This is a rather painstaking task, so you need certain knowledge and skills before starting work.
The potato planters themselves can differ from each other in a number of distinctive features and criteria. Let's consider each gradation separately.
So, potato planters may differ in the type of technological process:
- Units that plant sprouted tubers. Such fruits have developed sprouts that can sprout within 20 days from the moment they are planted in the soil.
- Potato planters that plant unsprouted tubers. Of course, not everyone has the opportunity to store potatoes in the right conditions when sprouts form normally. For such cases, similar units are used.
- Mixed potato planters.
Potato planters may differ in the number of rows:
- Single-row potato planters. Such a device is connected to a mini tractor (see here), having one potato tank. The capacity of such a bunker for tubers will reach, on average, 140 kg.
For more information about the single-row potato planter, watch the video:
- Double row units. It has the same design as the single-row potato planter.
- Both types of units are used for planting potatoes in relatively small areas of the territory, developing a fairly high speed - up to 15 km/h. Due to the fact that they have more compact dimensions, they are much more mobile than their 4-row counterparts.
- 4-row potato planters. Such units are capable of planting potatoes on an area of 2 hectares in about one hour of work. They have a bunker that can hold about 550 kg of tubers, and also have four planting elements.
In addition, potato planters can differ in the type of connection they have to the driving unit:
- trailed;
- semi-mounted;
- mounted
Necessary materials
In principle, to make a homemade potato planter, the materials that many summer residents have on their farms are sufficient. At worst, we can go to the nearest landfill, where we can find a lot of parts and related materials that may be useful to us during assembly.
Required material
Here is an approximate list of what we may need:
- sheet metal of various widths;
- bolts and nuts;
- welding machine;
- Bulgarian;
- wheels;
- channels, etc.
As we can see, we will need quite a lot of metal, which in itself implies the use of a welding machine. Therefore, if you do not have the skill to work with it, then assembling a homemade potato planter will not be available to you.
The list of required materials does not include various components that will be discussed in detail in the process of describing the technology for constructing this device.
Design and principle of operation of potato planters for walk-behind tractors
Such devices consist of:
- frames;
- a bunker in which potatoes intended for planting are placed;
- wheel base;
- a mechanism that ensures loosening of the soil and planting tubers on the site.
Most models have a similar device
Attention! In addition to those listed, other elements may be present - for example, a container for fertilizer.
The operating principle of such a device is very simple. The sprocket mounted on a wheel base is part of a chain lift. When the wheels rotate, the tubers from the hopper rise through a vertical pipe and then are dropped down into the prepared furrow.
Planting process
Potato tubers are planted in a furrow made in advance using a walk-behind tractor. Thus, first you need to use it to plow the garden, then you need to attach a trailed potato planter to the back of the walk-behind tractor, place the tubers in its hopper and plant the potatoes.
It is impossible to simultaneously cut a furrow and plant tubers with a potato planter using a conventional household walk-behind tractor. Only a powerful diesel walk-behind tractor or mini-tractor can perform such operations.
Options with partial mechanization
This group includes a tool for quickly planting potatoes, which looks like a regular garden cart with one wheel. This option is suitable for soft areas of soil that have been prepared in advance.
In the cart, the wheel is replaced with a rotary cutter, which can have several compartments at once (for example, four). Potatoes are poured into the cart. From there the tubers fall into the cutter compartments. When moving due to the rotation of the cutter, the tubers remain in the ground. It is worth noting that landing requires physical effort. To facilitate the process, another handle is welded to the front of the structure. It allows two people to move the device.
The main types of potato planters for walk-behind tractors
Such devices can be single- or double-row. The first type is suitable for a small area. It has small dimensions and low productivity.
Two-row models are more productive
Some potato planters for walk-behind tractors allow you to plant sprouted potato tubers. Others focus exclusively on unsprouted ones. Also, a number of models allow connection to a certain line of walk-behind tractors. Others, if they have a universal hitch, can be aggregated with various units. The loading hopper can be rectangular or cone-shaped.
Depending on the type of tuber feeding, such attachments are usually divided into units with:
- flat belt system. Tubers are planted using horizontal belts;
- spoon system. To serve potatoes, a design consisting of spoons attached to a belt is used;
- shaped belts that have a special recess that resembles a spoon. An operator must be present when planting, but there is no fear of damaging the tubers;
- piercing mechanism. Such devices are relevant when planting cut potatoes;
- multi-belt design. Such attachments allow you to simultaneously plant two rows of potatoes.
Feeding mechanism may vary
What devices are needed?
To plant potato tubers, it is clear that one single walk-behind tractor will not be enough; additional devices will be required, in particular a potato planter. This equipment will allow you to carry out the procedure efficiently and quickly, without the use of heavy physical labor.
The effectiveness of this approach also lies in the fact that the potato planter may well be homemade. That is, anyone can make the device with their own hands: it is not necessary to buy a finished product. This allows you to optimally select the dimensions of the potato planter for the walk-behind tractor that will meet your needs.
Therefore, we present a diagram and drawing of such a device in order to understand what kind of unit you can get in the end if you make it yourself.
Design assembly features
The required components are listed above, but often a potato planter for a walk-behind tractor can be supplemented with a special tank, where special fertilizers will be scattered in parallel with planting.
But the installation of such new elements also hides a number of disadvantages. For example, by adding additional weight to the structure, the potato planter becomes less maneuverable, which means that using it for small areas becomes problematic.
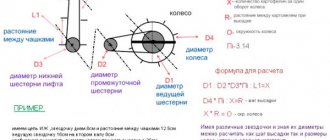
Drawings of a potato planter for a walk-behind tractor.
Calculation of gears of the chain rotation mechanism with potato planter bowls.
The frame of the potato planter is welded from a profile pipe; a tank from a Soviet Riga washing machine or a similar cone-shaped container can be used as a hopper.
Bearings with a lower axle and a drive sprocket for the chain and vertical posts for the upper axle with a sprocket are attached to the frame.
Bucket rings made of 6 mm wire are welded to the sides of the chain; the buckets must be welded in such a way as not to weld the connections between the chain links.
To prevent the tubers from falling out of the buckets prematurely, you need to install a guide pipe; alternatively, you can use a plastic drain pipe with a diameter of 100 mm.
To fill the furrow, two rotary disks with the ability to adjust the angles are installed.
Installation diagram of the planter on a walk-behind tractor.
I recommend watching a video of making a homemade potato planter.
Video: homemade potato planter in action.
Some tips
You can use a homemade device for planting potatoes even if you install a washing machine tank instead of a plywood or metal tank. Although its capacity will not be large, you can save effort and time for the manufacture of this part of the device.
It is also important to pay attention to the wheels. They should be wide
So, the device will not “trample” loose soil
The seeder can be made of a simple pipe, the diameter of which is 10-25 cm. All fastenings must be calculated according to the brand of the tractor (MTZ, Salyut, etc.). Although most of these home-made devices, single-row or double-row, can be attached to any type of vehicle, a device developed for a separate tractor is still better
Thus, the device will not “trample” loose soil. The seeder can be made of a simple pipe, the diameter of which is 10-25 cm. All fastenings must be calculated according to the brand of the tractor (MTZ, Salyut, etc.). Although most of these home-made devices, single-row or double-row, can be attached to any type of vehicle, a device designed for a separate tractor is still better.
The single-row machine is easier to use. The device makes 1 furrow in the soil, and with a certain step (which is set by the width of the blades), throws out the tubers. It is necessary to collect potatoes of the same size so that the planting material does not get stuck in the seeder or any other part. Another option is to install additional space for an assistant who will supervise the boarding process. You can make it from a simple car seat by attaching it to the frame of the device. If you have a two-row seeder in your design plans, you won’t be able to do without additional space.
DIY making
You can choose a potato planter and other necessary attachments in a specialized store, or you can make such a device at home. You just need to have some plumbing skills and purchase the necessary materials to make a mounting device for a walk-behind tractor.
Tools and materials
To make a potato planter with your own hands, you will need to purchase:
- Axles, bicycle chain (or chain from a car engine), bearings for wheel movement, making a chain elevator.
- Metal sheet for making a bunker.
- Square or round metal profile for mounting a frame holder and other purposes.
- Welding machine for firmly connecting potato planter elements to each other.
- Several electrodes for welding.
- Grinder and discs for cutting metal sheets into the required parts.
- An electric drill and drill bits for it for drilling work.
- Fastening elements to add strength to the device.
- Nuts and screws for mounting the structure.
- Wire (several meters) for fastening some elements of the device.
- Sandpaper or file for sanding and cleaning parts.
Before you start assembling the potato planter, you need to carefully study the drawing, think about the dimensions of the future device, its appearance, and the method of attachment to the walk-behind tractor. The dimensions of the planter should not be very large so that the design does not become too bulky.
The volume of the bunker for filling tubers is determined based on the calculation of the double length of the bed. The volume of the container should be enough for a walk-behind tractor with a bunker filled with potatoes to pass two furrows and return to the place of re-loading.
What are they and what types are there?
The variety of this garden equipment is impressive. Manufacturers have done their best, producing various products of this kind, differing not only in price, but also in appearance, material of manufacture, features, and functionality. Every year, new products of this miracle technology are presented to the public, with which it is comfortable to work with both professional farmers and owners of small plots, regardless of age and gender. The device makes the planting process partially or fully automated.
According to buyers, it is very difficult to answer the question of which unit is better to buy and how to choose one that meets all the requirements, does not break down, is reliable and durable, and is also safe. All this depends on the operating conditions and preferences of the owner. It is not for nothing that ratings of quality products from the world's best manufacturers are regularly published. The popularity of models is closely related to their average price. The more popular the brand, the higher the cost.
There are many models of this product with different descriptions and characteristics, with additional functions, equipment and without it, differing in design features and accessories, as well as the principle of operation. In order not to make mistakes when choosing products, you need to understand all this diversity, pay attention to reviews and ratings.
Kinds
You should immediately decide that this tool can be either manual or aggregated for walk-behind tractors and cultivators. Some are produced with fertilizer dispensers for applying them to the soil, others are designed exclusively for planting potatoes, doing this simultaneously in one, two or even eight rows.
Manual
In turn, hand tools can be of several types. We present the distinctive features in the comparative table:
| Type | Description |
| Conical | Affordable. It consists of a handle and a working part in the form of a cone. Similar to a shovel. It is used for its intended purpose - planting potatoes, while speeding up the process compared to manual labor. Feature: there is no need to first dig and then bury holes. The tuber is placed in a cone, which is buried in the soil. A special lever opens the hole, and the planting material ends up in the ground. When lifting the instrument, falling asleep occurs spontaneously. |
| Pipe | A budget option. A hollow pipe with a basic mechanism. The principle of operation is the simplest and does not cause any particular difficulties. Used for planting any vegetables. You can order online in the online store. |
| T-shaped | The name comes from the T-shaped handle, at the end of which there is a shape that visually resembles a glass. It’s quite simple to use: the mold is lowered into the ground, pressing a hole in it, where the tuber goes. Afterwards, falling asleep occurs with the help of a rake. The tool can either be purchased at a specialized store or made with your own hands. |
| Triple | People call it a “hole marker.” Used for a small vegetable garden. It looks like a simple device made of metal with three well formers. There is a kickstand in the center of the device. If you press on it, it will sink into the soil to the ground. The operating principle is identical to the T-shaped unit, but is more cumbersome. The average weight is almost 9 kilograms, which puts a significant strain on the back, arms and legs. |
Mechanized
Attachments for walk-behind tractors with various parameters. Used for large private plots or fields of several tens of hectares. It can be aggregated with various traction devices or moved manually.
Manufacturers produce the following types of popular models:
- Designed to work with a tractor or a specific model of walk-behind tractor. In any case, the role of the traction apparatus is performed by a certain self-propelled vehicle.
- The use of live traction is provided. As a rule, a horse provides assistance. Hand-powered tools are produced that are similar in appearance to deep garden wheelbarrows designed for two people. The cost of this product ranges from 5,000 to 11,000 rubles.
Based on the aggregation method, devices are:
- Trailed. Transportation occurs via its own wheels.
- Semi-mounted. They have both their own support wheels and attachment to the traction device.
- Mounted. There are no running or support wheels. It is mounted on the tractor chassis.
If we continue the review of products, then there is also the following division:
| View | a brief description of |
| Semi-automatic | It is mandatory to have an operator present during the work process to serve the root vegetables. Can be aggregated with walk-behind tractors. Inexpensive, but quite functional, units go on sale. There is no question of where to buy such a device. It is sold in any specialized store. Moreover, the variety of models is impressive, taking into account different selection criteria. There are options with automatic seeding of fertilizers. Such devices are sold with a special hopper for these purposes and a seeding mechanism. |
| Automatic | It does not require the use of manual labor, it does everything independently: it cuts furrows, lays tubers, digs in the soil. Modern models are equipped with an electric drive. |
The devices differ in the way they are driven. Based on this criterion, they are:
- chain (the presence of several sprockets connected to each other by a chain);
- belt (there is a pulley system and a belt drive).
A difference is also observed in the method of supplying seed, and therefore potato planters are divided into the following types:
- Belt or flat belt. Used for planting sprouted potatoes. Horizontal belts do not damage the seed.
- Spoon-shaped They join the “spoon” and take one tuber from the bunker.
- Spoon-disc. The disk with spoons rotates thanks to a shaft located under the hopper.
- Piercing. Brings cut potatoes into the soil.
- Conveyor - spoon or shaped. Identical to the belt model, but the belt has spoon-shaped indentations. Sprouted root vegetables can be used, but operator presence is required.
Another classification is the number of rows planted at the same time. This indicator affects the speed and efficiency of work performed. Accordingly, a special traction unit is required. There are:
- Single row. Compatible with mini tractors and walk-behind tractors.
- Double row. As a rule, it is aggregated to a mini-tractor using a rear linkage.
- Three-row. In most cases, it is mounted on a tractor with a bunker for applying fertilizers to the soil.
- Four-row. Trailed or semi-mounted aggregate, with a spacious bunker. Features high performance.
- Six-row. Trailed or semi-mounted equipment used for planting potatoes in rows. Equipped with a fertilizer box. Suitable for heavy or medium class tractors.
- Eight-row. It is mounted with heavy equipment, has a spacious bunker, and can be additionally equipped with special options, including a three-point hitch, and special devices for applying liquid fertilizers.
Potato planters larger than eight-row ones are usually not produced, since they must be mounted on high-power traction devices, the use of which is not always practical and efficient.
Specific points of using a potato planter for a walk-behind tractor
If you decide to use a potato planter for a walk-behind tractor, familiarize yourself with the features of its use in order to understand how to set up the device and the planting process itself.
The potato planter must be set up correctly
Setting up a walk-behind tractor and potato planter
Before planting, the soil is plowed, harrowed and moistened. The unit and device are configured to ensure the following points:
- forming a furrow of suitable depth;
- ensuring sufficient distance between furrows;
- stable operation of the planting material supply mechanism.
Recommendations for planting potatoes
To ensure that the walk-behind tractor does not change its position and is stable due to the large weight of the potato planter, you should immediately take care of the ballast, which is attached to the front of the unit. The speed of the unit should be about 1 km/h. Forming a furrow and covering the planted potatoes with soil is carried out using special sealing discs. Special cultivation paws should prevent the formation of marks after the walk-behind tractor passes.
If possible, planting potatoes should be uniform in size. It should be carefully prepared for the growing process.
TOP 3 factory models of potato planters
Among the factory models of potato planters for walk-behind tractors, the following are the most popular:
Important! The name of these models stands for single-row potato planter (PT), the number “1” after the hyphen. The additional letters “M” and “A” indicate modifications (improvements) of previously released models.
- Type – single-row, trailed;
- Weight –25 kg;
- Track – 700 mm;
- Hopper capacity – 40 l;
- Productivity – 0.15-0.2 g/hour;
- The required power of the walk-behind tractor is from 6 hp;
- Price – 12000-14500 rub.
Potato planting unit KS-1A
- Type – single-row, trailed;
- Weight –33 kg;
- Track – 600 mm;
- Hopper capacity – 34 l;
- Productivity – 0.25 g/hour;
- The required power of the walk-behind tractor is from 6 hp;
- Price – 15,000-16,000 rubles.
KSM-1A – productive and convenient potato planter
- Type – single-row, trailed;
- Weight – 44 kg;
- Track – 600 mm;
- Hopper capacity – 41 l;
- Productivity –0.25 g/hour;
- The required power of the walk-behind tractor is from 6 hp;
- Price – 15500-16000 rub.
All these models work well with walk-behind tractors, both domestic (MTZ, Neva, Salyut) and foreign-made (Viking, CAIMAN, Daewoo).
Related article: Saving potatoes after frost: treatment of tops and seedlings
Important! You can buy one of the models listed above in almost any large and medium-sized Russian city. But the most favorable prices are in such large cities as Moscow, St. Petersburg, Yekaterinburg, Novosibirsk. This is explained by high competition among a large number of sellers: firms, private entrepreneurs, which causes a wide variety of prices, seasonal discounts, and the possibility of purchasing equipment in installments or on credit.
Thus, a homemade inexpensive potato planter for a walk-behind tractor is a very convenient, easy-to-use unit, but at the same time it greatly facilitates the work of a summer resident or small farmer. Made from materials available to everyone, such a homemade product, compared to store-bought counterparts, will have a cost several times lower, while not being inferior to them in quality and reliability.
Design and principle of operation
All such units have almost the same design. This is necessarily a strong frame onto which the remaining components are attached, consisting of an axle with lugs, two gears, a conveyor with cells for root crops and a supply pipe. A small plow is also attached to the frame to create a furrow into which the tubers are placed at the same distance. And behind the frame, a disk hiller is installed to fill the potatoes with soil. The entire landing process occurs automatically.
The principle of operation is simple and is as follows. When the walk-behind tractor moves, the planter's lugs, on the axis of which the sprocket is located, begin to rotate. It is connected to the top gear via a chain. It is precisely the conveyor for feeding tubers into the furrow. Cells welded to the chain capture the potatoes and feed them into the guide pipe. At the very bottom there is a small plow. He makes a furrow in which the potatoes fall. A hiller is installed behind the frame, which backfills root crops.
The distance between tubers in a row is from 35 to 40 cm. All adjustments are made during the manufacture of the unit. Then tests are carried out and deficiencies are eliminated.
Additional Tips and Warnings
In general, the process of planting potatoes using a homemade potato planter is as follows:
One person sits on a seat located on the potato planter, and the second person sits on either a mini tractor or a walk-behind tractor (see here).
You can change the depth of removal of the top layer of soil that these discs produce. To do this you need:
- Adjust the stepladders that press the support to the posts by loosening them.
- You can slightly change the angle at which these disks are located. To do this, you need to turn them a little in the right direction.
After completing the planting process, all that remains is to remove the traces left by the walk-behind tractor and potato planter. In this case, baking powder will help us, i.e. cultivator blades located on stands. By the way, the degree of their immersion in the ground can also be adjusted.
A homemade potato planter with detailed dimensions can be a great way to save money that would inevitably be incurred if you purchased a potato planter from a specialty store.
Considering that the average cost of this unit is about 15 thousand rubles, this saving looks especially justified. At the same time, there are no special costs for the necessary materials during production, because the components are used from old, worn-out units.
Testing a planter in the garden
After production, the potato planter must be tested and adjusted for normal planting. The unit must meet the following parameters:
- the depth of the tuber is 12-15 cm. This is regulated by the height of the furrow plow;
- the distance between potatoes in a row is 30-40 cm. This depends on the diameter of the lugs and the number of conveyor cells. This calculation is made at the stage of manufacturing the unit;
- the distance between potato rows is 60-70 cm.
In addition, it is necessary to carefully select seed material. The tubers should be the same size, fit freely into the planter cell and not have long shoots.
These are optimal conditions for good germination and, therefore, a large harvest.
Comparative cost analysis
| KS-1A | KS-1 | KSM-1 | Small potato planter | Potato planter for the Neva walk-behind tractor | |
| Moscow | 14500 | 12000 | 9500 | 12000 | 12000 |
| Saint Petersburg | 14000 | 13000 | 10000 | 13000 | 13900 |
| Novosibirsk | 14800 | 14500 | 12000 | 14000 | 15000 |
| Ekaterinburg | 14800 | 14300 | 13000 | 14500 | 14800 |
| Chelyabinsk | 15000 | 15000 | 14000 | 16000 | 16000 |
| Omsk | 14800 | 14500 | 12800 | 15000 | 15000 |
| Vladivostok | 15500 | 15000 | 14000 | 16000 | 16000 |
From all of the above, it becomes clear that the cost of potato planters directly depends on the model, compatibility with walk-behind tractors, dimensions and region. And the decision to purchase this or that model is up to you. However, before making such a serious purchase, it is necessary to consider all the advantages and disadvantages of the purchased unit.
How do you like the article?
What is required for production
To make a walk-behind potato planter, you do not need any rare or expensive tool.
The simplest version of this device consists of six main elements:
- wheels;
- tuning mechanism;
- loosening mechanism;
- gear systems;
- bunkers for root crops;
- frames
The device can be improved by adding new parts to its design, for example, a container for fertilizers or a pair of landing modules. However, as the number of parts increases, the walk-behind tractor becomes heavier, and therefore becomes more difficult to control during operation.
To make your own potato planter for a walk-behind tractor, you usually use a tank from an old washing machine. It acts as a bunker for potatoes. Self-taught craftsmen also use a metal corner, steel wire, chain, gear, fittings, a pair of wheels from old vehicles, and a channel.
The tools you will need are the simplest:
- hammer;
- drill;
- spanners;
- welding machine;
- screwdriver;
- wire cutters;
- Bulgarian.
This is the required minimum for making a homemade unit. Essentially, a self-made potato planter is a cart attached to a walk-behind tractor.
But only at first glance the design seems simple: if you look closely, you can find many features in it.
Instructions
Do-it-yourself homemade potato planters for walk-behind tractors are a regular cart on wheels, which is attached to a walk-behind tractor. The apparent simplicity is a little deceptive, because the design of this unit has its own nuances and features that are worth paying attention to.
Frame design
You need to start assembly by making the frame structure. It will consist of channels welded together, as well as longitudinally located spars, which are connected by three transverse elements.
Thanks to a lawn mower, you can trim the grass and remove weeds - this is a suitable device for mowing unnecessary plants near the fence, at home, between the rows in the garden in a flower bed, and so on. Learn how to spool a line onto your lawnmower here.
The MAZ-500 can rightfully be considered one of the iconic cars of the Soviet period, which became the first cabover truck produced in the Soviet Union. MAZ-500 is a Minsk legend from the 60s.
Cultivation is on the list of priority tasks for any tiller, as it helps prevent the appearance of weeds, at least in large quantities, and helps saturate the soil with oxygen, thanks to loosening. Here's how to make a cultivator yourself.
There will be an arch and a fork in front, and on the sides of the structure there will be racks of elements for planting and digging holes. The wheels of the potato planter must be equipped with lugs. Between them there is a wooden disk 6 cm thick with four semicircular grooves located on it.
This disk will capture potato tubers, moving them into the dug holes.
Next you need to make a container for potatoes - a bunker. It can also be made from plywood, but for structural strength it is best to use sheet metal 3 mm thick.
The four sides of the hopper are measured and then cut out. They are connected by welding. The bottom can be covered with rubber so that the potato tubers are not damaged. It is necessary to strengthen the frame with steel strips, placing them from the middle transverse part to the arch in front.
There you need to weld linings and corners with a thickness of 4 mm. DIY drawings of a potato planter for a walk-behind tractor, which can be found on the Internet, describe this process in sufficient detail. Next, you need to attach a support and a footrest, consisting of a sheet of metal 5 mm thick, to the side members.
Making a seat
We make a seat. To do this, we need a metal corner with dimensions of 4.5 × 4.5 × 0.4 cm. To this support we need to attach boards covered with foam rubber for greater comfort. For the wheel axle, you can use a steel pipe that is sized to fit the frame.
At the ends there should be spikes secured with steel pins. As wheels, you can use any wheels from old equipment that has served its purpose. To hold the rippers, a metal rod measuring 5x5x0.5 cm is used.
On the sides of this rod there are elements holding the blade struts. They are made from metal plates 0.5 cm thick. As a seeder, you can use a regular 10 cm pipe, the wall thickness of which will be about 0.3 cm.
A furrow cutter will be located at the bottom of this structure. Digging elements, for which discs from a seeder can be used, must have two bearings. In principle, this description is quite schematic, with an approximate indication of dimensions and parameters.
On the Internet you can find quite a lot of detailed drawings, where other markings are indicated, so there are no strict recommendations in this process.
How to make a potato planter?
When considering the option of manufacturing such a device yourself, you must first think through all the components included in its design; for this you need to make a drawing, indicating on it all the main and auxiliary dimensions.
Frame
It is a welded structure made of two long spars, for which several pieces of channel can be used. Three steel jumpers are welded between them. An arch is welded at one end of the side members - this will be the front part of the device. On the arch there is a fork with a central link. Two fastening pins are welded to the frame; they are necessary for the lower link.
On the two outer sides of the frame, stands for the seed feeder are welded; they are made of plates. Next to them there are supports for the closing discs. To strengthen the frame and give it rigidity, two strips are welded crosswise to it; they are located closer to the arch, which is also reinforced with overlays made of 4 mm thick steel. Right triangles are cut from a sheet of the specified thickness.
Maybe
Types and descriptions of seeders for walk-behind tractors
Planting garlic and other crops with a walk-behind tractor can be done with different seeders. Below we will consider the design features of each type of seeders for walk-behind tractors in more detail.
Row seeders
Devices of this kind are used for row sowing and simultaneous placement of seeds into the soil. Depending on the purpose, on sale there is a row seeder for a walk-behind tractor for garlic, a corn seeder for a walk-behind tractor, and a universal row seeder, which is suitable for sowing seeds of any crops.
The main elements of row seeders on a walk-behind tractor are coulters and sowing devices. The coulters are equipped with special “legs” or chains, which are necessary for embedding seeds into the ground. For operation in areas with heavy soils, row seeders with disc coulters are used, and for use on loose soil, devices with anchor coulters are used. The main advantages of row seeders include the uniformity of sowing and the optimal depth of placement of planting material.
Nest seeders
Devices of this kind are optimally suited in cases where the farmer needs to sow crops precisely into holes or nests prepared in advance. Nest seeders for walk-behind tractors can be successfully used for sowing seeds of garlic, onions and other small planting material.
The advantages of nest seeders for walk-behind tractors include ease of use. Such equipment is characterized by small dimensions and weight. However, this type of seeders is very slow, which is why it takes a lot of time to work with them.
Square nest seeders
These grain seeders for walk-behind tractors make nests at pre-marked points in conventional squares or rectangles. Such structures consist of a frame, support wheels, a mechanism for unwinding measuring wire from a reel and sowing sections.
The advantages of these devices for a walk-behind tractor include the ability to cover a large area of territory when working. Among the disadvantages of such seeders is their large mass due to the presence of a large number of metal elements in their design. These seeders are not capable of developing high speed, which leads to loss of time when working with it.
Broadcast seeders
Devices of this type have a simple and reliable design, do not require special care and rarely require repairs. The principle of operation of broadcast seeders on a walk-behind tractor is very simple: during operation, seeds taken by a special disk are subject to pressure, as a result of which they are thrown out of the seeder onto the site.
The advantages of such devices include high productivity. Among the disadvantages, it is worth highlighting the difficulties when using seeders at the edge of the plot, in which most of the seeds are thrown outside the garden.
Dotted seeders
These devices are used for sowing seeds of garlic, onions, corn and legumes in pre-prepared nests, which are located at a certain distance from each other. Despite the complex design and large dimensions, dotted seeders for walk-behind tractors are quite easy to operate.
The advantages of such devices include high precision during sowing and good productivity. Among the disadvantages, we should highlight the inability to use such seeders in areas with heavy clay soil.
Quick manual potato planter
In this publication, we will first consider the simplest version of a manual potato planter, which will be useful for those who would like to quickly build an affordable tool and not spend money on complex designs.
Gardening tools and other products in this Chinese store.
The second part presents more complex structures that will have to be tinkered with, but for perfectionists and, at the same time, manual labor enthusiasts, these will be the most interesting developments.
The first video shows the simplest manual potato planter in the form of a wooden handle and a protrusion for the leg. According to the author of this mechanism, the potato yield does not suffer at all with this method of planting, but on the contrary, it is higher.
The device, which is presented in this video, is not particularly or even at least some kind of sophistication. The gardener simply called it “digging stick.” But, for the purposes of this publication, it would be fair to consider it as a manual potato planter. With its help, you can plant potatoes without a shovel practically with your own hands. This method is called “heeled” among gardeners.
The field was previously plowed with walk-behind tractors. First, a 70X20 field is marked. Or they simply stretch the threads at a distance of 70 cm from each other, and during planting of potatoes, 20-30 cm are measured each time using a potato planter.
Holes are made every 20 centimeters and potatoes and peas are thrown into them. All this is immediately covered with earth. The soil must be moist, because if it dries out, the holes will crumble. Therefore, you need to plant potatoes using this manual potato planter immediately after plowing the field. Peas do not interfere with potatoes; they grow in symbiosis. The fact that holes are made and the earth is compacted does not have any consequences for the harvest. On the contrary, it helps to collect moisture after rain. Such a simple mechanism, made in haste, has served for 7 years. In another publication about what kind of potatoes should be planted.
Second development.
When planting potatoes, after they are laid in the furrows, it is necessary to cover them with soil. Many people suffer when working with shovels, rakes or hoes. This video shows a manual potato planter that makes planting potatoes quick and easy. The furrows were pre-cut using a walk-behind tractor with a special device for cutting furrows. Planting material was placed in the furrows. A homemade heel is made in front of the hiller to adjust the constant depth and make it easier during work. Now we will show how the potato planter works. Thus, there were no more problems with planting potatoes and covering them with soil. The planter is also convenient when moving it across the field. You just need to turn it to the top with the working part and move it on the wheel.
Homemade seeder for walk-behind tractor: manufacturing features
In order to obtain a truly practical device after completing all the necessary procedures, you must:
- Two running wheels;
- Seed box;
- Screws and nails;
- Steel sheets;
- Rubber plates;
- Seeding roller;
- Self-tapping screws, tenons, steel angles;
- Two bearings and bracket.
The process itself is simple, but requires maximum concentration, so you need to pay attention to the following features:
- The seed box can be created from boards (wood) (thickness no more than 15 mm);
- To close them from the bottom, you can use steel overhead bottoms (1 mm thick);
- The walls themselves are connected using self-tapping screws, iron corners and spikes;
- Using nails, wooden linings (15 mm thick) are mounted on the bottom of the box walls;
- The process of placing the seeding roller in the walls and linings is accompanied by the creation of cutouts (semicircle shape). The fastening brackets are carefully screwed to the linings using screws;
- Special rubber plates, which are placed in inclined bottoms, help seeds fall out of the cells;
- The wheels of the created grain seeder for a walk-behind tractor (or corn) have 60 mm hubs;
- Special holes are created in the hubs (the diameter is similar to the seeding roller);
- The opener can be made from a sheet of iron and then attached to the brackets;
- You can adjust the depth at which the seeds will be placed by re-fastening the opener in special holes;
- A bracket is attached to the back wall of the seed box, serving as a “connecting link” between the device and the walk-behind tractor.
Sources
- https://MachinSpec.com/selskoxozyajstvennaya/kartofelesazhalka/samodelnaya-dlya-motobloka.html
- https://kalibrtractor.ru/spetstehnika/kartofelesazhalka-dlya-motobloka-svoimi-rukami.html
- https://tokar.guru/stanki-i-oborudovanie/motobloki/kartofelesazhalka-dlya-motobloka-izgotovlenie-svoimi-rukami.html
- https://dacktil.ru/motoblok/samodelnaya-kartofelesazhalka-dlya-motobloka.html
- https://www.samodelkindrug.ru/9007-2/
- https://pochini.guru/tehnika/izgotovlenie-kartofelesazhalki
- https://sotka.guru/dachnye-prisposobleniya/motobloki/izgotovlenie-kartofelesazhalki-dlya-motobloka-svoimi-rukami.html
[collapse]