Today it is simply impossible to see a personal plot and a dacha, no matter where potatoes are grown. Planting and subsequent care of this vegetable poses certain difficulties, so many gardeners decide to purchase special devices that automate the process of planting root crops and subsequent care of this vegetable crop. A manual potato planter can be made by every gardener with his own hands, which will allow him to save on the purchase of garden tools.
At first glance, making such hand-held devices may seem like a difficult job that only experienced craftsmen can do. However, in reality, with minimal experience working with a welding machine and having high-quality projects on hand that can be easily found on the Internet, every gardener can cope with such work.
Homemade potato planter
The story begins a long time ago, when I switched my garden to J. Mittlider's narrow bed system.
As you know, the width of the bed is 45 cm. Minus the sides. The entire width used for planting is 30-35 cm. These are wonderful, comfortable, well-thought-out sizes. But there must always be a fly in the ointment. And she was found. Potatoes according to J. Mittlider's method are planted in two rows. I don’t know about anyone, but I felt inconvenienced. In our area, it is traditional to cut deep furrows and plant potatoes in them. Then the furrows are filled in. In principle, this is a fairly convenient method, but not for narrow beds. But try planting under a shovel when the entire width of the bed is one and a half times the width of a bayonet?
I knew that there was a method of planting potatoes “iod stake”: a thick stake was used to press a hole in the ground and a tuber was placed there. But this method was more suitable for small tubers. I used large seeds of 150 -200 g. Try to push the soil to the required depth with such a log! But what if you don’t push a hole under the potatoes, but cut a pipe with a sharpened edge at the bottom, take out the soil and shake it out? Only the pipe should be comfortable and the excavated soil should easily pour out of it. No sooner said than done. The device turned out to be so easy to use that planting potatoes turned into a holiday. I place a marker along the bed to make holes at the same distance. I walk along the bed and make holes without bending over and crouching at each future plant. I leave piles of excavated soil right in the garden bed next to the holes. The wife follows and places the tubers in the holes. Then, using a rake, I sprinkle the hole with the excavated soil. The beds do not collapse. The holes are all the same depth and at the same distance. The bottom compacts a little. The planting material is germinated in advance in the light, and the seedlings appear quickly. Beauty!
Time has passed. I gradually gave up digging up the soil. From the system of J. Mittlider he left the dimensions of the beds, passages and the scheme for planting vegetables. This is where my planter came in even more useful. After all, there is a taboo on digging! How to make holes for planting potatoes? And it's very simple. Do as you did. Class! Moreover, the tool turned out to be universal. For example, gladioli corms are planted deep. The same planter comes to the rescue.
I grew tomato seedlings in pots. To plant, you need to squat and make holes with a scoop. But there were 250-300 plants. Yes, and three varieties of pepper. For what? There is also a planter. I made myself two sleeves with different diameters for tubers of different sizes. I have never regretted it.
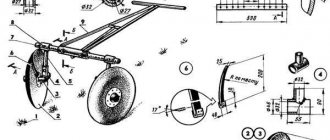
The device is very simple. I will give my sizes in the description. But they are not critical. You can use any that are convenient for you. The main element is the sleeve. This is a piece of pipe, the edge of which on one side is sharpened to a cone on a lathe. This is the cutting edge. It will go into the ground. As I said, I have two sizes of sleeves. Large - with a diameter of 90 mm and a height of 180 mm. The smaller one has a diameter of 60 mm and a height of 150 mm. A plate with a pre-drilled hole is welded to the other end of the sleeve. This is a bracket. A hollow stand will be welded onto it - a piece of pipe with a diameter of 22 mm. We must try to maintain the perpendicularity of the stand in relation to the bracket. The axes of the sleeve and the stand should ideally coincide. The performance of the planter depends on this. A handle was welded to the upper end of the rack in a T-shape - a piece of pipe with a diameter of 22 mm and a length of 400 mm. For ease of use, the length of the stand is selected individually so that the T-shaped handle is located at or just below the waist. My racks are 800mm high. In the middle of the handle, along the axis of the stand and sleeve, we drill a hole into which the rod will fit - a piece of wire with a diameter of 4 mm. It is better to make 5-6 mm. The rod fits into the hole in the handle, passes inside the post and enters the sleeve. A thread is cut at the lower end of the rod and a limit nut is screwed on.
Types and types of potato planters
Potato planters vary in size and type of tuber feeding.
To size
Small-sized ones are used for planting potatoes in a summer cottage or garden plot. The design provides a regulator for the depth and height of the earth ridge, which is formed when the soil is raised. Small-sized devices are suitable for walk-behind tractors. The hopper volume of such potato planters does not exceed 35 liters. The planting rate is 0.1-0.2 ha per hour.
For medium potato planters, the hopper volume reaches 45 liters, and the productivity is 0.25 hectares per hour. Such planters are installed on heavy walk-behind tractors and mini tractors.
Large ones are used for planting over large areas. Their bunker is correspondingly large and is loaded using a dump truck.
By type of seed supply
In a unit with a spoon system, potatoes are fed for planting using a structure of spoons attached to a belt.
The flat belt system consists of horizontally located belts between two main ones. This device produces a single-row planting.
The multi-belt system allows you to plant potatoes in two rows. Each row is served by several belts - up to 28 pcs.
Reference. When deciding which potato planter is better - belt or chain - you should take into account the fact that with the second, due to vibrations during operation, potatoes fall from the plate back into the hopper, and the planting turns out to be uneven.
Homemade potato planter.
Quick manual potato planter
In this publication, we will first consider the simplest version of a manual potato planter, which will be useful for those who would like to quickly build an affordable tool and not spend money on complex designs.
Gardening tools and other products in this Chinese store.
The second part presents more complex structures that will have to be tinkered with, but for perfectionists and, at the same time, manual labor enthusiasts, these will be the most interesting developments.
The first video shows the simplest manual potato planter in the form of a wooden handle and a protrusion for the leg. According to the author of this mechanism, the potato yield does not suffer at all with this method of planting, but on the contrary, it is higher.
The device, which is presented in this video, is not particularly or even at least some kind of sophistication. The gardener simply called it “digging stick.” But, for the purposes of this publication, it would be fair to consider it as a manual potato planter. With its help, you can plant potatoes without a shovel practically with your own hands. This method is called “heeled” among gardeners.
The field was previously plowed with walk-behind tractors. First, a 70X20 field is marked. Or they simply stretch the threads at a distance of 70 cm from each other, and during planting of potatoes, 20-30 cm are measured each time using a potato planter.
Holes are made every 20 centimeters and potatoes and peas are thrown into them. All this is immediately covered with earth. The soil must be moist, because if it dries out, the holes will crumble. Therefore, you need to plant potatoes using this manual potato planter immediately after plowing the field. Peas do not interfere with potatoes; they grow in symbiosis. The fact that holes are made and the earth is compacted does not have any consequences for the harvest. On the contrary, it helps to collect moisture after rain. Such a simple mechanism, made in haste, has served for 7 years. In another publication about what kind of potatoes should be planted.
Second development.
When planting potatoes, after they are laid in the furrows, it is necessary to cover them with soil. Many people suffer when working with shovels, rakes or hoes. This video shows a manual potato planter that makes planting potatoes quick and easy. The furrows were pre-cut using a walk-behind tractor with a special device for cutting furrows. Planting material was placed in the furrows. A homemade heel is made in front of the hiller to adjust the constant depth and make it easier during work. Now we will show how the potato planter works. Thus, there were no more problems with planting potatoes and covering them with soil. The planter is also convenient when moving it across the field. You just need to turn it to the top with the working part and move it on the wheel.
Landing cone design
A planting cone is the simplest planter. It consists of two parts - a cone-shaped working part and a handle. Since the planter must make holes even in hard soil, the working part must be made of high-quality metal. As a rule, carbon steel or stainless steel is used to produce such tools.
The working part (cone) is pointed on one side and has a measuring scale on it, which is very convenient for determining the depth of the planter depending on the type of seedling.
When purchasing, pay attention to the following parameters:
Handles can be plastic or wooden. Plastic ones are more practical, since wood can dry out over time and injure the palm. Cones with a sliding mechanism are more convenient when removing soil from a hole and filling in seedlings.
When making a purchase, be sure to ask how long the warranty covers. Manufacturers of high-quality garden equipment assume a warranty of at least three years.
DIY device for planting potatoes. Homemade potato planter: drawings
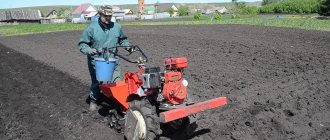
Potatoes are one of most people's favorite root vegetables. And therefore it is not surprising that you can see its plantings on almost every personal plot. But the areas of these plantings are very different. Some have a small garden bed, while others have a whole plantation. And this is due not only to differences in the size of summer cottages. The method of planting plays an important role in this matter. Doing this by hand is difficult and tedious. But technology will greatly facilitate this process. A special device for planting potatoes with your own hands can be aggregated, for example, with a walk-behind tractor or mini tractor. Or it can be used as a separate unit. Let's consider several similar options.
Types of landing devices
There are several types of devices for planting tomato seedlings in open ground, a greenhouse or a greenhouse:
For planting a small number of seedlings in small beds, the simplest device is suitable - a planting cone. With its help, you can easily make many holes of the required depth in the garden bed. This is an inexpensive device, and you can make it yourself.
A manual transplanter or an automated device is suitable for planting cassette seedlings in large household plots or farms. Their cost is much higher than a landing cone, and you won’t be able to make such a device yourself. The high cost is explained by a more complex design; in addition, such planters have undeniable advantages: when planting seedlings, there is no need to bend down, and productivity increases by 9-15 times.
Preparing for work
Before you start making devices for planting potatoes with your own hands, you need to familiarize yourself with the theory. There are two main tasks that are set for the unit:
- Plant potato tubers at the same distance from each other. It is convenient if this interval can be adjusted, as in most factory planters.
- The depth of the holes in which the tubers are placed should also be the same. This will allow you to expect the same period of plant germination.
All designs are created taking these requirements into account. It is worth understanding that devices for planting potatoes (manually or using machinery) only facilitate the planting process. But they still require human participation.
There are several design options. A homemade potato planter can be single-row, double-row or three-row. This will depend on the type of frame used to make the frame. A container is attached to the frame into which root vegetables are poured. It can hold up to 20-30 kg. An elevator with bowls is installed in this bunker, which lower the tubers into the prepared holes.
Preparation of drawings
A self-made potato planter is assembled on the basis of pre-prepared drawings and diagrams. You can develop them yourself if you have certain skills.
You can find a large number of drawings of potato planters of various designs and designs. You can choose a ready-made option. Or you can take the diagram and modify it according to your own discretion and understanding. In any case, before starting work, you must check all specified dimensions and data. Only after this can you start working.
Handheld devices
First, let's look at several design options that make planting potatoes easier, but at the same time require physical effort. They are not connected to equipment, but allow you to do the work manually. Devices for planting potatoes in this way are easy to implement. But they can also be made in different variations.
The simplest option is a cone-shaped punch. It is driven into the soil to the required depth. True, this requires some physical effort. This creates a hole in the soil where the potatoes fall. After removing the punch, the hole is filled up.
The second option is a slightly improved breakdown. It is made of a metal pipe, one edge of which is cut at an angle. A container for potatoes is attached to the top. A valve is made on the pipe. The pipe is driven into the ground and tilted so that the valve opens. A potato tuber coming from above falls out through the existing hole. The potatoes remain in the ground and are covered after the pipe is removed.
Another version of a homemade potato planter is popularly called “crow’s beak” due to its external similarity. The “beak” is driven into the ground in a closed form. After the “beak” opens, a tuber is thrown there, which remains in the ground.
Options with partial mechanization
This group includes a tool for quickly planting potatoes, which looks like a regular garden cart with one wheel. This option is suitable for soft areas of soil that have been prepared in advance.
In the cart, the wheel is replaced with a rotary cutter, which can have several compartments at once (for example, four). Potatoes are poured into the cart. From there the tubers fall into the cutter compartments. When moving due to the rotation of the cutter, the tubers remain in the ground. It is worth noting that landing requires physical effort. To facilitate the process, another handle is welded to the front of the structure. It allows two people to move the device.
Operating principle of mechanized options
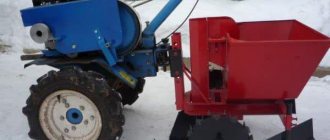
You can assemble devices on your own that are suitable for coupling with equipment. For example, for a walk-behind tractor. The potato planter in this case will have a more complex design. The rotation of its individual parts will depend on the operation of the equipment’s engine.
An axle is welded to the structure frame, on which the sprocket is placed. Another sprocket is fixed a little higher, which is connected to the previous one through a chain. When the tractor moves and its wheels rotate, the hitch axle begins to rotate. Due to this, the upper sprocket rotates through a chain drive. Cups are attached to the chain, into which root vegetables fall from the hopper. Rotating, the cups transfer the potatoes into the soil. As you can see, it is not difficult to assemble a device for planting potatoes with your own hands. Having selected a suitable drawing and purchased the necessary materials, you can begin to work.
Purpose and principle of operation
In agriculture, planting potatoes is rightfully considered one of the most labor-intensive processes.
The task is greatly facilitated by using one of the types of potato planters, which actually reduce labor costs. The main advantages of both hand tools and mounted equipment are:
- Reducing planting time and physical effort required. Even when used manually, the potato planter is easy to operate and, most importantly, fast.
- Uniform distribution of tubers over the planting area, equal planting depth. Due to the possibility of adjusting both parameters to individual working conditions, it becomes possible to ensure an increase in productivity, therefore a potato planter is also profitable.
- A large number of different types of models of varying performance and functionality, the ability to choose the option that suits specific conditions of use.
A manual potato planter is used to complete the entire process of planting tubers.
The principle of its operation resembles a shovel, but a pointed funnel with a tuber placed in it is immersed in the ground.
After digging deep into the planting site, the funnel opens, pushing the soil apart, the potatoes fall into the formed hole, after which the tool is removed, and the hole is naturally filled up.
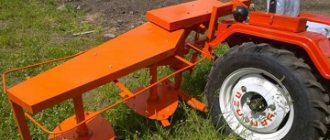
Aggregated mechanical potato planters, in the process of movement, independently form furrows into which tubers are distributed at an equal distance between adjacent holes, after which a special hiller fills the vegetable.
To the advantages described above, we should add the automation of the process, and for some models, the application of fertilizers to the soil is an integral part of planting.
Required materials and tools
To assemble a device for planting potatoes with your own hands, which will work in tandem with a walk-behind tractor (mini tractor), you will need the following materials:
- metal channel (square pipe or corner);
- a hopper (a tank from an old washing machine will do; it can be made from a sheet of metal or thick plywood);
- two stars;
- chain;
- wheels (preferably metal) or material for their manufacture.
To work on the project, you will need a grinder with cutting wheels for metal, a welding machine with electrodes and some other tools that any owner has in the garage. The connection of metal elements is made by welding. You can connect everything with bolts, but this will not add reliability and rigidity to the structure.
Execution of work
Creating a do-it-yourself device for planting potatoes begins with preparing the frame. A metal pipe is used for this. Next, prepare the wheels. Metal wheels will not slip if the soil is too loose. You can make them yourself from metal strips. It is convenient to use a gas cylinder. From it you need to cut two rings (about 15 cm wide), on the outside of which grousers are welded. Inside, spokes are made from metal fittings, pipes or plates. Their design does not matter.
Next, a chain drive is prepared, consisting of two sprockets and a chain connecting them. It is better to select gears from old agricultural machinery. Options from a bicycle will not work. Grips in the form of cups with a diameter of 5-6 cm are welded onto the chain, which will lift the tubers.
A bunker is made on top of the frame into which the potatoes will be poured. The bipod is easy to make. Difficulties may arise when making a hiller. Therefore, it is easier to take disks from old equipment.
A gardener-inventor made a hand-held planter for seedlings from rebar
I couldn’t miss this idea without posting it specifically for subscribers and everyone interested. It’s a pity that television does not promote the ideas of homemade inventors. And thanks to the masters for sharing ideas with us, distributing them on their own. This master should definitely be invited to work in factories and design bureaus as a technical innovation engineer. Such tools exist and there are modifications. But what is surprising about this development is the combination of practicality and relative simplicity of its planter. And the presentation of his product to the general public is worthy of praise: no slurred speech, interjections or omissions. Everything is clear and to the point. It's easy to repeat with these instructions.
Cool design of seedling planter
The tool is very high quality. It is important that the working part does not compact the soil, but the soil is cut and carefully pulled out of the hole. Potatoes and seedlings will quietly take root.
Inventors shop at a budget Chinese online store.
Inventions for DIYers in a Chinese online store.
Beautiful and, most importantly, comfortable thing!
The author of the video is a blogger of the YouTube channel “GARDEN, VEGETABLE VEGETABLE, WITH YOUR OWN HANDS”
The owner made a convenient device for planting seedlings in the ground. Drawing
Konstantin Solomatin shared his homemade product to streamline the work of amateur gardeners. The owner of the garden tried it out when planting strawberries, and it is convenient to plant with this device.
The advantage of this development is ease of manufacture and neat results. Suitable for leisurely work on the ridges, with comfort.
For his device, the master took a piece of duralumin pipe. These are used in chimneys. Its diameter is 6 cm. Two suitable plates are used for the handles.
Due to bad weather, it was not possible to film how the homemade product works. But let's explain in words. The tool works like this. A seedling is placed inside the cone from above, roots down. The cone is inserted into the ground. The “jaws” unclench, leaving the plant in the hole, and the tool rises up.
In the video, the master addressed the issue of optimal sizes and showed how he made his product (YouTube channel “Konstantin Solomatin)