Spring has arrived, which means it's time to prepare potatoes for planting. It is believed that a potato planter can increase the productivity of the planting process by 10-20 times. This does not mean that this device requires a tractor or walk-behind tractor; potato planters can also be manual.
Such equipment is a necessity these days, because cultivating fields and vegetable gardens in the age of high technology and automation with one’s own hands is not the most rational activity. Let's figure out how to properly make a potato planter with your own hands, get acquainted with the drawings and dimensions of the device and its components.
Homemade potato planter for walk-behind tractor: drawings, photos, videos
Potato planter for walk-behind tractor: drawings, dimensions, photos, video of production.
Planting potatoes by hand is a tedious process, because after plowing the garden, the soil quickly loses moisture and you need to plant the tubers as quickly as possible; if the area for planting is large, the planting process may take several days.
With a walk-behind tractor and a potato planter, the planting process will go much faster , because you can immediately install the planter and guide discs on the walk-behind tractor to fill the harrow with soil.
If the walk-behind tractor is powerful enough, you can immediately install a plow in front of the planter, which will make a furrow for planting potatoes.
There are quite a lot of options for potato planters on the Internet; we will consider the best proven option with a simple design.
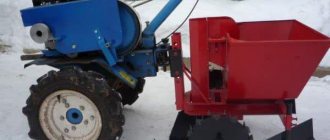
The design of the potato planter consists of a hopper for potato tubers, which is mounted on a frame made of steel profile. In turn, the frame is mounted on an axle with a pair of metal wheels with lugs.
A sprocket is welded onto the axle, which drives a chain with bowls. As the bowl moves, potatoes are lifted from the hopper and thrown into the furrow along the guide pipe.
Types and principle of operation
According to its design features, a potato planter is a type of attachment that is installed on the rear linkage of a tractor.
The performance of this equipment largely depends on the type of tractor. For example:
- Models that are usually used with walk-behind tractors are those that plant one row of potatoes per pass.
- The mini-tractor is suitable for products capable of planting up to two rows of seeds. Three-row modifications are used less frequently, if the power of the equipment allows.
- For middle-class tractors, power is used by planters in three-row or four-row versions.
- Heavy equipment can install models with up to six rows planted at a time.
Performance parameters determine the cost of the product. Therefore, before purchasing, it is necessary to correctly determine the scale of the upcoming work.
Separately, it is worth considering the device of the potato planter. Almost all models are designed according to the same principle:
- Steel frame equipped with driven wheeled chassis.
- Openers for forming planting furrows.
- Seed storage hopper equipped with a device for introducing planting potatoes.
- Disc furrow sealers.
The principle of operation of the equipment is as follows: when moving, the openers open the soil to a given depth. Seeds fall into the ground from a hopper, and the planting density can be adjusted.
The furrow is closed using disc blades. The result is an even bed, with the same planting density and row spacing.
Homemade potato planter for walk-behind tractor.
To make a homemade potato planter you will need:
- A couple of axes.
- Bearings.
- Chain from a car engine.
- Two sprockets for the chain.
- Wire with a cross section of 6 mm.
- Sheet metal 2 mm thick.
- Profile steel pipe.
- For a bunker, any cone-shaped container.
- Welding machine, electrodes.
- Grinder with cutting wheel.
- Electric drill, drills.
- Other locksmith tools.
Operating principle of mechanized options
You can assemble devices on your own that are suitable for coupling with equipment. For example, for a walk-behind tractor. The potato planter in this case will have a more complex design. The rotation of its individual parts will depend on the operation of the equipment’s engine.
An axle is welded to the structure frame, on which the sprocket is placed. Another sprocket is fixed a little higher, which is connected to the previous one through a chain. When the tractor moves and its wheels rotate, the hitch axle begins to rotate. Due to this, the upper sprocket rotates through a chain drive. Cups are attached to the chain, into which root vegetables fall from the hopper. Rotating, the cups transfer the potatoes into the soil. As you can see, it is not difficult to assemble a device for planting potatoes with your own hands. Having selected a suitable drawing and purchased the necessary materials, you can begin to work.
Drawings of a potato planter for a walk-behind tractor.
Calculation of gears of the chain rotation mechanism with potato planter bowls.
The frame of the potato planter is welded from a profile pipe; a tank from a Soviet Riga washing machine or a similar cone-shaped container can be used as a hopper.
Bearings with a lower axle and a drive sprocket for the chain and vertical posts for the upper axle with a sprocket are attached to the frame.
Bucket rings made of 6 mm wire are welded to the sides of the chain; the buckets must be welded in such a way as not to weld the connections between the chain links.
To prevent the tubers from falling out of the buckets prematurely, you need to install a guide pipe; alternatively, you can use a plastic drain pipe with a diameter of 100 mm.
To fill the furrow, two rotary disks with the ability to adjust the angles are installed.
Installation diagram of the planter on a walk-behind tractor.
I recommend watching a video of making a homemade potato planter.
Video: homemade potato planter in action.
Elevator device
And now in more detail about each of the most important nodes. The most important among them is the elevator. It performs 2 functions: transporting - moving and peeling potatoes, and also a base function - a complete motor-gear mechanism is attached to its frame. The elevator is mounted asymmetrically to the wheel carriage.
Elevator (conveyor and ramps are not shown in the top view): 1 - ploughshare, 2, 10 - borg, 3, 9 - ramps. 4 - frame, 5 - adjustable support sprocket (z.=9, 2 pcs.), 6 - non-adjustable support sprocket (z=9, 2 pcs.), 7 - non-adjustable traction sprocket (z=9, 2 pcs.), 8 — drive shaft, 11 — M10 bolt (16 pcs).
This is due to the fundamental features of the operation of the tractor - the track width, as a rule, is greater than the distance between the hogs, so one group of tractor and carriage wheels constantly moves between the rows, and the other group moves along the harvested area of the field. The elevator frame is made of 45x45 mm angle profiles. The ploughshare and the housings of the support and traction sprockets on the conveyor drive shaft are attached to it. Chain-bar conveyor (caterpillar) - from a decommissioned potato harvester.
Its chains are reduced to approximately 1670 mm (44 rods are made), and the rods are shortened to 300 mm. The caterpillar is equipped with blades for gripping fruits (if they were absent, large fruits would roll down) and is mounted on support sprockets; the front ones are adjustable (they determine the tension level of the chains).
The movement of the conveyor is ensured by traction sprockets on the drive shaft. Moreover, the speed is greater than the movement of the tractor between the rows, otherwise the combine would not be able to cope with the amount of incoming fruit. Sides made of sheet steel (thickness - 1 mm) are attached to the corner profiles of the frame; slopes are attached to the sides, covering the chains so that potatoes do not fall there. Moreover, two pairs of brackets are installed: one pair for the slats, which regulate the angle of inclination in relation to the wheel carriage, and the other pair for installing the elevator to the carriage. As stated above, a motor-gear mechanism with its own base is mounted to the elevator.
Do-it-yourself potato planter for walk-behind tractor
A do-it-yourself potato planter for a walk-behind tractor is a convenient unit used by summer residents and gardeners.
Such a unit consists of the following components:
- Frame with metal wheels equipped with lugs;
- Bunker for planting material;
- Chain with cups (conveyor) - mounted on 2 sprockets, one of which is fixed to the wheel axle, and the second - in the upper part of the hopper;
- Seed line - serves to move the chain with the cups and the tubers placed in them from the hopper until planting in the soil;
- Opener (furrow maker) - cutting into the soil to a certain depth, forms a groove into which the tubers are placed;
- Hatchers - discs or blades placed behind the frame that fill the furrow with the tubers placed in it, forming a triangular ridge
Drawing (diagram) of a standard potato planter for a walk-behind tractor
Produced independently, it has a number of advantages and several disadvantages.
The advantages of this unit include:
- Convenience and speed of planting - a potato planter allows you to plant areas that are quite large on the scale of a dacha or farm much faster and without significant effort;
- Minimizing soil tillage - such a unit allows you to avoid using a cultivator, hiller or harrow once again. During planting, he himself loosens, makes a furrow, plants tubers in it and “covers” them on top with a fairly thick layer of soil;
- Equal depth - a properly configured homemade unit will plant tubers at the same depth, which will subsequently ensure more friendly and healthy shoots;
- Maintaining the distance between planted tubers;
- Ease of use - planting with such a unit does not require special knowledge and skills.
Minuses:
- It is mandatory to have sufficiently powerful equipment - to use both a homemade and factory-made potato planter, you need a walk-behind tractor or
Motor cultivator with a power of at least 5-6 hp;
- Availability of welding skills - to assemble the frame, minimal skill in using a welding machine is required;
- Difficult to use on heavy soils - compared to more powerful and durable units mounted on large tractors, small potato planters have low efficiency when used on heavy clay soils.
Design
The combine harvester is simple in design - it consists of a large number of components and parts from decommissioned agricultural equipment, primarily from old, industrial potato harvesting equipment. The technology for its manufacture, however, is not complicated - you only need a hacksaw, an electric drill and a welding machine (turning work is present in a minimal amount).
Kinematic basis: 3 chain and 1 chain-rod transmissions (when using roller chains of moped sprockets, bicycles and agricultural implements).
Explanations for the drawing: 1,2 - hinge and rods of the coupling device (conditionally not shown in the front view), 3 - frame of the motor-gear unit, 4 - fuel tank, 5 - engine, 6 - drive chain of the elevator conveyor, 7 - hopper storage, 8 — wheel carriage, 9 — adjustment bars, 10 — elevator mounting unit, 11 — chain-rod conveyor, 12 — elevator side, 13 — ploughshare.
How to make a potato planter for a walk-behind tractor with your own hands
A potato planter for a walk-behind tractor is a unit that you can not only purchase, but also make with your own hands. To do this, you need to prepare all the necessary materials and tools,
- Corner or channel for the frame;
- Support metal wheels;
- Bearings;
- Sheet steel for the rear wall of the bunker, 1.5-2.0 mm thick;
- Galvanized sheet;
- Sprockets with 19-21 teeth;
- Timing chain;
- Axle for drive wheels;
- Steel wire 3-4 mm thick.
Related article: Ordan for potatoes: processing instructions and dosage
Tools
In order to make a potato planter for a walk-behind tractor with your own hands, you will need the following tools:
- Grinder (angle grinder);
- Welding machine (semi-automatic);
- Drill or powerful screwdriver;
- Compressor with spray gun.
A reliable welding machine is the main tool for making a homemade potato planter
Manufacturing process
- A rectangular frame is welded from a channel or corner, its size is selected taking into account the size and capacity of the hopper;
- The first sprocket is attached to the center of the support wheel axis;
- On both sides of the sprocket, bearings are pressed onto the axis of the support wheels in cages made of a thick-walled pipe of suitable internal diameter;
- Metal support wheels are attached to the axle;
Important! A belt drive with pulleys instead of sprockets for the tuber planting mechanism instead of a chain drive is not suitable, since the belt is more susceptible to stretching, slipping and damage in wet spring conditions.
The axle is welded to the frame; for this purpose, the bearing races are welded by resistance welding to a transverse corner specially provided for this purpose in the frame.
- A spiral of 12-15 turns is wound from the wire using a vice and a pipe with a diameter of 50-60 mm;
- The spiral is cut lengthwise, obtaining 12-15 individual rings;
- The rings are welded to the chain at a distance of 8-10 cm from each other. To prevent small potatoes from slipping through the ring, a bottom made of the same wire or pieces of sheet steel is welded to it from below;
- For the seed tube, a pipe is used with an internal diameter 10-55 mm larger than the diameter of the cups (metal rings with bottoms for tubers), and with a length equal to approximately half that of the chain. A longitudinal cut is made in the pipe, 20-30 mm wide;
- The seed tube is welded to the frame using two thick-walled metal plates;
- In the upper part of the seed tube, the cut is increased to a width of 40-50 mm;
- Using the lock located on it, the chain is disconnected and put on the lower and then the second sprocket. At the same time, it is carefully passed through the seed tube;
- The upper sprocket with an axle and two bearings is welded to the seed tube using angles;
Conveyor tension mechanism
Important! The upper sprocket can be attached rigidly to the seed tube or have chain tension adjustment. The latter option is preferable, since it helps, if necessary, to adjust the tension force of the chain in case of its stretching.
- Parallel to the seed tube near the lower sprocket, a pipe is welded to the frame, into which a chain with cups is inserted;
- The rear wall of the hopper is welded to the pipe and to the ends of the corners on which the upper sprocket is attached;
- A hopper with a capacity of 20-30 kg is riveted or welded from tin, 0.8-1.0 mm thick;
- In the upper part of the seed tube, two limiters are welded parallel to the movement of the chain, which are necessary so that the potatoes, falling out of the cup when turning over, fall into the pipe and not past it;
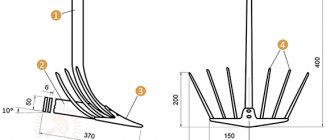
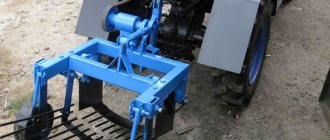
- Sealers are welded to the rear of the frame; for this, two convex plates are welded to the racks. The harrows are positioned at an angle so that when they cover the furrow with the planted potatoes with soil, they form a ridge 40-50 mm high above it;
- A towbar is welded to the front of the frame for attaching the unit to the walk-behind tractor (it can be used to adjust the height of the potato planter’s attachment to the walk-behind tractor), as well as a coulter. The body of a conventional hiller is used as a coulter. The central axis of the opener should be located under the center of the pipe from which the chain with cups emerges;
- On the wheel rims, lugs are welded in a checkerboard pattern - plates 20-30 mm high, located on the rim with a pitch of 40-60 mm;
- The frame, hopper, support wheels are cleaned, degreased and covered with 2-3 layers of paint.
Ready-made homemade potato planter
The approximate dimensions of a potato planter manufactured using the technology described above are as follows:
- Frame – 580×300 mm;
- Drive wheel diameter – 310 mm;
- Distance between wheels (track) – 585-600 mm;
- Seed tube length – 770 mm;
- The distance between the axes of the sprockets is 570 mm;
- Hopper (length×width×depth) – 370×400×400 mm;
- Covers (length×height) – 275×140 mm;
- The upper sprocket is 19 teeth, the lower sprocket is 21 teeth;
- Bearings – 4 standard 205 size bearings.
Important! When using both a factory-made and a home-made model of potato planter, it is imperative to install a heavy counterweight in the front part of the walk-behind tractor to improve the traction of its wheels with the soil.
Manual
Potatoes are the most popular crop not only in our country, but throughout the world. It is nutritious, tasty, but difficult to plant.
But large fields should be cultivated using agricultural machinery. So, to dig up and plant potatoes on a plot of 10 acres, a farmer needs to cultivate about 20 tons of land with his own hands. This work is comparable to unloading an entire train. The easiest way to solve this unpleasant problem is to make a manual potato planter. This is a very simple device that almost anyone can make.
The manual device is a pipe (empty inside) with a hole at the top and a sliding valve at the bottom. For a deeper understanding (including dimensions), we will study in detail the diagram of the device.
Drawings and dimensions of the grain crusher
The pipe must be cut at an angle from below to form a sharp handle, the task of which is to sink into the ground. The bevel contains a sliding type valve. The valve's task is to open only at the moment when the tuber is already inside at the required depth.
To avoid different depths when planting, it is necessary to place a mark at the required distance from the bevel. Such a mark can be a special flat device that rests on the ground and does not allow the pipe to move deeper. This is very convenient, because such a limiter allows you to deepen the tuber downwards, helping with your foot (like a shovel).
The upper part of the device is open; there may be a special container with potatoes and a dispenser, which does not allow several to be sent underground at once.
The practicality of the device is its most important characteristic. Many people try to make a potato planter compact, convenient, and even work on its design. This is all important, but you should never forget about the main task of the device. Potato planters should not be large and heavy, so the pipe should be no more than a meter in length and must be thin-walled.
It should be remembered that the pipe must easily withstand immersion in the ground and pressure from black soil, so the material must be very durable. Cooking it from a sheet of tin is not the best idea, because deformations cannot be avoided.
The valve is usually made of steel. Using a regular door curtain, you can make a simple hinge for attaching a valve. You can make a footrest from a metal corner.
After all components and tools are prepared, you should proceed to the actual assembly:
- Using an angle grinder (grinder), we cut the pipe at an angle, achieving optimal sharpening (the sharper the end of the pipe, the better it will fit into the ground).
- We make a valve cover that should close the pipe tightly enough at the right time.
- We fix the hinge mechanism to the pipe body.
- At a distance of 200 mm from the tip of the pipe, using welding, we install a footrest (its length corresponds to the distances between the bushes that are expected in the future).
- Handles and a container for tubers must be attached to the pipe (you should not install a huge container).
TOP 3 factory models of potato planters
Among the factory models of potato planters for walk-behind tractors, the following are the most popular:
Important! The name of these models stands for single-row potato planter (PT), the number “1” after the hyphen. The additional letters “M” and “A” indicate modifications (improvements) of previously released models.
- Type – single-row, trailed;
- Weight –25 kg;
- Track – 700 mm;
- Hopper capacity – 40 l;
- Productivity – 0.15-0.2 g/hour;
- The required power of the walk-behind tractor is from 6 hp;
- Price – 12000-14500 rub.
Potato planting unit KS-1A
- Type – single-row, trailed;
- Weight –33 kg;
- Track – 600 mm;
- Hopper capacity – 34 l;
- Productivity – 0.25 g/hour;
- The required power of the walk-behind tractor is from 6 hp;
- Price – 15,000-16,000 rubles.
KSM-1A – productive and convenient potato planter
- Type – single-row, trailed;
- Weight – 44 kg;
- Track – 600 mm;
- Hopper capacity – 41 l;
- Productivity –0.25 g/hour;
- The required power of the walk-behind tractor is from 6 hp;
- Price – 15500-16000 rub.
All these models work well with walk-behind tractors, both domestic (MTZ, Neva, Salyut) and foreign-made (Viking, CAIMAN, Daewoo).
Related article: Saving potatoes after frost: treatment of tops and seedlings
Important! You can buy one of the models listed above in almost any large and medium-sized Russian city. But the most favorable prices are in such large cities as Moscow, St. Petersburg, Yekaterinburg, Novosibirsk. This is explained by high competition among a large number of sellers: firms, private entrepreneurs, which causes a wide variety of prices, seasonal discounts, and the possibility of purchasing equipment in installments or on credit.
Thus, a homemade inexpensive potato planter for a walk-behind tractor is a very convenient, easy-to-use unit, but at the same time it greatly facilitates the work of a summer resident or small farmer. Made from materials available to everyone, such a homemade product, compared to store-bought counterparts, will have a cost several times lower, while not being inferior to them in quality and reliability.
Models
As an example, let's look at the technical characteristics of popular models.
2MBS-1
This model is produced by the famous mini tractor supplier XINGTAI. The potato planter is suitable for working with equipment with a capacity of 12-18 hp. With. This is a single-row model with adjustable planting depth, two loading bins - for seeds and organic fertilizers.
The potato planter weighs 105 kilograms, the planting width varies between 250-270 mm. Note that the productivity of the equipment is about 0.3 hectares/hour, which determines its use in small and medium-sized areas.
KS-2MT
This is a two-row model, domestically produced. Equipment weight – 115 kilograms, productivity: 0.2-0.25 ha/hour.
Among the technical features, we can note two seed bunkers with a total capacity of 70 kilograms, adjustable row spacing (65-75 cm), planting density of 5 tubers per linear meter.
A three-point hydraulic distributor is used for attachment to the tractor hitch. It is worth noting that this model is optimally suited for the MTZ-132N mini-tractor.
Homemade potato planter - a significant saving of your money
Attachments for various agricultural machinery can significantly expand the use of these units in rural areas. The presence of a walk-behind tractor or mini-tractor (for example, Russian-made) does not mean that you will be able to perform absolutely any tasks on earth.
For example, mowing lawns or planting potato tubers will not be possible for you without the use of additional equipment.
In many ways, the land is cultivated specifically for planting potatoes, because it is not for nothing that it is called “second bread.” Of course, many are accustomed to planting potatoes with a walk-behind tractor (for example, Don), manually, or using a potato planter for a mini tractor, but you can think about making a potato planter with your own hands.
This is a rather painstaking task, so you need certain knowledge and skills before starting work.
The potato planters themselves can differ from each other in a number of distinctive features and criteria. Let's consider each gradation separately.
So, potato planters may differ in the type of technological process:
- Units that plant sprouted tubers. Such fruits have developed sprouts that can sprout within 20 days from the moment they are planted in the soil.
- Potato planters that plant unsprouted tubers. Of course, not everyone has the opportunity to store potatoes in the right conditions when sprouts form normally. For such cases, similar units are used.
- Mixed potato planters.
Potato planters may differ in the number of rows:
- Single-row potato planters. Such a device is connected to a mini tractor (see here), having one potato tank. The capacity of such a bunker for tubers will reach, on average, 140 kg.
For more information about the single-row potato planter, watch the video:
- Double row units. It has the same design as the single-row potato planter.
- Both types of units are used for planting potatoes in relatively small areas of the territory, developing a fairly high speed - up to 15 km/h. Due to the fact that they have more compact dimensions, they are much more mobile than their 4-row counterparts.
- 4-row potato planters. Such units are capable of planting potatoes on an area of 2 hectares in about one hour of work. They have a bunker that can hold about 550 kg of tubers, and also have four planting elements.
In addition, potato planters can differ in the type of connection they have to the driving unit:
- trailed;
- semi-mounted;
- mounted
Types and types of potato planters
Potato planters vary in size and type of tuber feeding.
To size
Small-sized ones are used for planting potatoes in a summer cottage or garden plot. The design provides a regulator for the depth and height of the earth ridge, which is formed when the soil is raised. Small-sized devices are suitable for walk-behind tractors. The hopper volume of such potato planters does not exceed 35 liters. The planting rate is 0.1-0.2 ha per hour.
For medium potato planters, the hopper volume reaches 45 liters, and the productivity is 0.25 hectares per hour. Such planters are installed on heavy walk-behind tractors and mini tractors.
Large ones are used for planting over large areas. Their bunker is correspondingly large and is loaded using a dump truck.
By type of seed supply
In a unit with a spoon system, potatoes are fed for planting using a structure of spoons attached to a belt.
The flat belt system consists of horizontally located belts between two main ones. This device produces a single-row planting.
The multi-belt system allows you to plant potatoes in two rows. Each row is served by several belts - up to 28 pcs.
Reference. When deciding which potato planter is better - belt or chain - you should take into account the fact that with the second, due to vibrations during operation, potatoes fall from the plate back into the hopper, and the planting turns out to be uneven.
Necessary materials
A potato planter can be made at home, because it does not require any rare components or special tools. Homemade potato planters, drawings of which can be freely found on the Internet, are made from the following materials:
- a frame consisting of steel pipes and angles for attaching other structural parts to it;
- reservoir (hopper) for potato tubers;
- gears that will power the entire landing mechanism;
- steel parts that form the holes in which the potatoes will be planted, as well as burying them after that;
- wheelbase.
These are all the components of the design of a homemade potato planter that need to be made or taken from old agricultural equipment. Naturally, the work cannot be done without a welding machine, an angle grinder, as well as the presence of various channels, spars and other related materials.
You can also make a fertilizer dispenser for a potato planter with your own hands, with the help of which you will simultaneously plant and fertilize the holes. This is a fairly common phenomenon, because when planting by hand, they often use a mixture of ash and chicken droppings, or manure, with the addition of phosphate fertilizers.
This, of course, is not necessary, but additional fertilizer will contribute to the rapid ripening of the crop, which is important in our regions where the summer is quite short.
You can find out why you need a snow blower at your summer cottage in this article.
For example, read the article about the Honda snow blower - a description of the model range, main characteristics, advantages and disadvantages of the models.
And this article provides detailed instructions on how to make a snow blower for a walk-behind tractor yourself.
Characteristics, description and prices
The price for any potato planter depends on how much you plan to spend on this equipment, and a few more points:
- estimate the area that you need to plant, because there are many models of potato planters, some are suitable for sowing small plantations. And others are designed for large sowings;
- before purchasing attachments, you should carefully look at what kind of mount your tractor has, because the mounts on the canopy and the tractor may differ;
- It is worth assessing the performance of the selected potato planter, at what pace it can work; endurance is very important, especially with large volumes.
Additional functions
The cost of potato planters varies and depends on the number of built-in additional functions. It starts with budget options and ends with expensive models with built-in distributors of fertilizers and other vitamin and mineral supplements.
Try to buy special equipment directly from manufacturers, then there will be no price increases on the equipment.
Models of potato planters that are offered to us by manufacturers of agricultural machinery:
- An inexpensive option for the mini tractor 2 MBS-1, this unit has quite good technical data for working on small farms, the cost is 17,000 - 19,000 rubles.
- Model L - 201 (more details here), expensive, but equipped with a large capacity for potatoes and additional automatic adjustments, for convenient operation of the equipment, the cost of such equipment is 79,500 - 81,000 rubles.
- If the arable area is large, then a potato planter is needed for at least 400,000 rubles.
- Well, if you have an industrial enterprise, then only a four-row model of the S-super class is suitable, with hydraulics when lifting a bunker with potatoes; it costs starting from 550,000 rubles.
S-super
When choosing a potato planter, pay attention to the power of the tractor for which you are purchasing the attachment. If the power is low, then with the large weight of the unit, the tractor simply will not pull it.
In this case, there are options for compact and lightweight models:
- Ukrainian-made model KSC - 3, the main advantage of this potato planter is its weight - 73 kg, and even a walk-behind tractor can pull it.
- Model Xingtai 2 SM-1, heavy and equipped with additional options, capable of cultivating fairly large areas of land.
- Xingtai 2 CM – 2 weight of this potato planter from 200 kg.
Additional equipment includes:
- plowing the land and compacting it;
- loosening the soil;
- distribution of fertilizers in rads.
Model ASK – 2, the automatic planting system is additionally equipped with a Tehnos hiller, which levels the rows after planting. Model 2SM-1, due to its low weight, is suitable for swampy and viscous land areas.
ASK-2
Model GL 30-ECO, a good solution if the ground is rocky and hard, due to its large weight, the unit will be processed without problems. Model SK 2-130, heavy and equipped with forged wheels, is suitable for dense, dry soil. Before choosing a potato planter, look not only at its weight and characteristics, but also at the wheelbase and ground clearance, because the soil also has its own properties, it can be:
- soft;
- loose;
- swampy;
- dry;
- hard;
- rocky.
Depending on this, you need to choose the right unit with high clearance or on rubber wheels if the soil is marshy. And for dry soil, steel wheels with a small clearance are suitable.
Some landowners are wondering which potato planter is better: an automatic or semi-automatic one.
Well, let's look at both options.
Semi-automatic potato planter
The semi-automatic model requires the mandatory presence of an assistant tractor driver, as it gently regulates the process of distributing potatoes and mineral fertilizers.
The work, of course, goes faster, since the driver does not need to be distracted and regulate the process, but the mandatory presence of an operator is a minus. The unit is suitable for small farms where your family members can help. The automatic model is suitable for large farms, where one person is allocated for each unit of equipment.
You only need to connect and adjust the settings. The main thing is not to forget to add potato seeds in time.
Instructions
Many people ask the question - how to make a potato planter with your own hands, the drawings of which are on the Internet? Indeed, there are enough recommendations on the Internet with detailed descriptions and dimensions, following which you can make a fairly efficient unit.
The algorithm of actions, in this case, will be approximately as follows:
- You need to start, of course, with the manufacture of a frame structure on which the remaining components will be attached. To do this, we will need channels number 8, from which two longitudinal spars are welded, connected to each other by three transverse strips of steel.
- In front of the structure, you need to weld an arch with mounting forks going to the central rod.
- The frame can be strengthened with two inclined steel beams, which must be secured with the other side to the middle of the arch. Next, you need to secure the seatpost support, made from a 5x5x0.5 cm corner. We attach it to the spar with our own hands.
- A plastic type bracket must be welded to the inclined beams. It is to these beams that the potato tank will be attached.
- For the tank we will need ordinary plywood, the thickness of which will be approximately 12 mm.
We cut out all the sides of the bunker, and then fasten them together with steel corners. By the way, it wouldn’t hurt to treat the box with drying oil to protect it from moisture.
- Rubber sheets can be installed inside the tank so that the potatoes are not damaged by its walls during movement. Next, we attach the hopper to the bracket using two bolts.
- Next, you need to attach the wheel axle and ripper to the bottom of the frame. In principle, you can look at the drawings of a potato planter made by yourself for greater clarity.
- The wheel axle is a structure made from various parts. As a basis, you can take an ordinary steel pipe, at the ends of which you need to install trunnions. It is difficult to give exact dimensions here, depending on what diameter of pipe you are using.
- Therefore, the trunnions need to be adjusted to these dimensions on a lathe.
- You need to drill holes in the steel pipe into which special pins with spikes will be installed. At the end they must be brewed.
- The wheel axle must be secured using steel clamps, using 4 M16 bolts.
- As a wheelbase, you can use wheels from old agricultural machinery. If there are none, then you need to work a little in this regard.
- You need to weld hubs onto the wheels, on which you then need to install a pair of bearings. Next, we place the bearings on the studs and protect them with a felt pad so that they do not become excessively dirty.
- The part holding the rippers is presented in the form of a square of steel rods welded together. At the ends of the square you need to weld clamps made of 6 mm sheet steel. The racks of the cultivator blades will be located inside them.
- The seeder for this unit is made of a steel pipe with a diameter of 100 mm. At the same time, the thickness of the pipe wall must be at least 3 mm so that the structure does not bend during operation.
- A furrow cutter made of 6 mm thick sheet steel is welded to the bottom of the pipe.
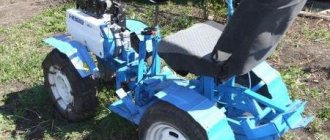
- Be sure to attach a seat for a person to the frame, as well as a footrest.
The frame structure of the seat itself is made of corners welded together. The seat can be made from ordinary boards, which are covered with something soft - foam rubber, for example.In principle, the dimensions of a homemade potato planter are indicated approximately, based on a specific case. In any case, this scheme is working, so you can safely design the unit based on these parameters.
A homemade potato planter for the T 25 is made in a similar way, because there is no definite meaning on what will act as the main traction machine - a walk-behind tractor or a mini tractor. Of course, the power indicators will be different, but the design of the potato planter itself is almost identical.
Making a potato digger
A single-row homemade installation for harvesting potatoes should be as stable and durable as possible. Any errors in the manufacture of the device can cause accidents and breakdowns, so it is better to assemble the device by people with technical education and the skills of a carver and welder.
The procedure for making a potato digger is carried out step by step:
- The frame of their prepared pipes is welded.
- A channel is welded to the bottom of the frame, onto which control units will later be installed.
- 3 vertical posts are welded to the frame at a distance from each other (support for the grille), which are connected by the remains of the channel.
- The ploughshare is welded or bolted to the supports.
Further actions are related to the working part of the vibration apparatus - the grid. It must be welded from prepared reinforcement and strips of sheet metal. When ready, it should be connected to the shaft. When the mechanism is ready, it is bolted to the already welded digger supports.
The next procedure is making the ploughshare. It can be made either from strips of sheet metal or from a metal pipe with a diameter of 24-25 cm. You should give the workpiece the shape of a ploughshare, having first cut off the pipe ring in one place. Next, the workpiece is sharpened and bolted to the grate.
The assembly of the device is completed by installing the chassis and installing fasteners connecting the digger to the mini tractor. The chassis is made at the request of the designer himself. You should attach 1 shaft with bearings to the frame or make 2 separate hubs. It is better to take car wheels (with tractor treads). They will easily endure a mileage of up to 1000 km.
Additional Tips and Warnings
In general, the process of planting potatoes using a homemade potato planter is as follows:
One person sits on a seat located on the potato planter, and the second person sits on either a mini tractor or a walk-behind tractor (see here).
You can change the depth of removal of the top layer of soil that these discs produce. To do this you need:
- Adjust the stepladders that press the support to the posts by loosening them.
- You can slightly change the angle at which these disks are located. To do this, you need to turn them a little in the right direction.
After completing the planting process, all that remains is to remove the traces left by the walk-behind tractor and potato planter. In this case, baking powder will help us, i.e. cultivator blades located on stands. By the way, the degree of their immersion in the ground can also be adjusted.
A homemade potato planter with detailed dimensions can be a great way to save money that would inevitably be incurred if you purchased a potato planter from a specialty store.
Considering that the average cost of this unit is about 15 thousand rubles, this saving looks especially justified. At the same time, there are no special costs for the necessary materials during production, because the components are used from old, worn-out units.
Potato planting technology
A minitractor or tractor is placed on a flat surface, and a device is attached to it.
Important! Fasteners must comply with the manufacturer's instructions for the specific model.
During operation, the following parameters can be adjusted:
- immersion depth;
- angle of attack of the hiller.
Often, before starting work, the field is marked with a special device made from any handle and a crossbar 1.5–2 m long. Pegs are screwed into the crossbar at a distance of 60–70 cm. The resulting device is passed along the ground, creating stripes that will serve as beacons when cutting furrows.
After this, the potatoes are poured into the bunker and planting begins. The distance between individual tubers is 30–40 cm.
This is interesting:
Starch in potatoes: varieties with high and low content.
Is it possible to spend fasting days on potatoes?
How to apply herbicides against weeds on potatoes.
Planting potatoes with a planter
A potato planter is an attachment for automating potato planting. As the potato planter moves around the area to be processed, the drive wheel with grounding hooks turns the elevator belt equipped with pipe trays. In this case, the potatoes, moved by the elevator, are thrown at a certain step into the furrow formed by the scraper. Fertilizer coming from a special bunker enters the same furrow through a special channel. Two digging discs fill the tuber, forming a ridge.
A potato planter is a very useful unit to have on the farm, even if your vegetable garden is not particularly large so you purchase or build one on its own, it will make your job a lot easier.
Mistakes when creating a potato planter
Potato planter “KS-1”
Agricultural technicians have identified several common mistakes when creating a potato planter with their own hands:
- Used for channel frames, the thickness of which does not meet the technical parameters.
- When creating a manual potato planter, the limiter bar is set too high, which leads to deep planting of potato tubers.
- When creating a potato planter for a walk-behind tractor, the closing discs located on the sides are equipped with one bearing each, which reduces the quality of work and the service life of the discs.
Semi-mounted four-row potato planter KSM-4
Description
The potato planter is designed for row planting of unsprouted potato tubers with adjustable row spacing of 70, 75, 90 cm with the simultaneous application of mineral fertilizers on all types of soils in all potato cultivation zones. The potato planter is aggregated with tractors of class 1.4 (MTZ-80/82, MTZ-100/102). The drive of the potato planter is carried out from the synchronous PTO of the tractor. The potato planter is loaded with potatoes from any dump vehicles. The potato planter ensures the fulfillment of the indicators set out in Section 2 when planting tubers of the main potato fraction (50-80 g) on light loam with a moisture content of up to 25% with stones in the arable horizon containing up to 150 mm in size no more than 33/ha, if present in the planting material by weight no more than 5% soil impurities and no more than 10% impurities of adjacent fractions of potato tubers (25-50; 80-120 g).
Specifications
| Machine type | semi-mounted |
| Productivity per 1 hour of main time, ha/h on row spacing of 70-75 cm on row spacing 90 cm | 1,2-2,4 1,8-3,2 |
| Productivity per 1 hour of operating time, ha/h at row spacings of 70-75 cm at row spacings of 90 cm | 0,8-1,6 1,2-2,1 |
| Fuel consumption, kg/ha, no more | 11,5 |
| Operating speed during main operation, km/h | 4-10 |
| Working width, row | 4 |
| Design row spacing, cm | 70; 75; 90 |
| Transport speed, km/h, no more | 15 |
| Number of personnel by profession required to perform the main operation, people - tractor driver - agricultural worker | 1 1 |
| Potato bin capacity, kg, not less | 1200 |
| Loading height of potato bin, m, no more | 0,5 |
| Total capacity of bunkers for mineral fertilizers, dm3, not less | 200 |
| Structural weight of the machine, kg, no more | 2240 |
| Operating time utilization factor, not less | 0,45 |
| Process reliability coefficient, not less | 0,95 |
| Planting density, thousand pcs/ha | 30-65 |
| Planting depth, cm | 5-15 |
| Uniformity of the layout of tubers in a row (on the main fraction of potatoes 50-80g), %, not less | 40 |
| Number of omissions (on the main potato fraction 50-80g), %, no more | 5 |
| Number of twos (on the main potato fraction 50-80g), %, no more | 5 |
| Uniformity of tuber placement, coefficient of variation, %, no more | 15 |
| Damage to tubers, %, no more | 3 |
| Dose of mineral fertilizers, kg/ha | 50-400 |
| Unevenness of fertilizer application along the length of the ridge, %, no more | 20 |
| Overall dimensions in working position, mm, no more: — length | 4750 |
| - width | 4500 |
| - height | 2650 |
| Overall dimensions in transport position, mm, no more: - length | 4200 |
| - width | 4500 |
| - height | 3000 |
| Operational labor intensity of installation (before assembly) of the machine at the place of its use, man/hour, no more | 9,5 |
| Operational labor intensity of conversion to another row spacing, person/hour, no more | 4 |
| MTBF, h, not less | 40 |
| Service life, years | 8 |
| Average shift operational time for maintenance, h, no more | 0,3 |
| Specific total operational labor intensity of maintenance, man-hour/hour, no more | 0,06 |
| Availability factor, not less | |
| - according to operational time | 0,98 |
| - taking into account organizational time | 0,95 |
| Specific structural mass, kg/m, no more | 680 |