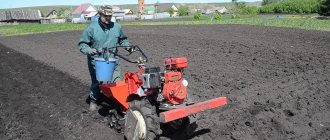
Planting potatoes is a difficult task. It takes a lot of effort and time. To make the work of gardeners easier, Russian companies have developed wonderful equipment - a walk-behind tractor. The most famous and popular brands are “Salut” and “Neva”, these are the best walk-behind tractors for cultivating land.
They are easy to operate, last a long time and rarely break down. But there are some rules that must be followed when planting potatoes. This article will tell you tips about proper planting and nuances in using a walk-behind tractor, as well as equipment that will help plant and dig potatoes.
Methods of planting potatoes
There are two planting methods. They differ in the tools they use:
- Hiller with regulator
- Mounted potato planter.
Both options are equally popular among summer residents. It’s just that the first option is used for a small area, and the second for a large area. But the first option is also cheaper. Good for those who like to save money. So, let's look at each of them.
Walk-behind tractor with hiller
Its design consists of the following elements:
- Conveyor is a conveyor that supplies seed.
- Furrower - lays furrows.
- Distributor - with its help, tubers are planted in a strictly specified period of time.
- Hiller - loosens the soil and covers the crop with soil.
This tool works on the following principle. Before you start working, the unit needs to be configured: metal wheels and a special hopper are installed on the tool. Wheels create furrows. They should be even, then the growing process will be simplified.
Potatoes are placed in the hopper, which will fall into the holes when moving. After this, the wheels are replaced from lug wheels to rubber ones and adjusted to the track width. This will prevent damage to the root crop.
Next, the hiller covers the potatoes with soil, compacting it at the same time. Apart from manually adding tubers to the hopper, the entire planting process occurs automatically.
Mounted potato planter
Before using the planter, you will have to carry out the preparatory stage for planting. First you need to plow the land. Then carry out harrowing so that the crop receives the required amount of water and oxygen. After this, you need to moisten the soil (if possible).
This type of walk-behind tractor has the following design:
- furrowers;
- special bunker;
- disk device for filling potatoes with soil.
The structure of the walk-behind hiller allows you to plant potatoes in one go, since the tool simultaneously makes furrows, pours out the tubers and covers them with soil. Before use, you need to attach special wheels to grab the soil and an additional attachment - a potato planter. You can use a homemade unit or buy special equipment.
Advantages and disadvantages
An attachment for a mini-tractor - a potato planter - has its pros and cons. The advantages include:
- the possibility of completely abandoning the use of physical effort and the use of a working tool such as a shovel;
- reduction of time spent during sowing work;
- the ability to plant tubers at the same depth with equal spacing;
- If desired, the potato planter can be used to grow other crops.
Among the disadvantages are the following:
- inability to work on rocky ground;
- inability to load tubers on the go;
- the need for constant maintenance.
However, all these shortcomings are not so significant. User reviews show that the potato planter is considered a very useful and necessary device with a high speed range. The mechanism has a fairly affordable price, and all costs for its purchase are more than recouped within 1-2 seasons.
How to plant potatoes with a walk-behind tractor
Pre-landing preparation
Before planting, it is necessary to cultivate the land: plowing and harrowing. Thanks to this, the soil will be saturated with oxygen and it will dry out a little. This is done using a plow or a special cutter.
The beds are crushed (cut) in two ways: using a hand rake or a walk-behind tractor. The choice of tool depends on the area of the site and your own desire. But using the second option is preferable. After all, some tools loosen the soil very well when planting. In this case, the loosening depth reaches 20 centimeters.
It is better to process the area from the edge. First you need to plow 2 meters. After this, you can plow the rest of the area. In order for the depth to be the same everywhere, the plow needs to capture part of the processed bed.
After this, the rows are marked. In order for potatoes to grow better, you need to create free row spacing. The average distance between them should be 60-70 cm. The distance of the rows depends on the type of potato. Various devices are used to create row spacing. After cultivating the soil, you can begin planting potatoes under the walk-behind tractor.
Landing technique
Regardless of how the work is carried out, one rule should be followed. The planting depth should not be less than 10-15 centimeters, and the distance between tubers (seeds) should be 20-30 cm. For ease of orientation, you can pull a rope. Potatoes will germinate better if the soil is fertilized after loosening.
Working with a hiller. First it is attached to the walk-behind tractor. Using the Neva apparatus, you will have to move the blades to increase the wingspan. This is necessary for proper placement of potatoes in the holes. When working with Salyut, you do not have to go through this procedure. The lug wheels are attached to the unit.
The track width of the walk-behind tractor for planting potatoes is 60 centimeters. The tops should be planted at the same distance. After sowing, it is necessary to remove the metal wheels and install rubber ones. In this case, the width should remain the same. The wings are at maximum distance. Now you can cover the crop with soil.
With a large area, it is more convenient, cheaper and faster to plant using a walk-behind tractor with an attached hiller. He plants the potatoes and covers them with soil at the same time.
There is another option for using a walk-behind tractor - using it under a plow. Metal wheels and a plow are simultaneously installed on the apparatus. When planting in this way, it is worth throwing potatoes at the stage of creating a furrow. This must be done immediately, since when the tool creates a new furrow, it covers the seeds in the already created one with soil.
Below you can watch a video on how to plant a plow walk-behind tractor.
Purpose
A potato planter is a unit that provides quick and easy cultivation of potatoes on agricultural land. During the work, the planting material is distributed fairly evenly in the dug furrow, thereby increasing the crop yield. The unit is attached to a mini-tractor and does not require any assistants, so it can be easily handled by a single operator.
The potato planter is used for planting potato tubers that have not yet sprouted and applying fertilizers to all types of soil. Moreover, the mechanism is suitable for operation in any climatic zones other than mountainous regions. In one pass, the potato planter performs several operations at once:
- forms a furrow in the ground using a plow;
- brings tubers into the ground at the required distance from each other;
- Using special discs with a certain angle of inclination, it forms a bed.
The use of a potato planter greatly facilitates and improves the work associated with growing vegetables. If used correctly, the tubers are placed in the hall in even rows at the required depth. This attachment for a mini-tractor allows you to effectively process small and medium-sized plots of land. Depending on the number of planting lines, potato planters are single-row and double-row.
Scheme of planting potatoes with a motor cultivator
Before planting potatoes, the soil must be loosened and, at the same time, furrows must be created. Potatoes should be planted at a time when the soil temperature reaches 8-9 degrees. At a depth of 10 centimeters. The furrows should be made as even as possible, and the distance between them should be about 60 centimeters. This is done so that when loosening the soil it does not touch the planted tubers.
Having finished cultivating the land, the potatoes are manually placed in the holes. The distance between tubers should be 30-50 centimeters. After this, the field is again processed with a motorized cultivator to cover the potatoes with soil.
The advantage of this planting method is that it produces a good harvest. With the help of a motor cultivator, soil loosening is much better than with an ordinary shovel.
At the same time, it saves a lot of effort and energy. All work and planting with the cultivator is carried out automatically. You will only have to work with your hands when harvesting.
If the site is located near groundwater, then the future harvest should be protected from excess water. In this case, potatoes can be planted directly into the ridges. The ridges are formed with a walk-behind tractor 20 centimeters high. But this method of growing potatoes will only help where the soil is well moistened.
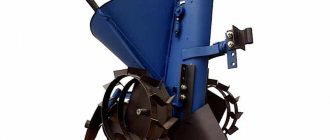
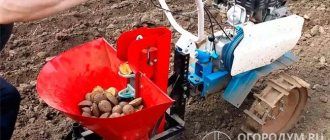
Making a potato planter
First, weld the frame structure from the channels. You will get 2 spars, fastened together with 3 strips of steel. An arch with forks that are directly directed to the center rod is firmly welded to the front. Then we attach the bracket by welding, there will be a container for potatoes.
For this tank, take thin plywood, approximately 13 mm. Next, we make the walls of the bunker and connect them with corners. We fix our bunker to the bracket.
Take the wheelbase itself from unnecessary equipment, hubs are well welded on them and 2 bearings are put on.
The seeder can be made from a tube with a diameter of up to 9 mm, but the thickness must be at least 3.5 mm. Attach a furrow cutter to the bottom of the pipe.
Insert the seat into the finished frame, be sure to cover it with warm and soft fabric.
As we see, you can make or buy a potato planter, but it will definitely make life easier for the farmer. Since the landing time will be reduced, and physical, hard work will not be needed.
Harvesting potatoes with a walk-behind tractor
Hilling
A month after planting, the first shoots appear. Now, using a walk-behind tractor, you need to properly hill up the potatoes. This process should begin when the height of the shoots reaches 15-20 centimeters.
Hilling itself is a replacement for loosening the soil and weeding it. At the same time, this treatment protects the crop in the spring from return frosts. It happens that before the emergence of seedlings, the temperature may drop slightly below zero. A layer of soil covers the fruits, warming them and allowing them to survive bad weather.
Usually they spud up 2 times: the first time as soon as the sprouts appear, the second time after three weeks. But you need to know what if:
- The nest begins to grow wider, across the ridge;
- Tubers peek out from under the ground and turn green in the sun
You will have to hill up a third time. There are times when potato hilling is needed 4 times per season. But then you get a good harvest.
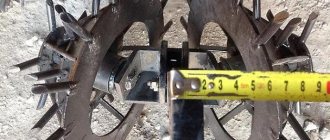
Any hiller is suitable for this procedure - with one, two or three rows. If necessary, an additional attachment is installed on the cultivators and the soil is fertilized with its help.
You can see how a two-row hiller works in this video.
Hilling secrets
Many gardeners earth up potatoes in the hot summer. But it's not right. This can damage the shoots or the root crop itself. Because of this, the plant may wilt. In addition, the procedure negatively affects health.
Therefore, it is recommended to do this in the morning or evening. And not in dry weather, but after rain, when the soil dries out a little, but remains quite moist. This makes it easier to get rid of weeds and weed the beds.
And it is much easier to hill up wet soil, since wet soil does not crumble. Moist soil added to the base of the stem stimulates the development of new shoots. And this leads to an increase in yield, this is the technology.
Potato planter for a mini-tractor: what to look for?
What is it made of?
When you come to the market or store to buy equipment for planting potatoes, do not rush to buy the first thing that suits your performance characteristics.
You should definitely spend some time inspecting the potato planter for the quality of the assembly and the strength of the weld. This is especially true for products supplied from Ukraine.
Breakdowns during work and searching for the necessary tools for repairs will take time and money. Therefore, you should not be lazy; you must carefully examine every centimeter of the structure.
Be sure to study the prospectus and ask the seller about such an important point as corrosion protection, which is used by the manufacturer of this type of equipment.
Before applying paint and varnish coatings to its products, the Xingtai company treats their metal parts with a special anti-corrosion compound, which allows them to maintain the strength and presentable appearance of the equipment for a very long time.
Method of connecting to a mini-tractor
Did you know that the performance of a tower crane depends on the way the boom is launched?
From the following article you can learn how to choose a gasoline self-propelled lawn mower for your dacha.
At the following address https://spez-tech.com/tehnika/selhoz/dlya-sadovodstva/kak-vyibrat-kultivator-d-dachi.html an article has been prepared for you on how to buy an inexpensive cultivator for your garden.
Husqvarna equips its equipment with a patented system for connecting additional options, which allows you to replace attachments in a matter of seconds.
If you decide to purchase such highly specialized agricultural equipment as a potato planter, you should take into account all the nuances that may arise during work, and based on them, make your choice.
Carefully read reviews on specialized forums, visit several stores. Think carefully before making a purchase and it will not disappoint you.
You can see how a single-row potato planter for a mini-tractor works in the video:
Harvesting
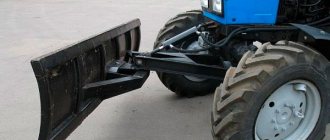
A walk-behind tractor is convenient not only for planting potatoes, but also for harvesting them. This is done in early autumn (September-October) in dry weather. To do this, an additional device is installed on the unit - a plower. Sometimes it is called a “potato digger” or digger. He digs the ground and takes out the tubers.
You can see how the harvest is dug up in this video
But you don't have to use it. It is enough to use a single-row hiller. He will lift the ground, and the potatoes will lie on the edge of the bed. All that remains is to go around the area and collect the ripe crop.
To avoid potato germination, after harvesting it should be placed in a dark, cool place. There it should lie for 2-3 weeks. Afterwards, the potatoes need to be sorted by size. And only after that send it to the cellar.
Some tips from experienced gardeners
If you purchased a potato planter or hiller relatively recently and have never used the equipment, please read the important recommendations. If you follow these tips, the work of planting tubers will go quickly and will not cause any difficulties. So:
- Maintain the same distance between potatoes.
- Do not bury the tubers deep into the ground. Otherwise, the potatoes will sprout for a long time and unevenly.
- Do not bury ripper discs more than 15 cm.
- Maintain the distance between the end of the spoon and the wall of the potato planter hopper. It is more convenient to plant potatoes of the same size.
- To adjust the planting depth, adjust the height of the rippers relative to the wheel axis.
And lastly: before planting, carefully check the functionality of all mechanisms.
Homemade designs
Considering that the average cost of potato planters varies between 15,000-30,000 rubles, many farmers prefer to use homemade ones. Making a potato planter at home is not difficult: the design of the equipment is quite simple.
Homemade potato planter
On the Internet you can find a lot of options for self-assembling a potato planter. Here is one of them:
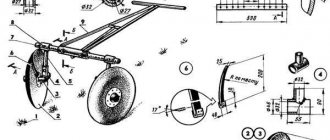
- As a base, you will need to make a steel frame. This element can be welded from pieces of channel No. 8. The frame looks like this: longitudinal spars are connected by three transverse rods.
- We immediately think about the equipment. In particular, you need to weld a mounting fork to the front rod, install brackets for closing disks, and weld an axle for the wheelset. To install the wheels, you can use a thick-walled pipe with bearings pressed into the ends.
- Then you need to install the seed tube. In our case, this is a 100 mm pipe equipped with a furrow cutter at the bottom.
- We make a seed hopper from waterproof plywood. Plywood can be replaced with steel sheets, but this will significantly make the structure heavier.
- The closing discs can be removed from the SO-4.2 seeder in finished form. The wheelset can also be obtained in finished form by removing it from a broken garden cart.
Please note that a homemade potato planter made according to the above diagram is quite cumbersome. Therefore, the design is not suitable for working with mini-tractors with a power below 12 l
With.
TELL YOUR FRIENDS
Soil preparation
Pre-sowing work begins with the laying of mineral or organic fertilizers in the fall.
Stages of preparation for sowing in spring:
- Immediately before planting, it is necessary to plow the soil to the depth of a spade bayonet (12-15cm). To do this you will need an attachment – a milling cutter.
- When planting potatoes under the Neva walk-behind tractor, the wings of the unit are removed before work. The equipment installed on the walk-behind tractor must be adjusted correctly. This will ensure smooth running of the machine and require a minimum of effort. A well-plowed field does not require harrowing.
You can watch the video online for more details about planting potatoes using the Neva walk-behind tractor:
- Humidify to saturate with oxygen and moisture. In a well-loosened soil layer, crops sprout more easily. At this stage, the walk-behind tractor will greatly facilitate the process of preparing the soil before planting the seed.
- Complete set of walk-behind tractor.
For plowing you will need wheels with lug elements, a set of rubber wheels, wheel extensions, a milling cutter, a universal hitch, hillers or a plow. If you are going to purchase additional attachments, you should first buy a hitch. The remaining elements are selected to match it.
Models
As an example, let's look at the technical characteristics of popular models.
2MBS-1
This model is produced by the famous mini tractor supplier XINGTAI. The potato planter is suitable for working with equipment with a capacity of 12-18 hp. With. This is a single-row model with adjustable planting depth, two loading bins - for seeds and organic fertilizers.
The potato planter weighs 105 kilograms, the planting width varies between 250-270 mm. Note that the productivity of the equipment is about 0.3 hectares/hour, which determines its use in small and medium-sized areas.
KS-2MT
This is a two-row model, domestically produced. Equipment weight – 115 kilograms, productivity: 0.2-0.25 ha/hour.
KS-2MT
Among the technical features, we can note two seed bunkers with a total capacity of 70 kilograms, adjustable row spacing (65-75 cm), planting density of 5 tubers per linear meter.