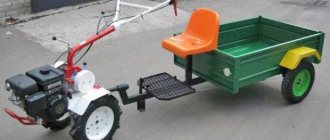
Undoubtedly, the most popular food product is potatoes. Without this root vegetable it is impossible to imagine the diet of a modern person. Growing potatoes without mechanical support is a rather difficult process. For this reason, many farmers use walk-behind tractors for hilling on their plots.
The hillers themselves for walk-behind tractors can be different: single-row, double-row, disk. Each of these types has its own nuances in operation. In order to know how to properly hill potatoes using mechanical devices, you need to familiarize yourself with the intricacies of operating each type.
Purpose of hilling, terms and conditions
When hilling potatoes, the following goals are achieved:
- preservation of moisture in the root area, which leads to the development of tubers without loss of nutrients and taste;
- Hilling reduces the risk of diseases and pests in tubers;
- the risk of damage to the upper tubers, which can protrude on the soil surface and negatively tolerate exposure to the sun, is reduced;
- preventing the impact of negative factors on potato tubers;
- using the hilling procedure, the size of the crop increases;
- if potatoes are planted ahead of schedule, the use of this type of treatment protects the crop from frost;
- reduction in the number of weeds.
Hilling is carried out in stages, which include:
- The first stage - processing is carried out after the potato sprouts reach a size of 10 cm. Such actions will prevent possible frost damage.
- The second stage - potato processing must be carried out after buds begin to form on the crop. This will promote the formation of tubers.
- The third stage is carried out if necessary, if there is excessively hot weather that negatively affects the development of tubers.
Hilling is carried out in the evening. This period will allow you to retain moisture longer. It is also recommended to apply mineral fertilizers before the hilling procedure if the soil is poor and the plant does not have enough useful components.
Features of soil treatment
The eternal law of balance says that if something has arrived, it means that somewhere has lost. In gardening, this is expressed in a pattern - the richer the harvest, the more the land is depleted. To preserve and restore the fertile layer, there is a whole range of measures, including various operations - digging, soil correction by introducing certain additives, fertilizing, and loosening. To increase fertility and provide vegetable crops with all the necessary substances, the soil is dug up every autumn, after harvesting and harvesting the tops.
Digging provides access to air and moisture to the lower root layers, thereby creating optimal conditions for the development of beneficial microorganisms. Autumn digging is more effective, as it allows you to apply organic fertilizers, which have time to “reach condition” over the winter, as well as get rid of the rhizomes of perennial weeds and reduce the emergence of annuals and the number of pests. In the spring, all that remains is to loosen the soil in time to level the surface and retain moisture. But it’s not always possible to “prepare a sleigh in the summer.”
angorohka Member of FORUMHOUSE
Please tell me if the beds have not been prepared since the fall. Can this be fixed in the spring? We bought the plot last summer, but there was no way to develop it. And this year I want to start by planting a couple of beds in the far corner: with herbs and carrots. And is it necessary to fertilize? This area was never cultivated, only grass grew on it.
It is possible, but there are nuances.
Kondrat Member of FORUMHOUSE
Can! As soon as the soil dries out a little and is easy to dig, pick up the soil from the roots in the right place and sow for good health. It is quite normal for the bed to settle within a week or two. Only after digging and shaping, pour it well with water, and it will quickly settle to its normal level. Before sowing, all that remains is to loosen it with a rake. As for fertilizer, it’s great that there are forbs, the harvest will be just crazy. I planted this way the first year, the main thing is the weather and watering, but no fertilizers are needed.
Today, deep digging using the moldboard method, with turning over the layer of earth, is practically not practiced. Although this approach kills most of the weeds and pests, the soil fertility and its structure deteriorate, since humus-forming microorganisms find themselves at depth, without access to oxygen, and die.
With the non-moldboard method, used by most gardeners, the dug out lump remains in its original position. And in order to increase processing speed and save their own energy, many people prefer to use motorized cultivators instead of shovels. These mechanisms also effectively loosen the soil to a given depth without turning over the formation.
Pros and cons of technology
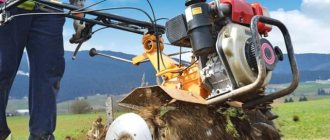
The growing season for potatoes is one of the most important. It is at this time that vegetable crops require increased attention from the gardener. The need for timely processing means that hilling will be carried out in a short period of time. Otherwise, the potatoes may not take root and die.
After all, the hilling process not only helps protect the vegetable from various infectious diseases and temperature changes, but also from the harmful effects of the weed, which will be removed in time. A summer resident can cope with this labor-intensive task by purchasing a walk-behind tractor.
Let's consider the main advantages of this device.
- The time spent on processing a potato plot will be significantly reduced.
- With the purchase of a walk-behind tractor, the gardener’s productivity increases several times when compared with manual processing.
- Using a walk-behind tractor, you can create a fairly deep furrow, which will prevent potato stalks from falling over. It is no secret that in this way you can favorably influence the yield of a given vegetable crop.
- Hilling up using a walk-behind tractor allows you to create a very loose soil structure, which promotes increased air ventilation (air exchange). In other words, the potato roots are saturated with air and begin to grow faster.
- Hilling allows you to maintain the required soil temperature for comfortable plant growth.
Despite all the advantages of this extremely useful garden assistant, the walk-behind tractor has one significant drawback - its cost.
There is always the option to find a cheaper device or even buy it second-hand. However, there is a peculiar risk in this. Since any walk-behind tractor has its own service life, buying a walk-behind tractor second-hand is a kind of game of roulette. And due to the fact that the manufacture of one walk-behind tractor requires quite expensive parts, a high-quality unit simply cannot be cheap.
The low cost should alert anyone who is planning to purchase equipment.
It is worth noting that the opinions of agronomists on the effectiveness of using a walk-behind tractor when hilling potatoes vary. The fact is that some experts argue that processing potatoes in this way only makes sense in warm regions.
In areas where the climate is predominantly cold, hilling with a walk-behind tractor can harm the condition of the vegetable crop. The solution to this problem is to plant potatoes “under straws”.
This planting method initially requires less plant care from the gardener. And procedures such as hilling, weeding and watering are kept to a minimum.
Disc hiller
Let's get started on how to make a potato hiller with your own hands. The drawing shows that the main tool is moldboard discs. They must be within 400 mm. This is optimal. Because we usually plant potatoes at a depth of 60-80 mm, and the roots then grow approximately 200 mm. It turns out that by walking between the rows with inclined disks of the specified size, we completely hill up the row of potatoes.
So, we make 2 disks from a steel sheet 2 mm thick, with a diameter of 400. Some are made from old pot lids. Let be. But it is advisable to make high-quality disks that will last a long time. Can be taken from scrapped agricultural machinery. But the best is alloyed stainless steel. We sharpen the edges of the disks, where the cutting edges will be. Now we are making a bridge with racks on which the disks will be attached. We calculate the sizes. We put a connecting fastener for pipes on both sides of a strong steel pipe (sold everywhere). The free ends of the fasteners are directed downwards. From above we drill the pipe through the holes in the mount. We drill each fastener from both sides. Secure with bolts and nuts.
If you want to make grips of different widths, then drill two more holes on both sides. To change the grip width, simply move the posts further or closer to the ends of the bridge and secure them through the holes. Then we insert the tubes - racks - into the fastenings from below. We also drill and fasten in the joint. Two bolts with nuts for each rack. Then at the bottom of each rack we make a mechanism for inclined movable disks. First we attach the bracket for the disk. Moreover, we also do 2 - 3 pipe drilling positions. To be able to change the inclination of the disks.
On the other side of the bracket we weld a short thick steel rod. At its other end - in the bushing ring - press a closed type sliding bearing. Pre-weld a wide washer with holes for fastening the disk to the inside of the bushing. Weld the same wide washers with holes in the center of each disk. We secure the disks with bolts and nuts. We ended up with two movable disks tilted at a certain angle, attached to racks on one bridge. You can come up with an additional device for tilting the disks to the right - to the left. To do this, you need to select a hinged mounting mechanism for the bracket. These are also on sale. Yes, you can find it in old parts of agricultural machinery.
We will not consider further the creation of a manual hiller. We don't need to make handles for our device.
Attaching the hiller
The hiller for the walk-behind tractor must be connected and hung to the unit in such a way as shown in this drawing:
Attaching the hiller to the walk-behind tractor
From the drawing you can see that we need to connect the device to the walk-behind tractor to the bridge through brackets and strong steel tubes. Reinforce the connection with a crossbar. Turn on the engine. The wheels are moving. You hold on to the handles of the walk-behind tractor. Carried away by the movement, the planting tool he created with his own hands comes into action. The discs just need to be made at symmetrical angles so that they don’t lead in one direction when hilling. The considered tool option is not the only one. There are others too. Let's look at them one by one.
Types of walk-behind tractor
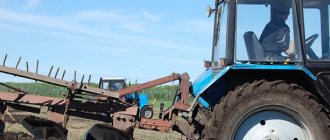
The walk-behind tractor has a simple design: a pair of wheels and two hillers, which are attached to a metal crossbar on the device. Hilling potatoes with a walk-behind tractor greatly simplifies the work. The design can be disk or in the form of a plow.
A plow-shaped walk-behind tractor is a plow whose sides are raised and wrapped in the shape of a triangle. When working, you should take into account the depth of entry into the ground to set the equipment, and what the angle of attack of the plow should be. The immersion depth should not exceed 15 cm.
To do this, the walk-behind tractor is placed on the garden bed and the plow is immersed in the ground. If the immersion is strong, then the device is slightly raised, and if, on the contrary, the plow has risen above the ground, then it is immersed again. There is a single-row hiller, and there is a double-row hiller, with which you can simultaneously go through two rows of potatoes.
A disc hiller is easier to operate; it does not require settings or adjustments during operation. It is enough to pre-adjust the distance between the disks, which can be from 40 to 75 cm. It all depends on the type of vegetable crop. Also, you need to set the rotation angle. It should be one for two disks.
With plow-shaped hiller
The use of a plow-shaped device requires caution; before starting, it is necessary to adjust the immersion angle and depth. Otherwise, you can turn the plant along with the roots onto the top of the soil. After all the necessary settings have been made, it is necessary to deepen the device into the ground and go through one bed, and then adjust the operation of the walk-behind tractor, if necessary. Double-row plow hillers can cover two potato beds at the same time while working.
With disc hiller
Using disc hillers is much more comfortable than using plow hillers. The discs are set at the desired angle, after which the gardener, controlling the device, hills the rows. The discs pick up soil in equal quantities, so treatment is carried out equally on all rows.
With disc hilling, only one row can be processed at a time.
Double row
A two-row hiller is an improved device that can be used to make furrows on both sides of plantings. The presence of adjustable elements allows you to adjust the cultivator to the desired width and depth level. Thanks to this, processing potato bushes with a two-row hiller is significantly simplified.
The important point is that if the device is on a flat, horizontal surface, it can still be adjusted. But as soon as the hiller plunges into the ground, this can no longer be done. When hilling potato bushes, the plow should not rise from the soil to the surface of the earth. If this happens, you need to tilt the stand back a little so that the hiller lowers back.
Single row
The single-row walk-behind tractor is plow-shaped and cannot be adjusted. It consists of two plates arranged in a wedge. With the help of such a unit, one furrow can be made in one pass. The advantage of single-row equipment is its simplicity of design. Even a beginner in agriculture can assemble it. This version of the walk-behind tractor is preferable for gardeners and is often used in areas with light soil.
Propeller
This hiller, unlike other models, consists of other elements for processing potatoes. The unit includes propellers with parallel teeth mounted on a crossbar. They play a major role in hilling bushes. With their help you can plant, loosen and hill up root crops. In addition, the propeller walk-behind tractor allows you to harvest crops and cultivate the soil. Particularly effective as a complement to a device with two forward speeds.
Cultivator
You can hill up potatoes using a cultivator. There are mechanical and automatic cultivators. Some models are only capable of loosening the soil, but there are also those that fully perform hilling of vegetable crops. During work, it is important to ensure that the work process occurs smoothly, the mechanism is in the center and does not harm the bushes. During work, control the depth of immersion of equipment into the ground.
Cultivators for inter-row tillage: types, how to make it yourself A motor cultivator is a universal tool for a summer resident, which can significantly facilitate the process of caring for root crops...
Preparing for work
Hilling up potatoes with a walk-behind tractor means making work in the beds easier. To do this without harm to vegetables, you should carefully prepare the tool.
The preparation process includes:
- setting;
- adjustment;
- installation.
Each stage should be carried out carefully so as not to damage the instrument or crop. Let's take a closer look at each stage.
Settings
General setup rules are described in manuals for beginning summer residents. However, there are certain features. These include:
- soil characteristics;
- weather;
- design, sharpness of details.
Rules for hilling potatoes
Hilling up potatoes is a mandatory procedure, the essence of which is to sprinkle the stems of the bush with soil. This must be done so that more oxygen reaches the tubers. In addition, such plant shelter allows you to get rid of weeds, accelerate the growth of seedlings and preserve them in the event of a sudden cold snap.
During hilling, first of all, pay attention to the condition of the soil. It should not be very wet, but not dry either. Moderately moist soil is ideal for hilling plantings.
Early processing of potatoes is especially important. It will be able to protect plants in case of a sudden drop in temperature. Hilling will also replace weeding and loosening the soil around the bushes. Even if you completely cover the potatoes with soil, they will be able to get to the surface.
It is best to carry out the hilling procedure when the soil is moist, for example, after rain. If no precipitation is expected, the soil is moistened artificially. The hilling procedure should not be carried out in hot weather. This is not safe both for the plants and for the gardener himself. The potatoes may begin to wilt. The most suitable time is early morning or evening, after sunset. Cloudy days are also suitable for this type of work.
Hilling process
When it comes to the actual hilling with the plow, all your tools should already be prepared. The main thing to do is to install several disintegrants in front of the main structure. But behind the walk-behind tractor, install a hiller - the one you chose for cultivating the land. After all the procedures have been completed, you can start working with the tools. It is necessary to place the entire tool exclusively in the middle, between all rows of potatoes, and start working at the very minimum speed, and after that you can be sure that the machine is working.
Basic Rules
Before you begin, you should familiarize yourself with the basic rules for hilling. First, they determine why this procedure is carried out when growing potatoes. Cultivated plants need hilling, because thanks to this treatment:
- The tubers have much more space, which they will need for further development and growth. Thanks to this, root crops become larger and ripen faster.
- Hilled bushes are better protected from possible night frosts.
- The soil is more saturated with oxygen, which potato root crops need. If you do not hill up, there will be insufficient oxygen in the soil, which will cause the roots to stop developing and die.
- The land is completely cleared of dangerous weeds, which actively absorb useful components from the soil.
Having understood the main purposes of hilling potatoes with a cultivator, they determine how many times to carry out the procedure. Each vegetable grower independently determines the optimal amount of the procedure.
However, experienced gardeners advise doing this at least three times a season:
- the first time - after the appearance of the first shoots on the site;
- the second time - when the height of the bushes reaches 25 cm;
- the third time - 2-3 weeks after the previous weeding of the area.
Sometimes it is not necessary to loosen the soil three times. For example, on hot summer days you can refuse the second hilling. In this case, it is enough to simply loosen the soil between the rows.
Benefits of use
Using a walk-behind tractor for processing crops has the following types of advantages:
- fast culture processing;
- soil drainage when using special devices;
- destroying weeds evenly;
- uniform immersion in the soil and the required slope of tillage.
When using this processing method, a person does not need to make complex physical efforts. Using a walk-behind tractor, you can process large volumes of plantings in a short time.
What it is?
A hiller for a walk-behind tractor is a device with which you can effectively plow and cultivate land of varying lengths and degrees of soil complexity. Using this attachment, you can hill up cultivated crops, as well as loosen, dig up the soil and fight weeds.
Hillers and weeders are installed on the walk-behind tractor using special fasteners. Attachments imply different hilling heights and depths of penetration into the soil. Simultaneously with loosening, the soil is raised to the desired height and aerated. Depending on the type of model, it may provide for varying the width and height of the hill, changing the angle of inclination.
However, models are selected specifically for a specific type of walk-behind tractor.
They are distinguished by the efficiency and quality of tillage.
Hiller varieties can be classified according to their design features and operating principle. Based on this, 3 types can be distinguished: disk, lister and propeller. Each modification has its own characteristic features.
How to make a device for hilling with your own hands?
If you don’t want to spend money, then you can make a universal manual hiller that will serve the farm for many years. It can also be used for digging potatoes. The work will require a minimum of materials: a stainless steel pipe, several metal plates curved towards the middle, and a welding machine. The assembly order is as follows:
- A piece 1 m long is cut from a pipe with a diameter of 25 mm. It will play the role of a stand, to the bottom of which you will need to weld a fastener that holds the working part of the potato digger. It is best for this element to have the shape of a flange to which the knives will be attached using threaded connections through special holes. It is necessary to weld a piece of pipe perpendicularly on top, which will act as a rod;
- For better support, the ends of the rods should be bent at a right angle. A grip is welded in the middle of the rack, which the farmer's assistant will pull on. To use it with a walk-behind tractor, you will need to make a mount on the grip;
- It is necessary to weld a knife in the shape of a faceted triangle onto the metal plates. To create a knife, carbon steel with a thickness of at least 4 mm must be used;
- Finally, the plate with the knife should be secured to the bottom of the rack.
After manufacturing, it will be necessary to process the seams remaining as a result of welding. To do this, you can use a grinder. The described option involves making a simple hiller with which you can dig potatoes. No more than three hours will be spent on the work, and as a result you will receive a reliable tool that processes the soil efficiently.
Instructions
I would like to start by considering the process of manufacturing a disk hiller, because this type of device is the most in demand today.
By installing disc sizes of different diameters, you can hill up potato bushes of various lengths.
Disc hiller
Many people ask the question - how to make a hiller for a walk-behind tractor with your own hands? At home, this is quite possible if you follow certain recommendations. So, let’s describe the manufacturing process step by step (for example, let’s take a disk hiller for the Neva walk-behind tractor):
- For manufacturing, we will need cutters from an old seeder, or sheets of metal 2 mm thick. They are secured using bearings with seals.
- They need to be placed at an angle to each other. The distance between the lower parts of the disks should correspond to the track width of the walk-behind tractor. They are connected by welding or using ordinary bolts.
- Here you need to follow a strict recommendation - the disks must be symmetrical to each other. Otherwise, the walk-behind tractor with the hiller will drift to the side, which will significantly complicate the entire work process.
- In addition to the discs themselves, the design of the hiller includes screw lanyards, a T-type leash and stands. Lanyards, in this case, perform the adjusting function of rotating the disks along the vertical axis.
- A do-it-yourself hiller for a walk-behind tractor, the drawings and photos of which you see below, must be made in strict accordance with the dimensions. Of course, there will be improvisation, but for the first assembly experience it is best to use other people's work.
- Depending on the capabilities, you can make a fixed or adjustable working width. The second method is more convenient, because you can change the inter-disk distance by simply rearranging the racks.
- To aggregate the hiller with a walk-behind tractor, you need to use a hitch bracket that does not have a beam. The hiller's leash is attached to the hitch using a stopper, connected with bolts and washers. The stopper itself is inserted inside the square pipe and then tightened.
The disk hiller for the Salyut walk-behind tractor is made using the same method, because the design itself and the method of connection to the walk-behind tractor are completely identical to the Neva.
Active hiller
To make such a hiller, we will need exactly the same list of materials and tools that we used in the manufacture of the disk hiller:
- welding machine;
- sheet iron;
- Bulgarian;
- fastening connections.
Using similar tools, you can make an active hiller for the MTZ, Plowman, Champion, Carver, Husqvarna, Lifan walk-behind tractor. The manufacturing principle is in many ways similar to the disk version:
- The axles also need to be adjusted to the parameters of the walk-behind tractor, and the parts themselves are welded using a welding machine.
- As previously reported, this type of hiller places certain demands on the walk-behind tractor. It must have two forward gears, as well as a PTO - power take-off shaft. Many sellers of walk-behind tractors, when they say that a walk-behind tractor has two gears, mean one rear and one forward.
- So you need to clarify this point when purchasing.
- It would be advisable to manufacture several bushings with brackets, as well as additional metal blades.
Double row hiller
The double-row hiller is the same lister type of hiller, but in double volume. Let's look at the whole process step by step:
- For work we need a sheet of metal about 3 mm thick. It is necessary to weld the base of the hiller from this material.
- A 4 mm steel strip can be used as a bracket. The field board is made of a steel sheet 5 mm thick.
- The hiller stand takes on the main load during operation. Therefore, you need to make sure that it is the most stable and reliable in comparison with other parts of the hiller.
- The wings of the hiller can be made from a sheet of steel 2 mm thick. They need to be bent a little using a pipe of the required diameter.
In principle, this is where the process of making a two-row hiller ends. You can also make an adjustable system of hiller wings, which are attached to the base using hinge technology. At the tail of the structure there are rods that regulate the angle of the wings.
Otherwise, the manufacturing principle is completely identical to that of the fixed list version.
https://youtube.com/watch?v=fSGR4FlZuFY
Motoblock Husqvarna 338
Back in 2015, the Swedish company released the Husqvarna TF 338 cultivator, which is in great demand among summer residents.
Among the features of this model are the following:
- The presence of pneumatic wheels and soil cutters, thanks to which the unit can work on slippery, loose soil, crushed stone and pebbles.
- The package includes attachments that significantly expand the functionality of the cultivator.
- The front part of the unit is equipped with a special protective bumper, which is made in the form of a powerful welded frame. The presence of this element on the cultivator allows you to protect it from dirt, snow, dust, and pieces of soil. Therefore, you can use the 338 walk-behind tractor not only when the weather is sunny and clear, but also when there is precipitation.
- The Husqvarna TF 338 walk-behind tractor weighs 93 kg. The heavy weight allows you to work on dense soil and make furrows in hard-to-reach places, especially between trees.
A review of the technical characteristics of this model of walk-behind tractor should begin with a powerful four-stroke engine, created on the basis of modern technologies. The motor is assembled in Russia using certified developments from well-known corporations around the world.
This motor is environmentally friendly and can quickly spin up to the required speed, which allows it to be used in any weather. The engine's service life is 3 thousand hours. Even if you put metal lugs on the walk-behind tractor, the motor will work just as flawlessly.
Grousers are installed in order to install a plow or a device for a hiller on motor cultivators. They are designed to cultivate virgin soil and form neat beds after cultivation. Grousers allow you to attach a trailer to the cultivator to transport cargo - root crops, cleared snow, firewood.
Recommendations from experienced gardeners
Experienced summer residents advise:
- Before starting work, carry out a test hilling to determine the optimal immersion depth, adjust the angle of inclination, and set the speed of movement. As a result of correct settings of all parameters, the unit will move along the specified path without touching the potato bushes.
- The first hilling should be carried out at low speeds. This will allow you to properly loosen the soil between the rows and notice errors in a timely manner.
- When a light walk-behind tractor slips while cultivating too dense soil, weighting agents are used. It is recommended to install monolithic disc weights or pre-fabricated and concrete-filled hollow loads on the wheels.
- Although the last, third, hilling can be skipped, it is still better to carry it out 2 weeks after the second, adding soil to the maximum height.
Rating of the best models
Today, the walk-behind tractor market is rich in a wide range of offers. At the same time, from the rich list, we can select several options that are most in demand among buyers, and which are suitable for most hillers.
- "Type. 2” is a sliding disc model that fits “Tselina MB”, “Cascade”, “Kadvi”, “Neva”. Excellent hilling, weeding, burying potatoes in the created deep strips. The model provides for adjustment of the discs in height, width and processing angle. Needs a hitch.
- “Tselina 010417” is suitable for walk-behind tractors “Neva”, “Tselina”, “Oka”, “Favorit”, “Salyut” (including “Salyut 100”). This is a two-row hiller without a hitch, which must be purchased separately. An adjustable version of the plow, customizable based on the characteristics of the soil and its cultivation technology.
- Hillers for Kipor walk-behind tractors (including the diesel version of Kipor KDT 610) are made to order. These models have an adjustable opening angle, and the hiller itself has a wheel. In addition to Kipor KDT, they are suitable for KAMA walk-behind tractors.
- Forma 2/4 is a forming device with adjustable row spacing, which can be 70 and 75 cm. Equipped with an adjustable tilt of the forming device. Provides for soil treatment after germination.
- The hiller "STV NPD" is designed for walk-behind tractors "VRMZ", "Neva", "Kaskad", "Oka". To achieve maximum efficiency, preliminary loosening of the soil is required before cutting furrows. Single-row model, without a hitch, which is purchased separately.
Tips for choosing
When choosing a unit for working on a plot of land, in particular for hilling, several factors must be taken into account:
Density of earth at the surface . If the soil is loamy and there are a lot of lumps in it, then you need to opt for a heavier aggregate.- Length of potato beds . The fewer turns you have to make when hilling, the easier it is to control the walk-behind tractor.
- Land area . If the potato bed is small, about 2-3 acres, then, of course, there is no need to spend money on an expensive cultivator.
And vice versa, with a large garden plot, in order to avoid overheating of the device, it is preferable to buy a powerful one, over 5 liters. s. – unit. There are several types of hilling tools. More information on how to choose a tool for hilling can be found here.
Harvesting
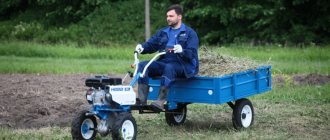
At the very end of summer - beginning of autumn, the potatoes grow, and it is time to harvest them. Before using the walk-behind tractor for harvesting, you need to remove the tops (with a scythe, trimmer) and wait for dry weather. In the process of digging up the soil, both a special mounted plower and a single-row hiller are used, which, lifting the soil and potatoes, will remain from the edge of the bed.
To do this, the component used must be placed on the device, the lugs are adjusted and the device is installed in the center of the ridge. In this case, the first speed is used. For greater efficiency, it is necessary to plow the beds one at a time, harvest the crop, then plow the remaining ones.
A walk-behind tractor for planting and harvesting potatoes can be indispensable in the process of cultivating land and other work. The required set of components used depends on the purpose of its use.
Using the example of planting, cultivating the soil and harvesting potatoes, it was shown how the unit simplifies the life of a gardener and makes it indispensable in any gardening farm.
Video tutorial on how to properly loosen row spacing and hill up potatoes with a walk-behind tractor
The planting technology is based on the well-known and widely practiced by gardeners planting potatoes under a plow.
It consists of using a specially designed plow to form a planting furrow into which potato tubers and fertilizers are then laid. To implement this technology using motor cultivators, we have developed special attachments - disc cutters, coupling device, hiller, protective wheels, expanders, the purpose and operation of which you will learn in this video. The proposed technology differs from the known one in that the formation of a planting furrow can be performed without preliminary spring plowing. 1.1. To form a planting furrow, the following equipment is required. 1.2. Disc cutters. 1.3. Hiller of a special shape. 1.4. Hitch with two coulters 1.5. Extenders. 1.5 Protective wheels.
Let's start installing the attachments. On the transport wheel, we take the motor-cultivator out onto a flat area, having previously installed a coupling device with two coulters in place of the mounting of the standard coulter. We tilt the motor-cultivator towards the control handles and place a special stand 12-15 cm high under the gearbox. We put a disk cutter marked LEV on the left axle shaft of the motor-cultivator gearbox, and a cutter marked P on the right axle shaft, and fasten it with threaded pins. We remove the stand from under the gearbox (3) and install the cultivator with cutters in a horizontal position. We install and secure the hiller on the middle seat of the coupling device. We unscrew the fastening bolts and move the openers to the transport position. We start the engine and take the motorized cultivator out into the field. We install two poles in the direction of the furrow and stretch a cord between them. Place the cultivator at the beginning of the furrow and start the engine. We press the clutch lever - this starts the rotation of the cutters. Hold the cultivator in one place by pressing down on the control handles. Having buried the rotating cutters into the soil to a depth of no more than half their diameter, we reduce the braking force before they begin to move in the direction of the furrow. At the same time, we control the straightness of movement along the cord. Loosening occurs in a deep layer of soil, which is partially moved by cutters to the sides of the gearbox. As a result, a furrow is formed behind the cutters, and small ridges are formed along its edges. When the motor cultivator moves, the loosened soil falls on the hiller's plowshares and moves to the sides and further to the surface. At the same time, the base and slopes of the furrow, as well as high ridges, are finally formed. read more here masteru.com.ua
The film shows working techniques for processing potatoes. In particular, methods of using a walk-behind tractor to carry out work on loosening rows and hilling potatoes.
Positive sides
The main role is played by the walk-behind tractor; your main task is to set it up correctly and insert it along all the rows. This method can in no way harm the roots and fruits of the bush and at the same time requires minimal expenditure of both time and energy. Gardeners praise MTZ from the manufacturer Centaur, excellent ears, hiller, eye for work. Also among motorized cultivators, the Neva, Salyut and Ugra models are praised. There is a large selection of walk-behind tractors, and you can easily choose the one that is perfect for you, and it will be convenient for you to process and care for bushes and soil. To ensure that the wheels ride well, lugs are used.
Loosening row spacing. Hilling potatoes.
Planting potatoes under a walk-behind tractor and little tips
Motoblock Zubr NT 105. Hilling potatoes.
Hilling potatoes with a Neva walk-behind tractor
Hilling up potatoes
Planting potatoes with a walk-behind tractor 2017
First planting of potatoes using a Centaur walk-behind tractor under discs without a shovel
Planting potatoes with a walk-behind tractor 2016