A plow is a tool designed to plow the soil and raise virgin soil. It was invented back in the 3rd century BC. Subsequently, the design was seriously modified, including the material - if previously wood was used, then they switched to metal. You can buy a plow ready-made - fortunately, there are no problems with supply now. However, the quality of such products (both domestic and Chinese) leaves much to be desired. Some people decide to make a plow for a walk-behind tractor with their own hands - this will cost much less. In addition, if you make a reversible plow with your own hands, it will be much stronger and more reliable than a factory one.
How does a manual hiller work?
Structurally, the hiller looks like a tool of the simplest assembly. Its only difference from a shovel or hoe is that two people need to work with it. This is a double-blade tool with a trimming knife mounted in its body. The front pull is designed so that one gardener can pull the hiller from the front, and the second one can push it forward using two rear handles.
Drawings of a manual hiller for homemade potatoes can be found both on the Internet and in specialized magazines and brochures on this topic. It can significantly speed up and facilitate the processes of caring for the plot, and not only in the potato plot. They are very convenient for cutting beds and loosening the soil.
To make your own hiller, you must have the following materials:
- A hollow water pressure tube that will be needed as a vertical stand. Diameter is 1 inch and length is 1 m.
- A hollow tube, ¾ inch cross-section, which is needed for front and rear traction.
- Sheet steel 2 mm thick, from which the dumps themselves are made;
- Lanyard required for the connecting part between the front link and the vertical post. It makes it possible to continuously adjust the attack angle. If you cannot find a lanyard, then assembling a manual disk hiller for potatoes, which you can do yourself, can easily be done using a steel plate in which holes are drilled for stepwise adjustment of the angle of inclination.
- A tool for bending pipes or a lamp for soldering; in some cases, even a simple gas burner is suitable for heating metal parts at the places where they are bent.
- Welding unit.
- Grinder for sanding seams.
Plow design
If we talk about the Neva walk-behind tractor, several types of plows are installed on it, each of which has its own design features.
Nowadays the land on personal plots is cultivated with plows of the following designs:
- single-hull;
- negotiable;
- rotary.
The most popular are single-hull guns. In addition, such a plow is considered the most optimal for plowmen without skills.
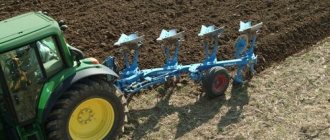
At the top of the reversible plow there is a curved feather, which allows you to immediately turn over the layer of earth during the plowing process. This feature makes the design an excellent option for cultivating hard soils. Since the design of such a plow is quite complex, only an experienced person can make it.
The rotary plow is the most difficult to manufacture. In design, it is more reminiscent of a cultivator, since there are several shares on one axis. When cultivating the soil, the axis rotates, causing the soil layer to turn over. The advantage of the design is that the soil can be cultivated to a depth of up to 30 cm with little effort. With the help of a rotary plow, plowing of the site can be done along different trajectories.
So, the single-hull plow is the most widely used, and anyone can work with it, even those not familiar with mechanized plowing. The advantage is that this tool is quite easy to make with your own hands.
How to assemble a hiller without resorting to the services of specialists
Any hiller must be multifunctional, so it is necessary to pay attention to the adaptability of its regulation. Height adjustment is carried out using a telescopic device in the central part. To do this, a tube with a smaller cross-section is inserted into this tube, which goes into the rear rod. This approach allows, when cultivating the land, to adapt the hiller to the individual parameters of human growth.
The attack angle is controlled by tilting the central post, in relation to its placement to the horizon of the ground. This effect is achieved by changing the angular difference between the vertical frame and the front link.
How to make a manual potato hiller on your own so that the tool frame is movable? To do this, the front link is attached to the central pillar with a hinge, and the adjustment itself is carried out with the participation of a lanyard. This allows you to change the angle of inclination gradually, depending on the type of soil you have to work on and the parameters of the leading person. In the absence of a lanyard, the angle is adjusted by moving the plate to the required position and fixing it with bolts in the required grooves.
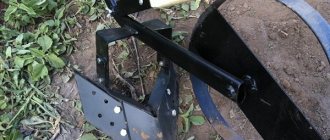
The vertical frame tube is bent at a distance of 40 cm from the end, the bending angle is 15 degrees.
The rear link and the blades themselves are then welded to this rack, and the front link is secured using a hinge mechanism and a long bolt. The rear link looks like a large letter “P”, the width of which is 50 cm. The length of the handles is at least 20 cm. A vertical tube is welded in the center of the fork, its length is 30 cm, and with this end the structure is inserted into the cavity of the vertical link.
To be able to adjust the height of the rack, holes are drilled at its upper end, and do the same with the vertical fork. The front link must be the same width as the rear link. However, the length of the front linkage handles must correspond to the owner’s parameters, so that he can easily fit between the handrails and comfortably grasp them.
To make disc blades, two identical plates are cut from a steel sheet. They are given a semicircular shape, similar to the disks of a classic agricultural plow. Both halves of the plow are fixed on a vertical stand. The weld seam must be smooth and without chips. All welded parts must be ground with a grinder, and the edges of the cutting discs must be sharpened. The cutting part will take on the main resistance of the soil when cultivating the plot. You should not buy ready-made discs, since such metal can only be sharpened with the help of special and expensive equipment.
What to make a manual hiller from - video
Agriculture is developing at a tremendous pace, as are other areas of home and industrial technology. Potatoes are the king of all vegetables and are considered the most popular crop grown in gardens.
And it itself has good nutritional properties, a variety of cooking methods and excellent taste.
To get a good result, you need appropriate care. Hilling is the process of adding soil to the bottom of the plant. Reasons for using this procedure:
- additional tubers grow from the sprinkled part;
- more air comes in;
- weeds are destroyed.
Hilling potatoes with hoes is a thing of the past. This method takes a lot of effort and time. Today, the favorite tools have been replaced by new hillers, which make the process much faster and easier.
Do-it-yourself manual plow drawings. DIY hand plow
When planning to make a plow, you must first decide what type of soil you will have to plow with the unit and the type of crop you are going to grow.
During operation, the body of the unit experiences enormous loads, its working surface is exposed to the abrasive effects of the soil. Therefore, for the manufacture of working parts, it is necessary to use steel metal with a thickness of 3-5 mm.
It is advisable to provide a removable design of the ploughshare, so that it can be sharpened.
Considering all these properties of equipment operation, you can begin manufacturing a carbon steel blade. You can do this in three main ways:
- If the surface of the dump is cylindrical, then it is better to use sheet-bending equipment to produce a workpiece of the desired shape. A steel workpiece, cut by gas welding or metal shears, is fed to sheet metal bending equipment at an angle of 23-25 degrees and bent. Then the finishing is carried out strictly according to the template, which is pre-cut from thick cardboard.
- A metal pipe with a diameter of 55–60 mm and a wall thickness of 4–5 mm is also suitable for the manufacture of the unit. Cut out a template from cardboard, place it on the pipe and mark the dimensions. Treat with a hammer and, if necessary, fine-tune with sandpaper.
- This method is the most time-consuming and requires special skill. The workpiece is preheated in any way, but preferably in a forge, and then bent along a matrix.
The unit body is made of sheet steel with a thickness of at least 3 mm.
Experienced craftsmen recommend cutting out all the parts from cardboard and gluing them together, maintaining all sizes and angles. Only after you are completely satisfied with the cardboard model can you begin metal work.
Manual hiller for potatoes: purpose
A potato hiller is an indispensable household assistant for anyone who has a vegetable garden. With its help, you can hill up a large plot of several hundred square meters in a short time. Its main advantage is that you can do it yourself.
In regions with high temperatures and low humidity, this procedure, on the contrary, is carried out much less frequently. After all, this removes all the moisture from the soil, which may already be insufficient.
Do-it-yourself manual plow. Housings
According to the number of bodies, plows are single-body, double-body and multi-body. The body consists of several parts:
- rack;
- working surface - ploughshare and blade;
- field board.
Body with share and blade
The ploughshare and blade are the working surface - this part is responsible for the quality and type of plowing. The soil layer is cut with a ploughshare, along which it rises to the dump. Here the soil crumbles and turns over. The degree of formation rotation depends on the shape of the dump. A field board is attached to the bottom of the body. Its task is to prevent the plow from moving towards the already plowed area.
If you are going to make your own plow, you need to choose a design based on the type of soil you are going to cultivate. Plow bodies are:
- Dump. For plowing with full or partial rotation of the formation. Such plows promote soil formation (grown plants are cut and placed at the bottom of the furrow, where they rot), and enrich the soil with oxygen (due to loosening).
- cultural - used for long-cultivated lands, crumbles the soil well, wraps to a medium degree;
- semi-screw moldboard bodies are used for cultivating virgin soil, plowing heavily turfed soil, it wraps the soil well, crumbles it moderately (models with an elongated feather wrap the layer completely);
- screw - good for cultivating virgin soil - the layer is completely wrapped;
Types of plowshare plow bodies
- Dumpless. Used in arid climates to conserve moisture and in regions at risk of wind erosion.
- Cutout. Suitable for soils with a small arable horizon. The lower part is only loosened, without rising outward, the upper part is removed and thrown onto the previous furrow, in which lies the podzolic layer loosened during the previous pass.
- With subsoiler. They are mainly used on marginal lands. The subsoil loosens the podzolic layer, which helps to increase the thickness of the fertile layer.
- With retractable chisel. Use on clay, loam, soil with a lot of stones. A chisel mounted on a stand in front of the plowshare prevents damage to the cutting edge. As grinding progresses, the chisel is pushed forward - for this there are special holes on it.
- Disk. It is used to treat waterlogged soils; it is also good when there are a large number of roots.
Tractor disc plow
Helpful tips for proper hilling:
- The procedure must be done at a certain time. Ideally - 2 times in 1 season. The first time is when the potatoes grow by about 10 cm. The second time is already about 20 cm. The flowers should not be open.
- Give preference to cloudy weather. If this is a rare occurrence in your area, then choose early morning and late evening. Ideal after rain or watering.
- Forget about the rake and hoe. Trust a modern tool - a potato hiller.
Read also: How to disassemble a screwdriver motor
So, without such a procedure you will not see a good result. And without the right device, you won’t be able to make it as easy and effective as possible.
Plow assembly
After manufacturing all the metal elements of the structure, for assembly you will need a welding machine and a square sheet of metal measuring 50 cm. Then, we weld all the elements of the device , observing all the angles and dimensions.
The next step is to fit the blade to the ploughshare. If you find a discrepancy in the angles of the parts, you need to bring them to normal using a hammer. We lightly weld all the parts to the side shield and weld the base plate and spacer bar onto it. We carefully inspect the resulting product as a result of all this work and, if we do not notice any errors, we carry out final welding.
Using a chisel or grinder, disconnect the unit from the metal sheet. Be sure to clean the welds, and sand the surface of the plowshare and blade with fine sandpaper.
Types of hillers
First, you need to decide on the type of device. Most Popular:
- plow;
- disk type.
A manual disk hiller for potatoes is a frame on wheels to which disks are mounted. The device includes:
- leash;
- turnbuckles - regulate the mobility of the discs;
- racks;
- disk dumps.
This type of tool is suitable for planting potatoes or after harvesting them, and hilling the soil between the beds. The disc type of design allows you to change the distance of rotation of the discs so that you can work comfortably in small areas.
A manual plow for hilling potatoes is a fairly comfortable type of device. Allows you to process large areas in a short time. Used for walk-behind tractors; fix it in the furrow during operation. You can work quickly even if the winter is dry. You can adjust the depth and width of plowing.
Most summer residents prefer the disk type due to its easy control and even beds. But their price is appropriate. The plow type benefits from its cost, but is not inferior in functionality.
Other tool types:
- To the tractor - process automation. This design can immediately remove all weeds from the treated area. In practice, it has been proven that after working with this type, potato yield increases.
- for a walk-behind tractor - also for automation of work. In principle, this is not a separate type, but the tool can be installed on this vehicle.
Which device is better is up to you to decide. It depends on your goals, the desired speed of operation and the functionality of the devices.
Advantages and disadvantages of hillers
The use of mechanisms always allows you to increase labor productivity on farms and summer cottages.
Manual hiller
Advantages:
- reduces labor costs and increases farmer efficiency;
- can be a multifunctional tool that can additionally be used for loosening the soil, planting potatoes, and also during harvesting;
- You can freely buy a potato hiller in a store or make it yourself.
Flaws:
- in order to use the device, you need to purchase it, which means that material costs will be required for the purchase and further maintenance;
- When working with the device, you must follow safety regulations.
Operating principle
The operating mechanism of manual hillers is very easy to understand. Two people handle the instrument from the front and back. The one in front places emphasis on the handle and moves the device forward. The one at the back presses the discs into the ground using a handle.
At this time, the discs pass through the soil, hilling the plants nearby. The distance is also adjustable.
In the case of automated devices, it all depends on the type of transport. Standard - you just need to drive the car.
Homemade lister hiller
Hand cultivator
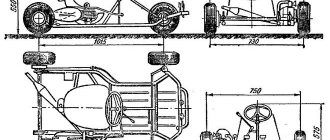
To make a homemade manual or automated hiller for any type of potato, you first need to draw a scale drawing of the mechanism on paper and indicate the required dimensions of the device.
Manufacturing equipment
In order for the work to be done quickly and efficiently, you must first prepare the tool. For this you will need:
- Bulgarian;
- welding machine with electrodes;
- drill with a set of drills;
- hammer.
A grinder and a welding machine are needed to make a hiller
From the materials you need to prepare:
- metal sheet, 2-3 mm thick;
- iron pipe, with a cross section of 20mmx20mm or 30mmx30mm;
- if an adjustable device is being made, then you will additionally need to purchase 4 loops and metal strips (3 mm thick).
Progress
- We cut out the sides of the plow (ears) from a metal sheet. The wider the width of the sidewalls, the more land will be captured and, accordingly, more of it will be poured under the bush. In the narrower part, intended for cutting soil, the width of the ears should be 5-7 cm. For narrow row spacing, ears are made smaller in width than for wide ones;
- We bend the sides and give them the desired shape. The bend radius should be the same for both the left and right halves;
- We weld both halves and clean the welding area;
- We connect the ears together with metal strips. If the hiller is not adjustable, then the strips are welded to the ears; if it is adjustable, then we fix it with loops. It is desirable that the angle between the stripes be 90°, and between the ears – 120°. We weld the other ends of the strips together;
- We attach the nose to the narrow ends of the ears by welding. The angle between the metal strips and the spout should be 150°;
- After manufacturing the working part of the hiller, it is welded to the bracket. Using a bracket, the hiller is then connected to a mechanism, for example, a walk-behind tractor.
Advantages and disadvantages of homemade structures
A homemade potato hiller has the following advantages:
- Availability. Almost every gardener can do it. This does not require special knowledge or any skills. It is enough to understand the basic tools and be able to use them.
- Saving. Ready-made solutions are always more expensive. And taking into account that a person does not pay himself for the work, then we get a free option.
- Performance. A self-made device is not inferior in efficiency to its automated counterparts.
The only drawback is that safety and quality depend only on you. Therefore, do not be lazy to pay due attention to each stage of work, even if it seems insignificant. To obtain a quality product, use the appropriate parts.
Advantages
There are certain advantages to making your own plow for a walk-behind tractor. The parameters of the blade and plowshare will meet the requirements for processing specific soil. These parameters include:
- blade angle;
- depth and quality of plowing;
- efficiency;
- capture area.
Taking into account the power of the walk-behind tractor, it is possible to make a plow that will not put excessive load on the engine and will not cause slipping, but its grip will be maximum. Only high-quality materials are needed, which can significantly increase the service life of the tool. It is useful to provide the possibility of attaching attachments that significantly expand functionality.
How to make a hiller with your own hands
How to make a potato hiller with your own hands? To do this we need the following tools:
- hollow water pipes: length - 10 cm, diameter 1 inch;
- another similar pipe, but with a diameter of 3/4 inch;
- sheet steel 1-2 mm;
- lanyard or steel plate;
- pipe bender or gas torch;
- welding tools;
- Bulgarians.
This is an approximate list of tools, depending on what type of hiller you want to make, it may change.
The device can be adjusted in several ways:
- By height. Due to the telescopic mechanism in the center. A smaller pipe will be mounted into the central pillar pipe, which will act as a rear linkage. This design is very comfortable to use, because it can adapt to any person’s height.
- We change the angle of attack by tilting the central post relative to the ground. We get this opportunity if we change the angle between the front link and the vertical post. If your design does not have a lanyard, then you can change the angle by changing the position of the plate.
We start making a homemade manual potato hiller with vertical stands
We take a 10 cm pipe and measure about 4 cm from the end. At this distance we should make a slight bend. Approximately - 15 degrees. The most comfortable and easiest way to do this is with a pipe bender - a tool specifically designed for this purpose. Of course, not everyone has such a device, so we’ll tell you about a more affordable way to complete this step.
We fill the pipe tightly with sand or earth - whatever is freely available. We insert plugs so that all the mixture does not spill out. Using a blowtorch or any other heating element, we make the bend we need. Due to the fact that there is a mixture of sand or earth inside the pipe, it will not bend and will maintain its ideal parameters.
Let's move on to making traction
A homemade manual potato hiller has a built-in rear pull. It has the shape of the letter "Pe". In our design it will be of the following dimensions: 5 cm wide and 2 cm long. Note that if you change this value for one engine, you must do the same for the others.
We attach a 3 cm long pipe to the center of the fork, vertically. Then we will insert it into the vertical rod.
We now need to bend a pipe with a diameter of 3/4. This can be done using the method already discussed above. If you have other options, you can use them. In this case, the main thing is one result.
Let's take care of the ability to change the height. We make a hole at the top and in the vertical part of the mechanism. And now, by changing the bolt, we can adjust the height. So, a person of any height will be comfortable working with the tool.
We have made the rear link, now we need to move on to making the front link. It is made in the form of a fork, like the rear link, differing only in size. The handles should be of such length that a person can comfortably stand between the handles.
For ease of use, we will also add an elastic belt that can be worn on the shoulders and chest. This design will reduce the load on the hands and preserve the strength of the person working with the tool.
Dimensions: handles - 6 cm, vertical part - 7 cm. On the vertical part of the fork at its end you need to make a hole with which it can be secured to the rack.
Let's move on to adjusting the angle of attack. The best option is a lanyard.
Read also: What is the seat diameter of an angle grinder
We count 3 cm from the bottom of the vertical post and mount a 25x25 cm corner in this place. We count 0.3 cm from the position of the fork and then do the same. And we repeat the procedure to the vertical post above our first corner.
The last step is the trimming knife.
It is this mechanism that takes the entire load and reduces resistance in the soil during operation.
For the knife, choose carbon steel. You need to cut the arrows and sharpen them at an angle of 45 degrees. Such parameters allow our mechanism to remain sharp and fully cope with its tasks.
Now you need to start welding the knife to the lower end of the vertical post. Our DIY potato hiller is now ready!
Do-it-yourself manual plow for planting potatoes. Planting plow
A hand plow will help you plant potatoes without a shovel. To make it yourself, you will have to put in some effort. But they are worth spending, since the device turns out to be universal - the plow is used not only for planting potato beds, but also for subsequent hilling of bushes and loosening row spacing.
Since hollow pipes and sheet metal are used in the manufacture of the structure, you will need welding equipment, a gas torch or blowtorch, and an angle grinder.
To create a universal method of planting potatoes, follow this algorithm:
- a meter pipe with a diameter of 2.5 cm is filled with sand and closed with plugs;
- bend at an angle of 10-15 degrees at a distance of 30 cm from the edge, using a blowtorch; a stand is obtained, indicated in the drawing by position 3;
- Having removed the plugs, pour out sand (it is only necessary for neat bending of the pipe);
- a double-blade working element with a trimming knife is formed from pieces of metal and secured from the bottom of the rack with bolts, for which holes are pre-drilled in the pipe;
- control handle 4 is inserted into the pipe from above and secured with bolt 12; there should be several holes on the handle to create a telescopic retractable system;
- the front link 5 is shaped as shown in the drawing and welded to the rack; positions 9, 10 indicate the presence of a horny handle;
- Using brackets 7 and 8, a lanyard 6 is attached to the rod and riser, allowing you to adjust the level of attack of the knife.
Manual plow with traction
For ease of control of the plow, a strong neck-axillary tape can be attached to the base of the draft handles (position 11). It will allow the lead worker to evenly distribute his efforts when walking with the plow across the site.
Reviews
A device for hilling potatoes is very popular among summer residents, and especially if it is made with your own hands. Numerous reviews prove this. Let's present you some of them:
“A homemade potato hiller is probably the best thing we have among all the gardening devices. This design saves so much effort and time. Previously, they even wanted to give up having a vegetable garden, because it requires a lot of dedication. A neighbor recommended a hiller to us. Accordingly, they wanted to buy it, but my husband made it himself. They also added a special belt, so now it’s generally comfortable to work with. From practice: this year we got 2 times more harvest than last year, when we used a hoe and, accordingly, did this work in bad faith.”
“I never thought that a potato hiller would bring me so much joy! We discovered this device recently, which we regret: how much time we could have saved. Our vegetable garden is very large; we had to ask our children and grandchildren to do all the work, because we couldn’t do it ourselves. Now we have solved at least one problem - hilling potatoes, which was very difficult if you used a shovel or hoe. We looked at how to make a homemade potato hiller and the next day we tested our invention. It seems to me that our mechanism is even better than the store-bought one. We designed it taking into account our own characteristics.”
I can’t imagine how we managed before without such a structure. A manual plow for hilling potatoes significantly saves time and effort. Of course, there are many outstanding inventions in the world, but for summer residents and gardeners this mechanism is probably the best thing that has been invented in recent years. There is a lot of equipment on the market for professional use, which costs accordingly. And you can make a tool for hilling potatoes yourself, which is what we did. For the second season we can’t do without him. The last time I noticed good progression in increasing the yield.
Remember that a manual potato hiller must be of high quality. Therefore, carry out all stages of work conscientiously and do not forget to select good parts and materials.
Modern agriculture is a technological field of activity. Innovations and developments do not bypass even the simplest processes associated with potato processing. This crop cannot be grown without labor and energy costs. Hilling is very beneficial for the culture.
Characteristics
Any gardener who has potatoes on his plot will most likely need a hiller. This tool is characterized by versatility and helps to cope with complex work more effectively. The most common option is a manual hiller. The characteristic features of the product allow you to cut ridges of earth into ridges and carry out pre-emergence and post-emergence treatment. The dimensions of the standard tool are suitable for simultaneous harrowing and hilling of rows in a potato field. Depending on the characteristics of the tool, it is possible to process several rows with plantings at once.
In addition to loosening the soil between the rows, the hiller simultaneously removes weeds. A high-quality tool purchased from the manufacturer has a special device that promotes self-cleaning of adhering dirt. Hillers successfully cope with the task on any type of soil.
The main condition for successful loosening of the soil is the absence of stones and humidity not exceeding 20%. Modern hillers allow you to apply mineral fertilizers simultaneously with soil cultivation. The features of the hillers allow one person to handle the tool.
Principle of operation
Gardeners know that hilling potatoes should be carried out several times a season. If the soil on the site is well-cultivated and loose, this contributes to a better process of oxygen exchange. The air entering the soil has a positive effect on the development and growth of plants. Timely loosening increases yield by 30–60%. Thanks to the design of the working body of the hiller, furrows with the required depth are obtained. The loosened soil falls off on both sides of the resulting ditch. Tubers are placed in it, and then the grooves are filled with earth. As the potatoes grow, you need to add a thick layer on top. This contributes to the formation of a large number of tubers. This addition is again ensured by loosening with the formation of a groove along the planted seedlings. This is achieved by the fact that the working parts of the hiller, when moving between the rows, cut off the top layer of soil.
Thanks to the wing-shaped device, the dumps fall onto the crop row and lightly cover it. Weeds are removed along with the cut soil.
In addition to potatoes, other crops that are planted in rows and require hilling, for example, tomatoes, eggplants, peppers, can be processed with a hiller. Tool designs differ in grip width, manual or mechanized operating principle. The first option is quite primitive, requiring two operators, one of whom takes the front handle, and the other presses on the rear link. As a result of the efforts, the device goes deep into the ground, cuts the soil, and when moving inside the formation, leaves a noticeable trail of earth. The automated version is attached to a tractor or walk-behind tractor and is controlled by one operator.
Manual and automated hillers can be divided into the following types:
- disc is a simple tool suitable for one person;
- garden plow is a universal plow that requires the presence of two operators.
It is clear that disc options are easier to use; they are also often automated by coupling with motor vehicles. The ridges of the earth after the disc hillers are higher. There is also a negative point in these devices - the price. Compared to a plow hiller, it is four times higher. Externally, the tool looks like a frame with wheels on which disks are suspended. The distance between them can be changed in accordance with the width of the rows. The discs are set at a certain angle, which is not recommended to be adjusted relative to the vertical. Without a constant equal distance between the circles, the tool will pull sideways.
Automation of the hiller is possible if the farm has a walk-behind tractor or cultivator. To fasten the tool, a bracket, a stopper, two bolts and washers are enough. When moving, the discs will grip the soil, creating a roller. To increase traction, the walk-behind tractor must operate in first low gear. By rotating the discs, the earth is crushed and loosened, covering the plants in the rows.
The simplest type of hand plow has a predetermined working width, wings (ploughs) shifted relative to each other, which are motionless. This is convenient if the row spacing has already been determined and the tool fits them. Another advantage of hillers with a fixed working width is the ability to use them with light cultivators weighing up to 30 kg. The advantage lies in its compactness, and the negative side lies in the limited work in wet areas. Here the tool will stick in the soil.
Read also: Worm gear ratio
A hiller with variable working width is the most common option. The adjustment mechanism is simple, but it allows you to move or extend the wings, adjusting them to the desired width to the row spacing. The tool can also be automated, but only with heavy walk-behind tractors. The wings of such a hiller push the earth in both directions at once. After the tool passes, the part falls back into the line that it cuts. For a more efficient harrowing process, a more powerful walk-behind tractor is required, otherwise pulling the hiller will seem harder than working with a hoe or hoe.
A Dutch-type hiller is more convenient in this regard. This species differs from the previous one in the ability to move the wings not only to the sides, but also upwards. As a result, the tool itself adapts to the soil conditions. The hiller is more convenient for cultivating furrows for planting potatoes. This option is simpler and cheaper to make yourself.
Types of potato hillers
Depending on the design, the following types of devices are distinguished:
- lister;
- disk;
- propeller
Disc hiller
Manual garden sprayer
Propeller mechanisms make it possible to move the soil between the rows into the furrows.
The most common are lister and disk devices.
Lister mechanisms
Interesting! Devices of this type are available with a fixed working width. Otherwise they are called plows, as they look like a plow.
They are produced with an adjustable angle of attack (the angle of inclination of the cutting part of the hiller to the ground) and fixed.
Adjustable ones allow you to change the depth of loosening and, accordingly, the gripping area.
Advantages of the device:
- consumes less energy compared to disk devices;
- simpler in design;
- the price is less than for a disk device;
- It is light in weight, so it works great on low-power machines (walk-behind tractors and cultivators).
Lister hiller
Flaws:
- does not work well on wet and heavy soil;
- Potato planting should only be level, with strictly fixed row spacing.
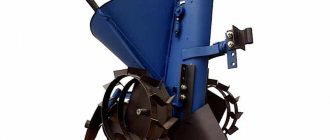
Disc hillers
Structurally, they consist of two disks with a sharpened edge. As the hiller moves, the discs rotate and crush the soil. They have a convex shape. Due to this shape, the soil is simultaneously loosened and an earthen ridge is formed.
The disks are attached through ball bearings to the racks, which are located on a horizontal holding frame.
Note! They can be adjusted vertically, less often horizontally. With vertical adjustment, the angle of rotation of the disks changes, due to which the amount of earth needed to form the ridge also changes. Horizontal adjustment moves the discs vertically (raises or lowers). In this way, the angle of attack is adjusted.
Advantages:
- better performance of hilling, the ridges are smoother and higher;
- can be used with different row spacings;
- allows hilling on heavier soil.
The disc hiller can be used with different row spacings
Flaws:
- higher price;
- higher fuel consumption.
Depending on the volume of work performed and the degree of mechanization, the potato hiller can be:
- manual;
- automated.
Fact! Manual - designed to perform only hilling, automated - used to perform several types of work: hilling, loosening, planting, harvesting.
Manual - moves due to the fact that a person pushes or pulls the mechanism.
An automated potato hiller is an additional hanging device for a walk-behind tractor, cultivator or tractor.
Manual potato hiller
Allows you to process potato beds, regardless of the presence of a walk-behind tractor or a tractor. For manual types, the most common designs are lister and disk mechanisms.
Potato hiller at work
Advantages:
- can be used in areas where the use of walk-behind tractors or walk-behind tractors is impossible or impractical;
- Cheaper to purchase and maintain.
Flaws:
- more expenditure of physical strength of the employee;
- It takes longer to process the area;
- Possible lower quality processing of plantings;
- When working with the mechanism, two people are needed: one must pull the potato hiller forward, and the second must push it from behind using the handles.
To make it easier to operate the manual mechanism, and so that one person can handle it, you can upgrade the manual hiller by equipping it with a bicycle wheel. In this case, the plow is mounted on a bicycle frame. The steering wheel allows you to direct the device in the desired direction. Why is it convenient to use a bicycle? Because it is light, and the steering wheel is at the optimal height for such work.
Modernized manual hiller
Hiller for tractor
These devices allow you to loosen the soil and hill up potatoes.
The design includes:
- metal frame;
- hitch;
- two wheels (usually stamped);
- pointed paws;
- dumps.
The paws are designed for cutting soil to a depth of about 150 mm when hilling. Thus, the mechanism can be used as a plow for potatoes.
Using a coupling device, the device is fixed to the tractor. Lattice dumps are used directly for hilling the plant.
If there is no need to loosen the soil, then unscrew the paws.
Hiller for tractor
Typically, such a device is used in conjunction with tractors that have low traction force, for example, T-25.
Hiller for walk-behind tractor
To fix it to the walk-behind tractor, you must first dismantle the coulter and install a device in its place. Potato hillers designed for walk-behind tractors can also be installed on a mini tractor.
The industry produces not only single-row, but also two, three and n-row mechanisms, which allow you to speed up the hilling process.
Attention! If you plan to install a hiller with a fixed working width, then the walk-behind tractor engine should have a power of less than 3.5 hp and a weight of about 30 kg. Devices with adjustable working width are installed on more powerful mechanisms.
For cultivators and walk-behind tractors that have an engine similar to a Neva walk-behind tractor, you can use a rotary mechanism. In this case, the wheelset is removed from the walk-behind tractor, and a hiller is installed on the gearbox shaft. The gear wheels perfectly grind the soil, cutting off the roots of weeds, and at the same time hill up the potato beds.
Potato hillers can be installed on mechanisms with gasoline or electric motors. In this case, electric hillers for processing potatoes are lighter and more mobile.
You can purchase the device without any problems in any city in the country, be it Moscow, Novgorod or Rostov. Usually a specialized store allows you to buy a hiller of the desired type, but more often than not you can buy a Chinese product that is not produced of the proper quality.
Hiller for walk-behind tractor
So that you have a reliable assistant at your dacha or on your farm, you can make a homemade manual or automated hiller for processing potatoes.
Variety of models
On the market for agricultural products you can find a manual hiller “Druzhba”. It is equipped with adjustable wings that allow you to change the working width, and the addition of a front iron support wheel. The equipment is controlled by two operators. The dimensions of the product are 55 cm width and 48 cm height. The weight of the unit is 17 kg. It is produced in the city of Cheboksary, and its cost varies from 3,000 to 4,000 rubles.
Another version of the hiller is “Pull-Push”, which is popularly called a hand plow. It is unregulated. The design of the tool allows it to cut furrows, weed weeds, and hill up planted potatoes. The width of the product is 45 cm, and the height is 90 cm (including the handle). The unit weighs 7 kg. It is lightweight due to rubberized handles. The price of the tool is from 1500 rubles. It was produced in Kyiv.
A popular hand-held tool is the “Phenom”. The design provides the ability to work with both two and one operator. The hiller is adjustable both in the height of the handles and in the width of the processed ridge. As an additional tool for the hiller, a flat cutter is offered, which is connected with a handle using ordinary bolts. The dimensions of the product are 16x40x40 cm, and the weight is 10 kg.
Important! The variety of models such as “Friendship” and “Pull-Push” is expanding due to the new generation rotary active hiller, which is also called a propeller hiller. It is believed that the tool not only loosens the soil, but also allows you to harrow plants with loosened soil, which is very useful for their roots.
Modern manufacturers offer flat cutters. This tool is a bent plate with sharpened edges. Using the equipment, you can remove weeds and loosen the soil. To weed several rows at the same time, several flat cutters are combined on a special hitch. On sale it is called a wide-row weeder.
Among the hand tools for loosening, the Tornado cultivator became famous. It has a simple design, which consists of curved teeth connected to the handle. In relation to the base they are turned counterclockwise. To work with the tool, it is enough to rotate it around its axis in a vertical position.
Homemade option
If you have the desire and opportunity, you can make a hiller with your own hands.
To do this, you will need everything that is in the garage or can be bought at a flea market for pennies:
- Wheelbarrow wheel - the larger the diameter, the more convenient it is to work with it in loamy and loose soils.
- Metal pipe - acts as a connection between the handle and the working mechanism.
- A handle that controls the pressure force and the depth of loosening - an ideal option is a bicycle handlebar.
- Working element - it is best to work with plow-type hillers. It can be made from a sheet of stainless steel or purchased separately. As an alternative, use a brush made of metal rods, which you can weld yourself.
- Brackets and hinges - help connect the elements of the hiller and adjust the height and position of the handle relative to the soil surface.
The work cannot be done without a welding machine, grinder and drill. They will help you cut metal, apply seams and connect the necessary elements to each other.
It is not recommended to start work without thinking through the small details and details of the device. You should first work out the drawing, displaying the parameters of all elements.
It is important to consider the following nuances:
- The height of the handle-holder and the possibility of its adjustment - you need to pick up any stick and imagine that it is the handle of a hiller. Lower it to the desired height, determining the maximum comfortable grip width and length to the ground.
- Type of working element - the simplest option would be to take two disks and place them on the axis.
Expert opinion
Mityuk Stefania Bogdanovna
All details should be written down on paper, and then an indicative drawing should be made. According to these data, the hiller will be assembled, and if there are errors and serious errors, this may negatively affect productivity.
When the drawing is ready, it is necessary to adjust all structural parts to the desired size. Next, assembly occurs: the wheel is installed on the shaft, the main pipe and handle are welded. Check the resulting version to ensure that the height is suitable. A vertical hinge is attached to the support shaft and holder, which holds the main hilling element.
Self-production
The tool is simple to make yourself. To make a hiller yourself, you need drawings and skills in working with metal. It is advisable to have the following tools:
- welding machine;
- gas-burner;
- angle grinder;
- drill;
- sharpener
An alternative would be homemade hillers, which can be used with any walk-behind tractor and cultivator. To make a part, you need a steel sheet from which the base is made. The pipe will act as a bracket. The entire load will be borne by an element called a rack. For the wings you need two sheets of the same size. If the hiller is adjustable, then hinges are attached to the base of the wings. For better rigidity, the products are bent at a slight angle. A two-row hiller differs from a simple hiller in the increased size of the bracket. It should be sufficient to attach two pairs of plows (wings).
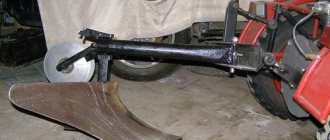
Rotary plow
This is a stand to which two plowshares are welded: cutting and turning and folding soil. For greater rigidity of the ploughshare tipping the earth, a corner is welded at the top, which rests against the upper edge of the tipper.
If you make it yourself, you can make a simpler unit for rearranging the plowing depth. The crossbar connected to the stand with bolts is welded to the plow and made longer. No boxes needed. At the front, a bracket is attached to the crossbar, into which an additional vertical post is attached, the size of which is sufficient to get out of the zone of turning over soil.
In the vertical small square rack at the front, several holes are drilled for bolts, through which the rod coming from the walk-behind tractor at an angle of 90° is secured at the required height. The rod is attached to this front strut by two welded plates with eyes. The two inserted bolts are secured with nuts. They connect the rack and the rod . This connection is simpler and more efficient. Plowing depth can be adjusted.
To prevent the soil from getting stuck in the gap, a thin sheet of tin is welded between the lower and upper plowshare, which will help the soil move smoothly and quickly along an arc and turn over in a layer.
Rotary plow Zykov
The reinforcement of the plowshares in this case is made with strips of steel on bolts. Below and above - at an angle. Economical and simple. A rod with a welded fixture holds two shares with racks that are inserted into the fixture. The bundle assembly is held in place by two locking bolts. For stability, a wheel is attached to the chassis.
Choice
A correctly made choice will help in maximizing the mechanization of agricultural labor. For less effort when planting potatoes, cutting furrows will be easier with adjustable wings. To hill up plants, it is better to choose a disk option. To get the job done faster, rather than pulling the tool along each row, you need to consider a two-row classification of hillers. If the walk-behind tractor has sufficient power, you can choose four-row equipment.
To choose the right hiller, you also need to compare factors such as:
- soil type;
- type of walk-behind tractor;
- dimensions of the site;
- amount possible to spend.
For example, if you plan to process heavy soils, the quality of the steel will be an important parameter. However, a cultivator with low power is unlikely to pull a heavy tool. If you don’t have enough money to buy a quality tool, and you need to cultivate heavy soils, you can turn to craftsmen for help or make the necessary parts yourself. For homemade products, the characteristics of some popular models will be useful.
For example, a two-row hiller has the following parameters:
- dimensions – 450x130x45 mm;
- working width – 300 mm;
- weight – 4.4 kg.
The disc hiller with adjustable width, height and depth has the following maximum parameters:
- width – 70 cm;
- height – 62 cm;
- disc diameter – 37 cm;
- processing depth – 30 cm.
Tips for use
Using a hiller on a handle is easy. There are a few steps to follow.
- The preparatory stage of cultivating a plot is loosening the soil. In loose soil, the furrows will be deeper, and the work of creating them will be easier. For greater accuracy, place marks on the ground. They must be equal to the width of the bracket on which the hiller is installed. Use a walk-behind tractor with attachments to make furrows and place the potatoes in them.
- Then it is recommended to expand the wings of the hiller to the maximum possible width. The tool is placed between the rows and driven along the furrow, covering the seed potatoes with soil.
- It is time to carry out the first harrowing simultaneously with the emergence of seedlings. The walk-behind tractor is installed so that the furrow to be processed is between the discs. The tool must be held smoothly, the discs will form a ridge, while simultaneously crushing clods of earth.
You can learn more about the manual hiller from the video below.